Installation Procedures
The installation procedure for commissioning EaInfoportT3 on your own server. All components must be installed under a Windows user account (e.g.: technical user). Therefore, not under an account, such as system service. Note: All underlined information in the installation is provided as an example and is likely to vary in your installation. Note: When migrating to a new version, it is better to back up the database for security reasons.
- Enterprise Architect Installation and Configuration
- Installation of the Enterprise Architect program
- Installation of the Database to Save Enterprise Architect Model
- Creating a database for an Enterprise Architect model
- Installation and Configuration of ODBC Driver
- Save an Enterprise Architect Model to a Database
- Create a Link to the Repository
- Optimal Zoom Setting
- Setting an Element Size in a Diagram
- InfoportLauncher
- How the Program Works
- Parameters
- Trigger "* * * * *"
- Source ftp | file
- Version "* * * *"
- Port 00000
- Start automatic | manual
- Stop automatic | manual
- Clear automatic | manual
- Prereq force | check
- Run force | check
- Preparing an empty database (or schema) for EA Infoport metadata
- Firewall Settings on the Server
- Scope
Enterprise Architect Installation and Configuration
It comprises the following steps:
- Installation of the Enterprise Architect program
- Database installation
- Installation of ODBC drivers for database access
- Optimal zoom setting in Enterprise Architec
The user will use C:\EAInfoport as the main folder for installing Dataprojekt applications in this manual.
In addition to executable files, various configuration files will be saved here.
If necessary, you can use any other folder with write permission.
Installation of the Enterprise Architect program
- Download the easetupfull.exe or ealite.msi file from https://sparxsystems.com/ and save it on the local disk (for example in the folder C:\EAInfoport).
- Run the easetupfull.exe or ealite.msi file
- Use the wizard to install the application
- Read and confirm the EULA
- Leave the default directory C:\EAInfoport\Sparx Systems\EA for the installation
- After the installation is complete, delete the easetupfull.exe file (or ealite.msi)
- Run the Enterprise Architect application
- In the licence management, fill in the name and title of the company and the registration key (four groups of four letters and numbers), confirm the dialogue and close it
- In the following dialogue for version activation, enter the activation code (four letters and numbers)
This completes the installation of Enterprise Architect and the application is ready for use.
Installation of the Database to Save Enterprise Architect Model
If a database engine is installed on the computer or available on the network, it is possible to skip this chapter.
Here you can learn how to install one of the supported database engines.
The one we’re using is MySql, which is recommended as ideal for the needs of both the Enterprise Architect program and EaInfoport
- Before installing MySQL, it is necessary to ensure that the vcredist_x86.exe helper package in version 2013 is installed on the computer. Search the internet for “Visual C++ Redistributable Packages for Visual Studio 2013”, save the vcredist_x86.exe variant to the disk and run it.
After approval of the licence, the package will be installed. There is no need to restart the computer. Delete the vcredist_x86.exe file - Download the 32-bit web installer for the 5.7.x series from https://downloads.mysql.com/archives/installer/. So currently mysql-installer-web-community-5.7.28.0.msi
Save the file to the local disk (for example, to the C:\EAInfoport folder) - Run the file
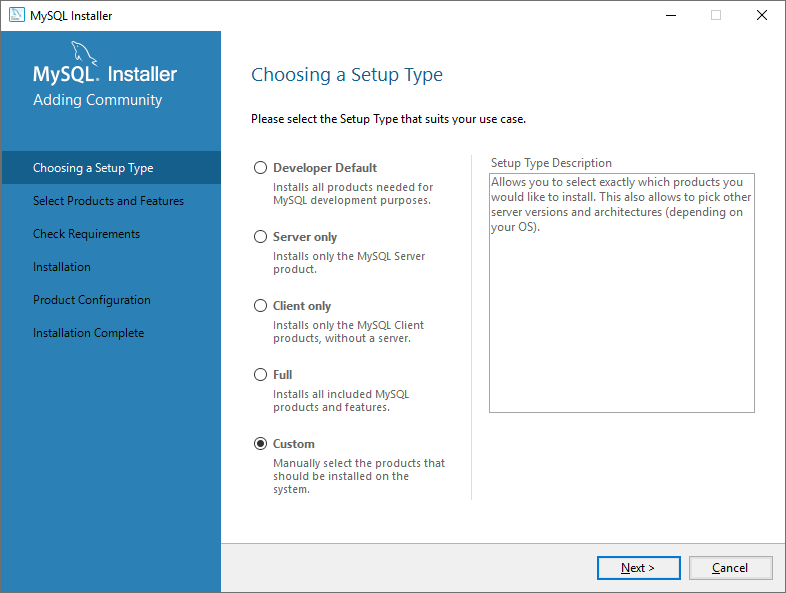
- Select Custom as the installation type

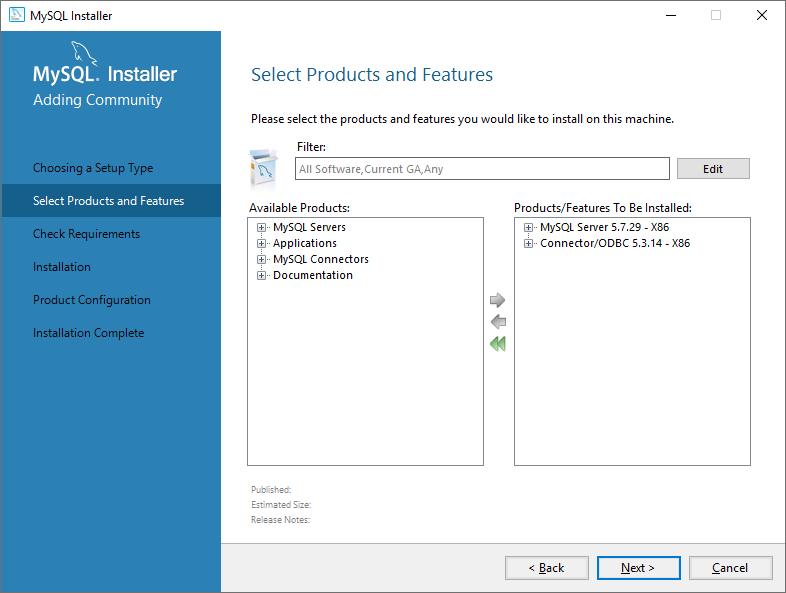
- Select two items to install:
MySQL Server 5.7.x – X86
Connector/ODBC 5.3.x – X86
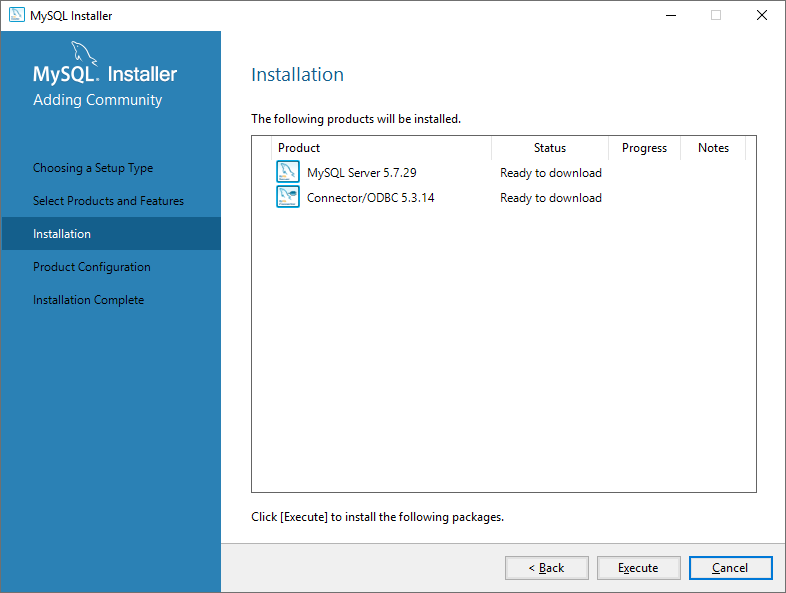
- On the next tab, start the MySQL installation MySQL

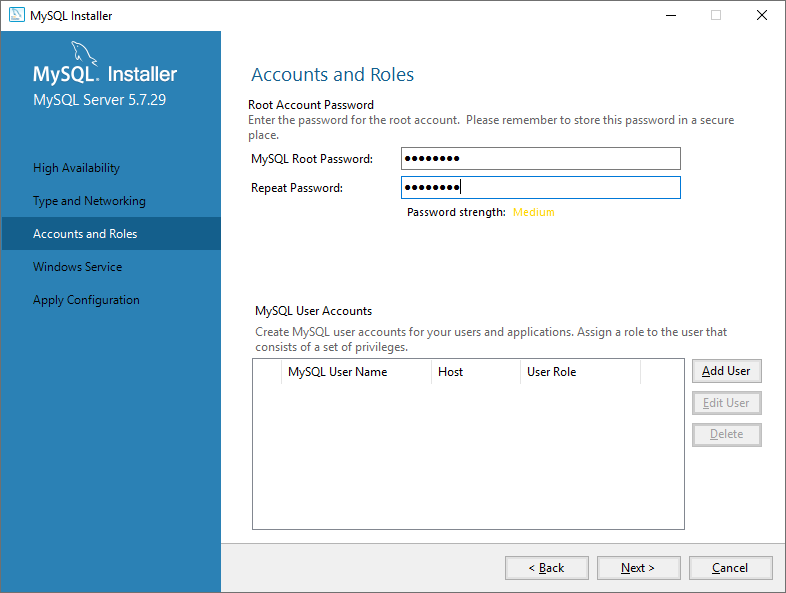
- Leave the settings on the other tabs as default.
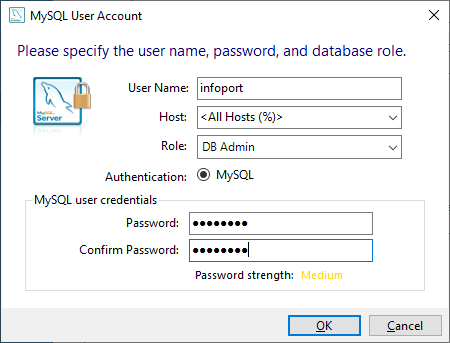
Only on the tab with the settings of accounts and roles, first fill in the root password (for the database administrator) and then create a user infoport, under which you will log into the database later.
All passwords (mainly the administrator ones) should be secure. For demonstration purposes, we use the phrase P@ssw0rd as a password in the manual. (It will be seen later in the connection definition)

- Delete the mysql-installer-web-community-5.7.28.0.msi installation file from the disk.
This completes the installation of the database and the ODBC driver (but it will still need to be configured – see below)
Creating a database for an Enterprise Architect model
- Download the database script to create the necessary tables from https://sparxsystems.com/downloads/corp/scripts/EASchema_1558_MySQL.sql
- Save the EASchema_1558_MySQL.sql file in the directory C:\EAInfoport\Dataprojekt
- Start the (line) program MySQL 5.7 Command Line Client
- Log in with the root (administrator) password
- Create the database “ea” using the command CREATE DATABASE ea;
- Switch to the database using the USE ea command;
- Create the tables needed for Enterprise Architect to work with the command SOURCE C:\EAInfoport\Dataprojekt\EASchema_1558_MySQL.sql
- End the program
DBMS Based Repositories For Enterprise Architect | Sparx Systems
Installation and Configuration of ODBC Driver
If you have installed a MySQL database (according to one of the previous chapters), continue with the ODBC configuration.
For EaInfoport to work, Enterprise Architect needs to have data saved in a relational database (not just in .eap file).
ODBC drivers are required to connect Enterprise Architect and the database. They are freely available for all supported database types.
Below is a detailed procedure for MySQL, for other databases the procedure is similar.
ODBC Installation for MySQL
- Download the installation file for the 32-bit version from the 5.x.x series from https://downloads.mysql.com/archives/c-odbc/. So currently mysql-connector-odbc-5.3.13-win32.msi.
Save the file, for example, to the folder C:\EAInfoport\Dataprojekt - Start the installation, confirm the licence, complete the installation
Delete the installation file
ODBC Configuration for MySQL
- Start the ODBC connection management application “ODBC Data Sources (32-bit)”
- Switch to the User DNS tab (attention: important!)
- Add a new Data Source type “MySQL ODBC 5.3 ANSI Driver”
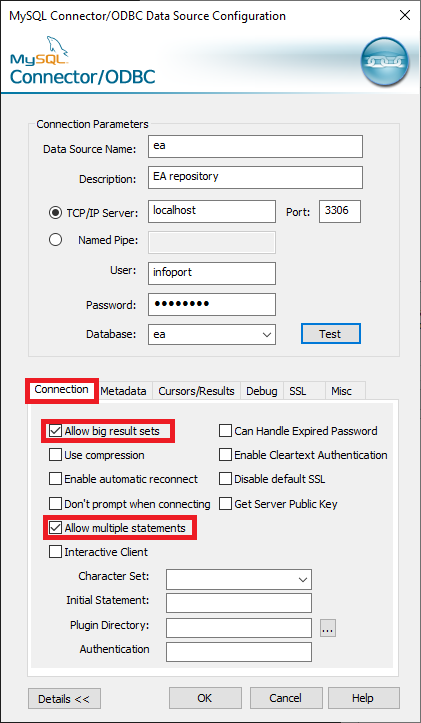
- Fill in the connection parameters according to the following pattern (and according to the values you entered when installing the MySQL database), and do not forget the Detailed Settings
- Data Source Name = ea
- TCP/IP Server = localhost
- User = infoport
- Password = P@ssw0rd

Connection tab
- Check Allow big result sets
- Check Allow multiple statement
Cursors/Results tab
- Check Return matched rows instead of affected rows

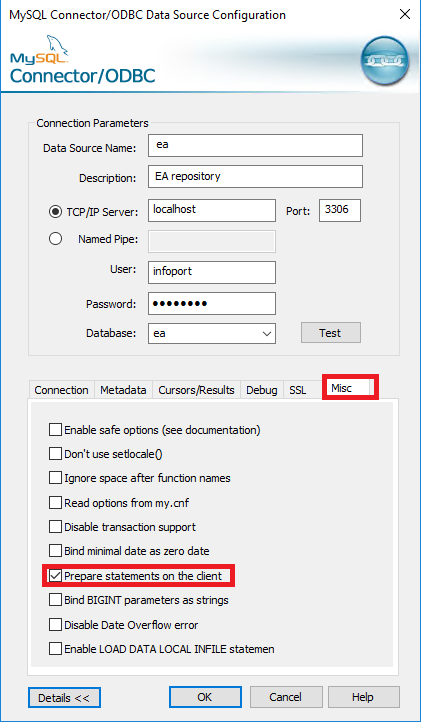
Misc tab
- Check Prepare statements on the client
- Save the settings
- Now you can close the ODBC Data Source Administrator application (32-bit)
Save an Enterprise Architect Model to a Database
If you do not have any EA model yet, create it (or open a sample one).
- In the Enterprise Architect application, start the Open Project command from the main menu (below the EA icon)
- Select Local File and find the file C:\Users\Administrator\AppData\Roaming\Sparx Systems\EA\EAExample.eap
If the EA project is not saved yet in a database (for example, because it has been just installed according to the previous chapters), then save it.
- Open the Project Transfer dialog using the Configure | Model | Transfer ribbon
- Select File to DBMD
- Enter C:\Users\Administrator\AppData\Roaming\Sparx Systems\EA\EAExample.eap as a Source Project
- As a Target Project, enter the following into Data Ling Properties:
- On the Provider tab, select Microsoft OLE DB Provider for ODBC Drivers
- On the Connection tab
- In part 1 (… source name…), select the ODBC connection value, i.e. ea ea
- In part 2 (… log on…), enter the name of the root user of the database (administrator) and its password. In our case root and P@ssw0rd
- In part 3 (… catalog…), select the name of the database schema, i.e.ea
- Test the connection and confirm
- Enterprise Architect copies the content of the project from the file to the database (and will be available for the EaInfoport system).
- The last step is to open the project from the database.
- From the main menu (below the EA icon) start the Open Project… command
- Select Connect to Server and fill in the same data as we used in the previous step to connect to the database.
- After confirmation, we are connected to the project saved in the database.
Create a Link to the Repository
Once we have the EA model stored in the database, it is necessary to create a shortcut that will use the EaInfoport system.
- In the Enterprise Architect application, start the Save as shortcut command from the main menu (below the EA icon).
- Select the folder where you want to create the shortcut (e.g. C:\EAInfoport\Dataprojekt\ea.EAP) and confirm.
- As soon as you connect a new repository in the EaInfoport administration, you will work with this file.
- To verify the functionality of the link, first turn off the Enterprise Architect program. Then find the file with the link CC:\EAInfoport\Dataprojekt\ea.EAP on the disk and “run” it (double click).
- If Enterprise Architect also opened with our project, everything is set and saved correctly.
Optimal Zoom Setting
The quality of diagram display in EaInfoport depends on the setting of a special Scale parameter in Enterprise Architect.
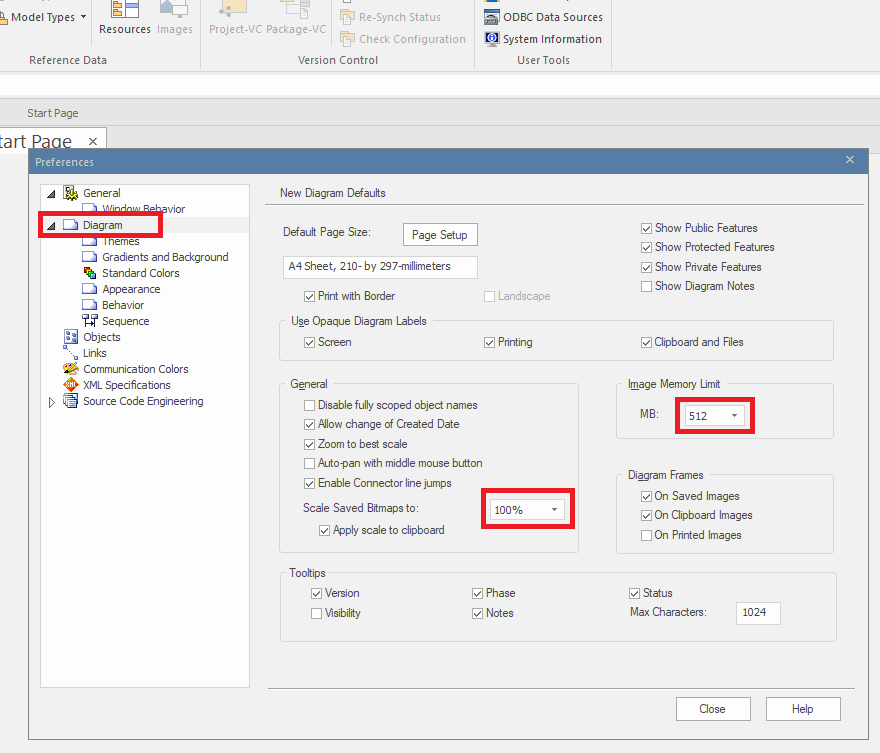
- In the Enterprise Architect application, open the Preferences dialogue (CTRL + F9)
- Select “Diagram” in the left part
- In the General section, set “Scale Saved Bitmaps to” to 100% and “Image Memory Limit” to 512
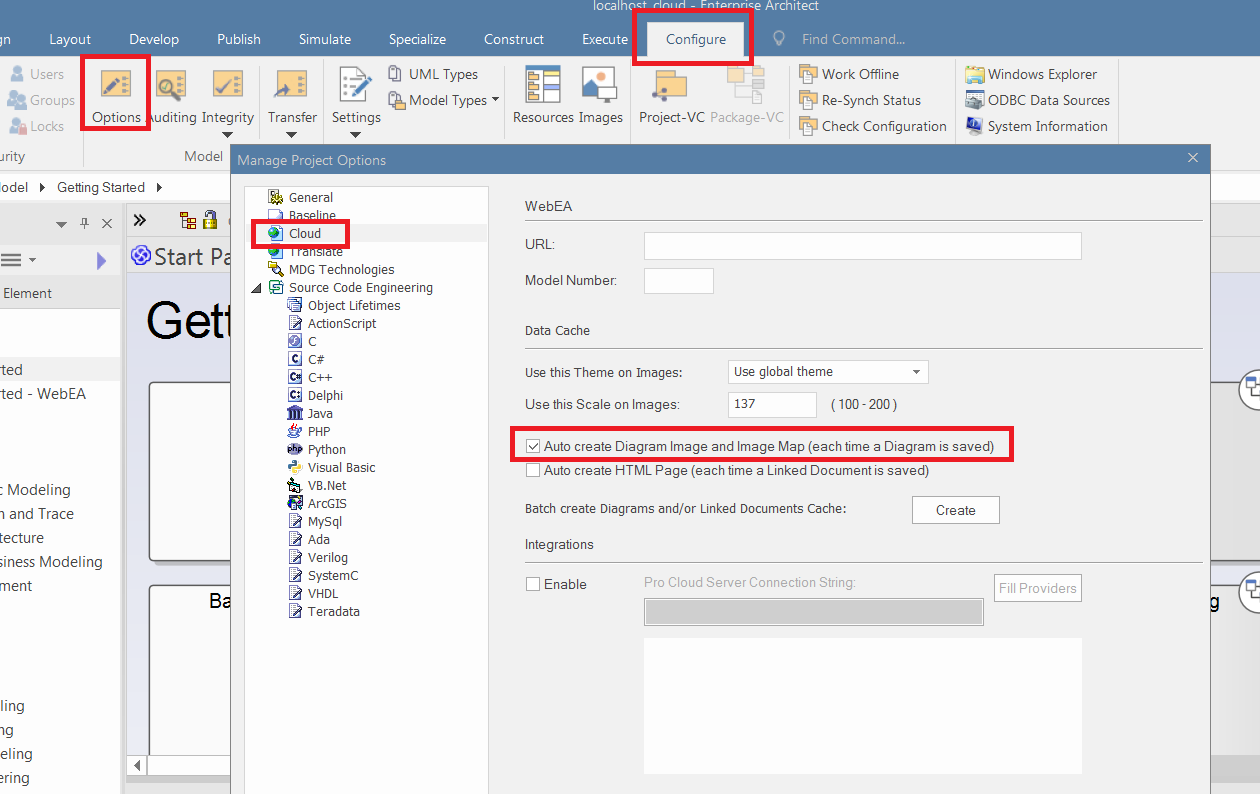
Setting an Element Size in a Diagram
- Settings required for each project!
If you want to use Infoport to edit a diagram, open Enterprise Architect, click on the Configure tab, then go to the Options tab. In the window that will open, click on Cloud and check the option Auto create Diagram Image and Image Map (each time a Diagram is saved).
InfoportLauncher
InfoportLauncher.exe is a program for installing and updating the EaInfoport system.
It autonomously downloads, installs and runs EaInfoport and ensures its regular updates.
It is configured using command line parameters. If you run it without parameters, “InfoportLauncher.exe” will show basic help with a list and description of all available parameters.
InfoportLauncher.exe is a “portable” program that is installed by simply copying it to a disk. We recommend copying it to the folder “C:\EAInfoport\Dataprojekt\Infoport”
- How the Program Works
- Parameters
How the Program Works
The program first checks the basic requirements for the environment in which it is running.
If it is configured to automatically download current versions from the ftp server, it will detect the latest available version of EaInfoport, download it and install it.If access to ftp is disabled for security reasons, it is possible to manually download EaInfoport.zip from the website and copy it to the same directory as InfoportLauncher.exe.
It will already ensure the installation. InfoportLauncher.exe can also check if the EaInfoport system is running and start it if necessary.
Parameters
InfoportLauncher.exe can be run with the following parameters:
„InfoportLaunch -Trigger -Source -Scope -Version -Port -Start -Stop -Clear -Prereq -Run“
- Trigger "* * * * *"
- Source ftp | file
- Version "* * * *"
- Port 00000
- Start automatic | manual
- Stop automatic | manual
- Clear automatic | manual
- Prereq force | check
- Run force | check
Trigger "* * * * *"
This parameter sets the period during which InfoportLauncher.exe performs its activity. The standard Cron format is used. It consists of five parts that describe time and date information. Gradually it is min (0 - 59), hour (0 - 23), day of month (1 - 31), month (1 - 12), day o week sd (0 - 6) (0 = Sunday) If the details are not important, they are replaced with *
This is best understood with examples:
- If you want to schedule an activity for each hour, use "0 * * * *", which means: at zero minutes, every hour, every day of the month, every month, any day of the week.
- If you want to schedule an activity always an hour after midnight, use "0 1 * * *", which means: at zero minutes, the first hour of the day, every day of the month, every month, any day of the week.
- If you want to schedule an activity always at half past two a.m. early Saturday morning, use "30 2 * * 6", which means: thirty minutes, of the second hour of the day, the sixth day of the week (on Saturday) regardless of the day of the month or month.
Source ftp | file
Switch between automatic and manual download of zip files with updates. If we set ftp, then InfoportLauncher.exe autonomously downloads (via ftp protocol) files and the administrator does not have to worry about anything. The file option is suitable in cases (especially for corporate companies), where there are security rules prohibiting programs from accessing outside their own domain.
In case of manual download of .zip files, it is always necessary to copy these “next to” the InfoportLauncher.exe program (i.e. for example to the folder “C:\Program Files (x86)\Dataprojekt\Infoport”). Furthermore, the program will perform the update itself. The downloaded zip file must not be renamed or unpacked in any way. It is only advisable to check whether the hash of the downloaded file (zipper) agrees with what is stated on the website from where the file was downloaded. It is possible to use any utility for calculating MD5 hashes for checking (for example, in the Total Commander tool, in the File menu, there is an option Create file with CRC data checking)
Version "* * * *"
You can use the Version parameter to filter which updates the administrator wants to install. The parameter consists of four parts, major, minor, build, revision. If any details are not important, they are replaced with *
The individual weights of the parameter are:
- major – usually released once a year/several years. These are major changes and improvements to the system
minor – usually released once a month/several months. As part of these changes, new functionalities are added and there are also changes in the database structures
build – they add minor improvements, and above all they fix bugs. They are released weekly
revision – a technical version that can serve as a hotfix for a problem found with a specific customer
It is best to give examples again to understand the appropriate settings.
- If you want to agilely install each released version, use "* * * *". This will guarantee that the new version will be installed as soon as it is released.
- If, on the other hand, you want to approach the updates conservatively, set the parameter to "* * 0 *", which means that the individual builds will not be tightened, but we will wait for the minor version.
- For corporate customers, it is also advantageous to be able to use this parameter to separate the live environment from the environment intended for testing/adoption of a new version. In that case, for example, in the live installation set "7 3 0 *" (you will fix the previously adopted version) and in the test installation set, for example, "7 4 * *" (thus you will receive all fresh updates)
Port 00000
The Port parameter is used only when installing and starting the EaInfoport system for the first time.
This parameter specifies which port the system will operate on until the portal administrator configures it.
EaInfoport is configured using itself (Setup page).
If the standard port 80 was already occupied by another web server, it would not be possible to start the Setup page in EaInfoport at all. Therefore, it is possible to set the port number to any free number.
After configuring the portal, this parameter is ignored.
Start automatic | manual
This parameter is used to refine the behaviour of InfoportLauncher.exe during updates.
If it is set to automatic, it will start EaInfoport after installing a new version.
If the value is manual, EaInfoport must be run by the administrator.
Setting to automatic also guarantees that the start of EaInfoport is checked whenever the version update is checked (which is given by the Trigger parameter). See also Run parameter.
Stop automatic | manual
This parameter is used to refine the behaviour of InfoportLauncher.exe during updates.
If it is set to automatic, it will turn off EaInfoport after installing a new version.
This setting makes sense especially if the Start parameter is also set to automatic.
After that, the whole update will be performed without an intervention of the system administrator.
Clear automatic | manual
This parameter is used to refine the behaviour of InfoportLauncher.exe during updates.
If it is set to automatic, it will uninstall (delete) EaInfoport after installing a new version.
Deletion only applies to the directory with the specific version and does not affect the database with data.
Prereq force | check
Each time you run InfoportLauncher.exe, the program verifies that the environment is eligible to install, update or run EaInfoport.
In particular, it checks that there is enough disk space and whether Enterprise Architect is installed
If all the prerequisites are not met and the parameter is set to force, InfoportLauncher.exe does not proceed and displays an error message.
However, if the parameter is set to check, the problems will also be checked and listed, but the program continues to run.
The consequences (such as a lack of free disk space) will take effect later.
Run force | check
It checks at regular one-minute intervals whether EaInfoport is running.
If not and the value of the parameter is set to check, it will display information that the currently installed version is not running.
If the value of the parameter is set to force, InfoportLancher immediately runs EaInfoport (and displays information about it).
Preparing an empty database (or schema) for EA Infoport metadata
To install Infoport, you need to have an empty schema created in the database that you want to use for application metadata.
You will use the created schema in the configuration manager where you will reference it.
When you first start Infoport, the necessary database tables are created in the schema for the application to run correctly and the default application settings are also created.
Firewall Settings on the Server
In the standard way (according to the used firewall), enable the port (for incoming requests), on which you want EAInfoportT3 to be available – for example 80 or 8080
Scope
The Scope parameter can be used to specify which versions the administrator wants to install from ftp.
Options:
- candidate - these versions are suitable for testing new functionality, not for production deployment
- release - version suitable for production deployment