# Installation Manual
# Basic Requirements
This chapter contains basic software and hardware requirements for the Enterprise Architect Information Portal application to function properly.
# Required Hardware
The Enterprise Architect Information Portal requires the following hardware to function properly.
**Name**
**Minimum**
**Recommended**
RAM
4 GB
8 GB
HDD
50 GB
150 GB
CPU
Intel® Pentium Dual-Core®
Intel® Pentium Dual-Core®
# Required Software
The Enterprise Architect Information Portal requires the following software and libraries to function properly.
**Název**
**Minimum**
**Recommended**
**Description**
Supported databases
5.7.7.
12
2012
12c+
8.+
14
2019
on request
MySQL
PostgreSQL
MSSQL
Oracle
Enterprise Architect (not included)
14
15,16,16.1 (pouze x32 bit)
easetupfull.msi
EALite.exe
Net Framework
4.7.1
4.7.1
NDP471-KB4033342-x86-x64-AllOS-ENU
Supported operating systems
Windows 10 (1607+)
Windows 2012
Windows 11
Windows Server 2019
Windows 10 Client
Windows Server
# Installation Procedures
The installation procedure for commissioning EaInfoportT3 on your own server. All components must be installed under a Windows user account (e.g.: technical user). Therefore, not under an account, such as system service.
Note: All underlined information in the installation is provided as an example and is likely to vary in your installation.
Note: When migrating to a new version, it is better to back up the database for security reasons.
# Enterprise Architect Installation and Configuration
It comprises the following steps:
- Installation of the Enterprise Architect program
- Database installation
- Installation of ODBC drivers for database access
- Optimal zoom setting in Enterprise Architec
The user will use C:\\EAInfoport as the main folder for installing Dataprojekt applications in this manual.
In addition to executable files, various configuration files will be saved here.
If necessary, you can use any other folder with write permission.
1. 1. [Instalation of the Enterprise Architect program](https://doc.eainfoport.cz/books/installation-manual/page/11-installation-of-the-enterprise-architect-program)
2. [Installation of the Database to Save Enterprise Architect Model](https://doc.eainfoport.cz/books/installation-manual/page/12-installation-of-the-database-to-save-enterprise-architect-model)
3. [Creating a database for an Enterprise Architect model](https://doc.eainfoport.cz/books/installation-manual/page/13-creating-a-database-for-an-enterprise-architect-model)
4. [Installation and Configuration of ODBC Drivers](https://doc.eainfoport.cz/books/installation-manual/page/14-installation-and-configuration-of-odbc-driver)
5. [Save an Enterprise Architect Model to a Database](https://doc.eainfoport.cz/books/installation-manual/page/15-save-an-enterprise-architect-model-to-a-database)
6. [Create a Link to the Repository](https://doc.eainfoport.cz/books/installation-manual/page/16-create-a-link-to-the-repository)
7. [Optimal Zoom Setting](https://doc.eainfoport.cz/books/installation-manual/page/17-optimal-zoom-setting)
8. [Setting an Element Size in a Diagram](https://doc.eainfoport.cz/books/installation-manual/page/18-setting-an-element-size-in-a-diagram)
# Installation of the Enterprise Architect program
1. Download the easetupfull.exe or ealite.msi file from [https://sparxsystems.com/](https://sparxsystems.com/) and save it on the local disk (for example in the folder C:\\EAInfoport).
2. Run the easetupfull.exe or ealite.msi file
3. Use the wizard to install the application
1. Read and confirm the EULA
2. Leave the default directory C:\\EAInfoport\\Sparx Systems\\EA for the installation
4. After the installation is complete, delete the easetupfull.exe file (or ealite.msi)
5. Run the Enterprise Architect application
6. In the licence management, fill in the name and title of the company and the registration key (four groups of four letters and numbers), confirm the dialogue and close it
7. In the following dialogue for version activation, enter the activation code (four letters and numbers)
This completes the installation of Enterprise Architect and the application is ready for use.
# Installation of the Database to Save Enterprise Architect Model
If a database engine is installed on the computer or available on the network, it is possible to skip this chapter.
Here you can learn how to install one of the supported database engines.
The one we’re using is **MySql**, which is recommended as ideal for the needs of both the Enterprise Architect program and EaInfoport
1. Before installing MySQL, it is necessary to ensure that the **vcredist\_x86.exe** helper package in version 2013 is installed on the computer. Search the internet for “Visual C++ Redistributable Packages for Visual Studio 2013”, save the vcredist\_x86.exe variant to the disk and run it.
After approval of the licence, the package will be installed. There is no need to restart the computer. Delete the vcredist\_x86.exe file
2. Download the 32-bit web installer for the 5.7.x series from [*https://downloads.mysql.com/archives/installer/*](https://downloads.mysql.com/archives/installer/). So currently *mysql-installer-web-community-5.7.28.0.msi*
Save the file to the local disk (for example, to the C:\\EAInfoport folder)
3. Run the file
4. Select *Custom* as the installation type
[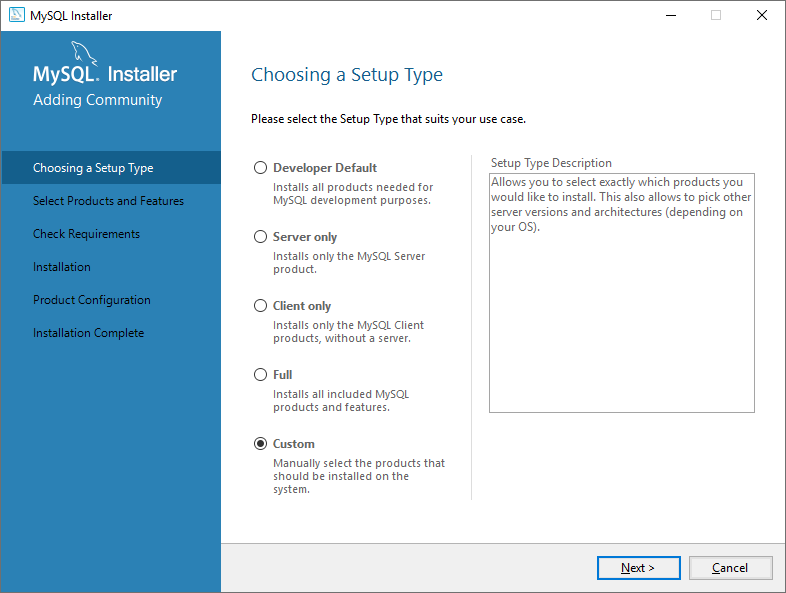](https://doc.eainfoport.cz/uploads/images/gallery/2022-04/mysql-instal.png)
5. Select two items to install:
*MySQL Server 5.7.x – X86
Connector/ODBC 5.3.x – X86
[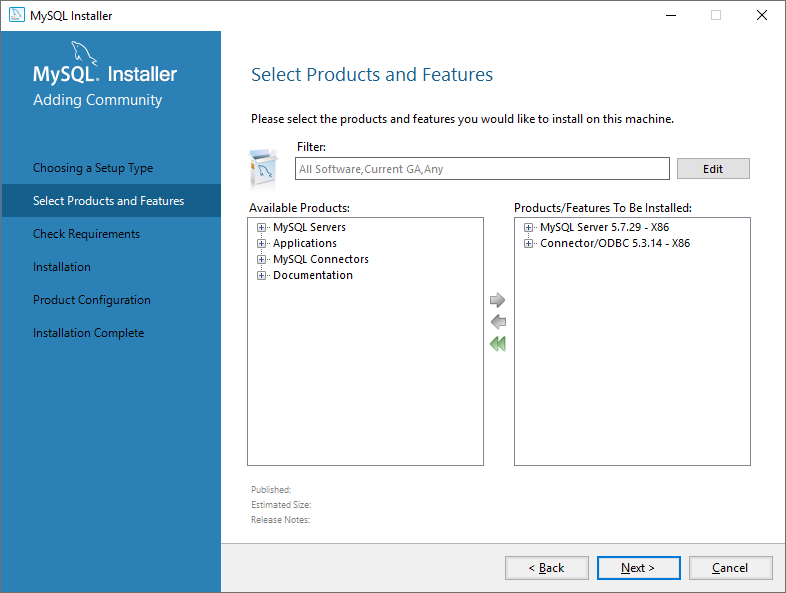](https://doc.eainfoport.cz/uploads/images/gallery/2022-04/mysql-instal-2-1.png)*
6. On the next tab, start the MySQL installation *MySQL
[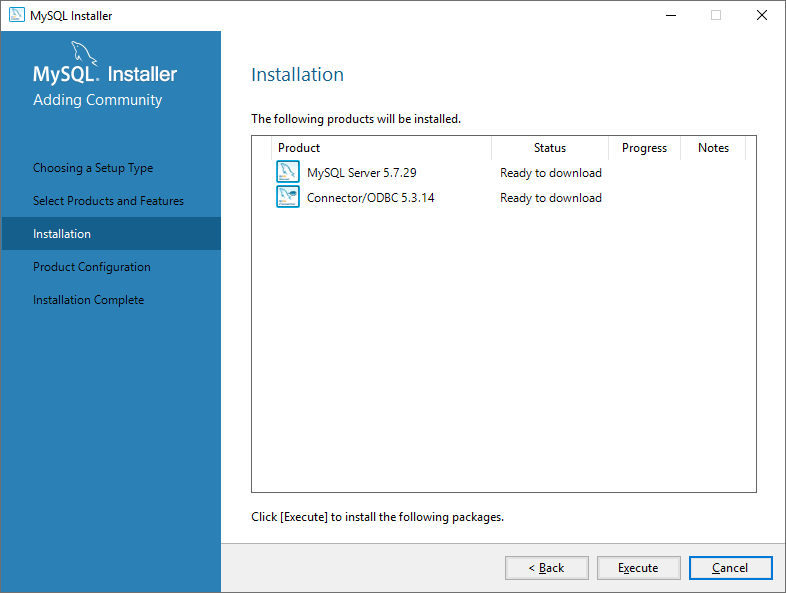](https://doc.eainfoport.cz/uploads/images/gallery/2022-04/mysql-instal-3.png)*
7. Leave the settings on the other tabs as default.
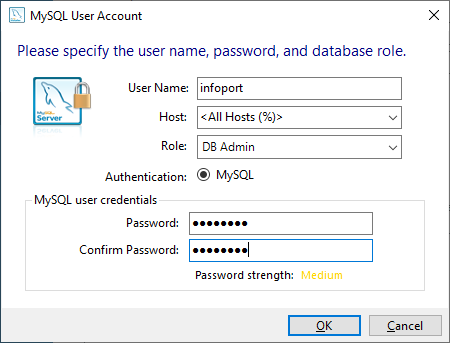
Only on the tab with the settings of accounts and roles, first fill in the root password (*for the database administrator*) and then create a user infoport, under which you will log into the database later.
All passwords (*mainly the administrator ones*) should be secure. For demonstration purposes, we use the phrase P@ssw0rd as a password in the manual. (*It will be seen later in the connection definition*)
[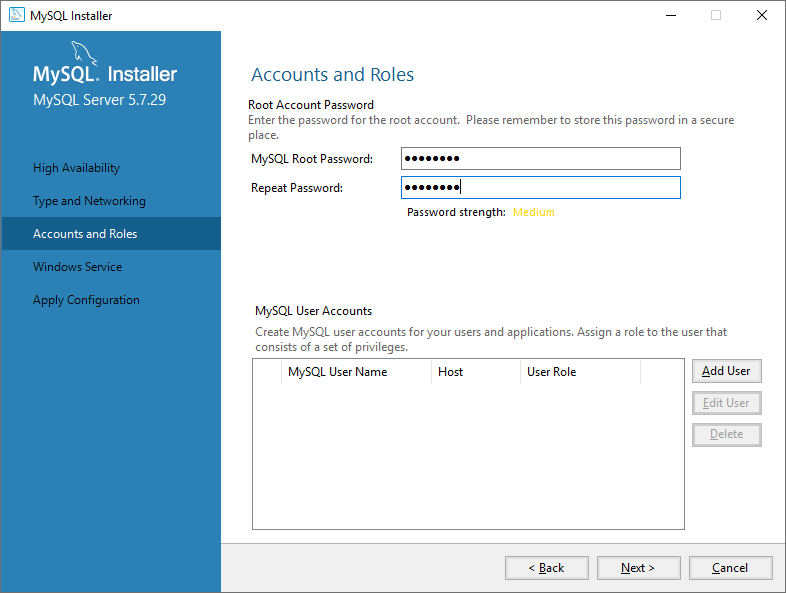](https://doc.eainfoport.cz/uploads/images/gallery/2022-04/mysql-instal-4.png)
[](https://doc.eainfoport.cz/uploads/images/gallery/2022-04/mysql-user-acount.png)
8. Delete the *mysql-installer-web-community-5.7.28.0.msi* installation file from the disk.
This completes the installation of the database and the ODBC driver (*but it will still need to be configured – see below*)
# Creating a database for an Enterprise Architect model
- Download the database script to create the necessary tables from [https://sparxsystems.com/downloads/corp/scripts/EASchema\_1558\_MySQL.sql](https://sparxsystems.com/downloads/corp/scripts/EASchema_1558_MySQL.sql)
- Save the EASchema\_1558\_MySQL.sql file in the directory C:\\EAInfoport\\Dataprojekt
- Start the (line) program MySQL 5.7 Command Line Client
- Log in with the root (administrator) password
- Create the database “ea” using the command *CREATE DATABASE ea;*
- Switch to the database using the *USE ea* command;
- Create the tables needed for Enterprise Architect to work with the command *SOURCE* C:\\EAInfoport*\\Dataprojekt\\EASchema\_1558\_MySQL.sql*
- End the program
[DBMS Based Repositories For Enterprise Architect | Sparx Systems](https://sparxsystems.com/resources/repositories/)
# Installation and Configuration of ODBC Driver
If you have installed a MySQL database (according to one of the previous chapters), continue with the ODBC configuration.
For EaInfoport to work, Enterprise Architect needs to have data saved in a relational database (not just in .eap file).
ODBC drivers are required to connect Enterprise Architect and the database. They are freely available for all supported database types.
Below is a detailed procedure for MySQL, for other databases the procedure is similar.
### ODBC Installation for MySQL
- Download the installation file for the **32-bit** version from the **5.x.x series** from [https://downloads.mysql.com/archives/c-odbc/](https://downloads.mysql.com/archives/c-odbc/). So currently mysql-connector-odbc-5.3.13-win32.msi.
Save the file, for example, to the folder *C:\\EAInfoport\\Dataprojekt*
- Start the installation, confirm the licence, complete the installation
Delete the installation file
### ODBC Configuration for MySQL
- Start the ODBC connection management application “**ODBC Data Sources (32-bit)**”
- Switch to the **User DNS** tab (attention: important!)
- Add a new Data Source type “MySQL ODBC 5.3 ANSI Driver”
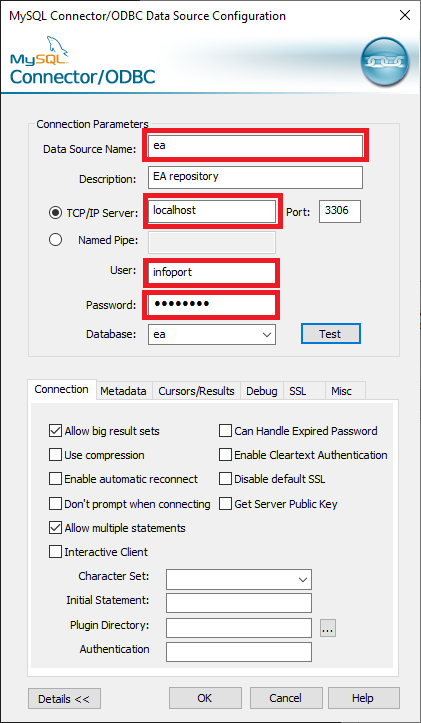
- Fill in the connection parameters according to the following pattern (and according to the values you entered when installing the MySQL database), and **do not forget the Detailed Settings**
- *Data Source Name = ea*
- *TCP/IP Server = localhost*
- *User = infoport*
- *Password = P@ssw0rd*
*[](https://doc.eainfoport.cz/uploads/images/gallery/2022-04/mysql-connector-1111.png)*
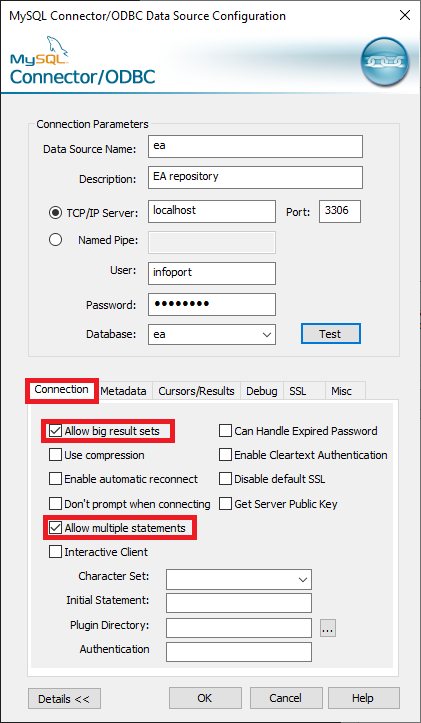
**Connection** tab
- Check *Allow big result sets*
- Check *Allow multiple statement*
*[](https://doc.eainfoport.cz/uploads/images/gallery/2022-04/mysql-connector-1upraveno.png)*
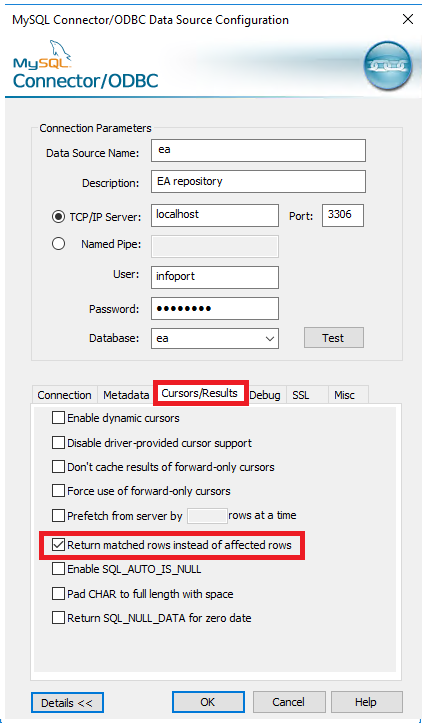
**Cursors/Results** tab
- Check Return *matched rows instead of affected rows*
*[](https://doc.eainfoport.cz/uploads/images/gallery/2022-04/microsoftteams-image-1-opraveno.png)*
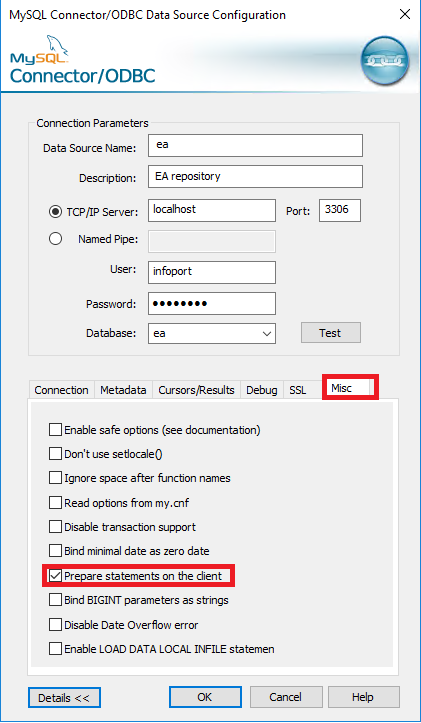
**Misc** tab
- Check *Prepare statements on the client*
*[](https://doc.eainfoport.cz/uploads/images/gallery/2022-04/microsoftteams-image-2upraveno.png)*
- Save the settings
- Now you can close the ODBC Data Source Administrator application (32-bit)
# Save an Enterprise Architect Model to a Database
If you do not have any EA model yet, create it (or open a sample one).
- In the Enterprise Architect application, start the Open Project command from the main menu (below the EA icon)
- Select Local File and find the file *C:\\Users\\Administrator\\AppData\\Roaming\\Sparx Systems\\EA\\EAExample.eap*
If the EA project is not saved yet in a database (for example, because it has been just installed according to the previous chapters), then save it.
- Open the Project Transfer dialog using the Configure | Model | Transfer ribbon
- Select File to DBMD
- Enter *C:\\Users\\Administrator\\AppData\\Roaming\\Sparx Systems\\EA\\EAExample.eap as* a Source Project
- As a Target Project, enter the following into Data Ling Properties:
- On the Provider tab, select Microsoft OLE DB Provider for ODBC Drivers
- On the Connection tab
- In part 1 (… source name…), select the ODBC connection value, i.e. ea ea
- In part 2 (… log on…), enter the name of the root user of the database (administrator) and its password. In our case root and *P@ssw0rd*
- In part 3 (… catalog…), select the name of the database schema, i.e.*ea*
- Test the connection and confirm
- Enterprise Architect copies the content of the project from the file to the database (and will be available for the EaInfoport system).
- The last step is to open the project from the database.
- From the main menu (below the EA icon) start the *Open Project*… command
- Select Connect to Server and fill in the same data as we used in the previous step to connect to the database.
- After confirmation, we are connected to the project saved in the database.
# Create a Link to the Repository
Once we have the EA model stored in the database, it is necessary to create a shortcut that will use the EaInfoport system.
- In the Enterprise Architect application, start the Save as shortcut command from the main menu (below the EA icon).
- Select the folder where you want to create the shortcut (e.g. *C:\\EAInfoport\\Dataprojekt\\ea.EAP*) and confirm.
- As soon as you [**connect a new repository**](https://en.eainfoport.cz/en/create-and-edit) in the EaInfoport administration, you will work with this file.
- To verify the functionality of the link, first turn off the Enterprise Architect program. Then find the file with the link *CC:\\EAInfoport\\Dataprojekt\\ea.EAP* on the disk and “run” it (double click).
- If Enterprise Architect also opened with our project, everything is set and saved correctly.
# Optimal Zoom Setting
The quality of diagram display in EaInfoport depends on the setting of a special Scale parameter in Enterprise Architect.
- In the Enterprise Architect application, open the Preferences dialogue (CTRL + F9)
- Select “Diagram” in the left part
- In the General section, set “Scale Saved Bitmaps to” to 100% and “Image Memory Limit” to 512
[](https://doc.eainfoport.cz/uploads/images/gallery/2022-05/zoom.png)
# Setting an Element Size in a Diagram
- ***Settings required for each project!***
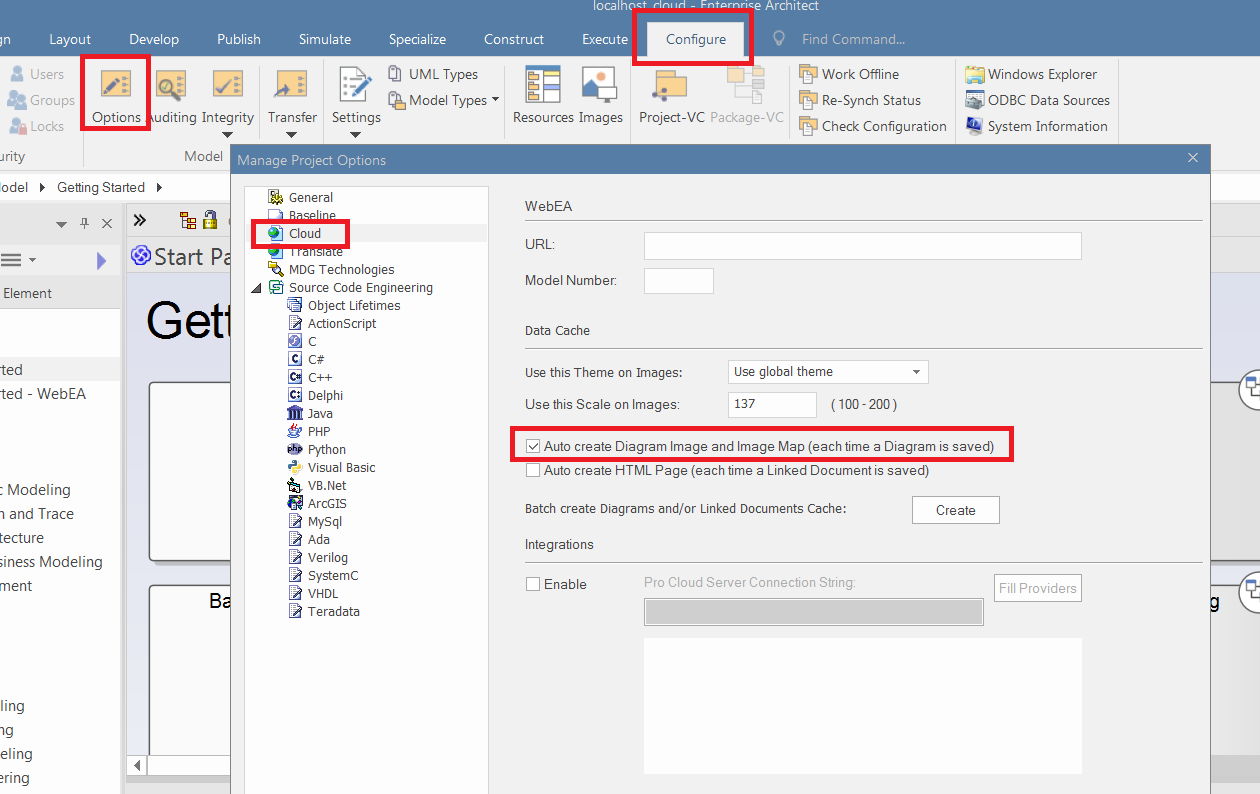
If you want to use Infoport to edit a diagram, open ***Enterprise Architect***, click on the ***Configure*** tab, then go to the ***Options*** tab. In the window that will open, click on ***Cloud*** and check the option ***Auto create Diagram Image and Image Map (each time a Diagram is saved).***
***[](https://doc.eainfoport.cz/uploads/images/gallery/2022-04/ea-na-ticket-otazky-a-odpovedi.png)***
# InfoportLauncher
InfoportLauncher.exe is a program for installing and updating the EaInfoport system.
It autonomously downloads, installs and runs EaInfoport and ensures its regular updates.
It is configured using command line parameters. If you run it without parameters, “InfoportLauncher.exe” will show basic help with a list and description of all available parameters.
InfoportLauncher.exe is a “portable” program that is installed by simply copying it to a disk. We recommend copying it to the folder “*C:\\EAInfoport\\Dataprojekt\\Infoport*”
1. How the Program Works
2. Parameters
# How the Program Works
The program first checks the basic requirements for the environment in which it is running.
If it is configured to automatically download current versions from the ftp server, it will detect the latest available version of EaInfoport, download it and install it.If access to ftp is disabled for security reasons, it is possible to manually download EaInfoport.zip from the website and copy it to the same directory as InfoportLauncher.exe.
It will already ensure the installation. InfoportLauncher.exe can also check if the EaInfoport system is running and start it if necessary.
# Parameters
InfoportLauncher.exe can be run with the following parameters:
*„InfoportLaunch -Trigger -Source -Scope -Version -Port -Start -Stop -Clear -Prereq -Run“*
1. [*Trigger "\* \* \* \* \*"*](https://doc.eainfoport.cz/books/installation-manual/page/221-trigger)
2. [*Source ftp | file*](https://doc.eainfoport.cz/books/installation-manual/page/222-source-ftp-file)
3. [*Version "\* \* \* \*"*](https://doc.eainfoport.cz/books/installation-manual/page/223-version)
4. [*Port 00000*](https://doc.eainfoport.cz/books/installation-manual/page/224-port-00000)
5. [*Start automatic | manual*](https://doc.eainfoport.cz/books/installation-manual/page/225-start-automatic-manual)
6. [*Stop automatic | manual*](https://doc.eainfoport.cz/books/installation-manual/page/226-stop-automatic-manual)
7. [*Clear automatic | manual*](https://doc.eainfoport.cz/books/installation-manual/page/227-clear-automatic-manual)
8. [*Prereq force | check*](https://doc.eainfoport.cz/books/installation-manual/page/228-prereq-force-check)
9. [*Run force | check*](https://doc.eainfoport.cz/books/installation-manual/page/229-run-force-check)
# Trigger "* * * * *"
This parameter sets the period during which InfoportLauncher.exe performs its activity. The standard Cron format is used. It consists of five parts that describe time and date information. Gradually it is *min (0 - 59), hour (0 - 23), day of month (1 - 31), month (1 - 12), day o week sd (0 - 6) (0 = Sunday)* If the details are not important, they are replaced with \*
This is best understood with examples:
- If you want to schedule an activity for each hour, use "0 \* \* \* \*", which means: at zero minutes, every hour, every day of the month, every month, any day of the week.
- If you want to schedule an activity always an hour after midnight, use "0 1 \* \* \*", which means: at zero minutes, the first hour of the day, every day of the month, every month, any day of the week.
- If you want to schedule an activity always at half past two a.m. early Saturday morning, use "30 2 \* \* 6", which means: thirty minutes, of the second hour of the day, the sixth day of the week (on Saturday) regardless of the day of the month or month.
# Source ftp | file
Switch between automatic and manual download of zip files with updates. If we set *ftp*, then *InfoportLauncher.exe* autonomously downloads (via ftp protocol) *files* and the administrator does not have to worry about anything. The file option is suitable in cases (especially for corporate companies), where there are security rules prohibiting programs from accessing outside their own domain.
In case of manual download of .zip files, it is always necessary to copy these “next to” the InfoportLauncher.exe program (i.e. for example to the folder “*C:\\Program Files (x86)\\Dataprojekt\\Infoport*”). Furthermore, the program will perform the update itself. The downloaded zip file must not be renamed or unpacked in any way. It is only advisable to check whether the hash of the downloaded file (zipper) agrees with what is stated on the website from where the file was downloaded. It is possible to use any utility for calculating MD5 hashes for checking (for example, in the Total Commander tool, in the File menu, there is an option Create file with CRC data checking)
# Version "* * * *"
You can use the Version parameter to filter which updates the administrator wants to install. The parameter consists of four parts, major, minor, build, revision. If any details are not important, they are replaced with \*
The individual weights of the parameter are:
- *major –* usually released once a year/several years. These are major changes and improvements to the system
*minor –* usually released once a month/several months. As part of these changes, new functionalities are added and there are also changes in the database structures
*build –* they add minor improvements, and above all they fix bugs. They are released weekly
*revision –* a technical version that can serve as a hotfix for a problem found with a specific customer
It is best to give examples again to understand the appropriate settings.
- If you want to agilely install each released version, use "\* \* \* \*". This will guarantee that the new version will be installed as soon as it is released.
- If, on the other hand, you want to approach the updates conservatively, set the parameter to "\* \* 0 \*", which means that the individual builds will not be tightened, but we will wait for the minor version.
- For corporate customers, it is also advantageous to be able to use this parameter to separate the live environment from the environment intended for testing/adoption of a new version. In that case, for example, in the live installation set "7 3 0 \*" (you will fix the previously adopted version) and in the test installation set, for example, "7 4 \* \*" (thus you will receive all fresh updates)
# Port 00000
The Port parameter is used only when installing and starting the EaInfoport system for the first time.
This parameter specifies which port the system will operate on until the portal administrator configures it.
EaInfoport is configured using itself (Setup page).
If the standard port 80 was already occupied by another web server, it would not be possible to start the Setup page in EaInfoport at all. Therefore, it is possible to set the port number to any free number.
After configuring the portal, this parameter is ignored.
# Start automatic | manual
This parameter is used to refine the behaviour of InfoportLauncher.exe during updates.
If it is set to automatic, it will start EaInfoport after installing a new version.
If the value is manual, EaInfoport must be run by the administrator.
Setting to automatic also guarantees that the start of EaInfoport is checked whenever the version update is checked (which is given by the Trigger parameter). See also Run parameter.
# Stop automatic | manual
This parameter is used to refine the behaviour of InfoportLauncher.exe during updates.
If it is set to automatic, it will turn off EaInfoport after installing a new version.
This setting makes sense especially if the Start parameter is also set to automatic.
After that, the whole update will be performed without an intervention of the system administrator.
# Clear automatic | manual
This parameter is used to refine the behaviour of InfoportLauncher.exe during updates.
If it is set to automatic, it will uninstall (delete) EaInfoport after installing a new version.
Deletion only applies to the directory with the specific version and does not affect the database with data.
# Prereq force | check
Each time you run InfoportLauncher.exe, the program verifies that the environment is eligible to install, update or run EaInfoport.
In particular, it checks that there is enough disk space and whether Enterprise Architect is installed
If all the prerequisites are not met and the parameter is set to force, InfoportLauncher.exe does not proceed and displays an error message.
However, if the parameter is set to check, the problems will also be checked and listed, but the program continues to run.
The consequences (such as a lack of free disk space) will take effect later.
# Run force | check
It checks at regular one-minute intervals whether EaInfoport is running.
If not and the value of the parameter is set to check, it will display information that the currently installed version is not running.
If the value of the parameter is set to force, InfoportLancher immediately runs EaInfoport (and displays information about it).
# Preparing an empty database (or schema) for EA Infoport metadata
To install Infoport, you need to have an empty schema created in the database that you want to use for application metadata.
You will use the created schema in the configuration manager where you will reference it.
When you first start Infoport, the necessary database tables are created in the schema for the application to run correctly and the default application settings are also created.
# Firewall Settings on the Server
In the standard way (according to the used firewall), enable the port (for incoming requests), on which you want EAInfoportT3 to be available – for example 80 or 8080
# Scope
The Scope parameter can be used to specify which versions the administrator wants to install from ftp.
Options:
- candidate - these versions are suitable for testing new functionality, not for production deployment
- release - version suitable for production deployment
# Configuration Manager
Used to set up the Infoportal.
After running EaInfoportT3.exe for the first time, the console tells us that it is listening on a localhost with a certain port..
"Now listening on: http://localhost:64297"
After entering the URL into the web browser, the “Configuration Manager” will load.
The first run of the manager is used to create the appsettings.json file, which saves certain parameters for the operation of Infoport.
# Configuration Manager
[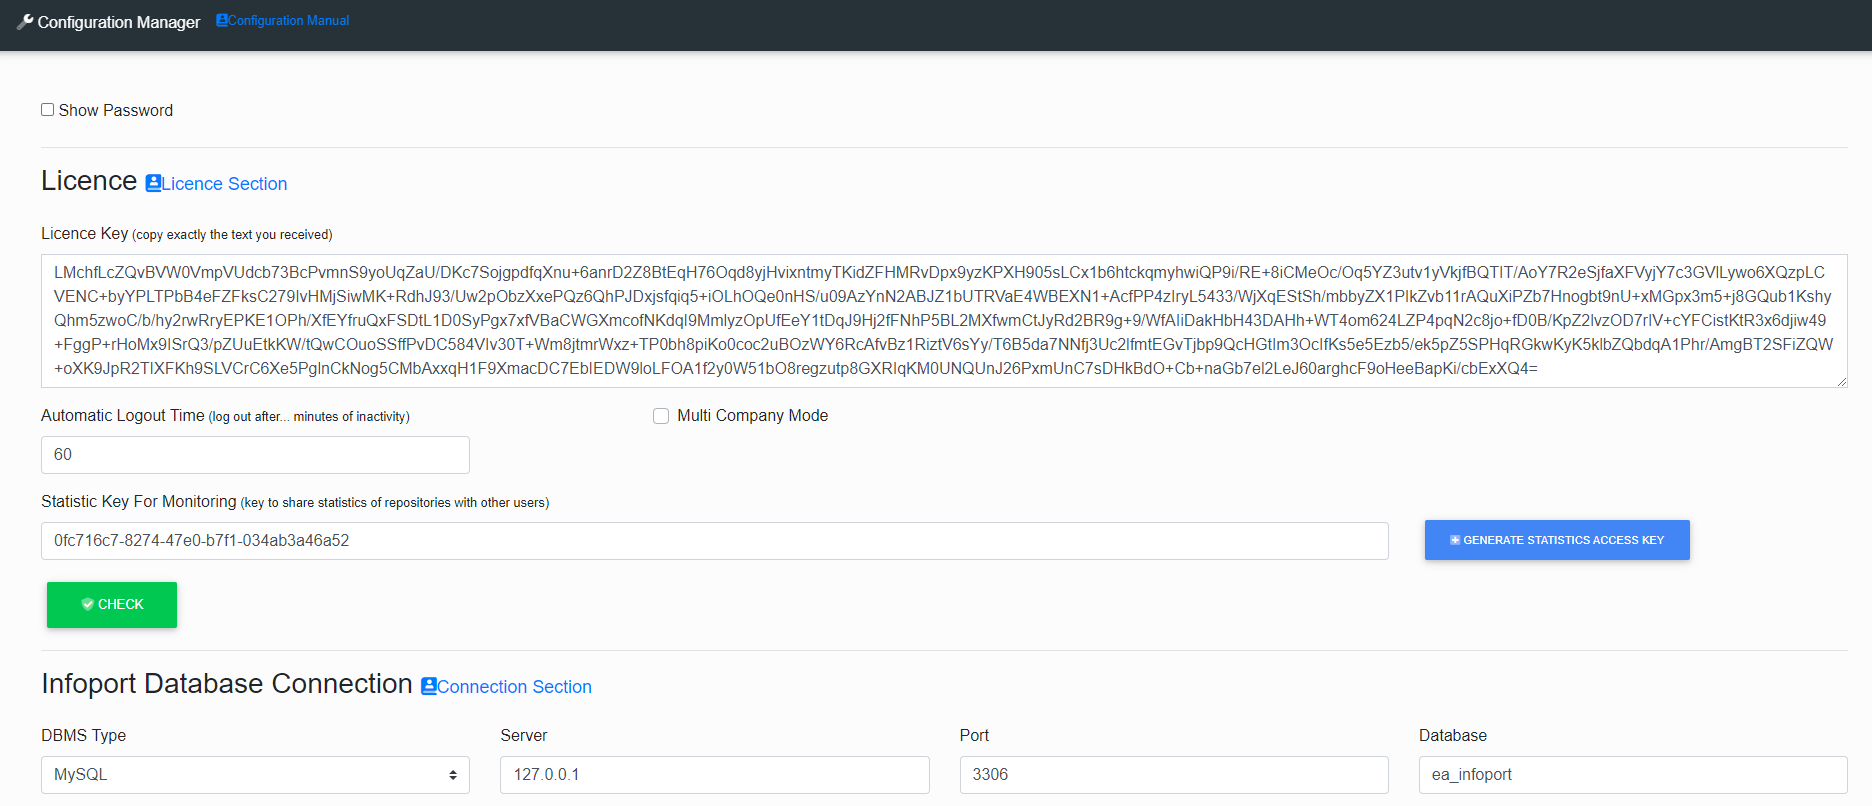](https://doc.eainfoport.cz/uploads/images/gallery/2022-05/0c8config.png)
After filling in the form, press the button [](https://doc.eainfoport.cz/uploads/images/gallery/2022-05/chceck-all.png) and if everything is filled in correctly, it will appear in each section [](https://doc.eainfoport.cz/uploads/images/gallery/2022-05/schvaleno.png).
Then press the button [](https://doc.eainfoport.cz/uploads/images/gallery/2022-05/savesetup.png) and wait until the entire Configuration Manager is set up and saved.
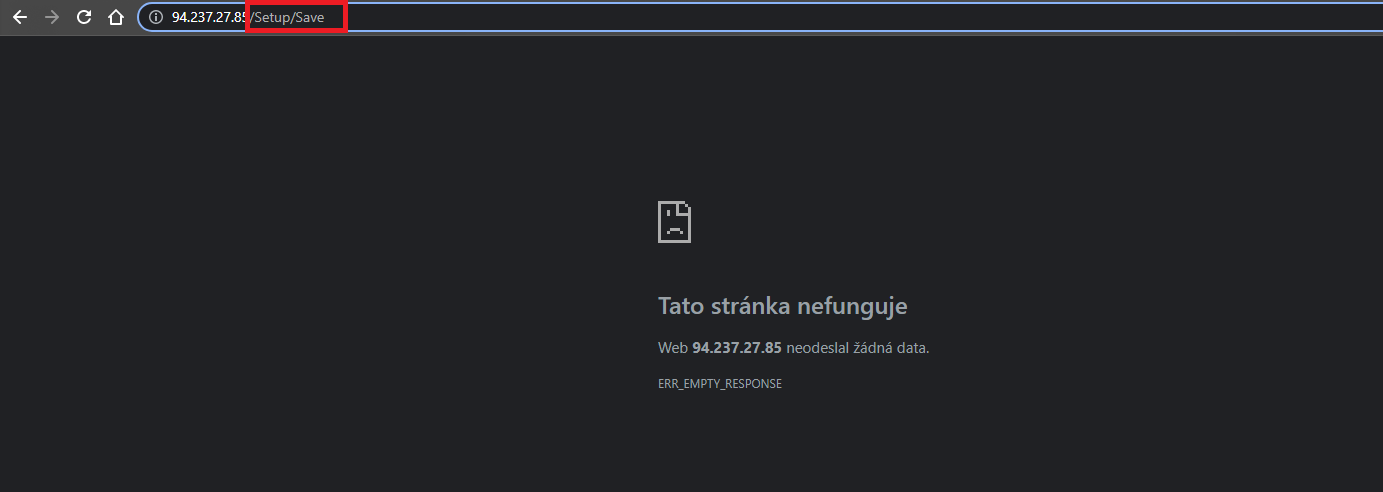
This page pops up, where we just delete ***/Setup/Save*** in the Url address and hit Enter.
[](https://doc.eainfoport.cz/uploads/images/gallery/2022-05/wbnerror.png)
- [Show Password ](https://doc.eainfoport.cz/books/installation-manual/page/show-password)
- [Licence](https://doc.eainfoport.cz/books/installation-manual/page/1-licence-key)
- [Infoport Database Connection](https://doc.eainfoport.cz/books/installation-manual/page/2-infoport-database-connection)
- [URL](https://doc.eainfoport.cz/books/installation-manual/page/3-url)
- [Serilog](https://doc.eainfoport.cz/books/installation-manual/page/4-serilog)
- [Active Directory](https://doc.eainfoport.cz/books/installation-manual/page/5-active-directory-ldap-section)
- [OpenID](https://doc.eainfoport.cz/books/installation-manual/page/5-openid)
- [Environment](https://doc.eainfoport.cz/books/installation-manual/page/6-environment)
- [Infoport na pozadí](https://doc.eainfoport.cz/books/installation-manual/page/7-infoport-in-the-background)
- [Trust Server Certificate](https://doc.eainfoport.cz/books/installation-manual/page/trust-server-certificate)
# Show Password
[](https://doc.eainfoport.cz/uploads/images/gallery/2022-05/1Qepass.png)
After checking the checkbox, all passwords in the configuration manager will be displayed.
# Licence Key
The licence key will be sent to you by Dataprojekt s.r.o.
[](https://doc.eainfoport.cz/uploads/images/gallery/2022-05/lrClicence.png)
In the first section, you insert the licence key and set the expiration time of the user's login.[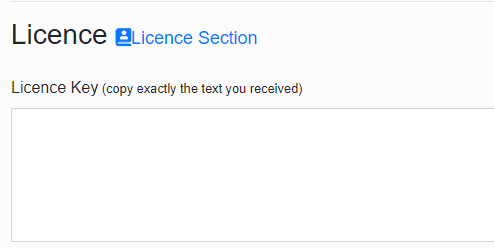](https://doc.eainfoport.cz/uploads/images/gallery/2022-05/8aplic-klic.png)
- - - - - -
Automatic Logout Time is a security feature that is used to automatically log out when inactive for a long tim.[](https://doc.eainfoport.cz/uploads/images/gallery/2022-04/snimek-obrazovky-2022-03-15-143042.png)
- - - - - -
Multi Company Mode
If Multi Company is activated (checkbox checked) then only Login Email will be visible, both when creating a new user and when editing an existing user.
You will also see the Login Email on the login screen.
[](https://doc.eainfoport.cz/uploads/images/gallery/2022-05/multicompany.png)
- - - - - -
Statistic Key For Monitoring is a key for sharing statistics with other users.
Clicking on the Generate Statistics Access Key button will generate a key.[](https://doc.eainfoport.cz/uploads/images/gallery/2022-04/ae9snimek-obrazovky-2022-03-15-143138.png)[](https://doc.eainfoport.cz/uploads/images/gallery/2022-04/snimek-obrazovky-2022-03-15-143525.png)
# Infoport Database Connection
The first section in the configuration contains the Infoport database settings. (Database schema in which the program has all settings stored).
[](https://doc.eainfoport.cz/uploads/images/gallery/2022-04/infoport-database.png)
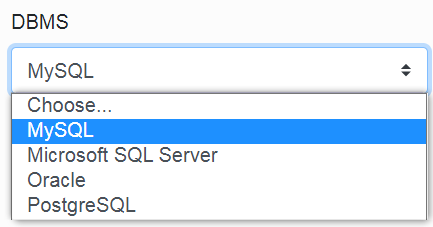
In the first item, we choose the type of database. There is a choice of three types.
1. MySQL with default port 3306
2. Microsoft SQL Server with default port 1433
3. Oracle with default port 152
4. PostgreSQL with default port 5432
After selecting the type, the value of the Port item will be filled in automatically.
[](https://doc.eainfoport.cz/uploads/images/gallery/2022-04/dbms-0.png)
The second item is setting the IP address of the database server. (If Infoport runs on the same machine with the database, just fill in the local IP address).
[](https://doc.eainfoport.cz/uploads/images/gallery/2022-04/server.png)
The third item is the database server port setting. By default, the pre-filled data according to the database type can be changed.
[](https://doc.eainfoport.cz/uploads/images/gallery/2022-04/port.png)
The fourth item is only relevant for MySQL and Microsoft SQL Server.
Fill in the name of the schema in which Infoport will create its tables. (If the schema is not created on the database server, Infoport will create it itself, provided the user has sufficient permissions in the database).
[](https://doc.eainfoport.cz/uploads/images/gallery/2022-04/database.png)
The other two items are user and password. You need to fill a user who has DML and DDL rights into our chosen database.
[](https://doc.eainfoport.cz/uploads/images/gallery/2022-04/user.png)
The Timeout item is used to set the maximum length of a query within the database. It has an effect mainly on queries during the search.
[](https://doc.eainfoport.cz/uploads/images/gallery/2022-04/timeout.png)
# URL
In the second section, we will determine to which URL Infoport will listen.
[](https://doc.eainfoport.cz/uploads/images/gallery/2022-06/url.png)
- - - - - -
***TLS***
If you are using secure communication, it is possible to choose the TLS version(s) that you consider secure enough.
For example, version 1.1 is not supported on Windows operating systems after 2021 and should not be used.
[](https://doc.eainfoport.cz/uploads/images/gallery/2022-05/tls-url.png)
- - - - - -
The *URL* consists of three parts.
The first one specifies the protocol (http or https); the second one is the IP address, and the third one is the port.
If we want to use https (see below), the certificate must be issued to the same IP address as specified here.
[](https://doc.eainfoport.cz/uploads/images/gallery/2022-04/urls.png)
- - - - - -
***Protocol Http1 a Http 2***
These are the protocols that are set by default.
The user only needs to configure the Http1 protocol, which supports the operation of Windows Authentication.
[](https://doc.eainfoport.cz/uploads/images/gallery/2022-05/http.png)
- - - - - -
***Pfx File***
Other items to fill in are the path and password to the certificate to the URL entered above.
[](https://doc.eainfoport.cz/uploads/images/gallery/2022-05/pfx-file.png)
- - - - - -
***Installed certificate***
[](https://doc.eainfoport.cz/uploads/images/gallery/2022-05/1url.png)
[](https://doc.eainfoport.cz/uploads/images/gallery/2022-05/biy2url.png)
- - - - - -
***Https Redirection***
*[](https://doc.eainfoport.cz/uploads/images/gallery/2022-05/3url.png)*
- - - - - -
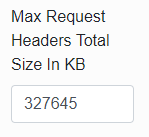
***Max Request Headers Total Size In KB***
This parameter allows you to set the maximum allowed request size.
Some requests may contain large amounts of data and Infoport cannot process them. (*For example, an OpenID login where all the groups the user is in are sent*).
***[](https://doc.eainfoport.cz/uploads/images/gallery/2022-06/url-max-request.png)***
- - - - - -
If you want another URL to which the portal will listen, press the [](https://doc.eainfoport.cz/uploads/images/gallery/2022-04/add-row.png) button and new items will be created to fill in.
To delete a URL, press the button [](https://doc.eainfoport.cz/uploads/images/gallery/2022-05/delete-url.png).
# Serilog
The next section allows us to set the Infoport logging.
[](https://doc.eainfoport.cz/uploads/images/gallery/2024-04/snimek-obrazovky-2024-04-23-144643.png)
The first item is a check box that says whether user activities should be logged. (List of visited URLs).
[](https://doc.eainfoport.cz/uploads/images/gallery/2022-03/insighs.png)
In the second item, we choose the relative path for saving logs.
[](https://doc.eainfoport.cz/uploads/images/gallery/2022-03/log-path.png)
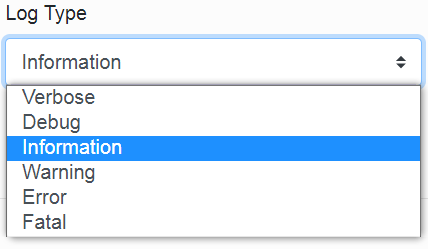
In the third item, we select the type of logging.
(Each type is described in the table. We recommend Information logging.)
[](https://doc.eainfoport.cz/uploads/images/gallery/2022-03/logtype.png)
Table for logging types.
**Level (from the most detailed to the least detailed)**
**Description**
Verbose
For information that's typically valuable only for debugging. These messages may contain sensitive application data and so shouldn't be enabled in a production environment. Disabled by default.
Debug
For information that may be useful in development and debugging. Example: Entering method Configure with flag set to true. Enable Debug level logs in production only when troubleshooting, due to the high volume of logs.
Information
For tracking the general flow of the app. These logs typically have some long-term value. Example:Request received for path/api/todo
Warning
For abnormal or unexpected events in the app flow. These may include errors or other conditions that don´t cause the app to stop but might need to be investigadet. Handled exceptions are a common place to use the Warning log level. Example: FileNotFoundException for file quotes.txt.
Error
For errors and exceptions that cannot be handled. These messages indicate a failure in the current aktivity or operation (such as the current http request), not an app-wide failure. Example log message: Cannot insert record due to duplicate key violation.
Fatal
For failures that require immediate attention. Examples: data loss scenarios, out of disk space.
In the fourth item, we select where we want the logs to be written. We have three options: Console, File or Both.
[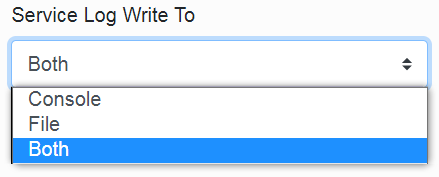](https://doc.eainfoport.cz/uploads/images/gallery/2022-03/service-log-write-to.png)
In the fifth item, we choose how often the log file should be closed.
[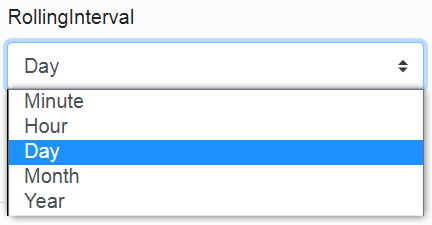](https://doc.eainfoport.cz/uploads/images/gallery/2022-03/rollinginterval.png)
Here we can see the chosen day. This means that a new log file is created for the portal every day. Logs from previous days remain on disk.
[](https://doc.eainfoport.cz/uploads/images/gallery/2025-06/image-1749473080529.png)
#### Audit for login/logout
The "/Account/Login" and "/Account/Logout" events are logged, both successful (StatusCode == 302) and unsuccessful ones.
Audit for Enterprise Architect Database modifications
Logs changes that users make to repository data. Adding, editing and deleting Packages, Element, Diagram, Attribute, Operation, etc.
#### Audit for HTTP status codes
Failed/unauthorized accesses are logged, specifically "403 Forbidden for user ...", "404 NotFound for user ...", "401 Unauthorized for user ...". These events mainly occur when manually modifying (spoofing) a url, when the id or guid of an artifact that the user cannot access is replaced.
#### Audit for Infoport permissions
Both approved and denied accesses are logged. These are always calculated for the requested Package and separately for personal and group permissions.
Warning: there may be a large number of these entries in the log.
In addition, changes to user and group permissions made by administrators are also logged. From these logs, it is possible to see who has assigned or removed what permissions when.
#### Audit for Access Keys
Creation or deletion of an access key is logged so that it can be determined who ever created the key, which is then used for direct access (where no explicit user logging is required)
After filling in, just press the [](https://doc.eainfoport.cz/uploads/images/gallery/2022-03/check.png) button and the manager will tell you if everything is OK.
# Active Directory - LDAP Section
In this section, we set up Active Directory using the LDAP protocol.
[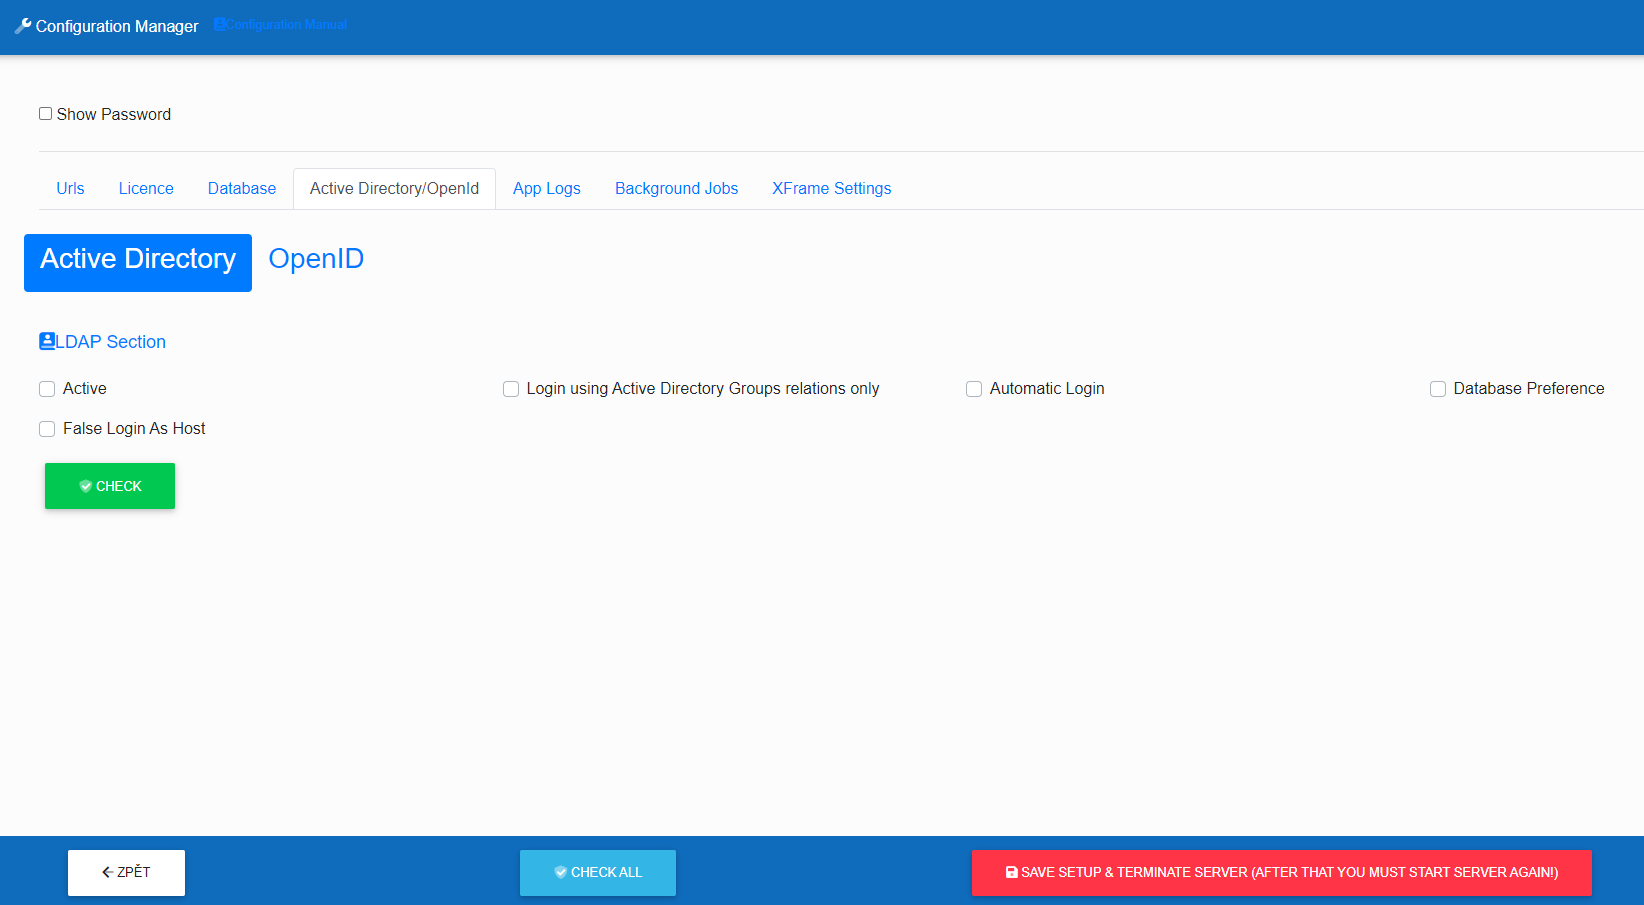](https://doc.eainfoport.cz/uploads/images/gallery/2024-04/snimek-obrazovky-2024-04-23-141927.png)
- "*Active*" tells us if we want Infoport to work with AD.
- "Login using Active Directory Groups relations only" it is possible to set a ban on the login of a user who does not have an Active Direcotry group assigned.
- "*Automatic Login*" determines if users will automatically log into AD if they enter the Infoport URL in the browser.
- "*Database Preference*" tells us that when logging in, it goes to the database to the users first and then to AD
- "*False Login As Host*" allows us to choose if we want a user who is not in AD to be able to log in as a portal guest.
# OpenID
[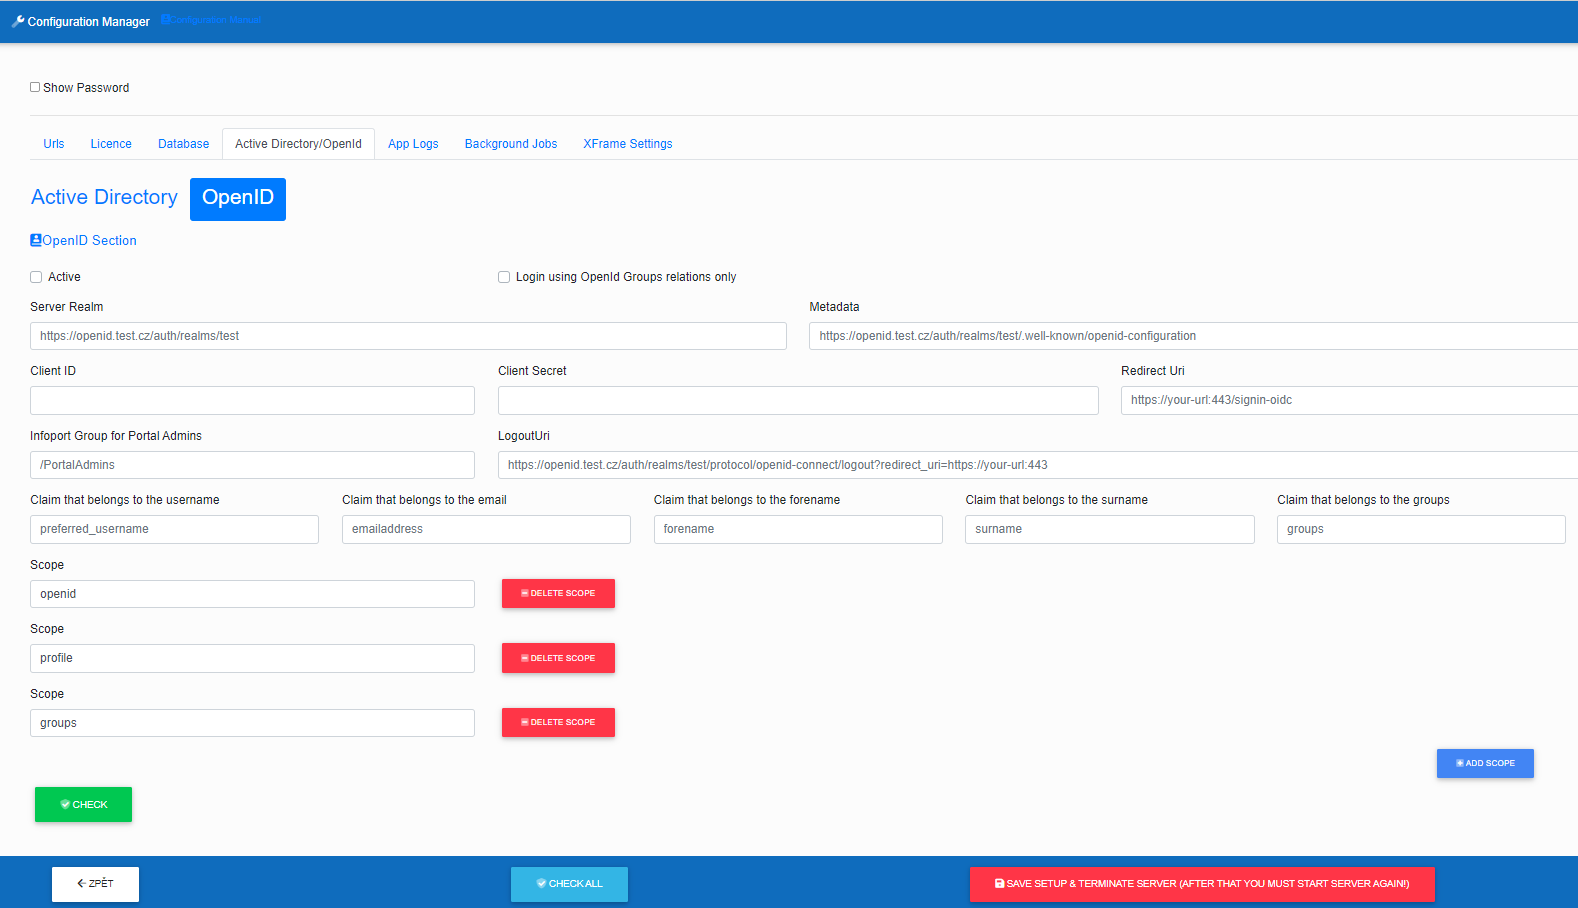](https://doc.eainfoport.cz/uploads/images/gallery/2024-04/snimek-obrazovky-2024-04-23-142722.png)
- "*Active*" tells us if we want Infoport to work with OpenID.
- "Login using OpenId Groups relations only" it is possible to set a ban on the login of a user who does not have an OpenID group assigned.
***Server Realm*** – fill in the link to the open id server
[](https://doc.eainfoport.cz/uploads/images/gallery/2022-10/image-1665479608966.png)
- - - - - -
***Metadata*** – fill in the link to the open id server metadata
[](https://doc.eainfoport.cz/uploads/images/gallery/2022-10/image-1665479593158.png)
- - - - - -
***ClientID*** – fill in the reference to the Client identifier
[](https://doc.eainfoport.cz/uploads/images/gallery/2022-10/image-1665479977551.png)
- - - - - -
***Client Secret*** – insert client secret
[](https://doc.eainfoport.cz/uploads/images/gallery/2022-10/image-1665479962615.png)
- - - - - -
***Redirect Uri*** – enter the url that will be called after logging out of the infoport
[](https://doc.eainfoport.cz/uploads/images/gallery/2022-10/image-1665479987025.png)
- - - - - -
***Infoport Group for Portals Admins*** – enter the name of the group where you want the Infoport portal administrator users to be
[](https://doc.eainfoport.cz/uploads/images/gallery/2022-10/image-1665480000658.png)
- - - - - -
***LogoutUri*** – enter a url that logs out of open id
[](https://doc.eainfoport.cz/uploads/images/gallery/2022-10/image-1665480018624.png)
- - - - - -
***Claim that belongs to the username*** – specify a claim by which the infoport will pull the infoport username from the response
[](https://doc.eainfoport.cz/uploads/images/gallery/2022-10/image-1665480031495.png)
- - - - - -
***Claim that belongs to the email*** – specify a claim by which the infoport will pull the email from the response
[](https://doc.eainfoport.cz/uploads/images/gallery/2022-10/image-1665480040204.png)
- - - - - -
***Claim that belongs to the forename*** – specify a claim by which the infoport will pull the user's first name from the response
[](https://doc.eainfoport.cz/uploads/images/gallery/2022-10/image-1665480049916.png)
- - - - - -
***Claim that belongs to the surname*** – specify a claim by which the infoport will pull the user's last name from the response
[](https://doc.eainfoport.cz/uploads/images/gallery/2022-10/image-1665480059247.png)
- - - - - -
***Claim that belongs to the groups*** – specify a claim according to which the infoport will pull the groups to which the user belongs from the response
[](https://doc.eainfoport.cz/uploads/images/gallery/2022-10/image-1665480067373.png)
- - - - - -
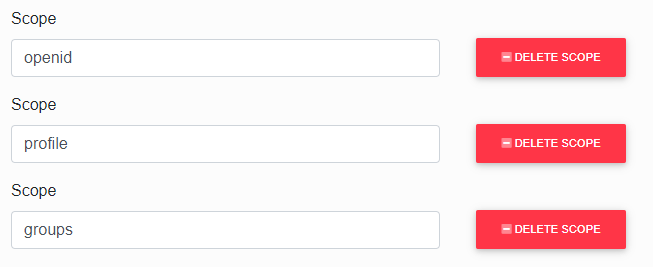
Add ***Open ID Scopes***,to return all necessary attributes
[](https://doc.eainfoport.cz/uploads/images/gallery/2022-10/image-1665480078281.png)
Další související informace s OpenID:
[https://doc.eainfoport.cz/books/uzivatelsky-manual/page/mapovani-skupiny-na-openid](https://doc.eainfoport.cz/books/uzivatelsky-manual/page/mapovani-skupiny-na-openid)
[https://doc.eainfoport.cz/books/uzivatelsky-manual/page/prihlaseni-uzivatele-ktery-nema-prirazenou-openid-skupinu](https://doc.eainfoport.cz/books/uzivatelsky-manual/page/prihlaseni-uzivatele-ktery-nema-prirazenou-openid-skupinu)
https://doc.eainfoport.cz/books/otazky-odpovedi/page/chybejici-opravneni-repository-behem-prihlaseni-pres-ad-nebo-openid
# Environment
The first item is a check box that determines whether we want to save published images to the database.
In the next three items, we choose the relative path in which the published images, cached images and temporary files will be saved.
[](https://doc.eainfoport.cz/uploads/images/gallery/2022-03/3-environment-0.png)
# Infoport in the Background
### Infoport in the Background
Infoport performs various background functions.
Some can be set by a user, others run according to default settings.
A user can find configurable functions in the “**appsettings.json**” file.
The functions mainly work with repositories.
In the **Configuration Manager**, a user selects some background functions.
After it has been started, the function starts working in the background and gradually loads the tree for a user (the function is named InitialLoadCacheDeep in the Background section).
[](https://doc.eainfoport.cz/uploads/images/gallery/2022-04/cache.png)
1. [SynchronizeADUserJob](https://doc.eainfoport.cz/books/installation-manual/page/71-synchronizeaduserjob)
2. [SynchronizeSparxUserJob](https://doc.eainfoport.cz/books/installation-manual/page/72-synchronizesparxuserjob)
3. [Startup Jobs](https://doc.eainfoport.cz/books/installation-manual/page/73-startup-jobs)
4. [Scheduler Jobs](https://doc.eainfoport.cz/books/installation-manual/page/74-scheduler-jobs)
# SynchronizeADUserJob
[](https://doc.eainfoport.cz/uploads/images/gallery/2022-05/I4Xsynchronize-ad-user-job.png)
Synchronization with Infoport users is for users from AD.
The function is called **SynchronizeADUserJob**.
Again, it has a cron item to run synchronization on a regular basis.
#### CreateUser a AddUserToGroup
***CreateUser*** is a flag if we want users from AD to be created in Infoport.
***AddUserToGroup*** is a flag if we want users to be added to group.
[](https://doc.eainfoport.cz/uploads/images/gallery/2022-04/synchronizaad.png)
# SynchronizeSparxUserJob
[](https://doc.eainfoport.cz/uploads/images/gallery/2022-05/CoWsynchronize-sparx-user-job.png)
We will now discuss the function for synchronizing Sparx users with Infoport users.
The function is called **SynchronizeSparxUserJob**.
It contains a single item for setting (cron settings).
According to the specified settings, users are synchronized regularly.
[](https://doc.eainfoport.cz/uploads/images/gallery/2022-04/synchronizasesparx.png)
# Startup Jobs
Are processes that are activated only once at the application’s launch and perform actions that need to be performed before users start using the application.
### Prefetch Repository Cache Job
[](https://doc.eainfoport.cz/uploads/images/gallery/2022-05/x1Vprefetch.png)
Each time the application is launched, a basic part of the repository tree is loaded from the database into the memory cache.
The reason is the acceleration of user’s work while strolling through the tree.
The amount of loaded levels depends on the parameters „*Initial Load Cache Deep*“ and „*Maximum Auto Cache Deep*“.
The first one „***Initial Load Cache Deep***” indicates how many levels have been loaded before the application starts to „obey” and is available for the users.
Here it is suitable to choose 3 to 5 levels.
- ***The value 3*** if the repository is ordered more to the width and there is a larger amount {>>50} of models or packages.
- ***The value 5*** for the packages ordered more into the depth.[](https://doc.eainfoport.cz/uploads/images/gallery/2022-04/initial-load-cache-de.png)If the value of the other parameter „***Maximum Auto Cache Deep***” is set larger than the first one (7 to 13 is recommended), the data loading into the cache goes on even after the application is available for the users.
It goes on this way gradually up to the depth of the tree that is given by this parameter.[](https://doc.eainfoport.cz/uploads/images/gallery/2022-04/maximum-0.png)If a random user strolls through the tree deeper than it is set in the parameter for the maximum automatic download (“*Maximum Auto Cache Deep*”), the cache grows larger with the displayed data.
Other users thus get a significantly accelerated display.
These cached data then (if arranged so) influence how some other jobs (“*Regenerate Repository Tree”, “Regenerate Existing Image”, “Regenerate Missing Image*”) can work.
# Scheduler Jobs
Are processes that are activated regularly and serve to keep the application in good condition. These include refreshing data in a memory and disk cache, various data synchronisations, and deleting unnecessary data and system processes.
#### Common settings for all scheduled Jobs
The basic parameter for each job is information about the frequency with which it will run.
It is possible to set it to run every minute, or maybe just once a month.
The syntax known as [CRON](https://en.wikipedia.org/wiki/Cron) is used for this and there are always five items in the configurator (Minute, Hour, Day of the Month, Month and Day of the week).
For each job it is also possible to set whether it should be run immediately after the application (server) start by checking the "***Run Immediately***" item.
# Regenerate Repository Tree Job
[](https://doc.eainfoport.cz/uploads/images/gallery/2022-04/snimek-obrazovky-2022-03-15-155349.png)
This job is designed for the periodical update of the repository tree, independently of the users.
When launched, it strolls gradually through the currently cached tree and compares it to the state in the database.
If it does not detect any differences, it leaves the tree branches untouched.
But if it detects any change at some level of immersion (*added / taken out / changed artefact*), it takes all the deeper immersed artefacts out of the cache and restores them from the database.
This restoration progresses into the depth of immersion given by the parameter „***Maximum Cache Deep***” from the section „***Prefetch Repository Cache***”.
The suitable timing is a moment in which the users work minimally with the programme, i.e. during night hours and after (possible) automatic synchronisations of the models on the database level with some external software.
# Regenerate Image
The chart images are generated commonly in two ways.
The user may either display a detail of the chart or the jobs in the background „***Regenerate Existing Image***" and „***Regenerate Missing Image***".
After it has been generated, the image is saved into the disc cache, and upon a requirement from (any) user, it is displayed from the disc again.
However, the images also get outdated when they are modified or changed as metadata by someone.
If a user displays the image of the chart that has been modified recently, the system will recognise it.
It displays the original outdated image from the disc cache, and it starts to regenerate the chart.
But it takes some time (higher value of seconds typically), and it delays the user.
Therefore, there are two jobs that try to prevent it. They search for the outdated or still non-generated charts, and they regenerate them.
- [RegenerateExistingImageJob](https://doc.eainfoport.cz/books/installation-manual/page/7421-regenerateexistingimagejob)
- [Regenerate Missing Image Job](https://doc.eainfoport.cz/books/installation-manual/page/7422-regenerate-missing-image-job)
# Regenerate Existing Image Job
[](https://doc.eainfoport.cz/uploads/images/gallery/2022-05/9IDexisting.png)
This job has to regenerate the formerly created chart images.
It recognises whether the chart has been modified since it was last created, and it possibly lets it be created and saved into the disc cache again.
The word *„Existing*” in the name of this job means that the work of this job relates exclusively to the charts that already have “some” image in the disc cache. (The non-existing images are handled by *„**Regenerate Missing Image***”.)
The switch *„**Only By Tree Cache***” decides whether the regeneration focuses only on the images from the disc that belong to the charts that are loaded into the memory cache of the tree (see *„**Prefetch Repository Cache***”). If this switch is not ticked, the job ensures the timeliness of all images saved in the disc cache, regardless of the current state of the tree.
[](https://doc.eainfoport.cz/uploads/images/gallery/2022-04/only-be-tree-cache.png)
The switch *„**Check Modified Date***” and *„**Check Hash Matching***” serves for specifying the method of what programme it will use to detect whether an image is outdated.
The first one *„**Check Modified Date***” means that the time stamp of the file is checked in comparison with the time stamp in the database.
This is very fast, but the reliability is somewhere around 90%.
It is given by the fact that not all modifications in the chart update this time stamp. (This is directly the property of the Enterprise Architect programme.)[](https://doc.eainfoport.cz/uploads/images/gallery/2022-04/check-modifite-date.png)The other switch *„**Check Hash Matching***” decides that, for the control, the calculation of the so-called hash of all metadata that influence the visual aspect of the image will be used.
This method is 100% responsible but it is time-consuming.[](https://doc.eainfoport.cz/uploads/images/gallery/2022-04/check-hash-matching.png)
Both switches may be *„combined*”.
If we tick neither of the switches, we tell the programme not to control anything and to regenerate directly all the charts.
The last option is to tick the both switches, due to this, the programme first controls the date of the modification and then the hash.
The recommended settings are to have only *„**Check Modified Date***” ticked, taking into account that the probability of non-regenerating the outdated chart does not mean such a serious complication.
In case the user displays an (outdated) chart image, the hash is controlled at any instance, and the programme reacts to the untimeliness by its regeneration and displaying the refreshed image follows.
The last parameter of this job is *„**Gap Milliseconds***”.
It is an interval between the generation acts of individual chart images.
These are not typically generated one after another, but a time gap is kept here.
Its purpose is to also enable processing the user’s requirement for generating an image without undue delay.
The default value of this parameter is *5000* (i.e. 5s), but if we know that during the period of regeneration the users will stay inactive, this parameter can be significantly reduced or set to 0.
[](https://doc.eainfoport.cz/uploads/images/gallery/2022-04/gap.png)
# Regenerate Missing Image Job
[](https://doc.eainfoport.cz/uploads/images/gallery/2022-05/mqvmissing.png)
This job has to add generation of the not-yet-created chart images and save them to the disc cache.
It does not work with the already created and in-cache-saved images in any way, not even if they were outdated. (For this purpose, there is „***Regenerate Existing Image***”.)
The switch „***Only By Tree Cache***” decides whether the generation focuses only on the charts loaded in the memory cache of the tree (see „*Prefetch Repository Cache*”).
If this switch is not ticked, the job ensures generating of all chart images that are included in the complete tree.
[](https://doc.eainfoport.cz/uploads/images/gallery/2022-04/only-be-tree-cache.png)
The last parameter of this job is „***Gap Milliseconds***”.
It is an interval between the generation acts of individual chart images.
These are not typically generated one after another, but a time gap is kept here.
Its purpose is to also enable processing the user’s requirement for generating an image without undue delay.
The default value of this parameter is 5000 (i.e. 5s), but if we know that during the period of regeneration the users will stay inactive, this parameter can be significantly reduced or set to 0.
[](https://doc.eainfoport.cz/uploads/images/gallery/2022-04/gap.png)
# Clean Dcom Job
[](https://doc.eainfoport.cz/uploads/images/gallery/2022-05/6suclean-dcom.png)
This Job is used to remove redundant (*typically non-functional*) DCOMs from the operating system’s memory.
DCOM is an intermediary in communication between EAInfoport and Enterprise Architect.
DCOM is most often used to generate diagram images but also for some active operations (such as creating and deleting an artefact).
At least one DCOM is required to connect to each repository.
Sometimes an error occurs in DCOM, and it is then ineligible for further communication.
If this happens, a new instance of DCOM is created immediately in the memory (and transparently for the user) and it will start to be used.
However, the original instance remains in memory at that moment. It is only removed by this cleaning job.
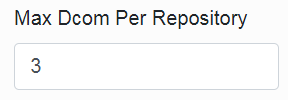
The “***Max Dcom Per Repository***” parameter specifies the maximum number of tolerated DCOMs in the memory per repository.
This means that the program multiplies this parameter by the number of connected repositories and checks whether the total number of running DCOMs is less than this number.
The “***Max Dcom Per Repository***” does not distinguish which DCOM “belongs” to which repository.
If the limit is exceeded, all instances of DCOM are deleted from memory and the program then re-creates them when needed.
[](https://doc.eainfoport.cz/uploads/images/gallery/2022-04/max-dcom-repository.png)
If you run multiple EaInfoport installations on one server (which is possible on different ports), the “*Max Dcom Per Repository*” parameter must be set with the knowledge that each installation (if this job is active) will count the number of repositories accordingly.
# Cleaning Disk Cache Job
[](https://doc.eainfoport.cz/uploads/images/gallery/2022-05/j3Jclean.png)
This job is used to clean the disk cache.
Disk cache is a directory on a disk where diagram images are stored so that they can be viewed quickly by users.
Some image files created a long time ago may no longer matter. They take up disk space unnecessarily and can be removed.
The first of two “***Safety Gap Seconds***” parameters protects the youngest (latest) files from being deleted.
For example, the default value of *86400* (which is 60\*60\*24 s) says that files created in the last 24 hours will not be cleaned (deleted), even if their total disk size exceeds the limit (given by the second parameter).
[](https://doc.eainfoport.cz/uploads/images/gallery/2022-04/safety-gap-seconds.png)
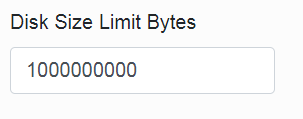
The second “***Disk Size Limit Bytes***” parameter says what is the maximum total size of files on the disk after cleaning.
The job sorts the image files according to the time they are created and gradually deletes them from the oldest ones until the rest take up less disk space than this limit.
However, if even too “young” files (according to the first parameter) should be deleted, the deletion will end, and the files will take up more space on the disk.
[](https://doc.eainfoport.cz/uploads/images/gallery/2022-04/disk-size-limit.png)
Between runs of this job, it is not monitored (nor regulated) that the files on the disk do not take up much space.
It is advisable to set the size of the “***Disk Size Limit Bytes***” parameter so that the image files generated by the “***Regenerate Missing Image***” just fit into the disk limit. If the size limit is lower than the size of images, there is a constant cyclic (i.e. unnecessary) generation and deletion of the same images.
If a diagram image is already stored on the disk, then its regeneration (of course, if its model has not been extended) no longer requires additional disk space.
# Setting an email notification server
We have created three notification services to alert users of changes to the diagram
- [Notification Hour Job](https://doc.eainfoport.cz/books/installation-manual/page/751-notification-hour-job)
- [Notification Day Job](https://doc.eainfoport.cz/books/installation-manual/page/752-notification-day-job)
- [Notification Week Job](https://doc.eainfoport.cz/books/installation-manual/page/753-notification-week-job)
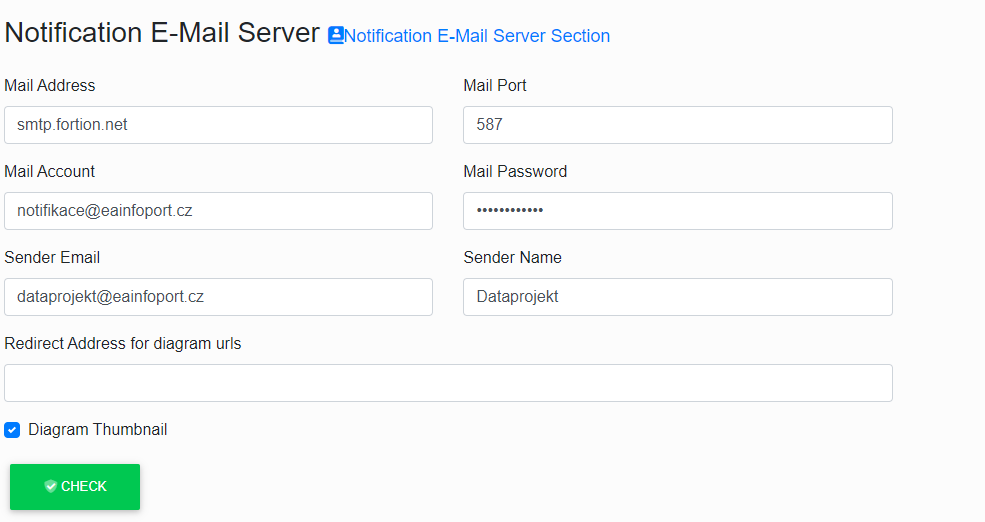
The administrator must set up an email server to be able to send notification emails to users.
[](https://doc.eainfoport.cz/uploads/images/gallery/2022-10/a8zemail-server.png)
- - - - - -
***Mail Adress*** this sets for entering the email server.
[](https://doc.eainfoport.cz/uploads/images/gallery/2022-10/image-1665475238321.png)
- - - - - -
***Mail Port*** this sets for entering the email port.
[](https://doc.eainfoport.cz/uploads/images/gallery/2022-10/image-1665475296514.png)
- - - - - -
***Mail Account*** this sets for entering the username that has access to the email server.
[](https://doc.eainfoport.cz/uploads/images/gallery/2022-10/image-1665475328780.png)
- - - - - -
***Mail Password*** this sets for entering a password for the user.
[](https://doc.eainfoport.cz/uploads/images/gallery/2022-10/image-1665475484529.png)
- - - - - -
***Sender Email*** this sets an email that will be shown to users who receive an email notification of a change to the EA diagram.
[](https://doc.eainfoport.cz/uploads/images/gallery/2022-10/image-1665475511602.png)
- - - - - -
***Sender Name*** this sets the name that will be displayed to users who receive email notifications of EA diagram changes.
[](https://doc.eainfoport.cz/uploads/images/gallery/2022-10/image-1665475526536.png)
- - - - - -
***Redirect Address*** this is a field where the user enters the url of the Infoport so that the user can refer to the portal via a link in the email.
[](https://doc.eainfoport.cz/uploads/images/gallery/2022-10/image-1665475571050.png)
- - - - - -
***Diagram Thumbnail*** is a checkbox to determine if we want to send users smaller diagram images in emails.
The basic parameter for each job is information about the frequency with which it will run.
It is possible to set it to run every minute, or maybe just once a month.
The syntax known as [CRON](https://en.wikipedia.org/wiki/Cron) is used for this and there are always five items in the configurator (*Minute, Hour, Day of the Month, Month and Day of the week*).
For each job it is also possible to set whether it should be run immediately after the application (server) start by checking the "***Run Immediately***" item.
[](https://doc.eainfoport.cz/uploads/images/gallery/2022-09/day-jov.png)
This job has the task of sending the user an email notification about a change on the diagram.
If it does not detect any change on the diagram, it does not send the notification.
If it detects a change on the diagram, the job sends an email notification on the diagram with the change made.
- - - - - -
The user can see an "i*nformation bar*" icon on the diagram which, when clicked, informs what type of notification is set.
[](https://doc.eainfoport.cz/uploads/images/gallery/2022-10/tree-information-bar.png)
To set up an hourly notification, the user must click on the icon [](https://doc.eainfoport.cz/uploads/images/gallery/2022-09/hodina.png)and when the icon changes the sending of the diagram is set.
# Notification Day Job
The basic parameter for each job is information about the frequency with which it will run.
It is possible to set it to run every minute, or maybe just once a month.
The syntax known as [CRON](https://en.wikipedia.org/wiki/Cron) is used for this and there are always five items in the configurator (*Minute, Hour, Day of the Month, Month and Day of the week*).
For each job it is also possible to set whether it should be run immediately after the application (server) start by checking the "***Run Immediately***" item.
[](https://doc.eainfoport.cz/uploads/images/gallery/2022-09/day-jov.png)
This job has the task of sending the user an email notification about a change on the diagram.
If it does not detect any change on the diagram, it does not send the notification.
If it detects a change on the diagram, the job sends an email notification on the diagram with the change made.
- - - - - -
The user can see an "i*nformation bar*" icon on the diagram which, when clicked, informs what type of notification is set.
[](https://doc.eainfoport.cz/uploads/images/gallery/2022-10/tree-information-bar.png)
To set up an daily notification, the user must click on the icon [](https://doc.eainfoport.cz/uploads/images/gallery/2022-09/den.png)and when the icon changes the sending of the diagram is set.
# Notification Week Job
The basic parameter for each job is information about the frequency with which it will run.
It is possible to set it to run every minute, or maybe just once a month.
The syntax known as [CRON](https://en.wikipedia.org/wiki/Cron) is used for this and there are always five items in the configurator (*Minute, Hour, Day of the Month, Month and Day of the week*).
For each job it is also possible to set whether it should be run immediately after the application (server) start by checking the "***Run Immediately***" item.
[](https://doc.eainfoport.cz/uploads/images/gallery/2022-09/week-job.png)
This job has the task of sending the user an email notification about a change on the diagram.
If it does not detect any change on the diagram, it does not send the notification.
If it detects a change on the diagram, the job sends an email notification on the diagram with the change made.
- - - - - -
The user can see an "i*nformation bar*" icon on the diagram which, when clicked, informs what type of notification is set.
[](https://doc.eainfoport.cz/uploads/images/gallery/2022-10/tree-information-bar.png)
To set up an weekly notification, the user must click on the icon [](https://doc.eainfoport.cz/uploads/images/gallery/2022-09/tyden.png)and when the icon changes the sending of the diagram is set.
# Database Maintenance
# X Frame
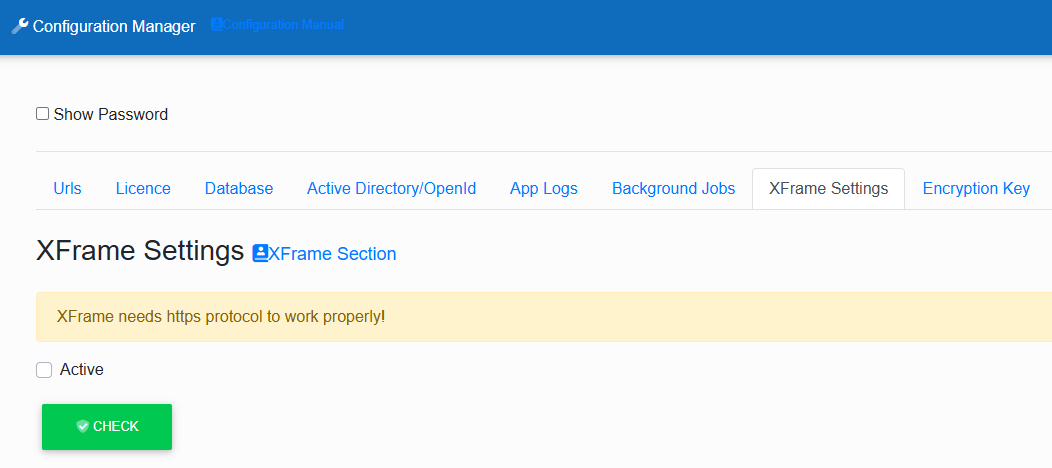
The portal administrator now has a new option in the configuration. If you want to enable the XFrame feature you must have Https protocol enabled and we recommend to enable this feature only in the internal network. The feature allows you to embed the entire portal via html iframe into other applications.
[](https://doc.eainfoport.cz/uploads/images/gallery/2025-07/image-1751977271613.png)
# Trust Server Certificate
[](https://doc.eainfoport.cz/uploads/images/gallery/2025-02/image-1740666449792.png)
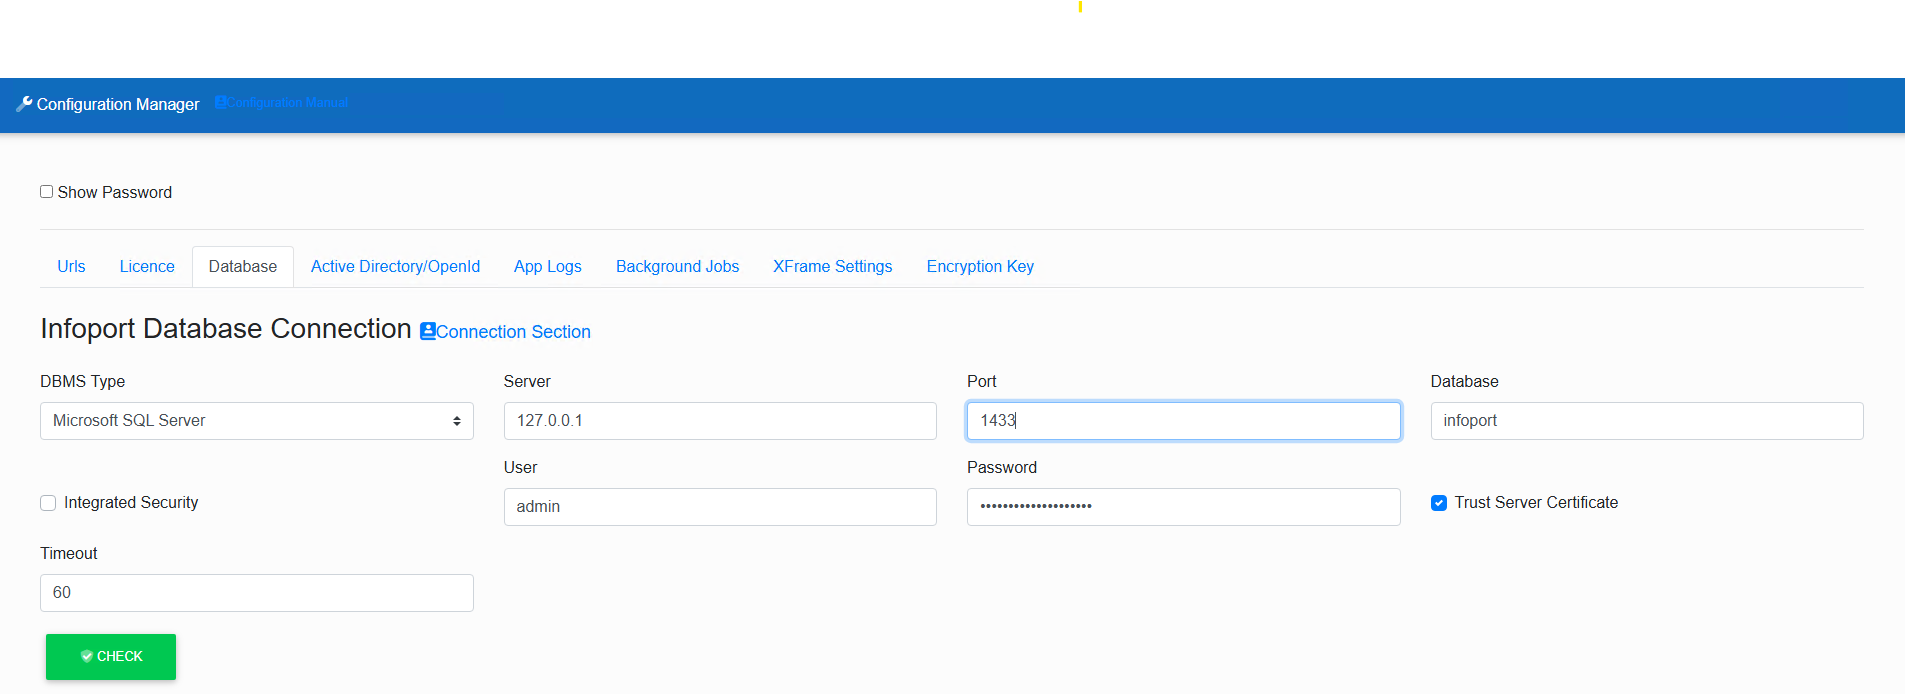
For EaInfoport version 8.8.0 and higher for the MSSQL database it is necessary to have a verified certificate.
In case of test versions, the requirement for this certificate can be disabled by setting:
Configuration Manager>Databases>Trust Server Certificate
If the configuration is not possible (Infoport will not start) then this can be set manually in appsetting.json by adding the parameter "TrustServerCertificate=True;" to the Connection string.
The setting must also be added to >Manage Repository>edit> EA Database Connection (this is not ODBC!) to all existing repositories.
If necessary, contact the helpdesk .
# Application Configuration
# Application Configuration Settings
This chapter describes only the parameters that are typically edited during installation.
Before starting the application, make sure that no application is communicating on port 80.
After starting the application, the Configuration Manager is displayed, which needs to be filled in.
[](https://doc.eainfoport.cz/uploads/images/gallery/2022-04/1-infoport.png)
[](https://doc.eainfoport.cz/uploads/images/gallery/2022-05/nV0xt4ad.png)
[](https://doc.eainfoport.cz/uploads/images/gallery/2022-03/3-environment-0.png)
# Infoport Connection Settings
In this section, we configure the portal's access to the database with its metadata. (We created it in step 3.4.8.) It is necessary to have a prepared database user with permissions for reading/writing/creating DB objects.
If an MSSQL database with integrated security is used, it is not necessary to fill in a UserId or Password. However, it is necessary to have an established user in the database, under which the portal (and therefore also EA) is run.
InfoportConnection\_MySql": "Server=127.0.0.1;port=3306;Database=ipInitData;Uid=Admin;Pwd=xxxxx;"
- DBMS: The parameter name must be the same (InfoportConnection), suffix of this parameter differs according to the used db: \_MySQL / \_SQLServer / \_Oracle / etc..
- Server: Name or IP address of the server.
- Port: The port on which the DB is listening (optional parameter).
- Database: The name of the database in which the portal metadata is stored.
- Name: The name of the database user.
- Password: Database user password.
- Timeout: Time for which the query takes place. In a large database, this may take longer than a minute, so set a minimum of 90 for large databases. ("Timeout": 90)
- Maximum Dcom Instances: 2 – MaximumDcomInstances indicates the maximum number of DCOMs for each running EaInfoport server. The default value (if nothing specified) is 2. If a user does not wish to terminate DCOMs, then he/she should set a very high number (for example 99). If the maximum number of DCOMs is exceeded, the server will kill them all and start a fresh one. The check is done at startup, as well as at regular intervals set in Background / Seconds.
- If DCOM is turned off in the task manager, EAInfoportT3 will turn it back on in a moment
[](https://doc.eainfoport.cz/uploads/images/gallery/2022-04/infoport-database.png)
Fill in the database schema (**this is not the Enterprise Architect repository schema, but the schema for EAInfoport metadata**). The **database schema must be empty** and only for EAInfoportT3 purposes. After filling in the appropriate tab, the user clicks the "Check" button, if the tab lights up red, any errors need to be corrected. If it lights up green, the tab has been filled in correctly.
# Running EaInfoportT3
In the EAInfoportT3 directory, run the EaInfoportT3.exe file.
After the application starts (it may take a few minutes), verify the correct operation of the application by entering the url set above in the browser.
Follow this procedure and run EaInfoportT3.exe. Running multiple instances of the portal: Running multiple instances of the portal on one server can be set by simply copying the EAInfoportT3 folder, configuring each folder according to this procedure and running EaInfoportT3.exe.
The administrator logs in for the first time using the login credentials:
Username: admin
Password: P@ssw0rd
We recommend changing your password after the first login!
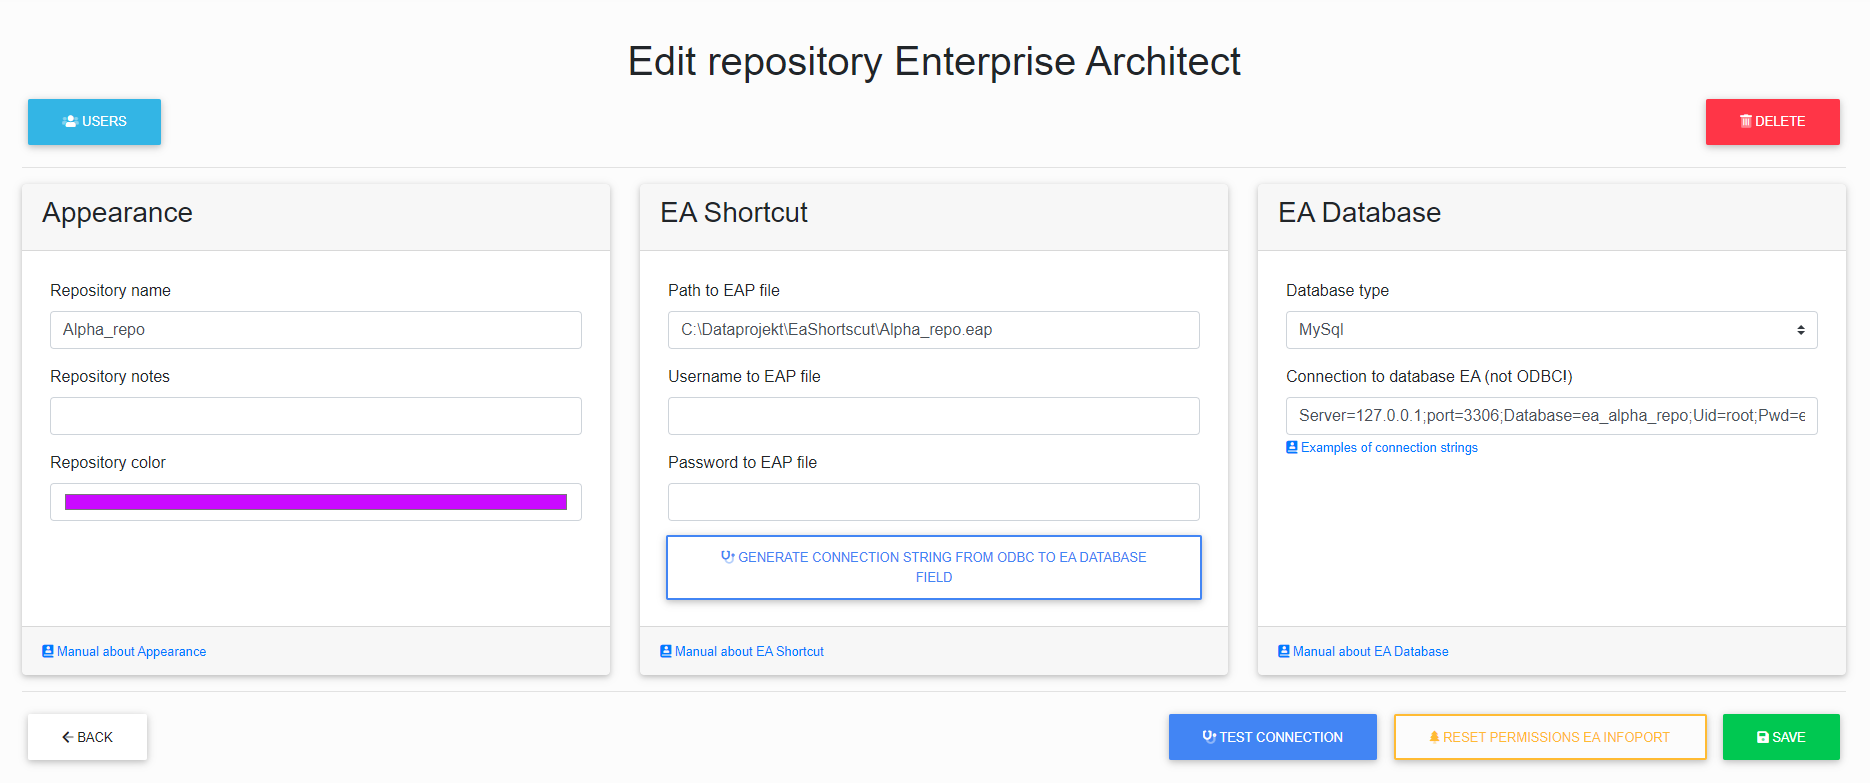
# Creating and editing a repository
[](https://doc.eainfoport.cz/uploads/images/gallery/2022-10/image-1665490942165.png)
- [Appearance](https://doc.eainfoport.cz/books/installation-manual/page/appearance)
- [EA Shortcut](https://doc.eainfoport.cz/books/installation-manual/page/ea-shortcut)
- [EA Database](https://doc.eainfoport.cz/books/installation-manual/page/ea-database)
- [Examples of Connection Strings](https://doc.eainfoport.cz/books/installation-manual/page/examples-of-connection-strings)
# Appearance
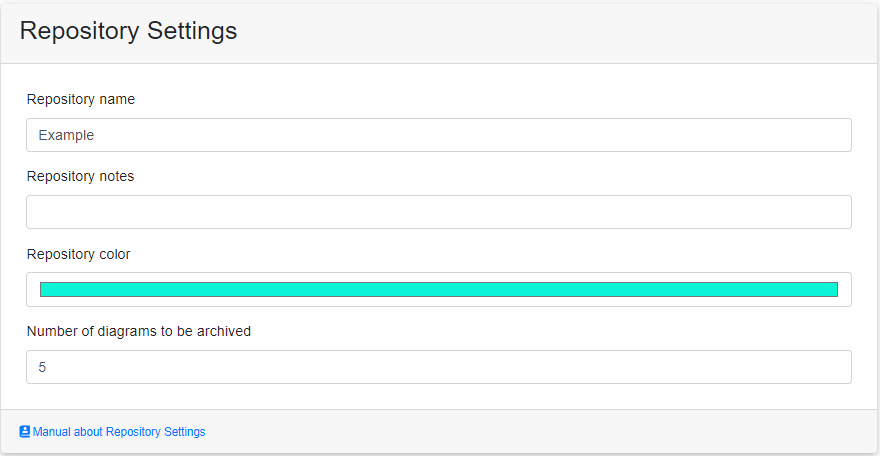
Just fill in the title, description and choose a color. (Name is a required field).
[Number of diagrams to be archived](https://doc.eainfoport.cz/books/user-manual/page/archiving-of-diagrams)
[](https://doc.eainfoport.cz/uploads/images/gallery/2023-08/snimek-obrazovky-2023-08-22-111227.png)
This configuration is reflected when switching between repositories or in repository lists.
[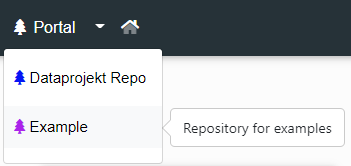](https://doc.eainfoport.cz/uploads/images/gallery/2022-04/2dUobrazek2.png)
# EA Shortcut
***To create a shortcut, you must have Enterprise Architect installed and be connected to the EA repository.***
If we have managed to connect to the repository and have an open project, click on the EA icon in the upper left corner [](https://doc.eainfoport.cz/uploads/images/gallery/2022-04/ea.png)
[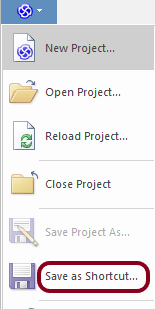](https://doc.eainfoport.cz/uploads/images/gallery/2022-04/ea1.png)
Click on ***Save as Shortcut***... select the path and click OK.
(we recommend saving the path to your history clipboard using ctrl+c and opening the file beforehand to see if it redirects you to the repository)
[](https://doc.eainfoport.cz/uploads/images/gallery/2022-04/project.png)
Now, in the EA Shortcut configuration, enter the path to the EAP file and the user with the password to the repository, if security is enabled. The generate button is optional.
[](https://doc.eainfoport.cz/uploads/images/gallery/2022-04/shortcut.png)
(If your EA database is MySQL or PostgreSQL, you use ODBC to connect to EA. You can use the blue bordered button to generate a connection string to your database).
# EA Database
Choose the type of database in which the EAP is connected using EA and write its connection string.
[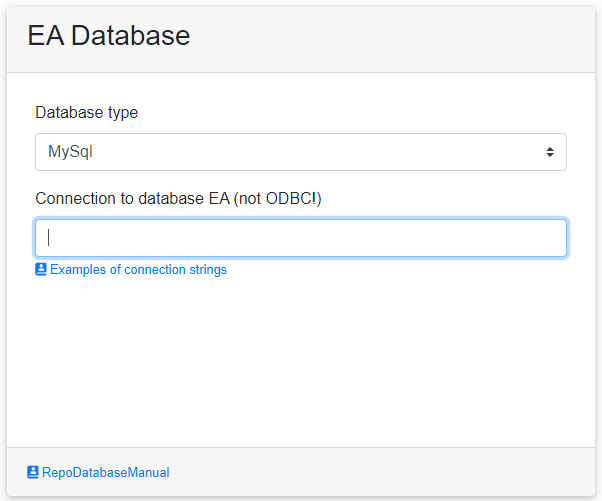](https://doc.eainfoport.cz/uploads/images/gallery/2022-04/database-0.png)
If you have filled in all the details, you can select the test connection and save button.
[](https://doc.eainfoport.cz/uploads/images/gallery/2022-04/conn.png)
[](https://doc.eainfoport.cz/uploads/images/gallery/2022-04/save.png)
- - - - - -
The "*Reset Permissions Ea Infoport* " button resets all permission settings on the packages.
[](https://doc.eainfoport.cz/uploads/images/gallery/2022-10/image-1665490962905.png)
# Examples of Connection Strings
# Known Startup Errors
The following errors may occur when running EaInfoportT3:
- Untrusted zip error
[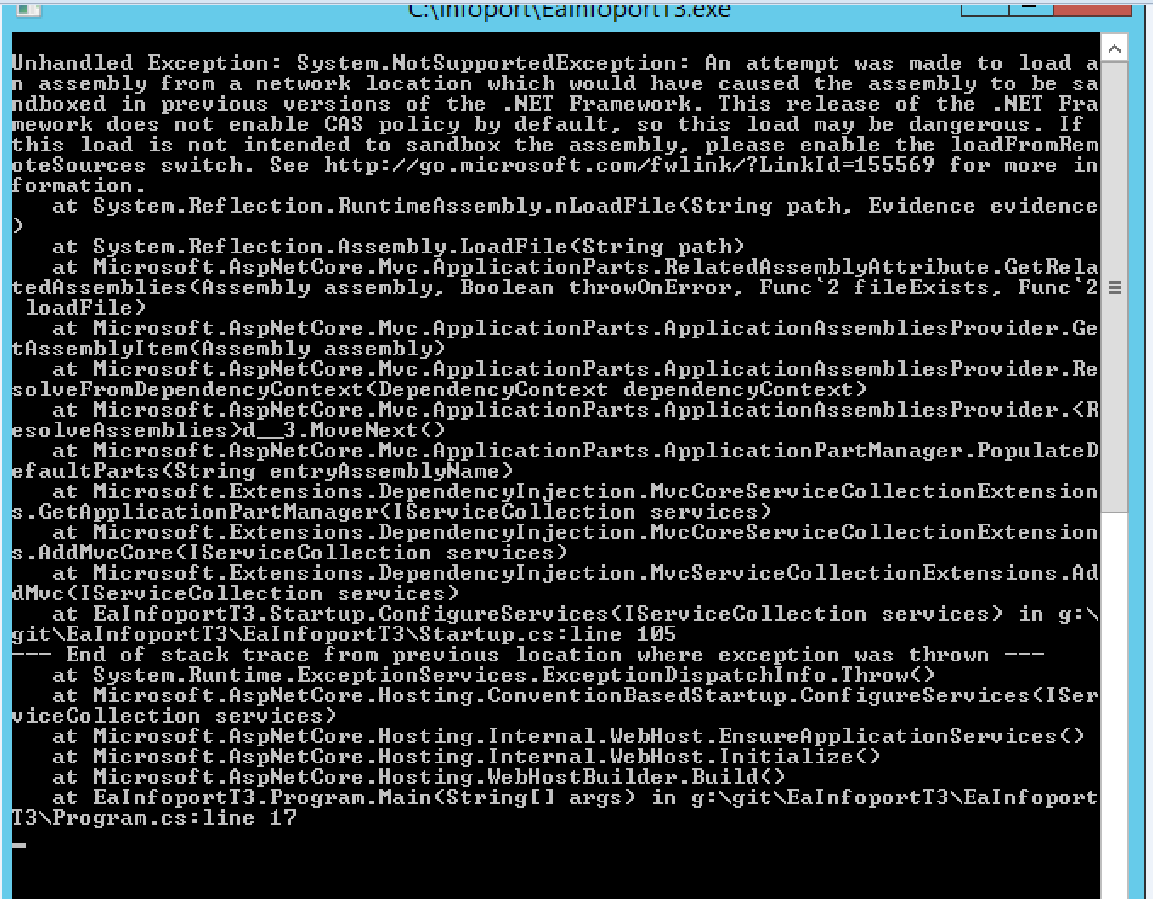](https://doc.eainfoport.cz/uploads/images/gallery/2022-03/zname-chyby.png)
If a user sees this error after running **EaInfoportT3.exe**, either in the log or in the console, it means that the server considers the downloaded EaInfoportT3\_Delivery.zip to be untrusted. The repair will be performed as shown below.
[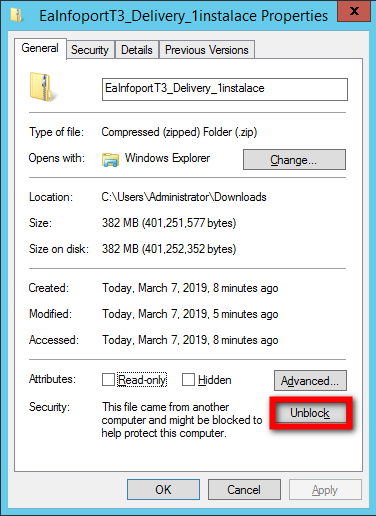](https://doc.eainfoport.cz/uploads/images/gallery/2022-03/zname-chyby-1.png)
The user right-clicks on EaInfoportT3\_Delivery.zip and calls up the properties. In the “*General*” > Security tab then click on the “*Unblock*” button and unzip the corresponding .zip again – the error should be resolved.
- Another error is related to the EaInfoportT3 database language – it must be created in utf8\_general\_ci
If it is created in a wrong language, an error containing the following characters is displayed in the console: *Incorrect string value: '\\xC5\\x98\\xC3\\xA1de...'*
- FIPSPolicy error
**Error form:** \[ERR\] An unhandled exception has occurred while executing the request.
System.Reflection.TargetInvocationException: Exception has been thrown by the target of an invocation. ---> System.InvalidOperationException: This implementation is not part of the Windows Platform FIPS validated cryptographic algorithms.
at System.Security.Cryptography.MD5CryptoServiceProvider..ctor()
**Fix:** The following lines must be added to EaInfoportT3.exe.config.
<configuration>
<runtime>
<!-- below tag will disable security policy checking for FIPS -->
<enforceFIPSPolicy enabled="false"/>
</runtime>
</configuration>
# Settings of the scopes
EaInfoportT3 has a new functionality that allows globally filtering the tree based on „proprety Scope“.
It is possible to determine the visibility of attributes, operations or elements.
The repository manager will find the settings below in the "Repository Management" section → "Repository Detail“
Here is a newly added section of filters in which you can set the visibility of artifacts in the repository tree.
[](https://doc.eainfoport.cz/uploads/images/gallery/2023-03/4.png)
# Connecting EaInfoport to Azure EntraID
- First, you need to register the EaInfoport application in Azure. This is done in the "App registration" service.
[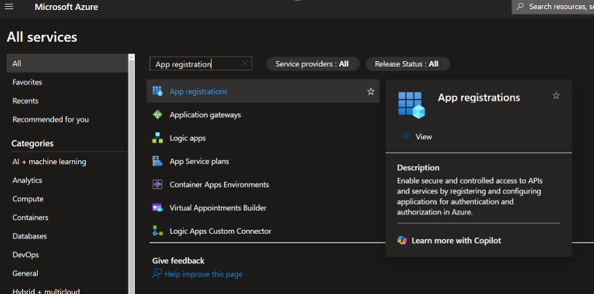](https://doc.eainfoport.cz/uploads/images/gallery/2025-03/image-1740998580817.png)
[](https://doc.eainfoport.cz/uploads/images/gallery/2025-03/image-1740998736037.png)
- by clicking "New registration"
- In the registration process, you only need to fill in the "Name" (for example "Infoport") and complete the registration with the "Register" button.
[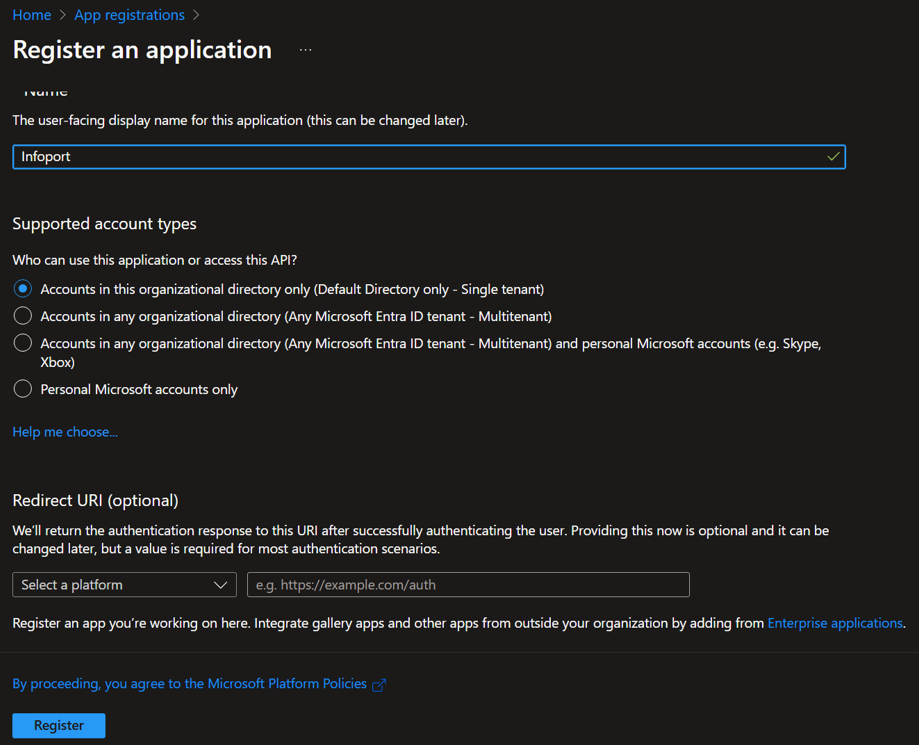](https://doc.eainfoport.cz/uploads/images/gallery/2025-03/image-1740998852520.png)
- Basic information about the registered application is displayed as a confirmation.
- The most important information here is the "Application (client) ID". We will enter this information in the Infoport configuration manager under "Client ID" (see later).
[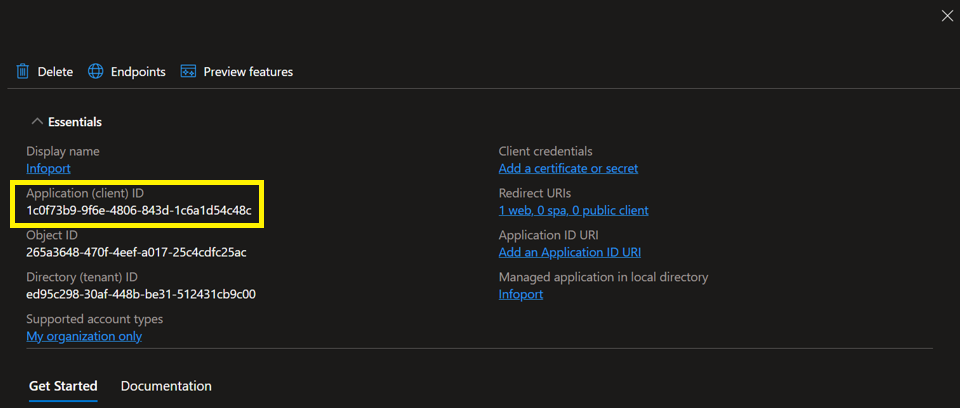](https://doc.eainfoport.cz/uploads/images/gallery/2025-03/image-1740999007680.png)
- If we now go back to the list of registered applications we will see "Infoport" among them (sometimes we need to use the "Refresh" button).
- You can also see the "Application (client) ID" as the primary identifier of the application, which unlike Name cannot be changed after registration.
[](https://doc.eainfoport.cz/uploads/images/gallery/2025-03/image-1740999212412.png)
- Nyní budeme pokračovat v konfiguraci zaregistrované aplikace Infoport tím, že se proklikneme (skrz jméno Infoport) do detailu.
- Zde v menu vybereme „Manage“ a následně „Authentication“.
[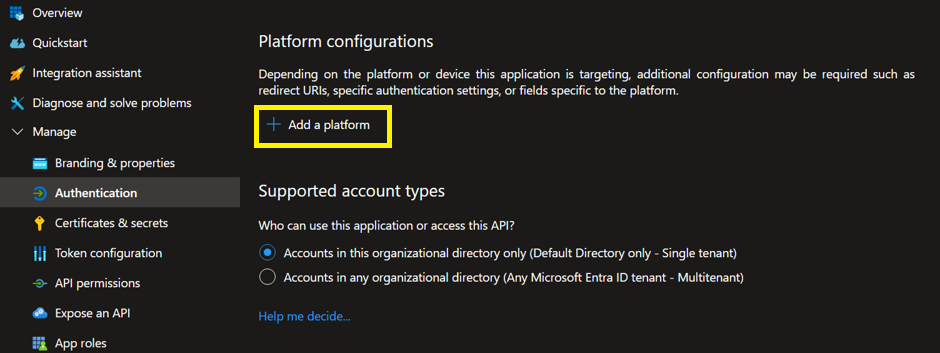](https://doc.eainfoport.cz/uploads/images/gallery/2025-03/image-1741008224488.png)
- The first thing to do is to add the Infoport application platform using the "Add aplatform" button by selecting "Web" from the menu.
[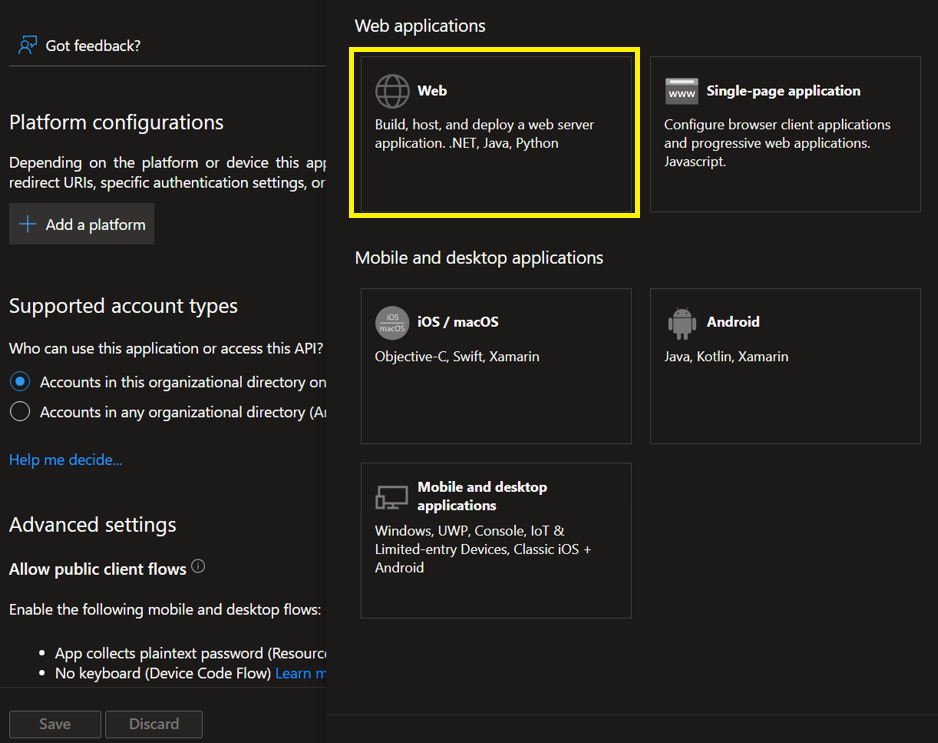](https://doc.eainfoport.cz/uploads/images/gallery/2025-03/image-1741008348517.png)
- Azure then asks you to fill in information about two URLs.
- The first of these "Redirect URIs" is the url of the Infoport application where the user will be redirected after logging in with the EntraID.
- Fill in the URI consisting of the server address (where we have Infoport running - in the example it is "http://localhost") and the fixed path "/signin-oidc".
- The second is the "Front-channel logout URL" and is the url of the Infoport application that will be called after the user logs out using single sign-out.
- Fill in the url here consisting of the server address (note: https must be used here) and the fixed path "/Account/Logout".
- It is very important to check the option "ID tokens (used for implicit and hybrid flows)", which selects what type of token will be sent to Infoport after successful authentication in EntraID.
- Confirm the configuration with the "Configure" button.
[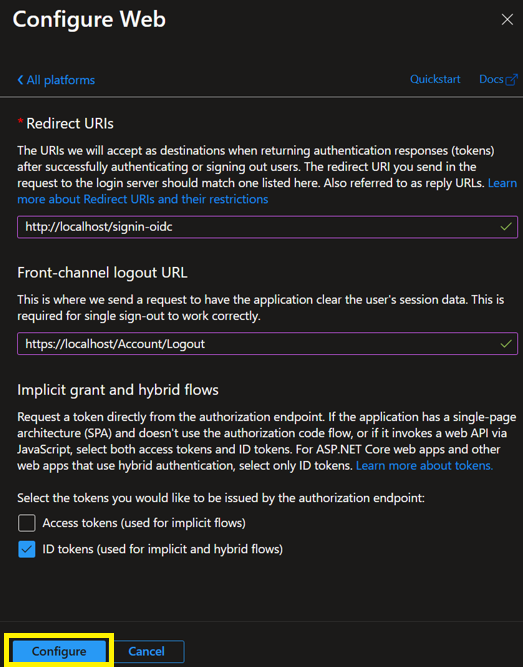](https://doc.eainfoport.cz/uploads/images/gallery/2025-03/image-1741009288949.png)
- The following is the "Certificates & secrets" setting.
[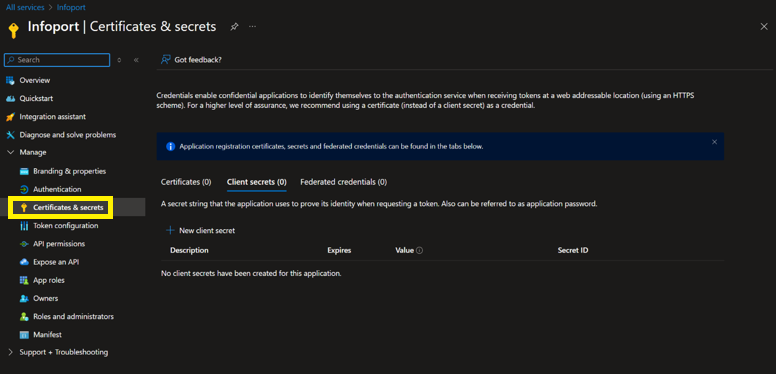](https://doc.eainfoport.cz/uploads/images/gallery/2025-03/image-1741009526009.png)
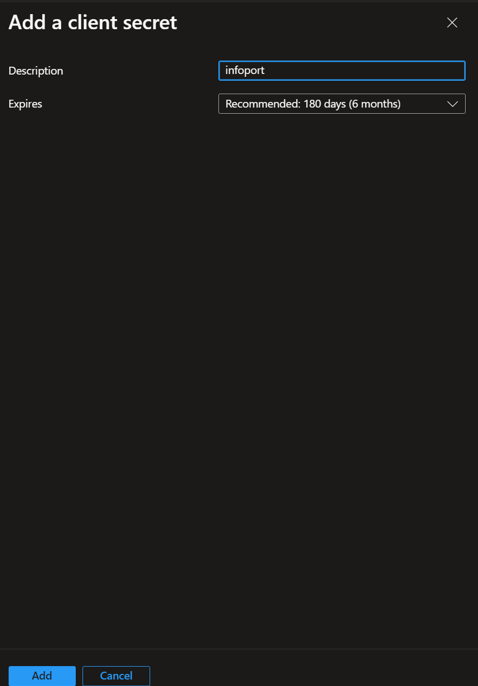
- Use the "New client secrets" button to add a new "client secret" with the desired expiration date.
[](https://doc.eainfoport.cz/uploads/images/gallery/2025-03/image-1741009620257.png)
**Note:** the value is available for copying (in the Value column) only immediately after the Client Secret is created. If it is not copied immediately, a new Client secret must be created. This will be entered in the Infoport configuration manager under "Client Secret" (see later).