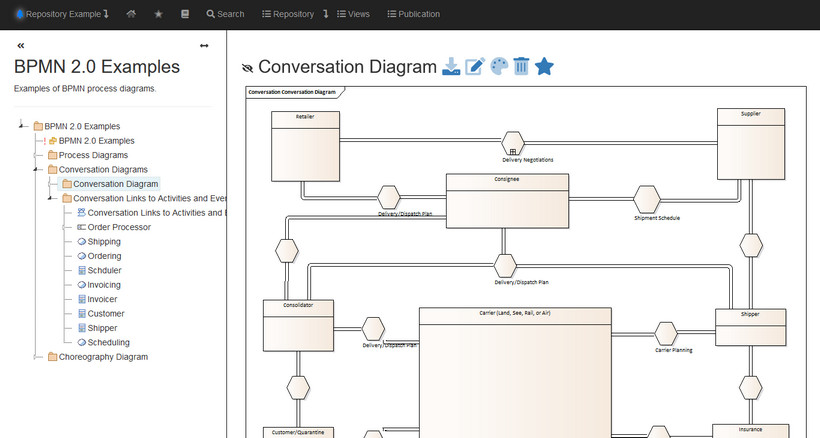
User Manual
This user manual describes an EA Infoport from user point of view. Includes description of application features. The screen shots can slightly differs depends on particular application version.
- Login to the app
- Login with a user account
- Login with Active Directory
- Login with a Visitor Account
- Initial login by administrator
- Basic Description of the User Interface
- Logout of the Application
- Management of Own User Account
- User Settings
- Selection of Preferred Language
- Changing the Password
- Overview of notification subscriptions
- Bookmarks - favorites
- Glossary
- Full-text Search
- Search
- Simple search
- Advanced search
- EA Path search
- GUID search
- Diagram search
- Recently Discussed Elements
- Recent Maintenance
- Repository (Repository Browser)
- Permissions to parts of the repository
- Repository View
- Basic Description of the Repository User Interface
- Tree Repository
- Hiding the Repository Tree
- Turning repository tree editing on/off
- Manipulating the tree repository
- Internal artifacts
- Clone
- Create a view
- Export/Import XMI
- Slider between the Repository Tree and the Detail
- Description of commands in the context menu
- Full Screen
- Find in the Repository Browser
- Copy URL
- Copy EA Address
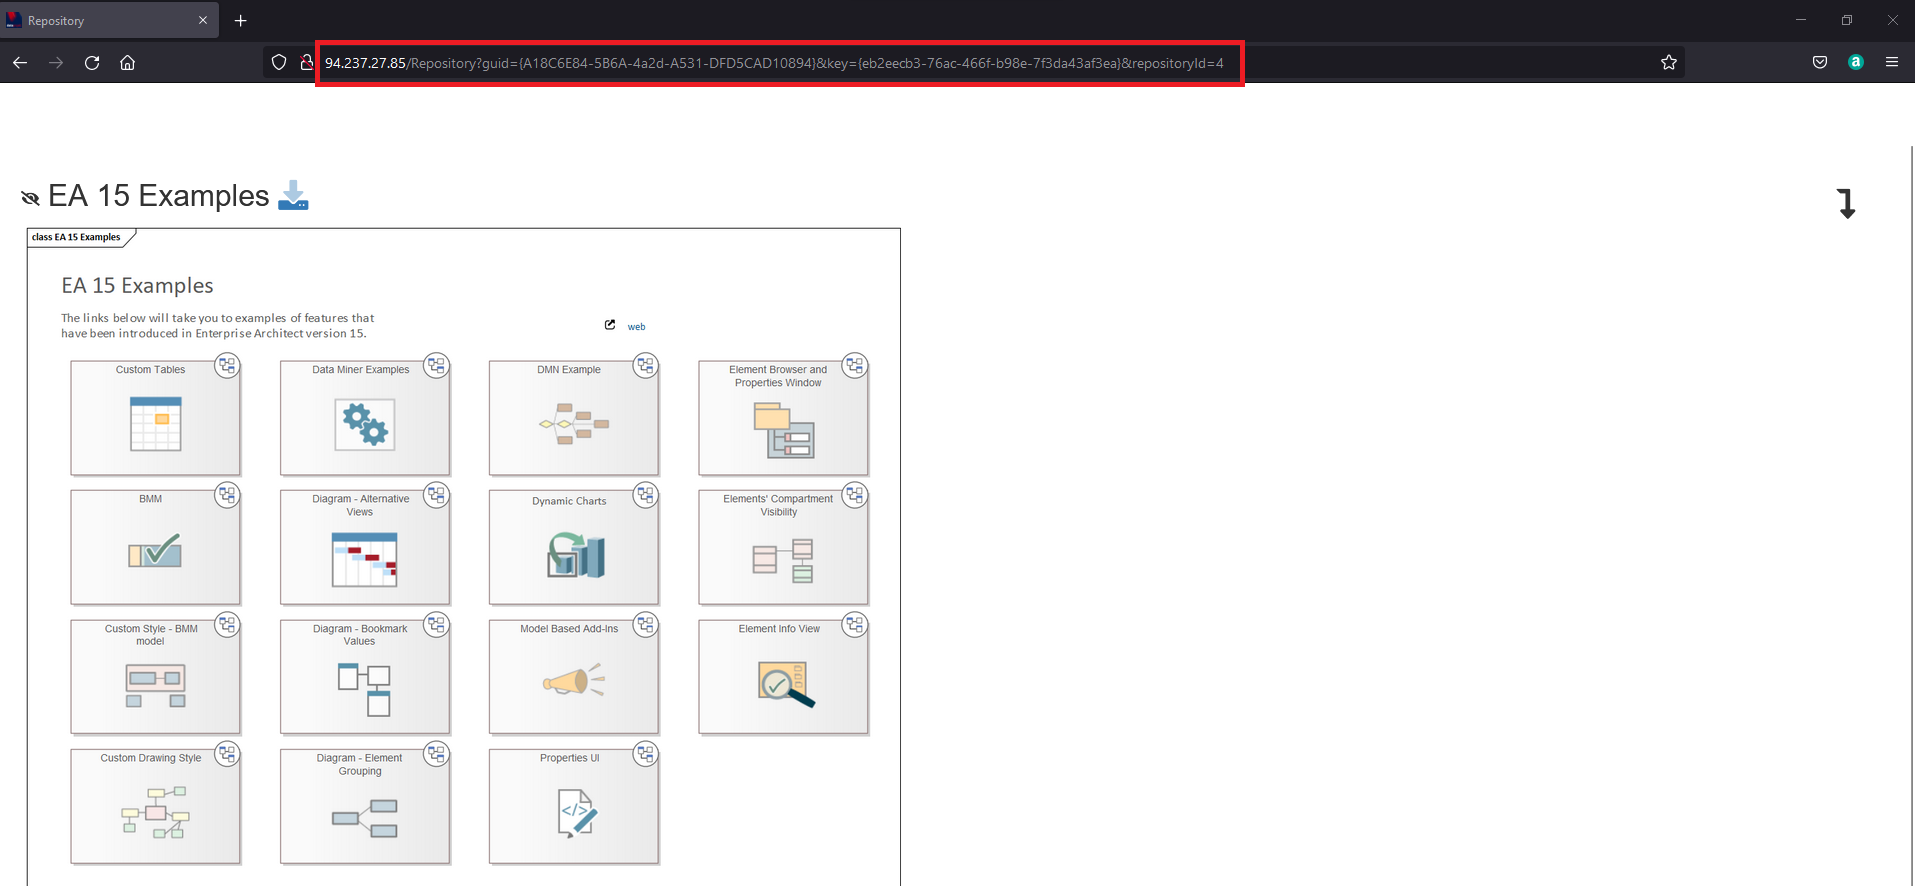
- URL for Direct Access
- Forced Refresh
- Zoom
- Zoom in
- Zoom out
- Reset Diagram Zoom
- Reset Diagram Position
- Elements in the Diagram
- Hiding Text Information in Element Detail
- Information about the repository
- Icons on Artefacts
- Detail elementu / package / diagramu
- Discussion (comments) in packages, diagrams, elements
- Setting of Dynamic Detail
- Setting of Dynamic Detail for Users
- Setting of Dynamic Detail for Groups
- Setting of Dynamic Detail for Repository
- Repository Tree Filter
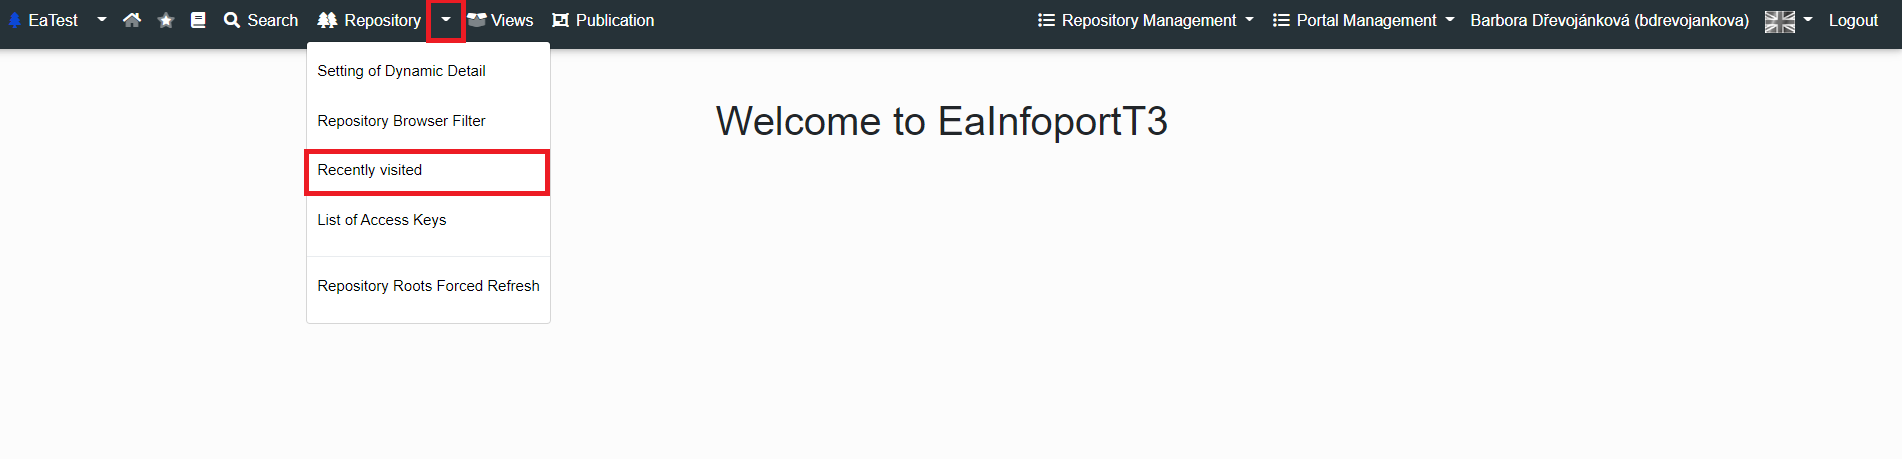
- Recently visited
- List of Access Keys
- Repository Roots Forced Refresh
- Setting the notification interval for diagram subscribers
- Permissions to parts of the repository - default settings
- Dynamic detail - tagged values
- Archiving of diagrams
- Sharing images
- Tagged values - Enum
- Recently visited
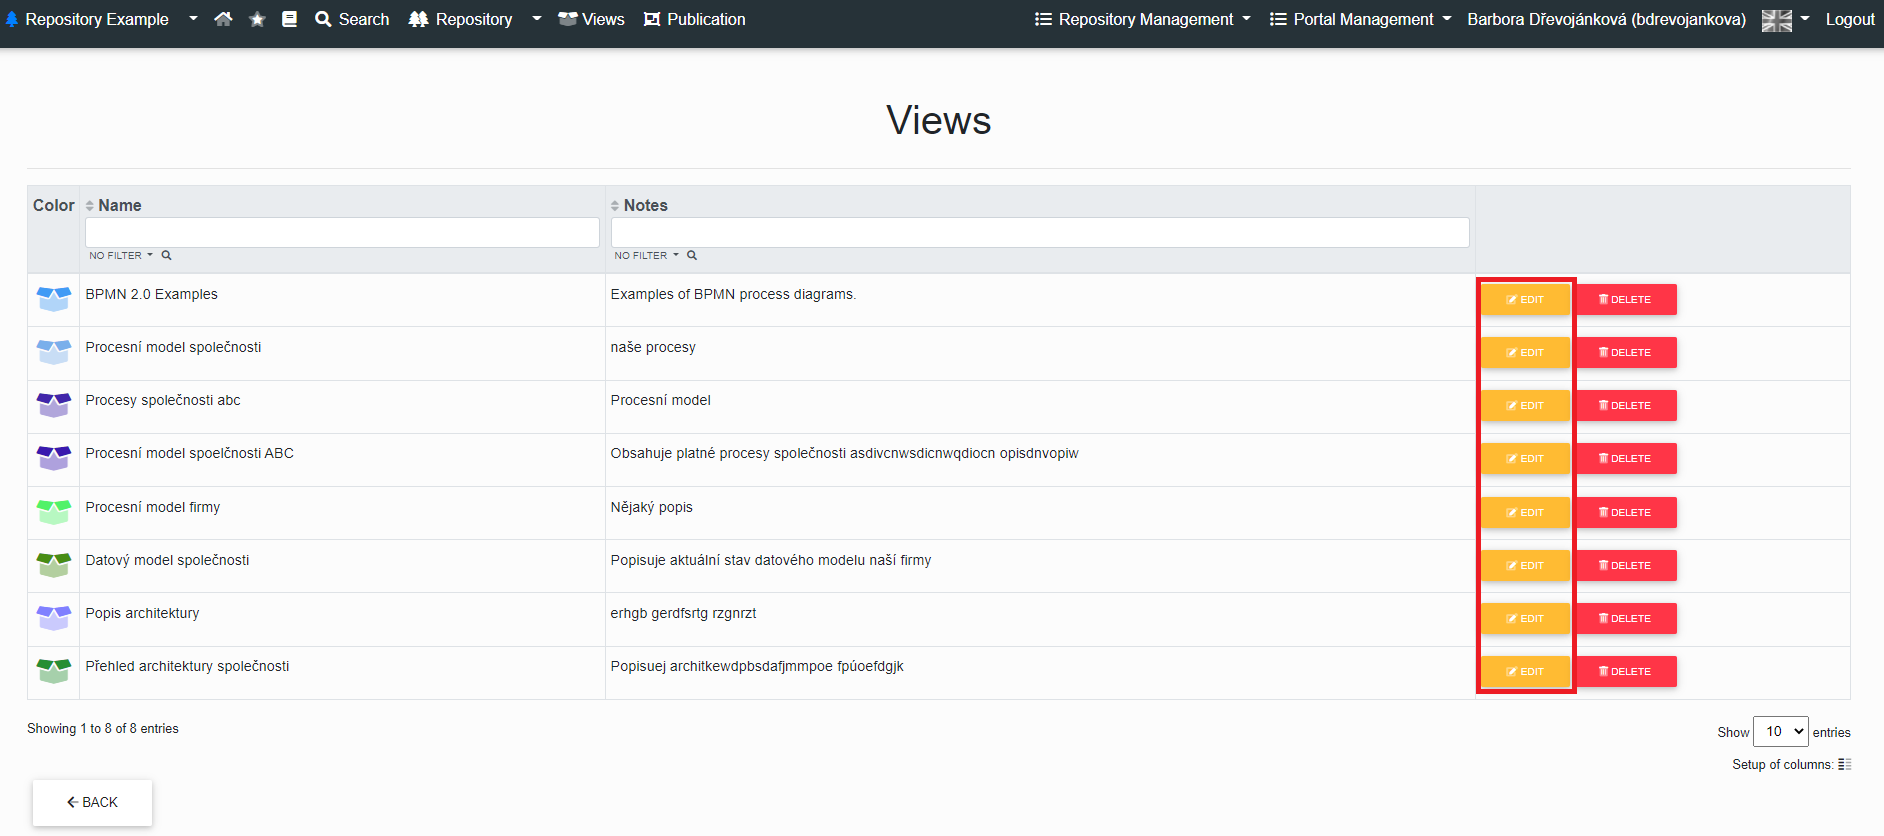
- Views
- Creating a View
- Editing and deleting a view
- Default diagram settings
- Access to views
- Reorder in views
- Publication
- Sections
- Publication Module Structure
- Move the section
- Creating a Section
- Edit a Section
- Delete a Section
- Publication statuses
- Publishing a Diagram
- Approval of Publications
- Historisation of Published Diagrams
- Logging Changes in a Publication
- Historical Publication
- Setting default section rights
- Rights in the publishing module
- Setting user and group permissions
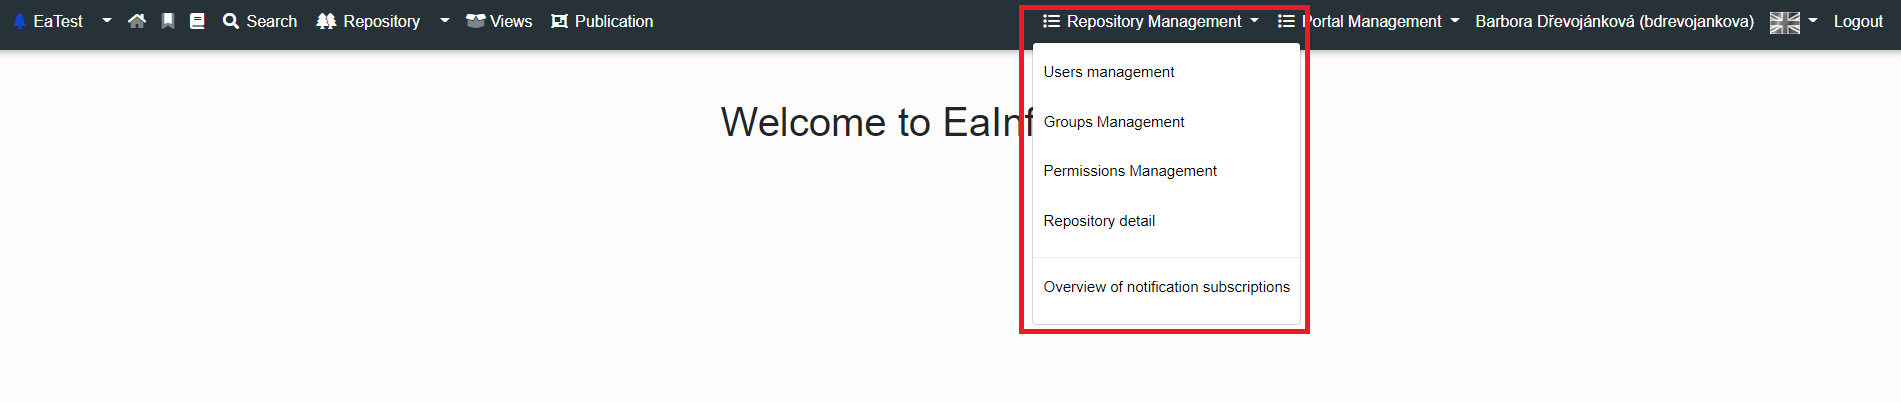
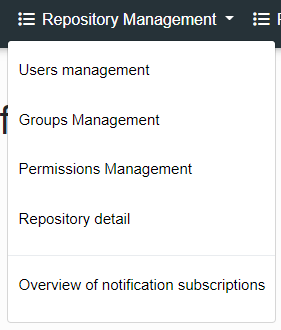
- Repository Management
- Repository Management
- User Management
- Creating a New User
- Assigning Groups to a User
- Assigning Permissions to a User
- Edit a User
- Remove a User
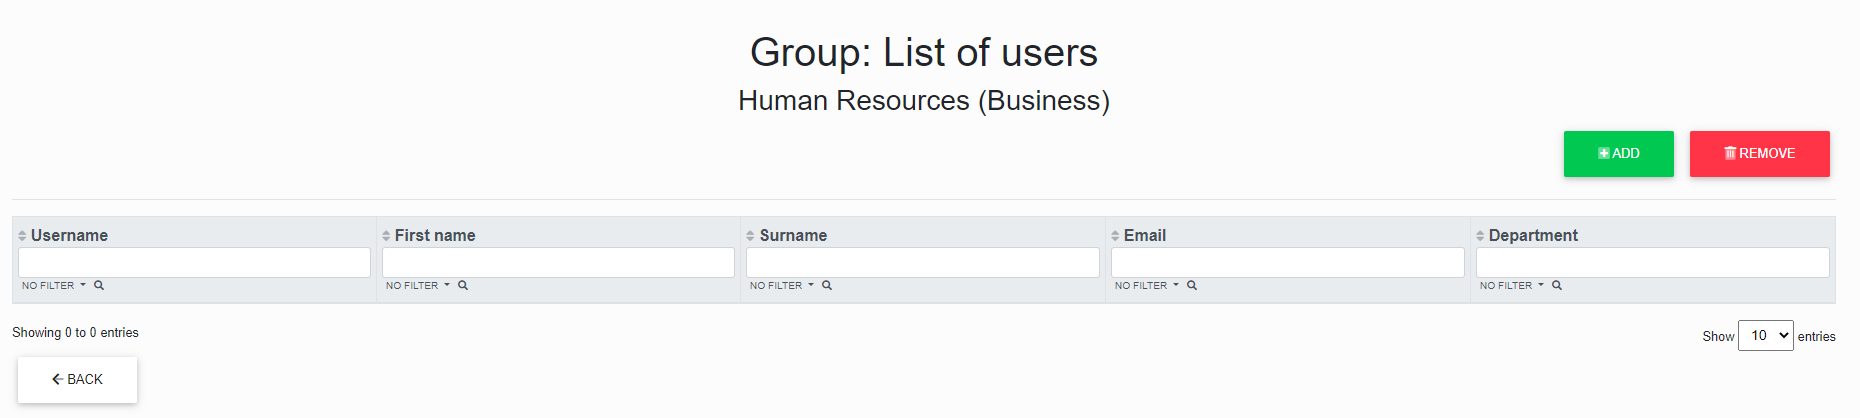
- Group Management
- Creating a New Group
- Assigning Users to a Group
- Assigning Permissions to a Group
- Edit a Group
- Delete a Group
- Permission Management
- Assigning Permissions to Groups
- Assigning Permissions to Users
- Repository Detail
- Overview of notification subscriptions
- Archive repository
- Repository password encryption
- Portal Management
- Portal Management
- User Management
- Creating a new user in the portal
- Edit users in the portal
- Removing a user from the portal
- Permissions to a user in the portal
- Assigning permissions to a user in the portal
- Removing permissions from a user in the portal
- List of Repositories and Repository permissions
- Assignment Repository and Repository permissions to a user in the portal
- Removing Repositories and Repository permissions from a user in the portal
- List of Deleted Users
- Permissions Management
- Assigning Portal Permissions to a user
- Remove Portal Permissions from a user
- Repositories Management
- Active Directory Management
- Configuration Manager
- Statistics
- Overview of notification subscriptions
- Login of a user who does not have an OpenID group assigned
- Login of a user who does not have an Active Directory group assigned
- Audit Logs
- Access Tokens
- List of Access Keys
- Creating an access key
- Transfer of access keys
- To remove an access key
- Access tokens of deleted users
- Transferring Access Tokens of Deleted Users
- List of public diagrams
- Permissions - Access to publish public keys (permalinks)
- Permissions on the package
- Permissions to parts of the repository
- Default settings
- User/group role specifications
- Owner
- Setting permissions on package
- Authorization if the user is a member of two groups with different permissions
- Pool/Lanes
- Detail in the element
Login to the app
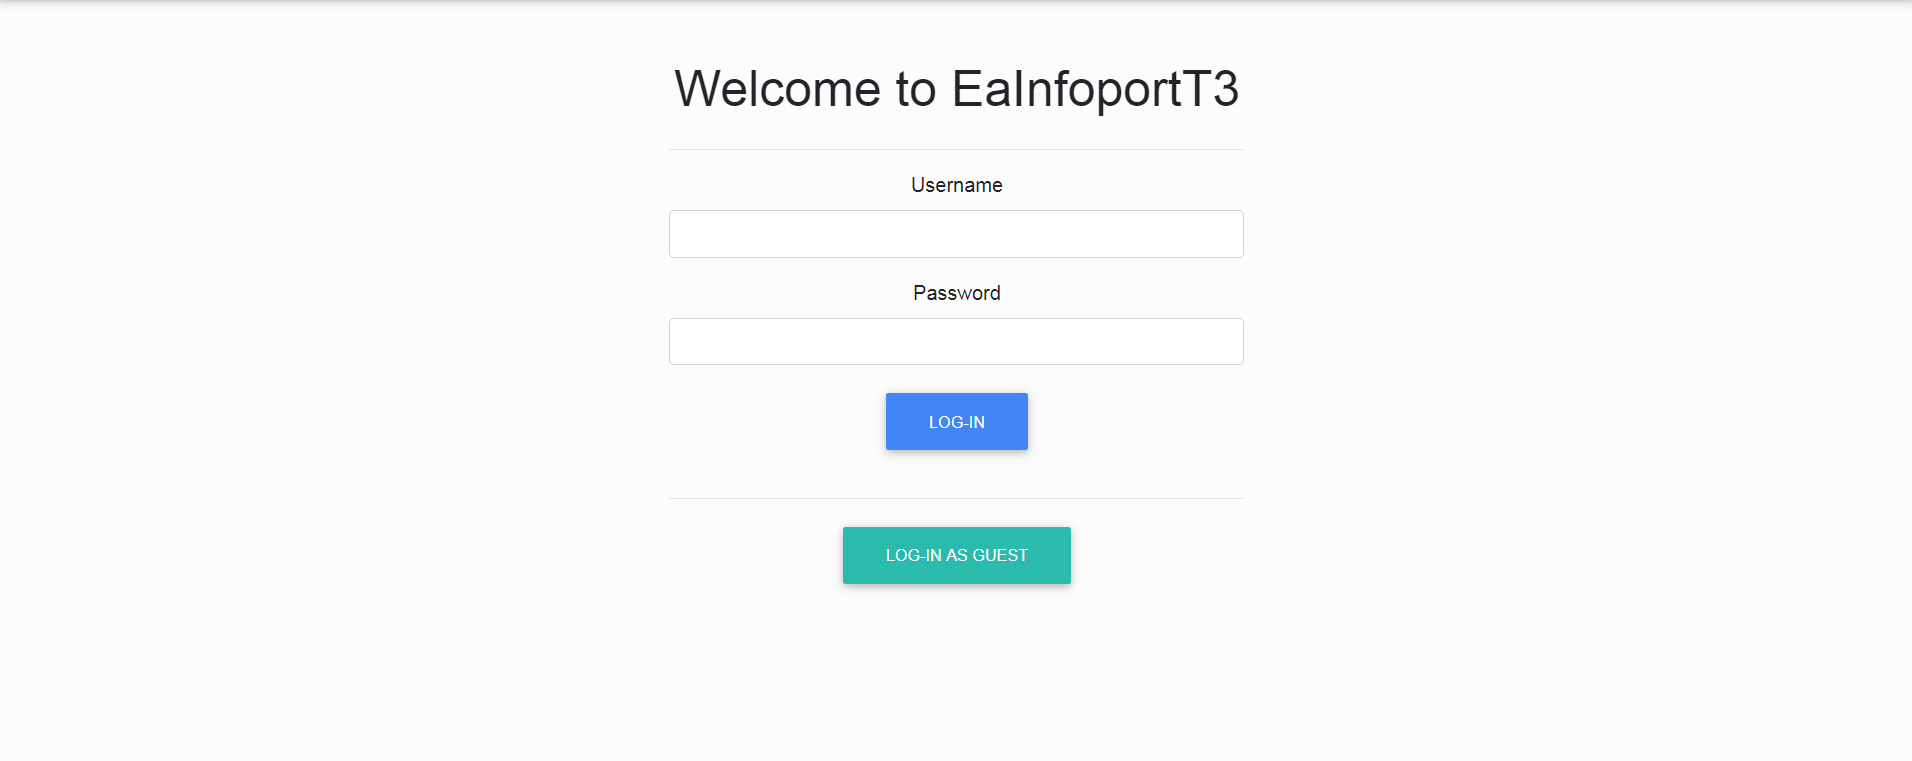
This chapter describes the options for logging into EaInfoportT3. The portal supports several login methods, which are described in the following chapters. Login can be manual (for example, using a user account or a visitor account) or automatic (in the background), using Active Directory. A user can log in to the application using their login credentials, or as a visitor (the visitor function will be described later in this manual).
Login with a user account
In order for a user to log in with a user account (i.e., a username and password), the user must first be set up with an account by the portal administrator, or by the administrator of the individual repositories.
Note that the portal user accounts are separate from the Enterprise Architect repository user accounts.
In other words, a portal user does not have to have an account in the Enterprise Architect repository and vice versa.
If a user wants to log in with his or her account, he or she uses the username and password assigned by the administrator.
He fills in these details in the corresponding fields and presses the login button.
If the user succeeds in logging in, the application home page with the main menu is displayed.

The design of the main user interface may vary depending on the permissions that the user has set.
However, at a minimum, the following items will always be available:
- Setting up the user's own account
- User logout

The meaning of these items will be explained later in this manual.
Login with Active Directory
In addition to logging in with a username and password, EaInfoportT3 supports login via AD/LDAP.
- If EaInfoportT3 is configured via AD/LDAP, the user does not enter a username and password but is logged in in the background. The login form (with fields for entering your name and password) will therefore not be displayed at all. Instead, it will display the introductory page with the main menu (similar to the situation after logging in with the name and password, see the relevant chapter).
- In order to successfully log into EaInfoportT3, the user must be created in EaInfoportT3 in the user management with the same username as in Windows.
Attention: If a user logs in incorrectly several times (depending on the domain policy settings), he/she may consequently block access to Windows.
Login with a Visitor Account
Administrators of individual repositories can allow access to their repositories using a Visitor Account.
This technical account does not require a username and password to log in when using it.
The repository administrator can set which data a user can see in the repository and which functionalities to use when logged in under this account. He/she can also turn off this account completely.
The visitor account is, in fact, a shared technical account and as such has some limitations:
- A user logged in under this account cannot change personal data in the user settings, i.e. username, email, name and department.
- The password for this account cannot be changed.
- This account cannot be set as the owner.
Initial login by administrator
The administrator logs in for the first time using the login credentials:
Username: admin
Password: P@ssw0rd
We recommend changing your password after the first login!
Basic Description of the User Interface
The basic concept of the user interface consists of several basic elements, which will be described in this chapter.
User interface description
Once the user successfully logs in, the following screen will be displayed:
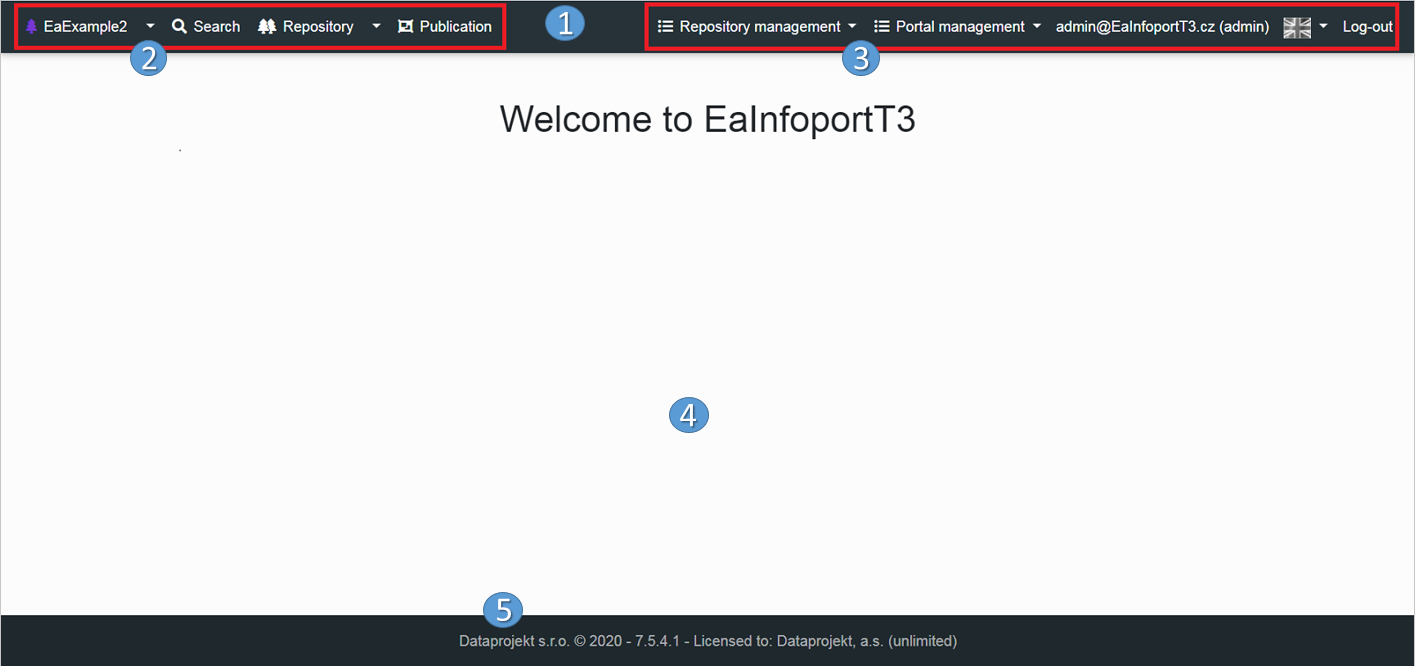
This screen consists of several sections:
The individual elements of the basic user screen will be further described in this document, within the related functionalities.
Logout of the Application
The user can log out of the application manually or can be logged out automatically due to inactivity.
Manual Logout
The user can log out by clicking on the “Logout” button (Depending on the application language setting).
The user will find this button in the right part of the main menu.

After logging out, he/she is redirected back to the login screen.
Automatic Logout
Automatic logout occurs if the user is idle in the portal for a certain period of time.
This period of time depends on the specific settings of the portal.
After automatic logout, the user is (after another click) redirected to the homepage of the Infoport.

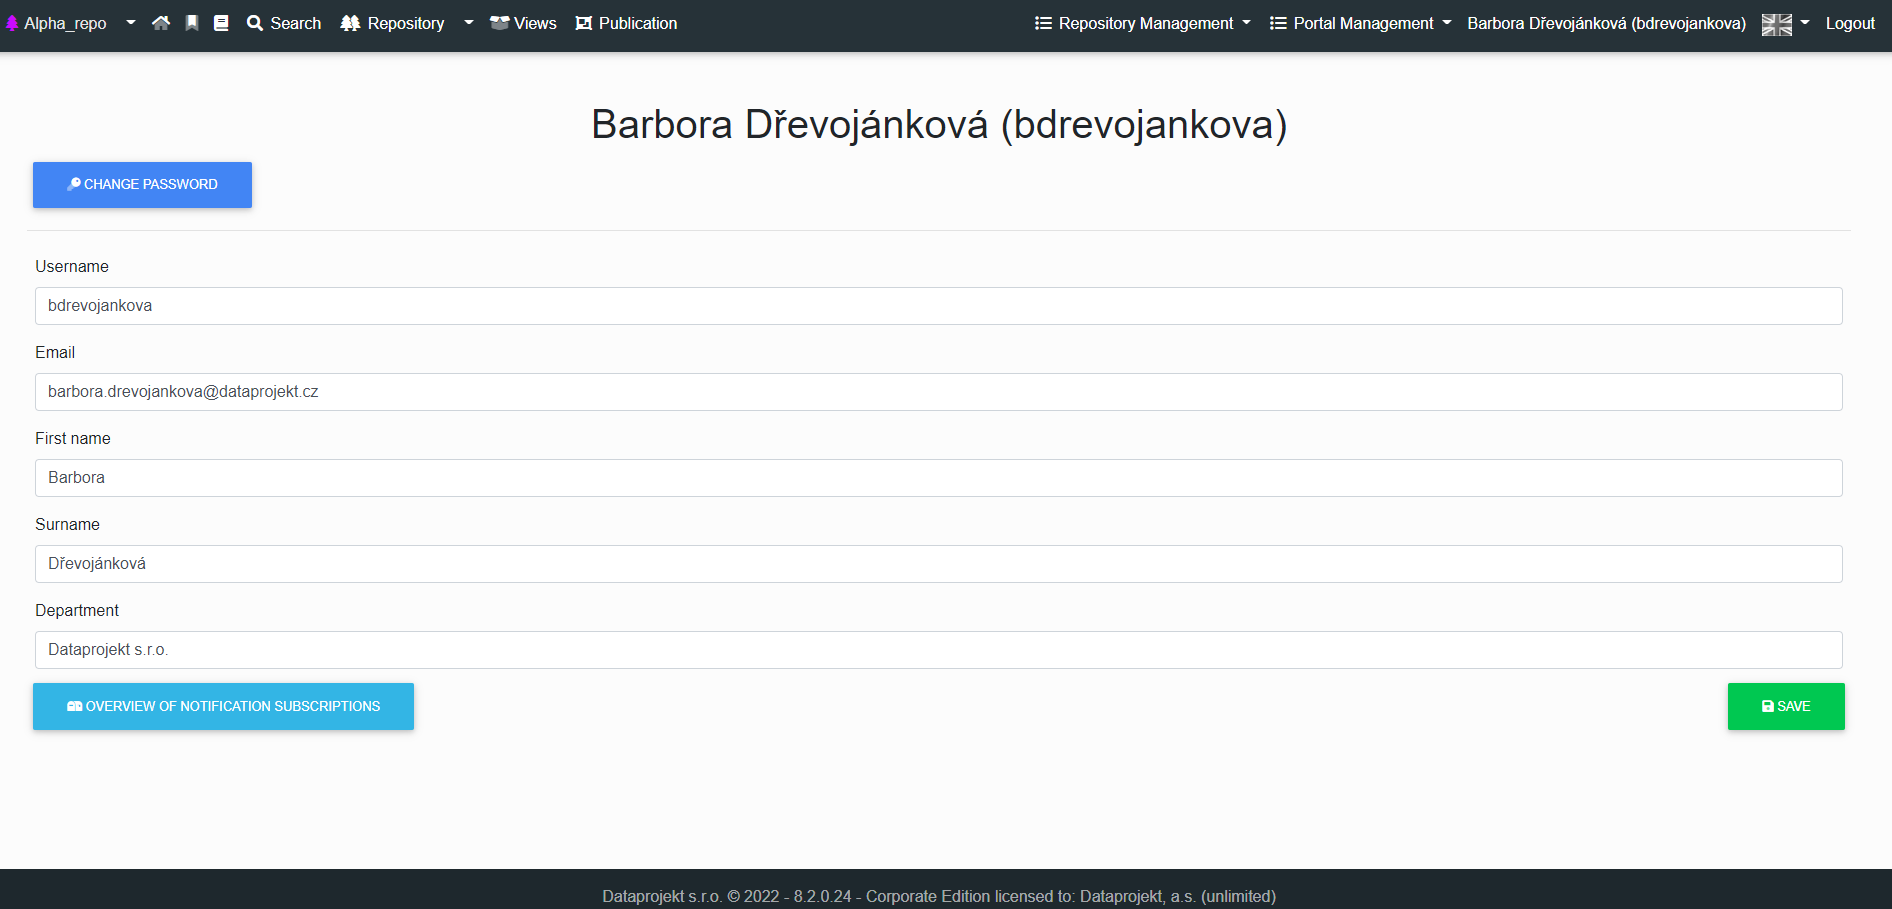
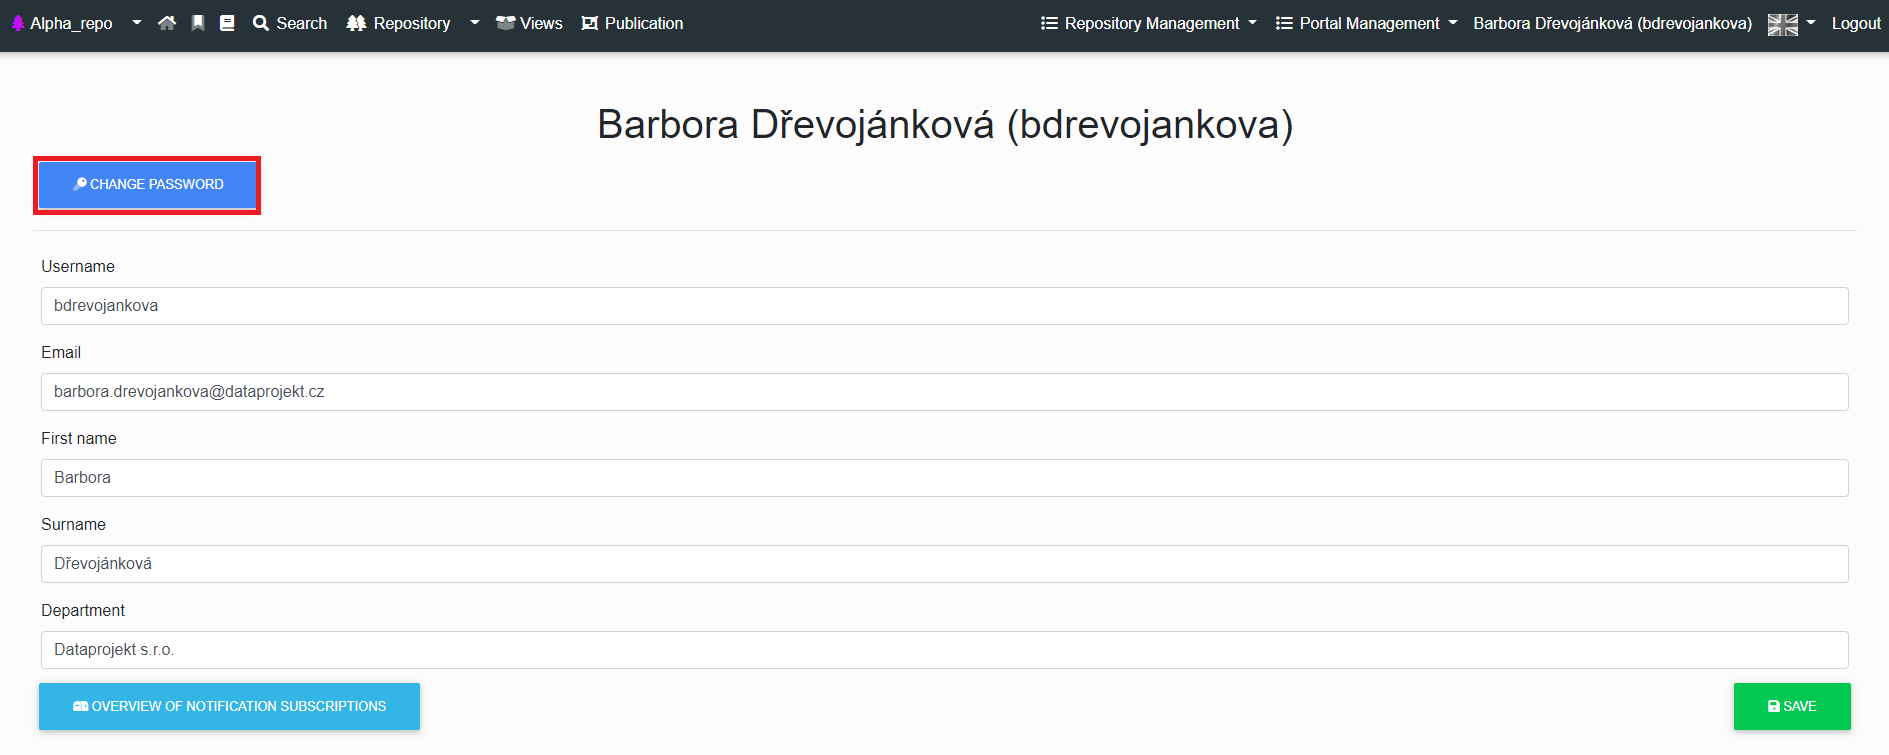
Management of Own User Account
Users of the portal can adjust the details of their account, set the language in which they want to have the user interface of the portal and other details. The “User Settings” function is used for this purpose. To open the user settings, it is necessary to click on the tab with the user name. After clicking on the tab with the username, the form for editing the profile will be displayed.
User Settings

After clicking on the tab, the user will see the user settings.
After clicking on the “Profile” tab, a user can change username, email, first name, last name, department and set up an alert subscription summary..
Changes will be saved after filling out the form and then clicking on the “Save” button.
Selection of Preferred Language
Under the flag, you can choose the language of the application.
You can choose from 2 application languages by clicking on the flag icon:
- Czech language
- English language
The choice of language only applies to the translation of the user interface, not to the actual content of the repositories. Changing the language only affects a specific user, i.e., different users may have different UI settings.

After clicking on the appropriate icon, the changes will be saved immediately.
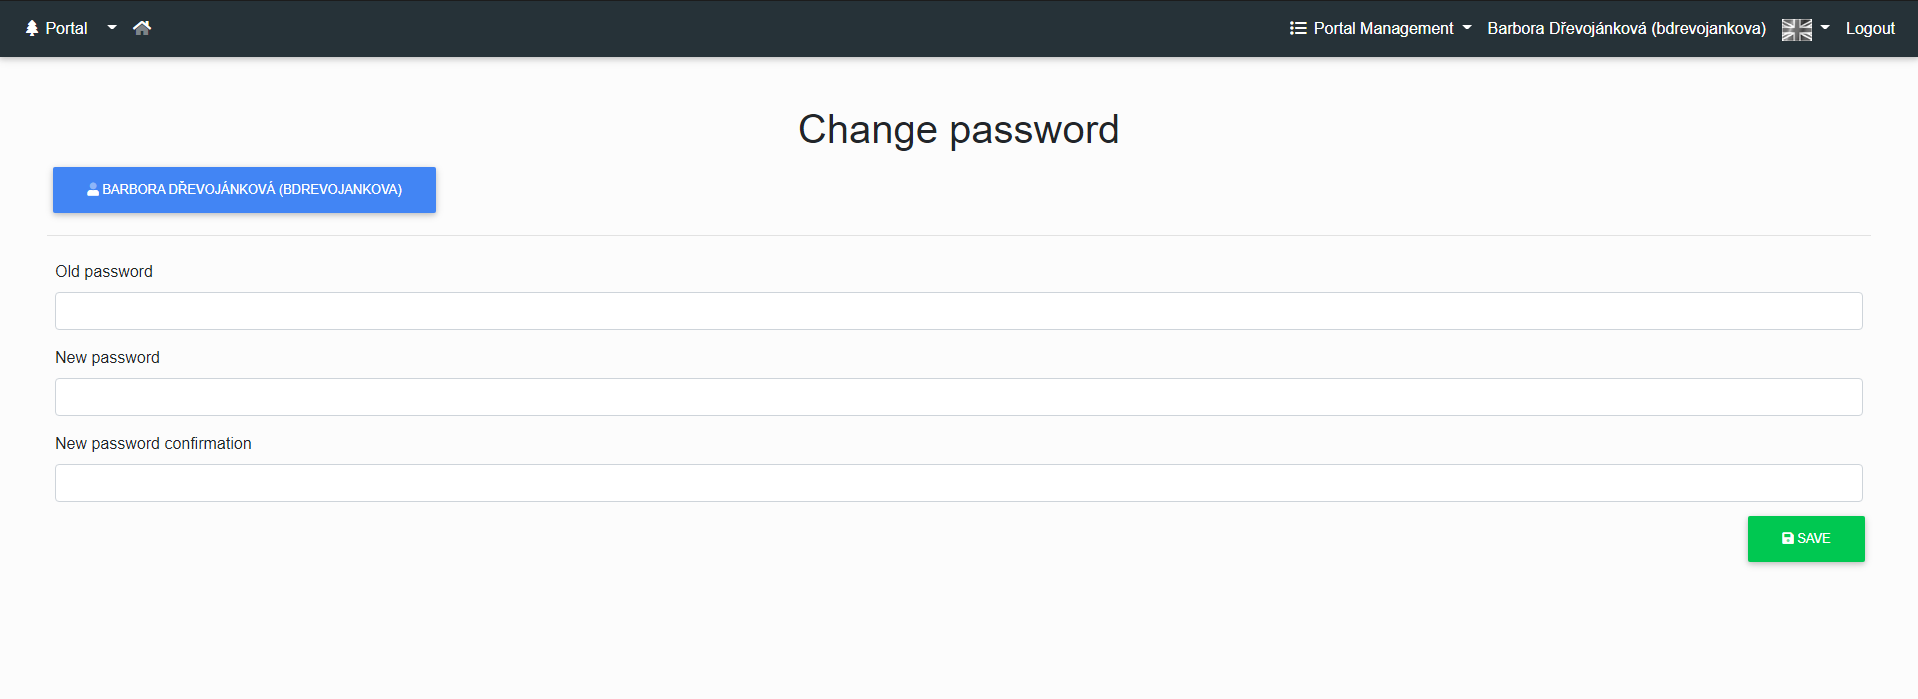
Changing the Password
In this form, the user has the option to change their password.
At the moment, there are no enforced rules for the new password, neither for the strength of the password nor for its expiration. If such rules need to be enforced, the portal needs to be connected to LDAP / Active Directory, which allows password rules to be enforced.
To change the password, a user clicks on the “Change Password” tab, fills in the old password and then the new one and finally clicks on the “Save” button.
The (portal or repository) administrator can also change passwords for other users.
Overview of notification subscriptions
The administrator must set up an e-mail server in Configuration Manager to send notification e-mails to users.
If a notification system is set up, then in this section the user can see all their set notifications.

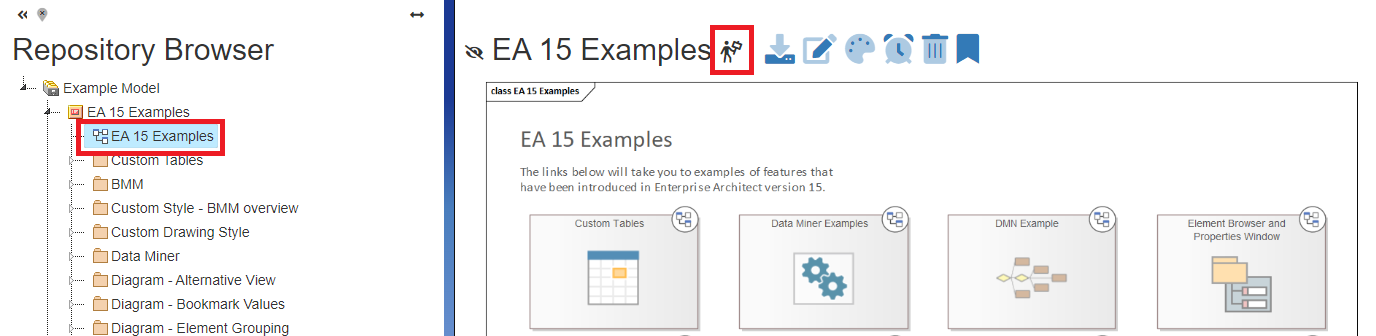
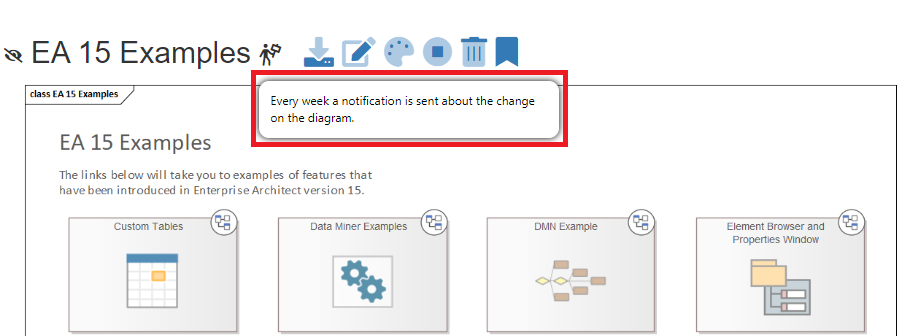
Click on the icon  to see a Overview of Notification Subscriptions.
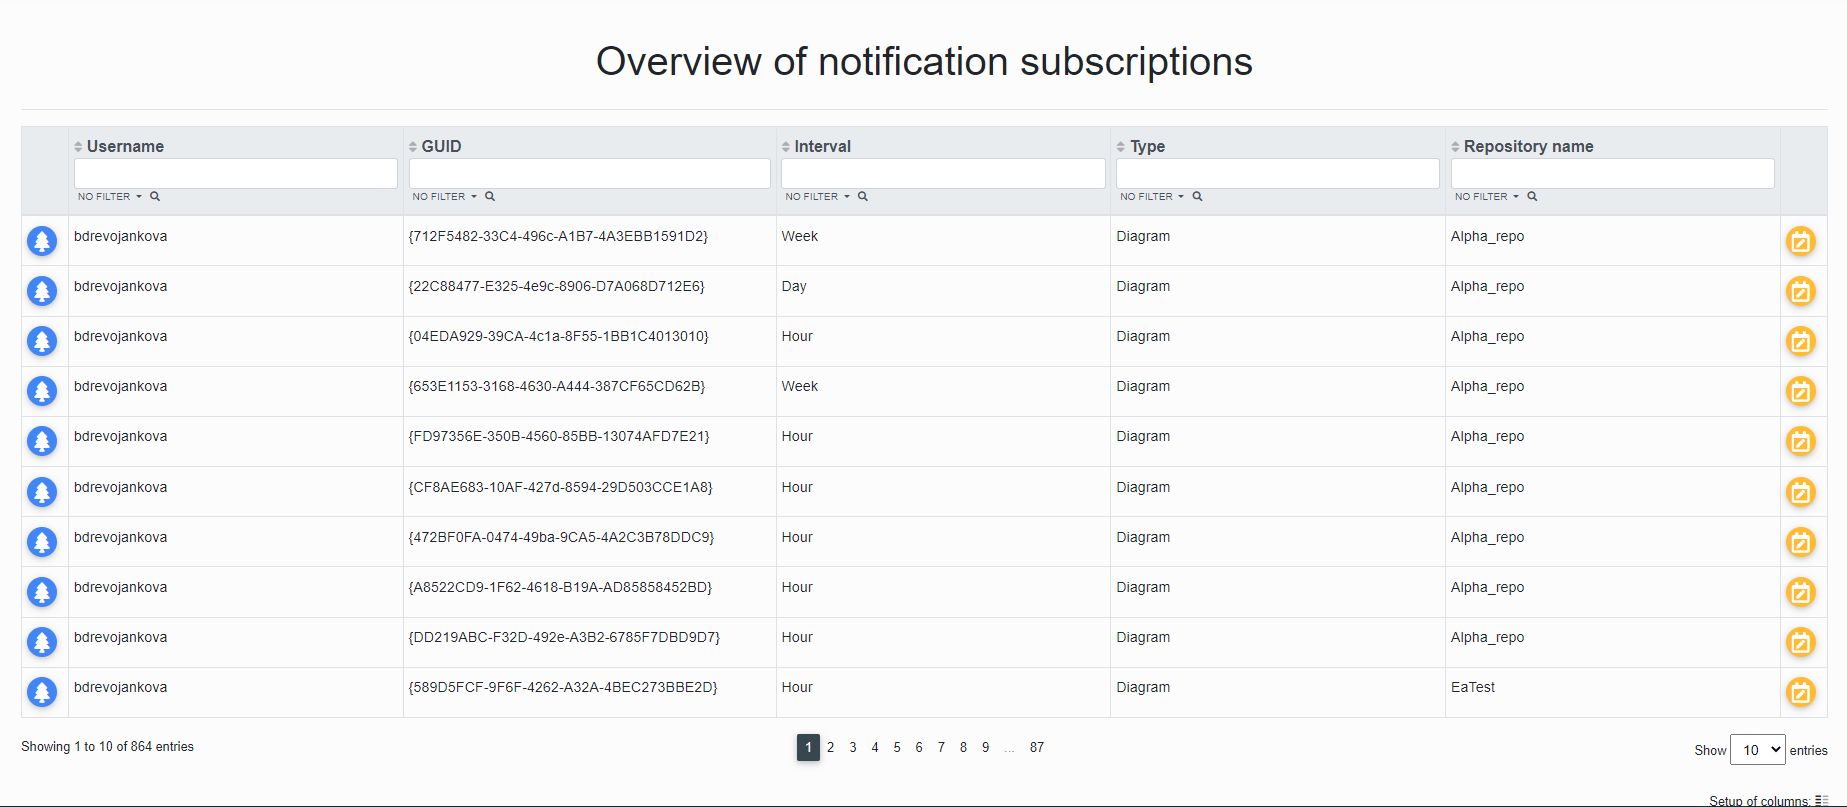
The user can click on the "Tree" icon or the "ChangeNotificationType" button.
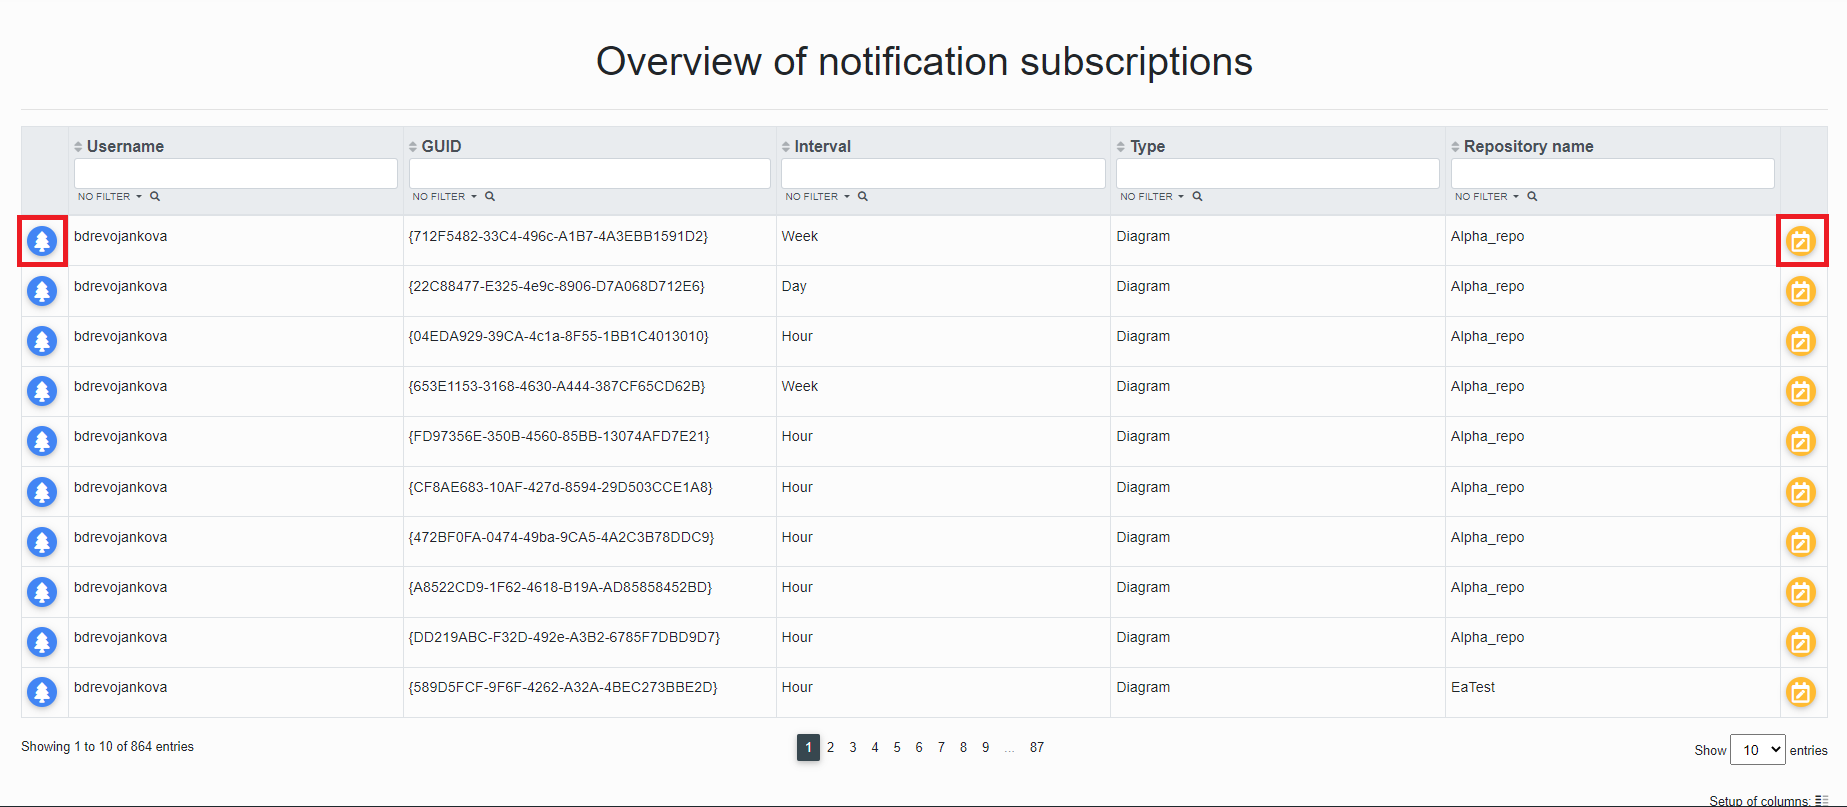
After clicking the "ChangeNotificationType" button, the user is redirected to the "Diagram Subscriber Notification Interval Settings" page where they can check the Name, Type, Login Name and Email to which the notification is sent.
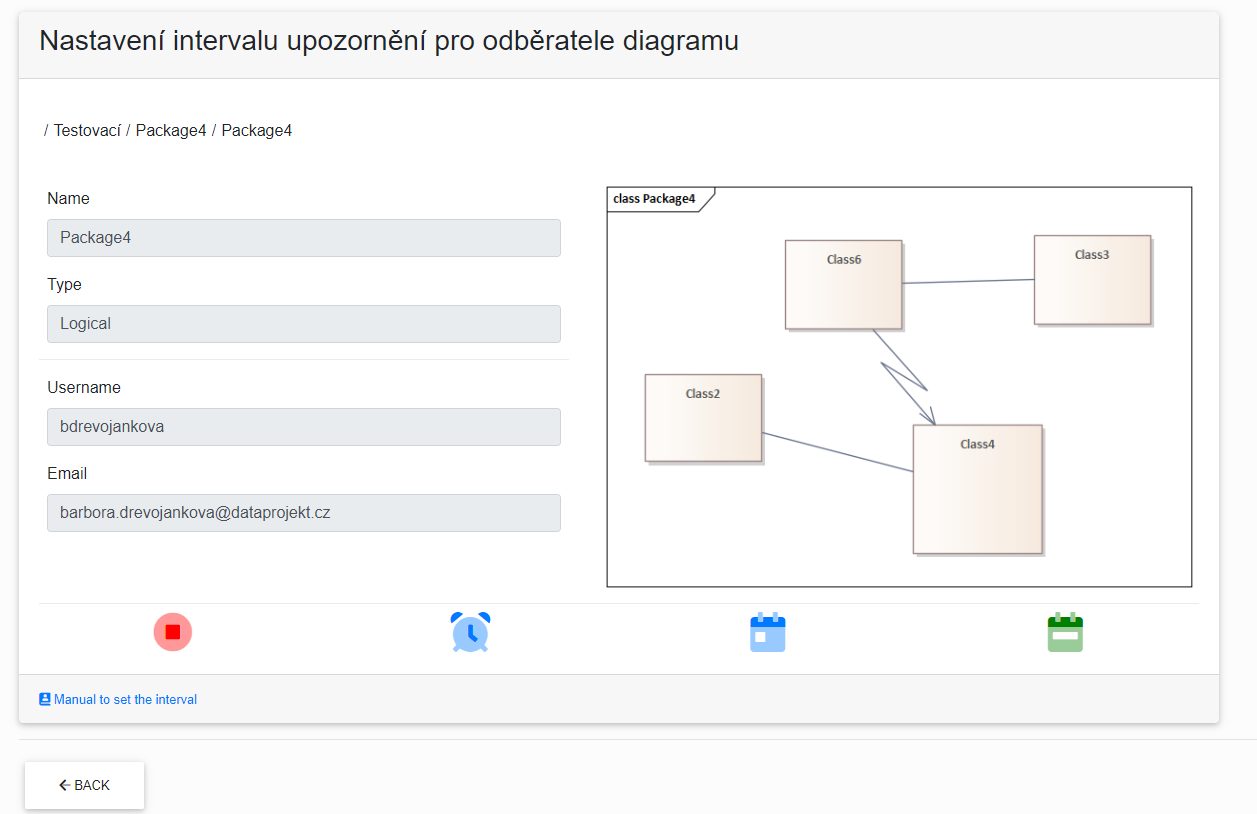
There are three notification services that alert users of changes to the diagram.
By hovering the cursor over the icons, the user can read what type of notification it is.

You can easily change the notification type either on this page, where you just click the blue icon, or go to the repository of the diagram.

The green colour of the icon informs which notification type is on.
If the user wants to cancel the notification, just click the red icon.
When the user clicks on the "Tree"  icon, he is redirected to the repository of the diagram.
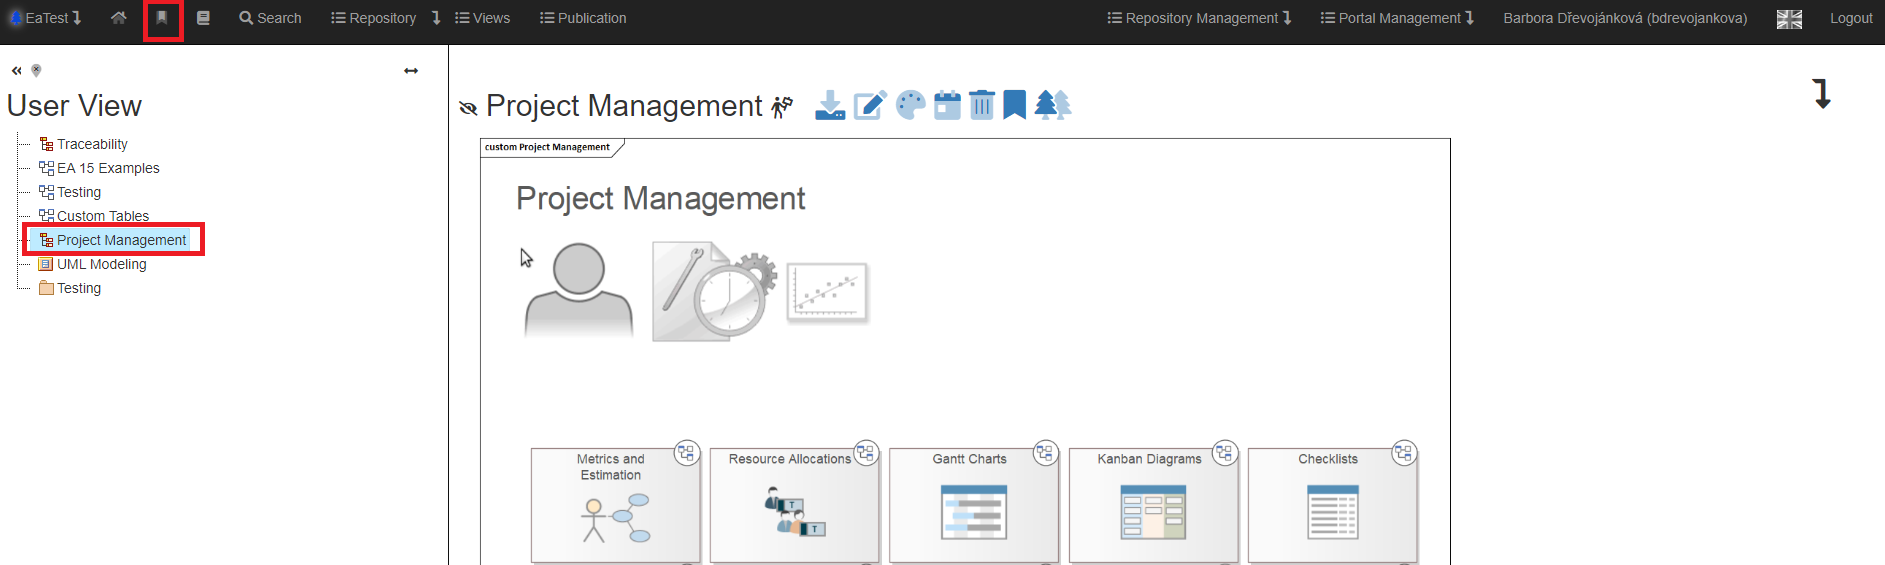
Bookmarks - favorites
EA Infoport supports a bookmarking system. Each user has their own bookmarks (this is actually similar to favorites) and can add selected packages, elements and diagrams from the main tree. This is useful, for example, if the user is working on only one project and doesn't want to keep clicking through the whole repository structure, or just needs to mark elements (diagrams, etc.) to return to in the future.
Personal view
To add (diagram, package, element, attribute or operation) you need to click the icon.
![]()
![]()
When clicked, the icon is filled in and this means that the (diagram, package, element, attribute or operation) is added to the "Personal View" section.
Glossary
EA Infoport can display the Enterprise Architect repository dictionary (this is standard EA functionality). The dictionary consists of a term, a type (general dictionary, product dictionary, etc.), and its meaning. It is particularly useful for explaining the meaning of abbreviations used. Glossaries can be edited directly in Infoport or in Enterprise Architect. The glossary is displayed as a filterable list. It is therefore possible to search for a certain type of terms or to full-text search for the occurrence of a certain word. In order to create, edit and delete the glossary, the user must be assigned the permission "Portal Administrator, Repository Administrator or Glossary Editor".
Creating a Glossary
To create a glossary, a user must be assigned the "Portal Administrator, Repository Administrator, or Glossary Editor" permission.
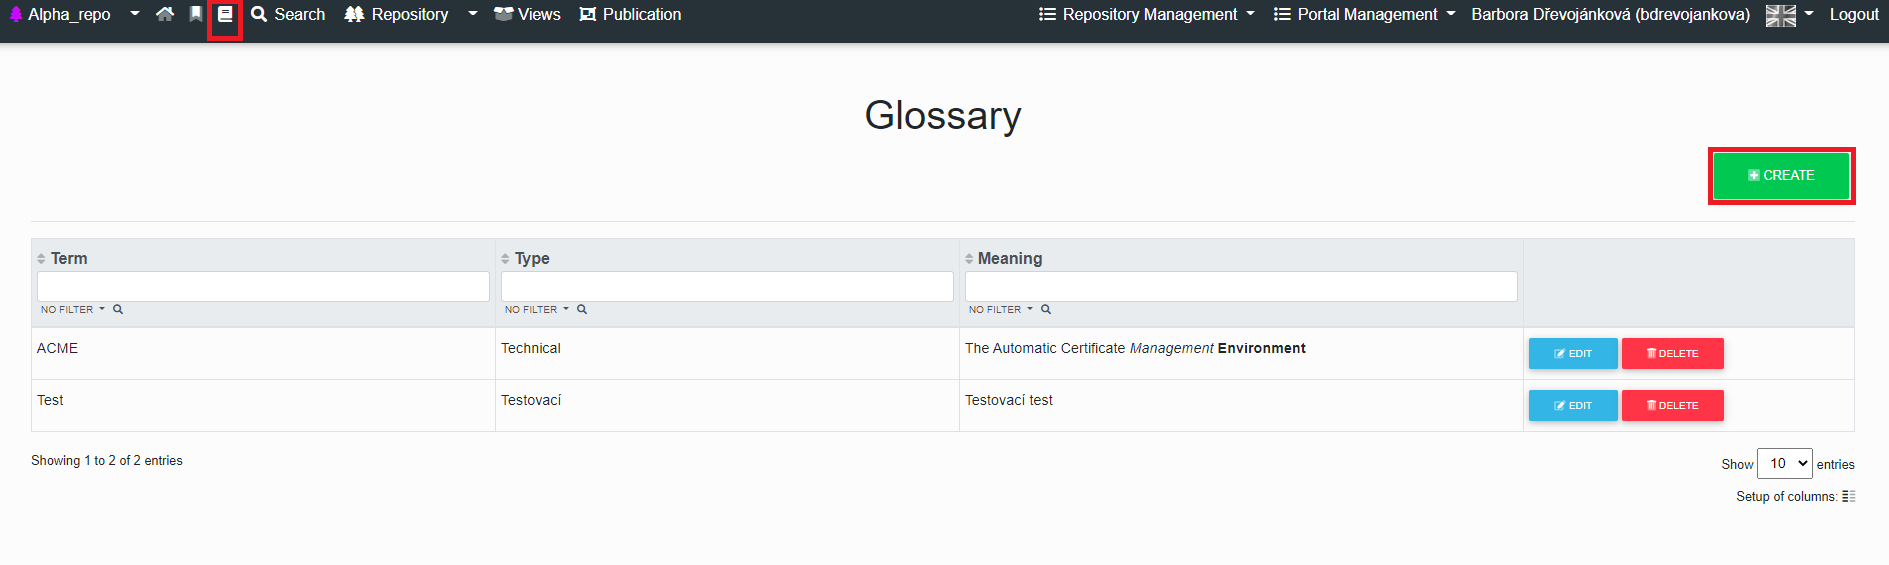
After clicking on the "Create" button, the user is redirected to the "Create Glossary" table. The table can be filled with the term, type and meaning.
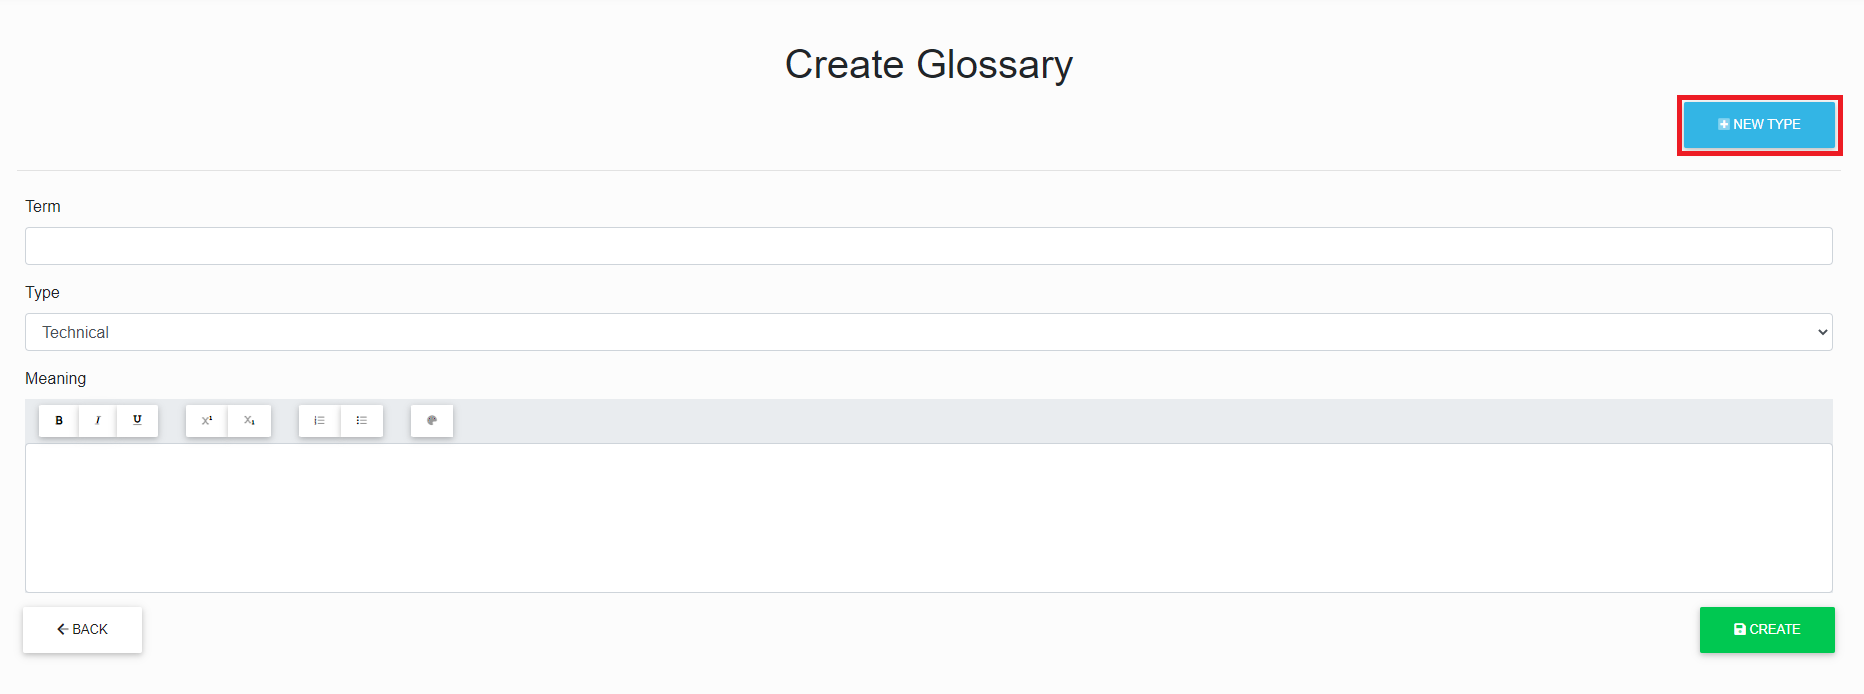
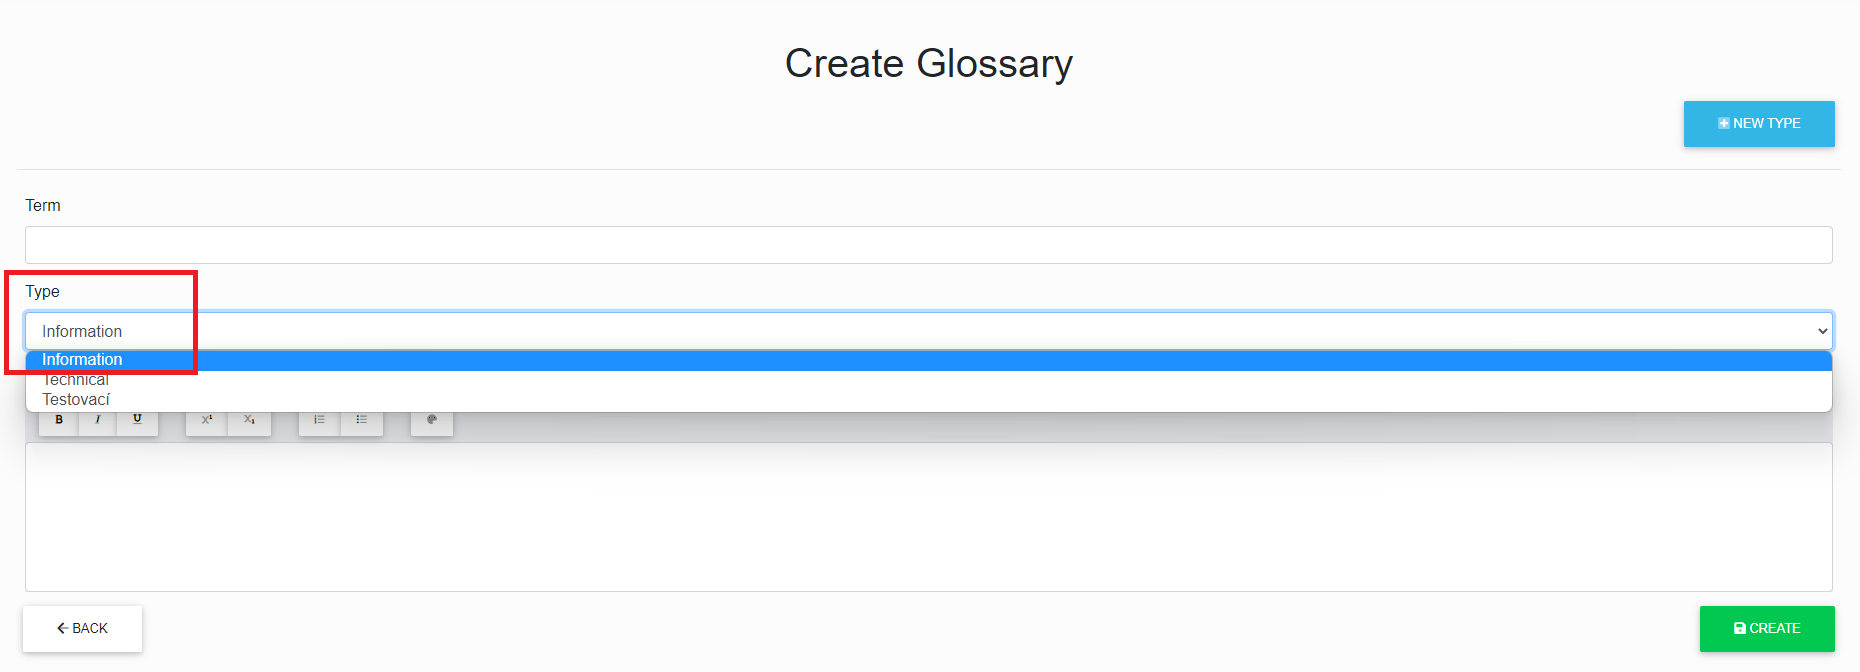
To create a new type, the user clicks on the "New Type" button. After displaying the table and filling in the type, the user clicks on the "Save" button.

After saving, the user is redirected back to the table to create the glossary, where they can see the newly created type by clicking the arrow next to the type.
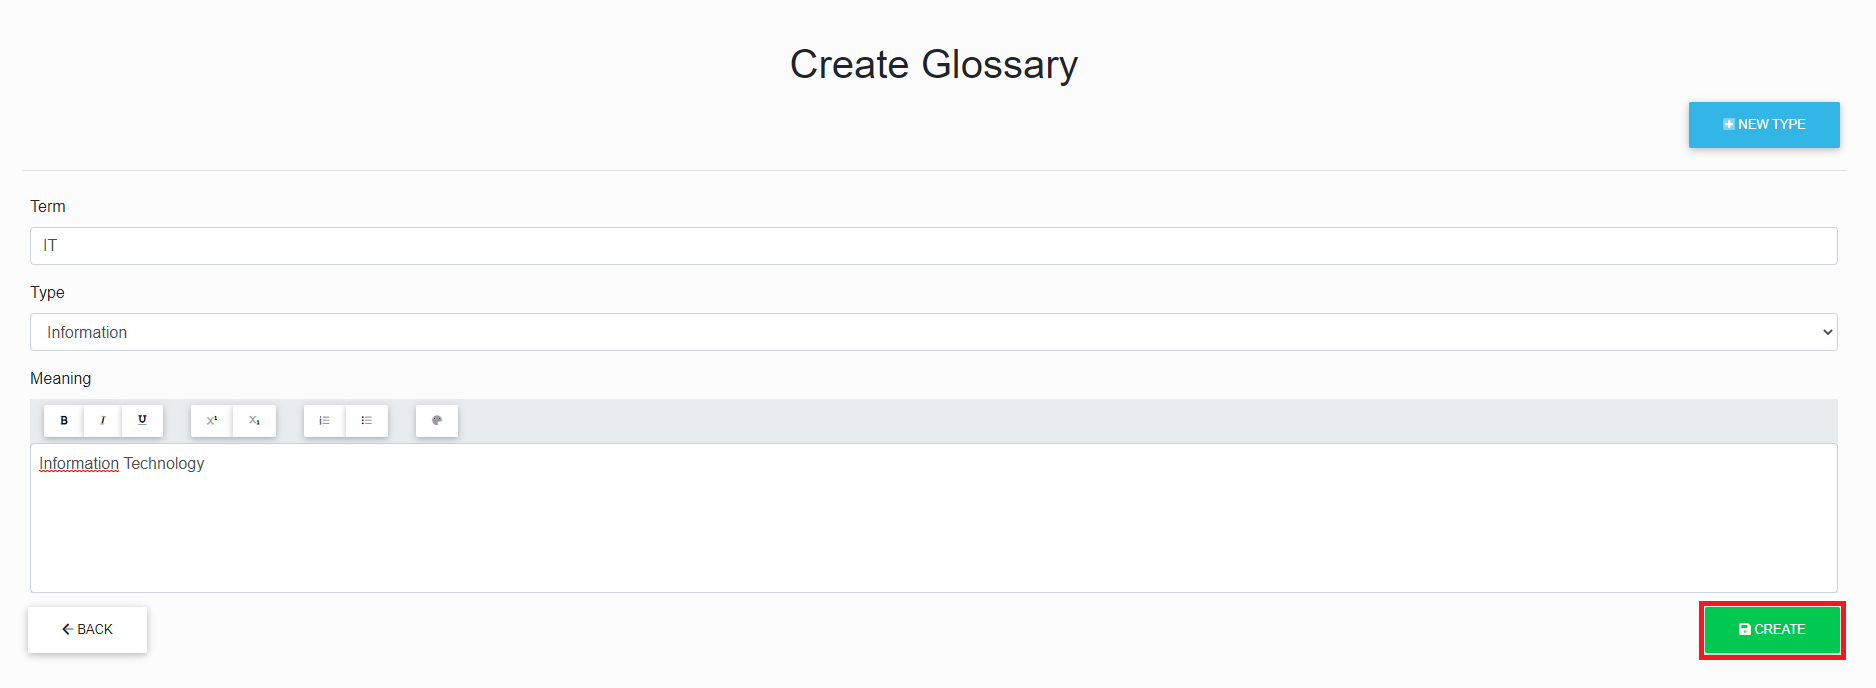
After filling in the term and meaning, the user can create the glossary by clicking on the "Create" button.
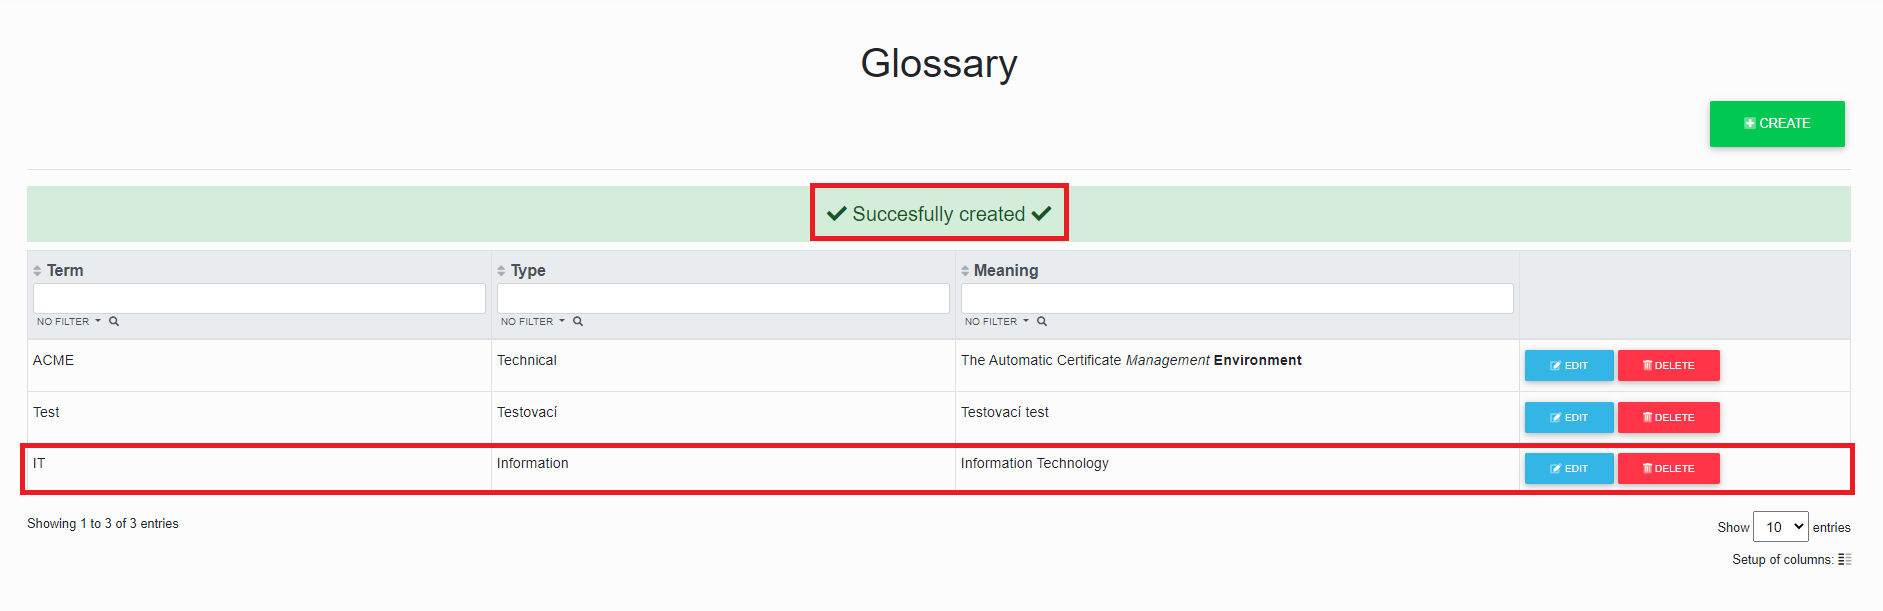
After creating a glossary, the user is redirected back to the glossary overview table, where the message "Successfully created" is displayed and a row with the new glossary appears.
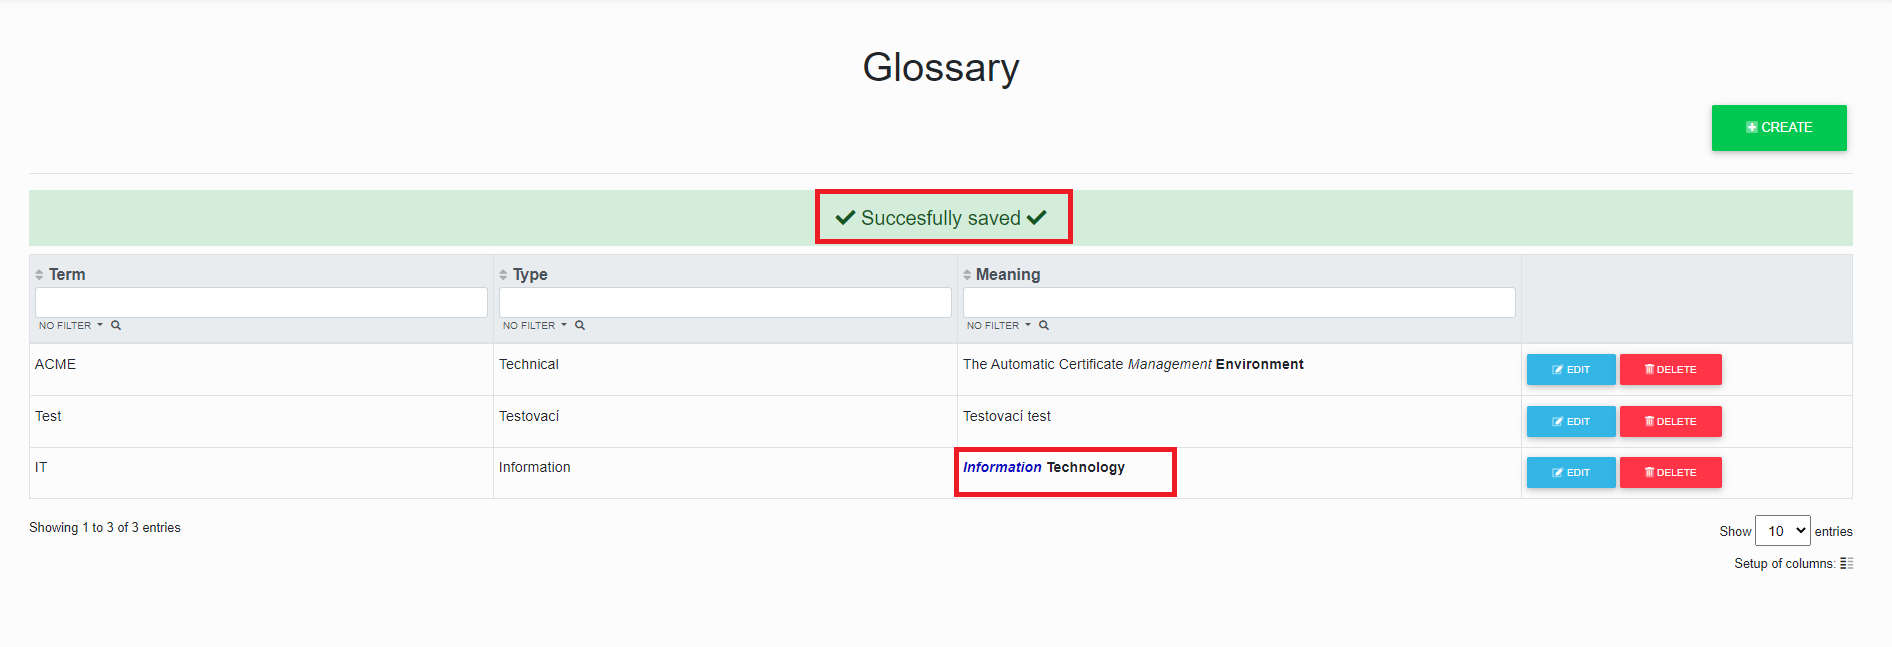
Edit a Glossary
To edit a glossary, a user must be assigned the "Portal Administrator, Repository Administrator, or Glossary Editor" permission.
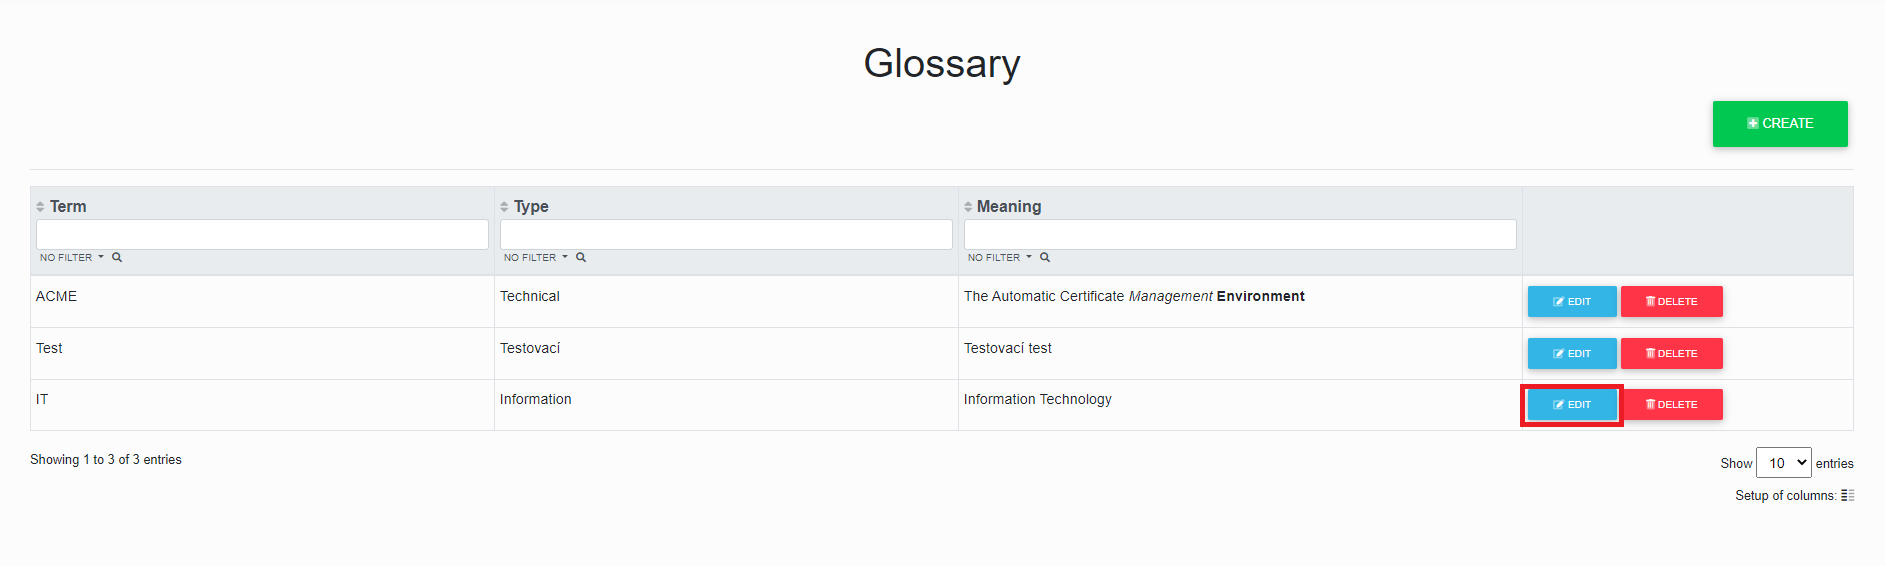
After clicking on the "Edit" button, the user is redirected to the "Edit Glossary" table.

The user can change the term, meaning, type, or create a new type by clicking the "New Type" button.
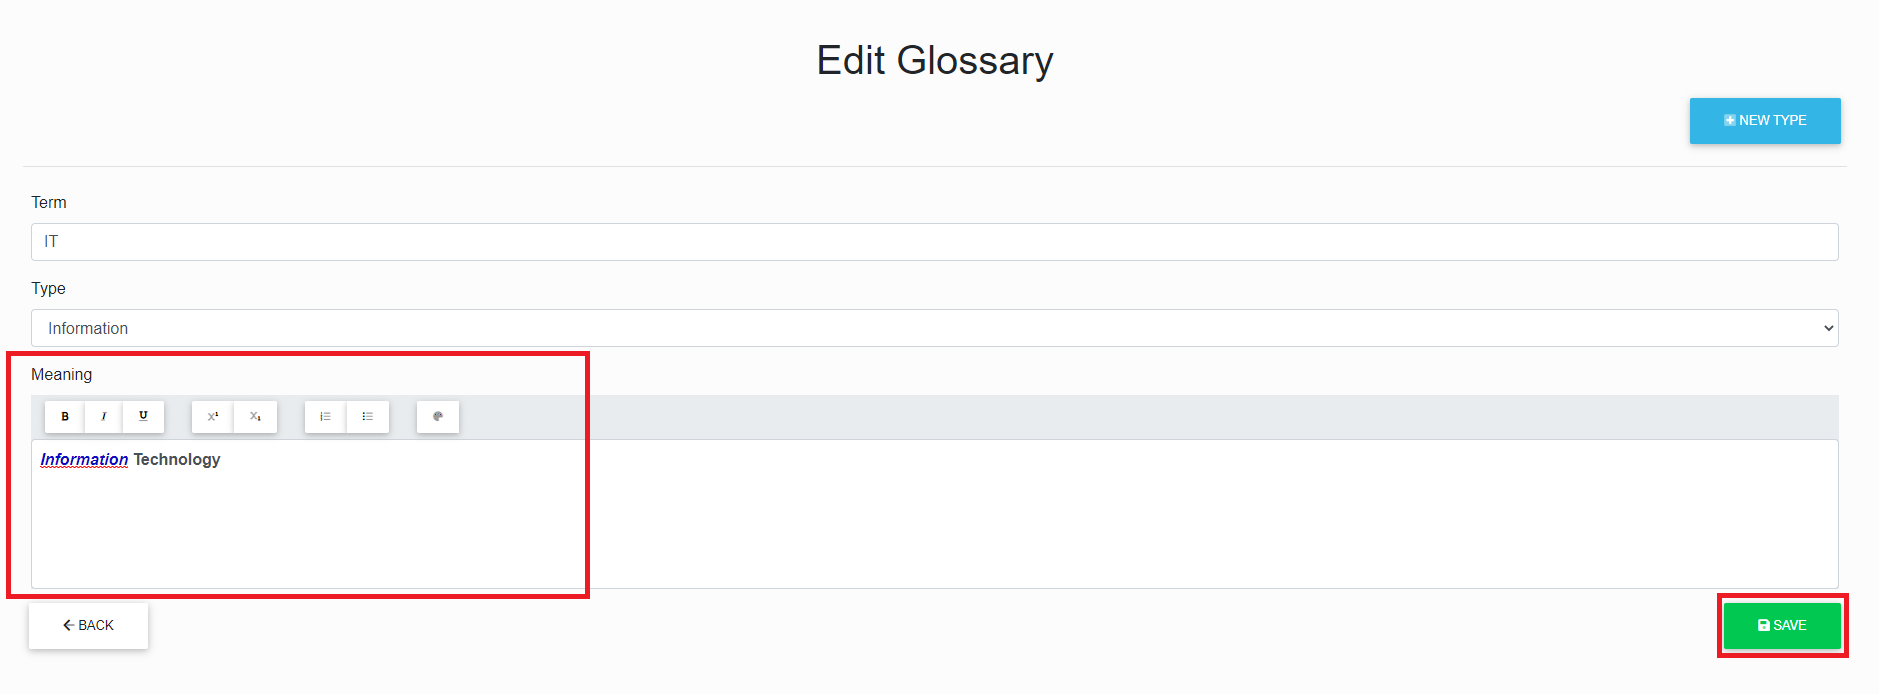
After the change is made, the user clicks on the "Save" button.
The user is redirected back to the glossary overview, where the message "Successfully saved" is displayed and the changes made to the glossary are visible.
Delete a Glossary
To delete a glossary, a user must be assigned the "Portal Administrator, Repository Administrator, or Glossary Editor" permission.
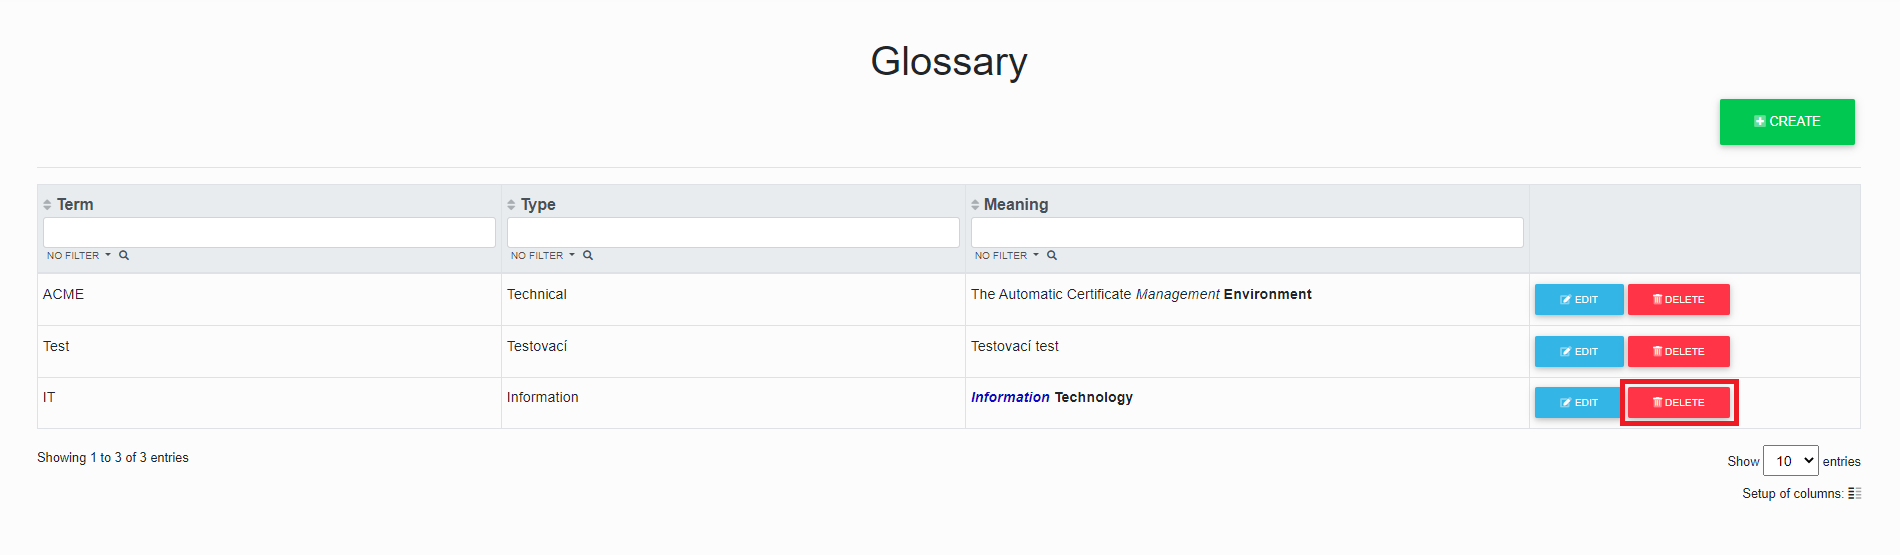
After clicking on the "Delete" button, the user is redirected to the "Edit Glossary" table.
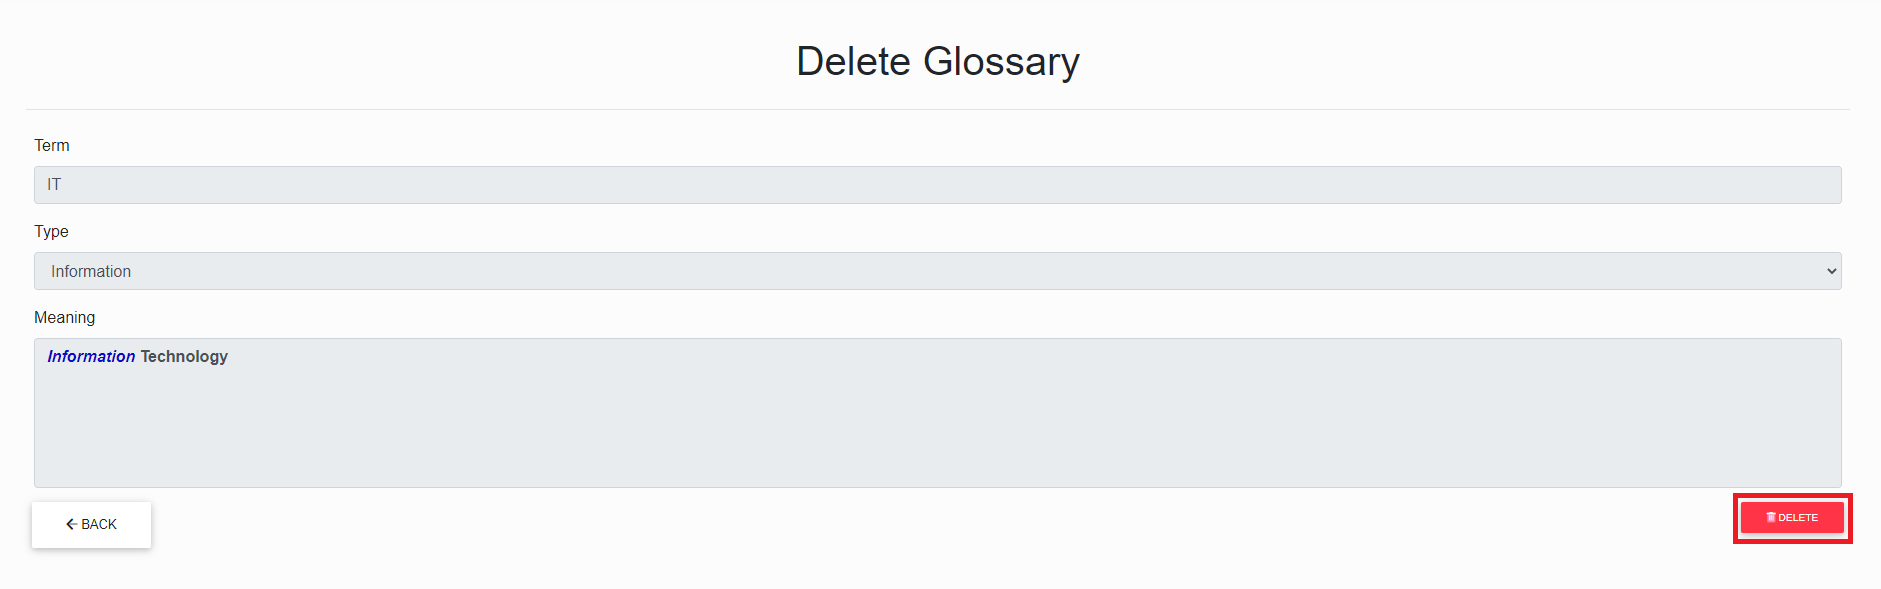
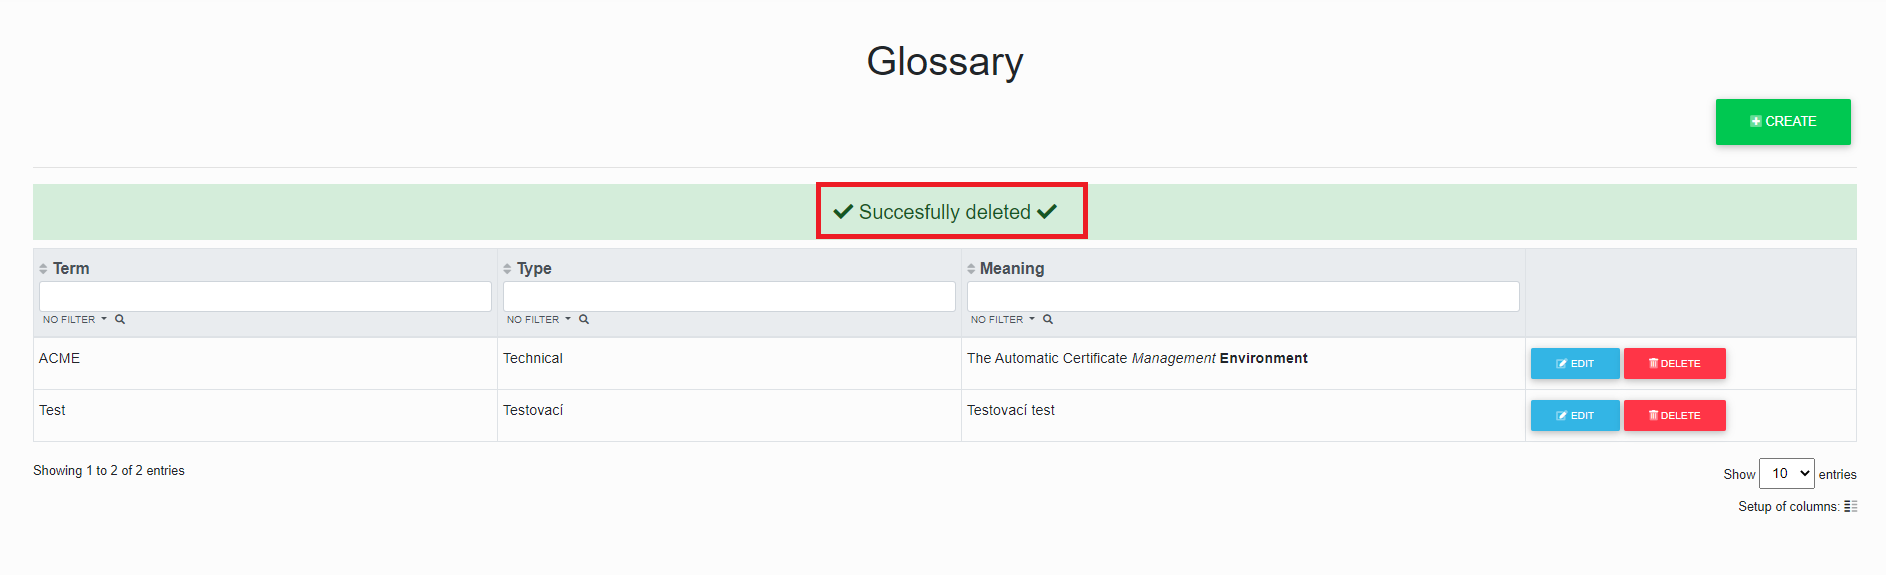
After checking the details, the user clicks "Delete" and is then redirected back to the glossary overview, where the message "Successfully deleted" is displayed.
Full-text Search
The information portal supports full-text searches throughout a model repository. The searched elements/diagrams are displayed in a list that can be filtered or sorted. You can view the detail of the searched elements or find them in the tree.
Search

The user can choose whether to use search:

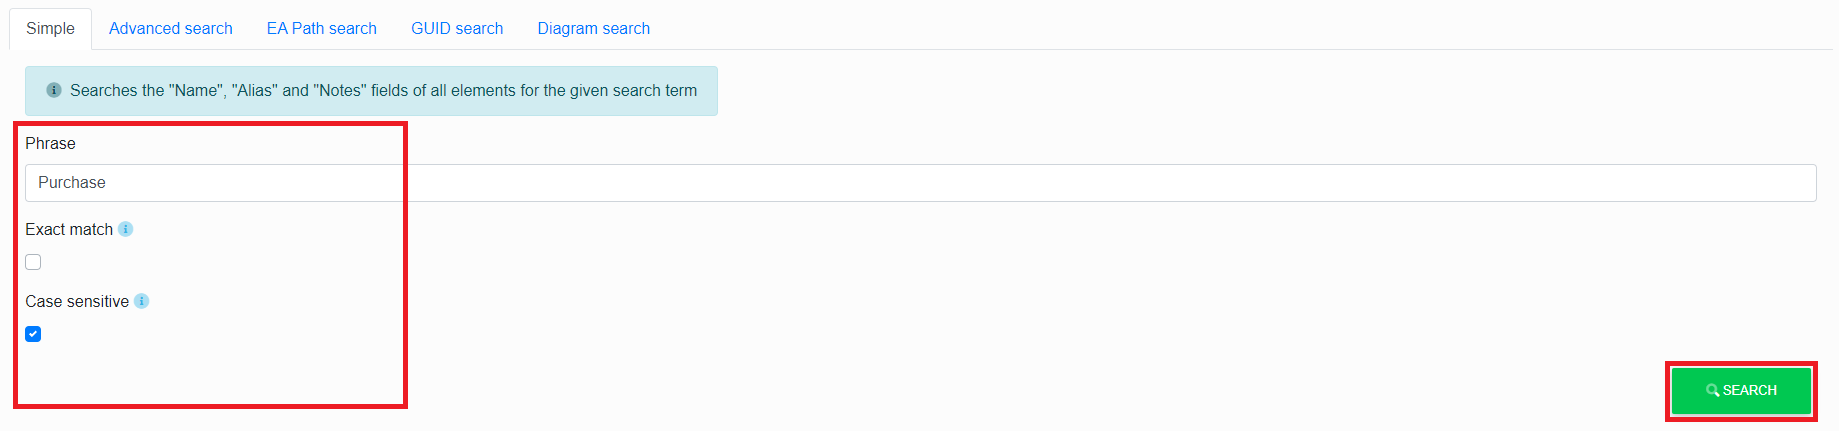
Simple search
In a basic search, only elements are searched, and only some of their fields typically (name, note, alias, etc.).
The user can also choose whether to search
- Exact match - searches only for elements that match the search phrase
- Case-sensitive - case-sensitive (only works if the EA database is CaseSensitive)
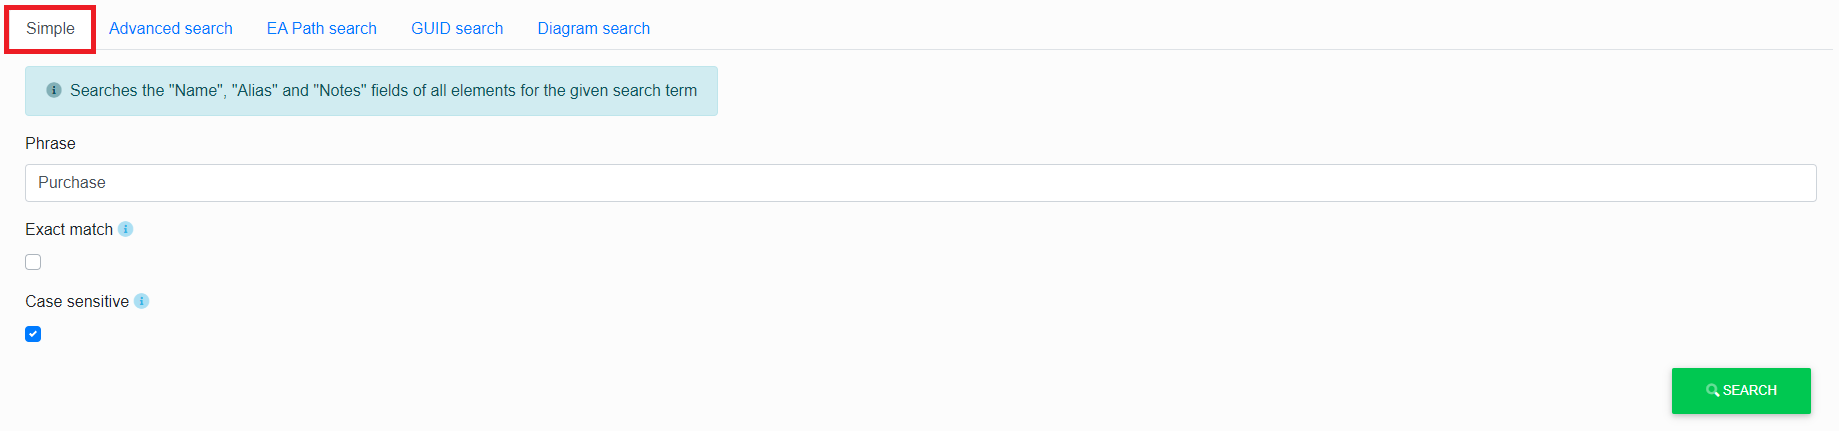
In the "Phrase" field, the user types the element to be searched.
If the user wants an exact match, he checks the "Exact Match" box and/or if he wants case sensitive, he checks the "Case Sensitive" box and clicks the "Search" button.
A table is displayed where the user can see "Artifact type, name, type, stereotype, modified and package".
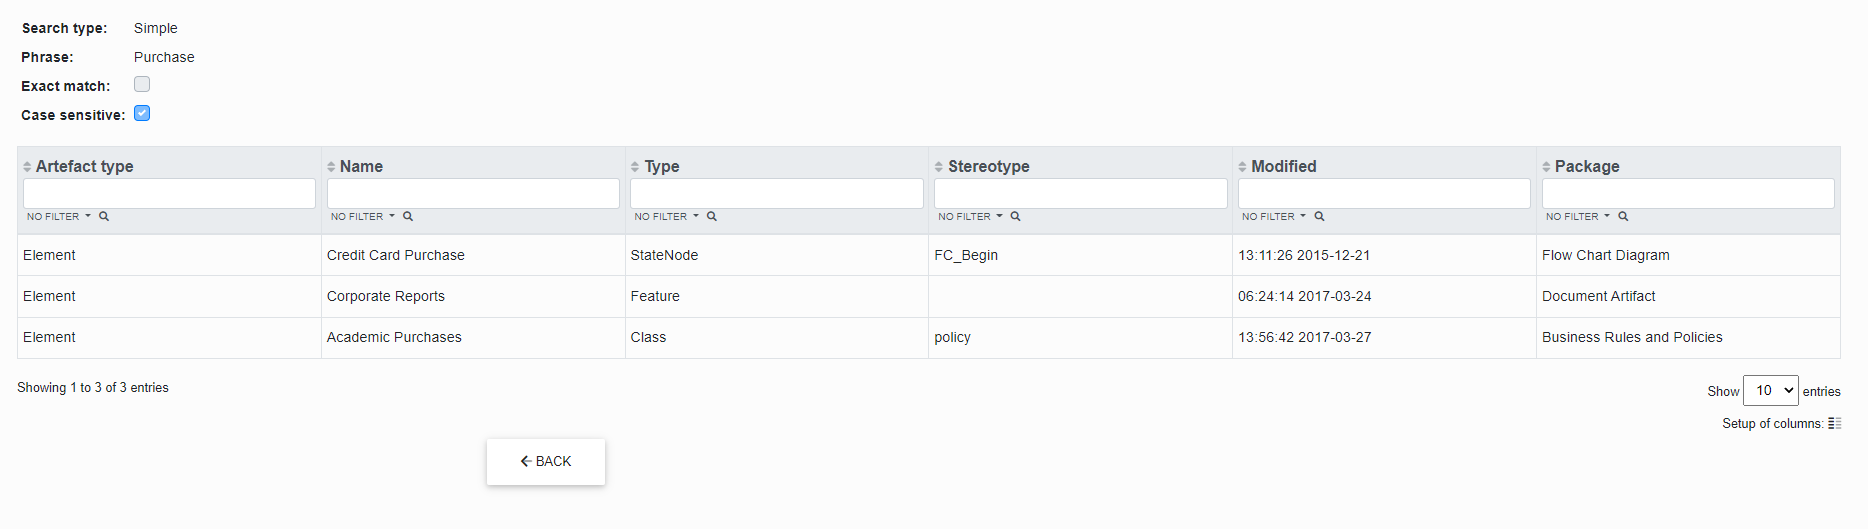
The user can fill in part or all of the name of the highlighted section to find a specific element more quickly.
After filling in, just use "Enter" and the table will be updated and filtered according to the filled in text.
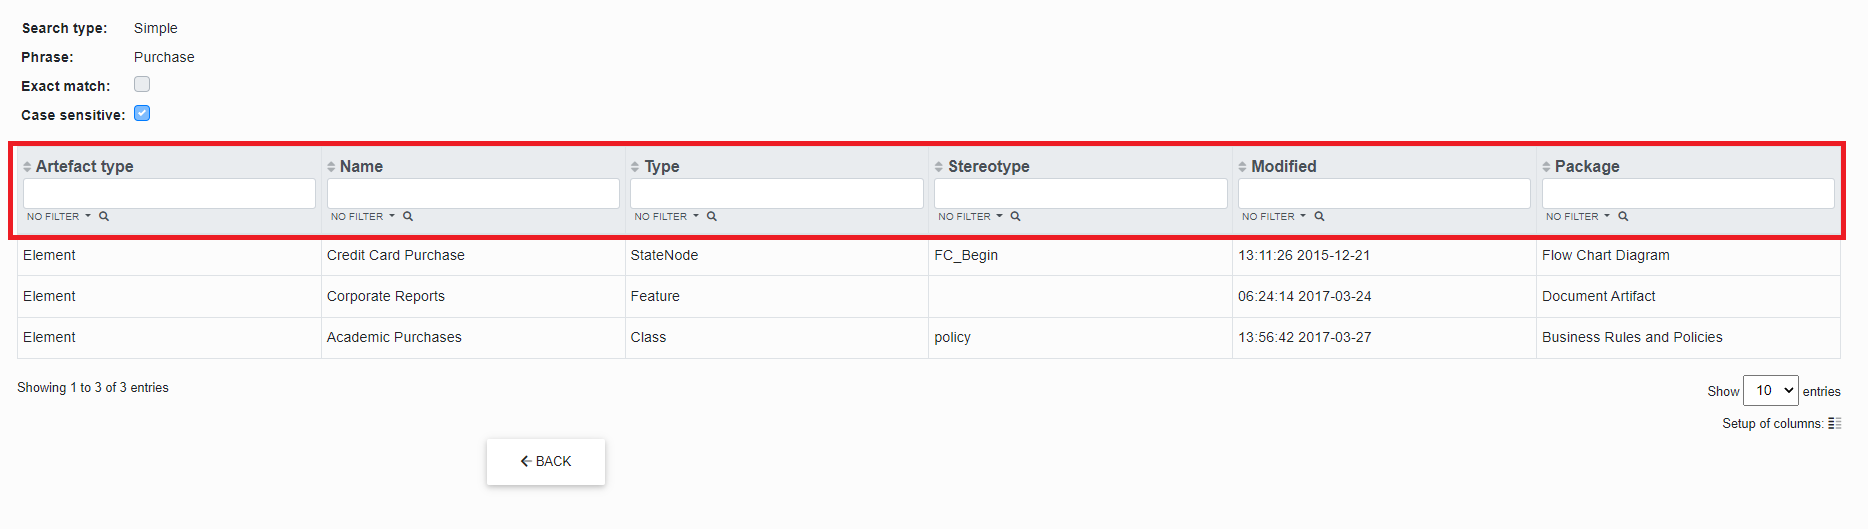
Each column has arrows in the header next to the name to allow sorting (No. 1)
The arrow next to the "magnifying glass" expands a mini dialog where the user can select the type of filtering condition (No. 2)
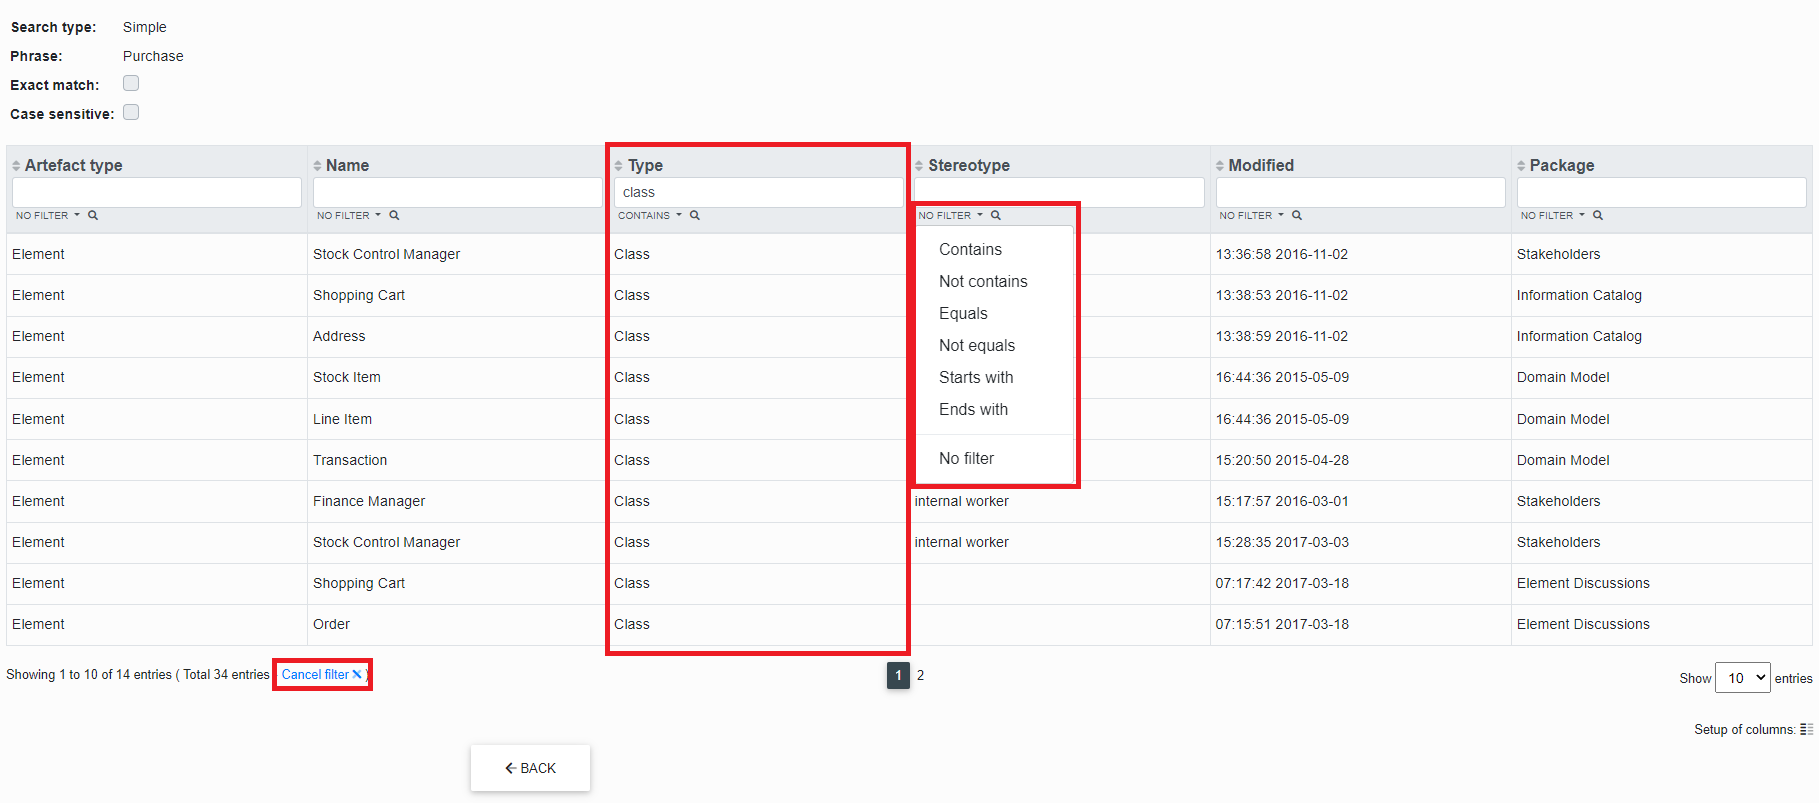
If the user wants to refresh the filtering table, just click on the blue text "Cancel filter" (No. 3).
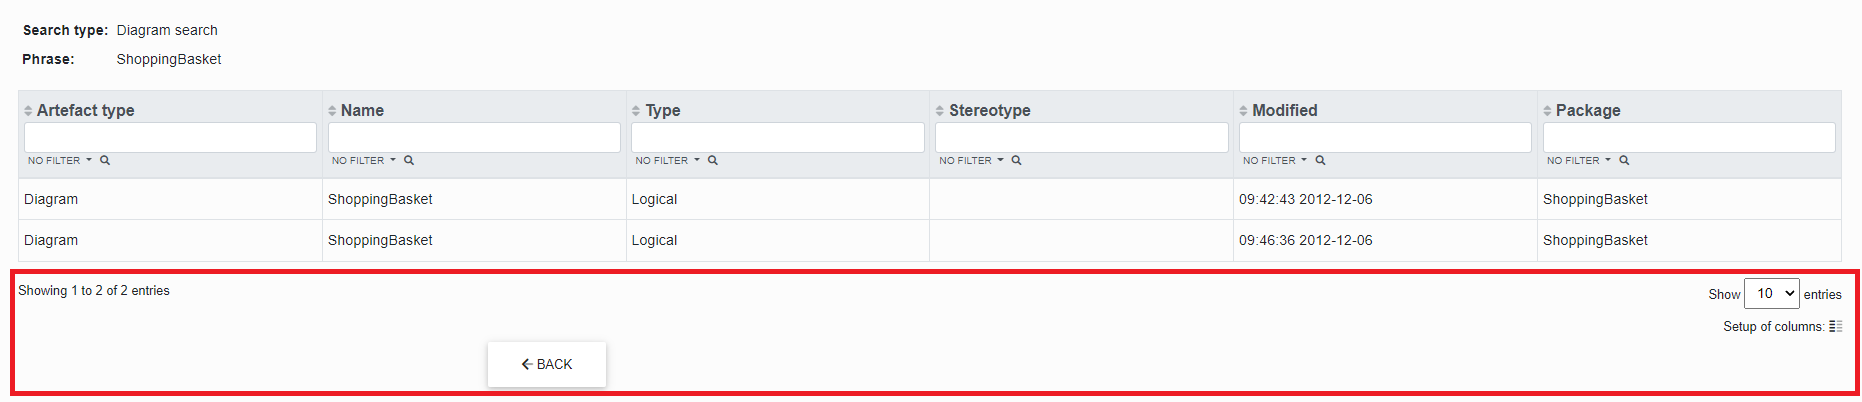
- Number of artifacts displayed
- Number of pages of displayed artefacts - active area where it is possible to click on the page number to get further in the displayed list
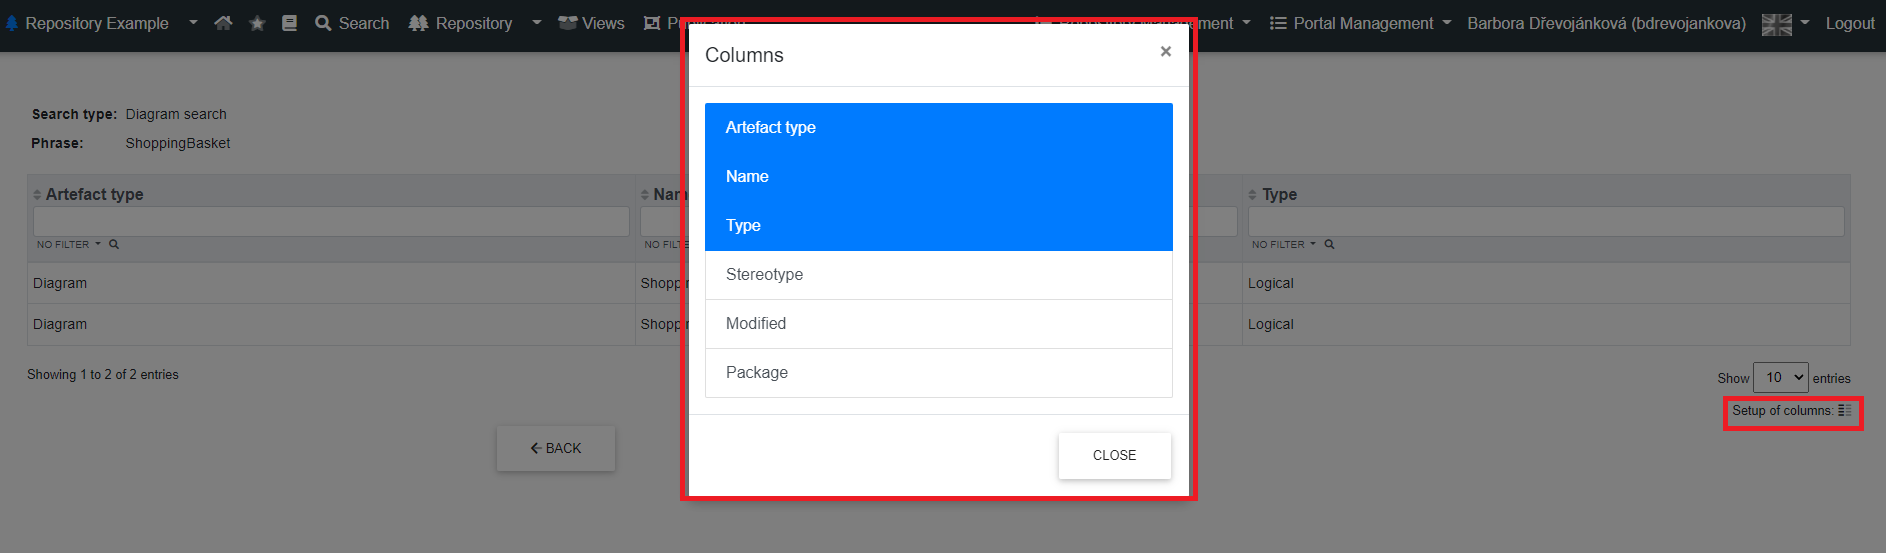
- Setting the columns displayed in the table
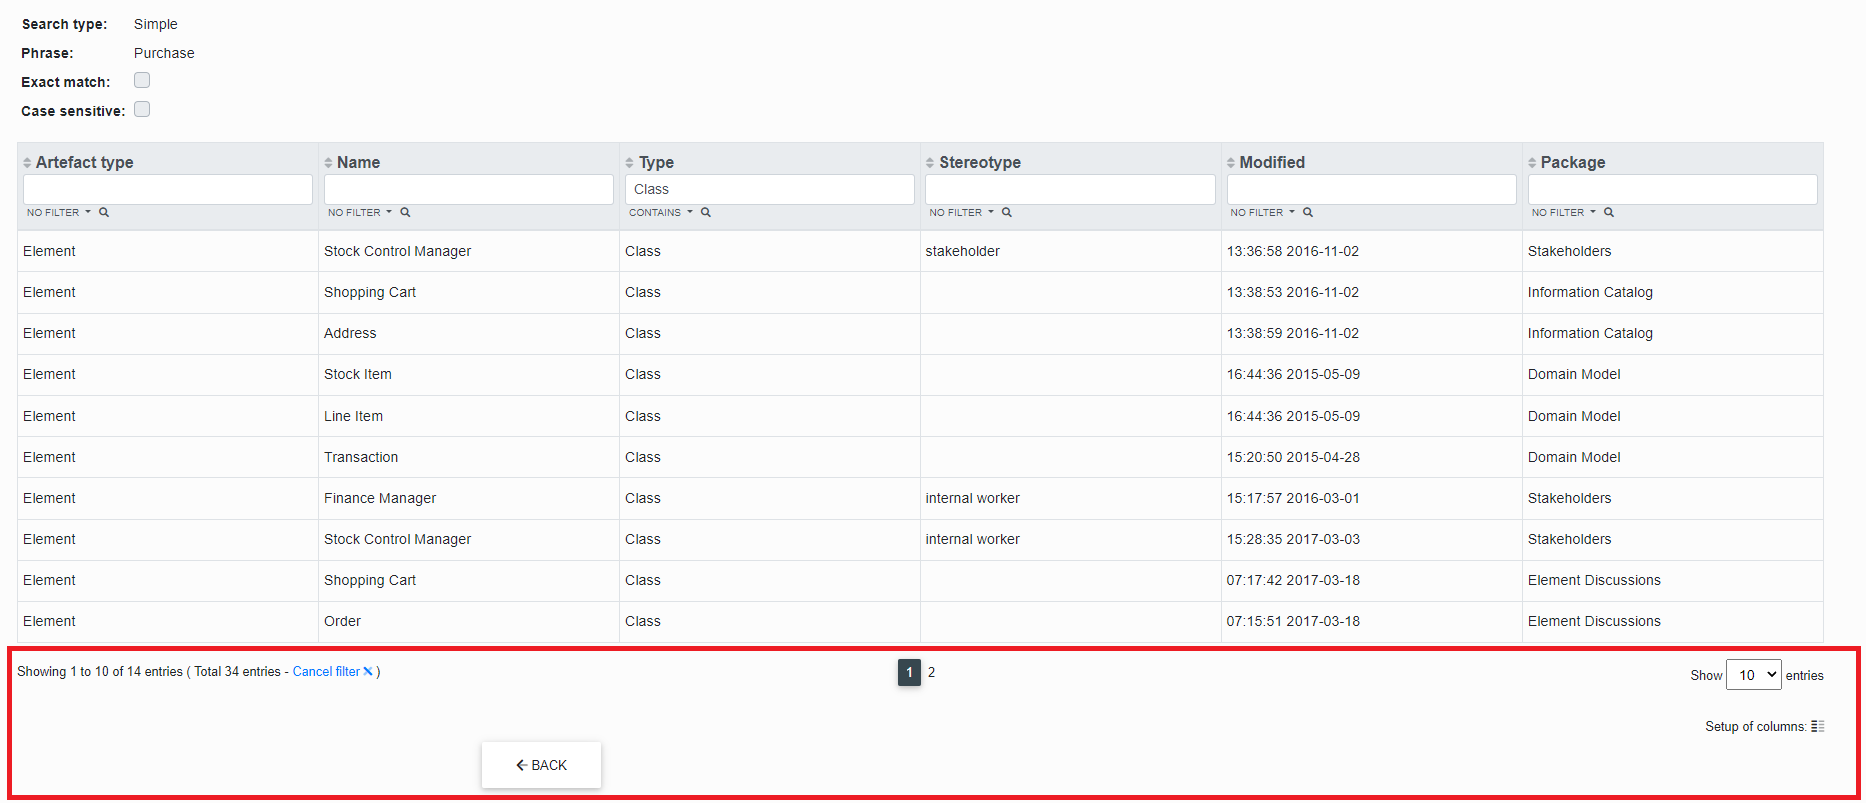
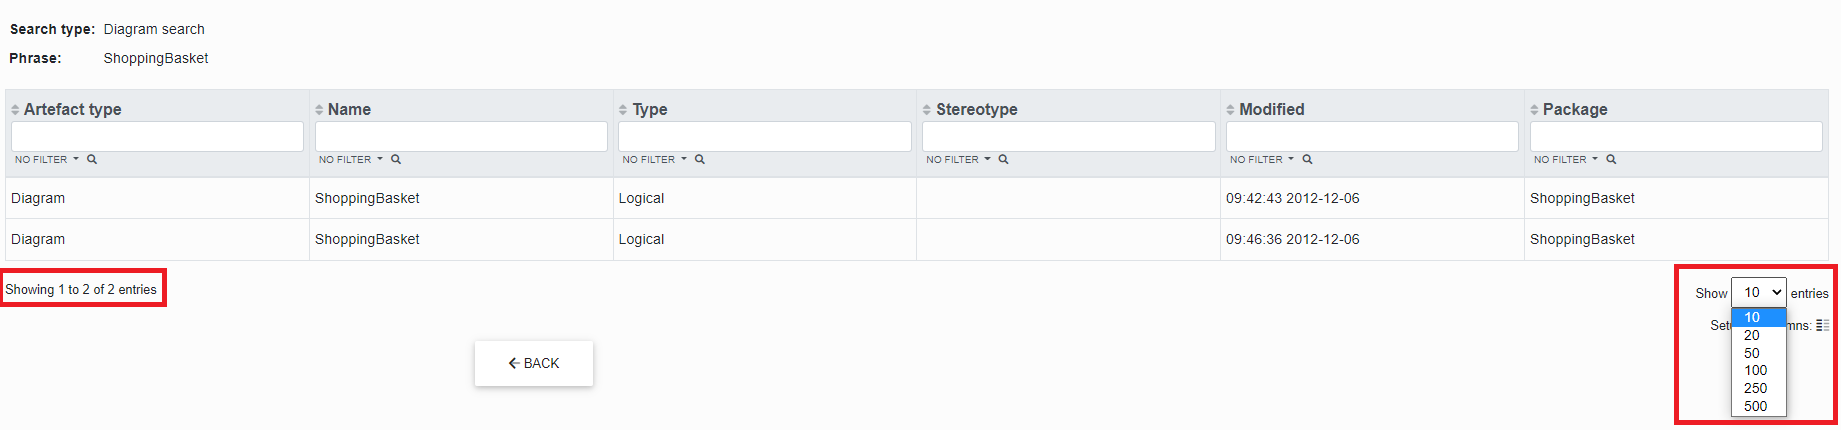
"Displayed records" - you can see how many records are searched and how many are displayed.
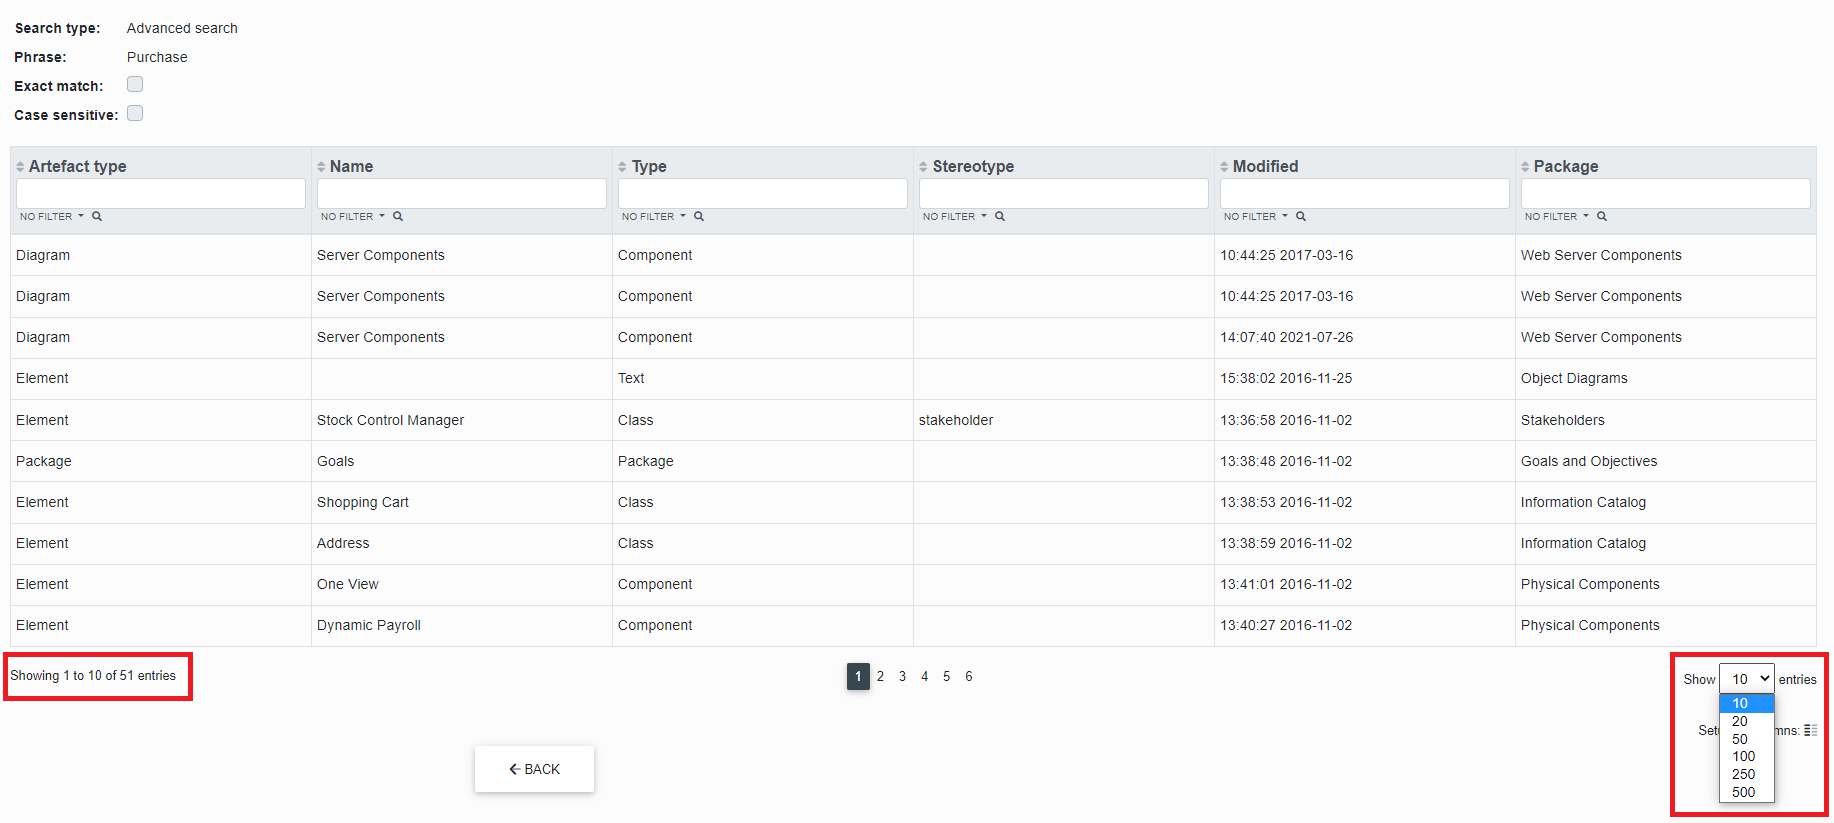
"Display settings" - you can set how many records are displayed per page (the number of records can be changed with the arrow). According to the displayed records the number of pages changes.
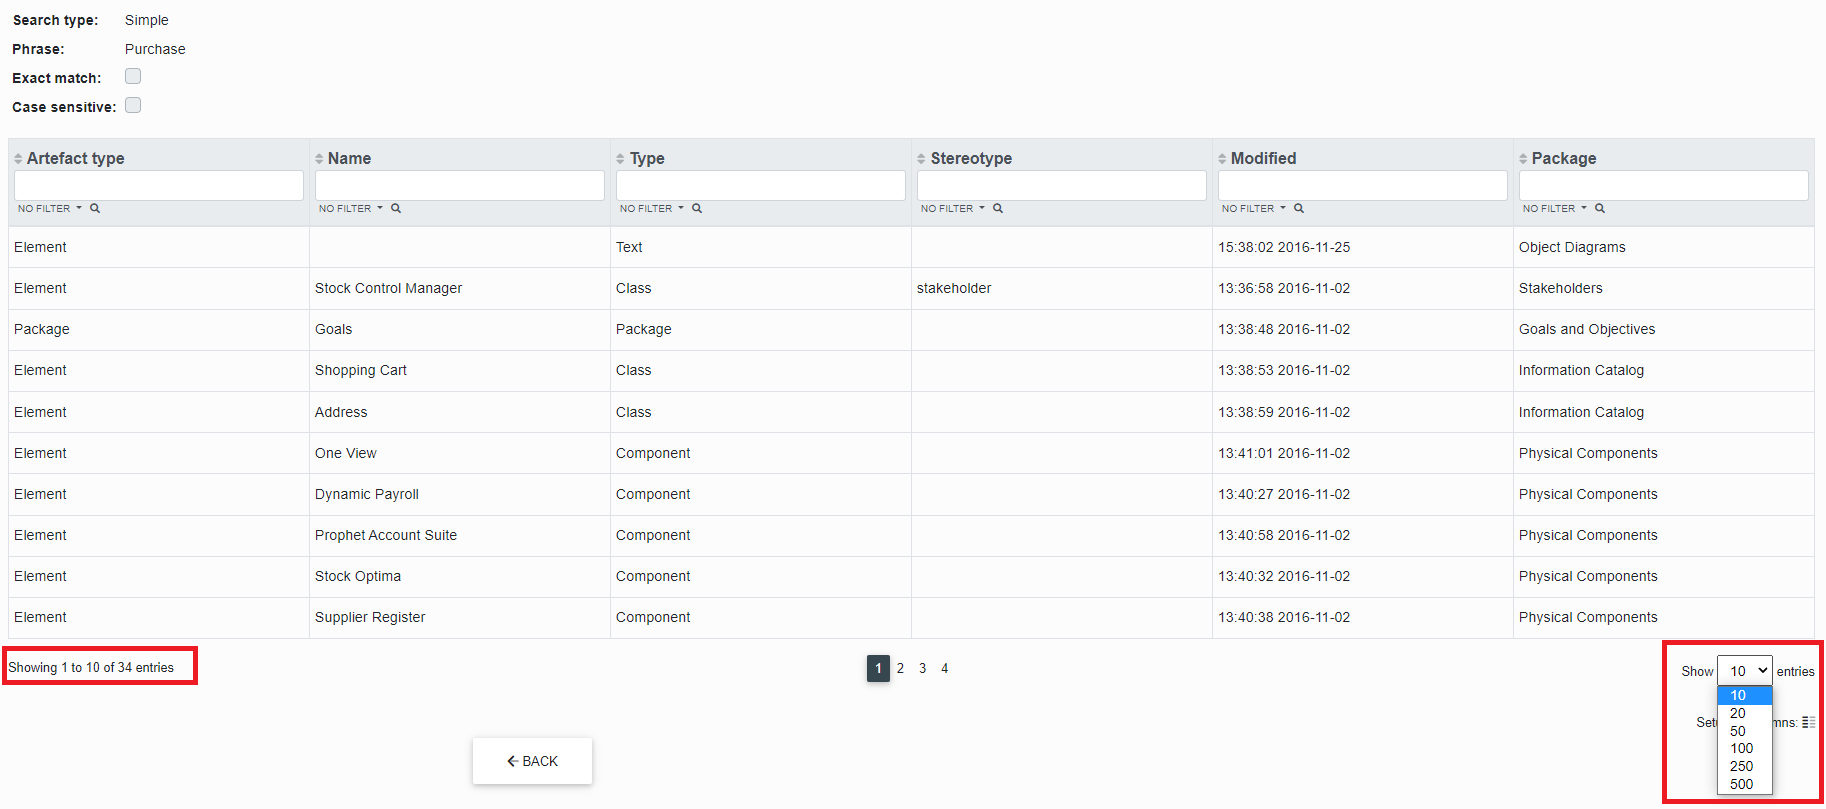
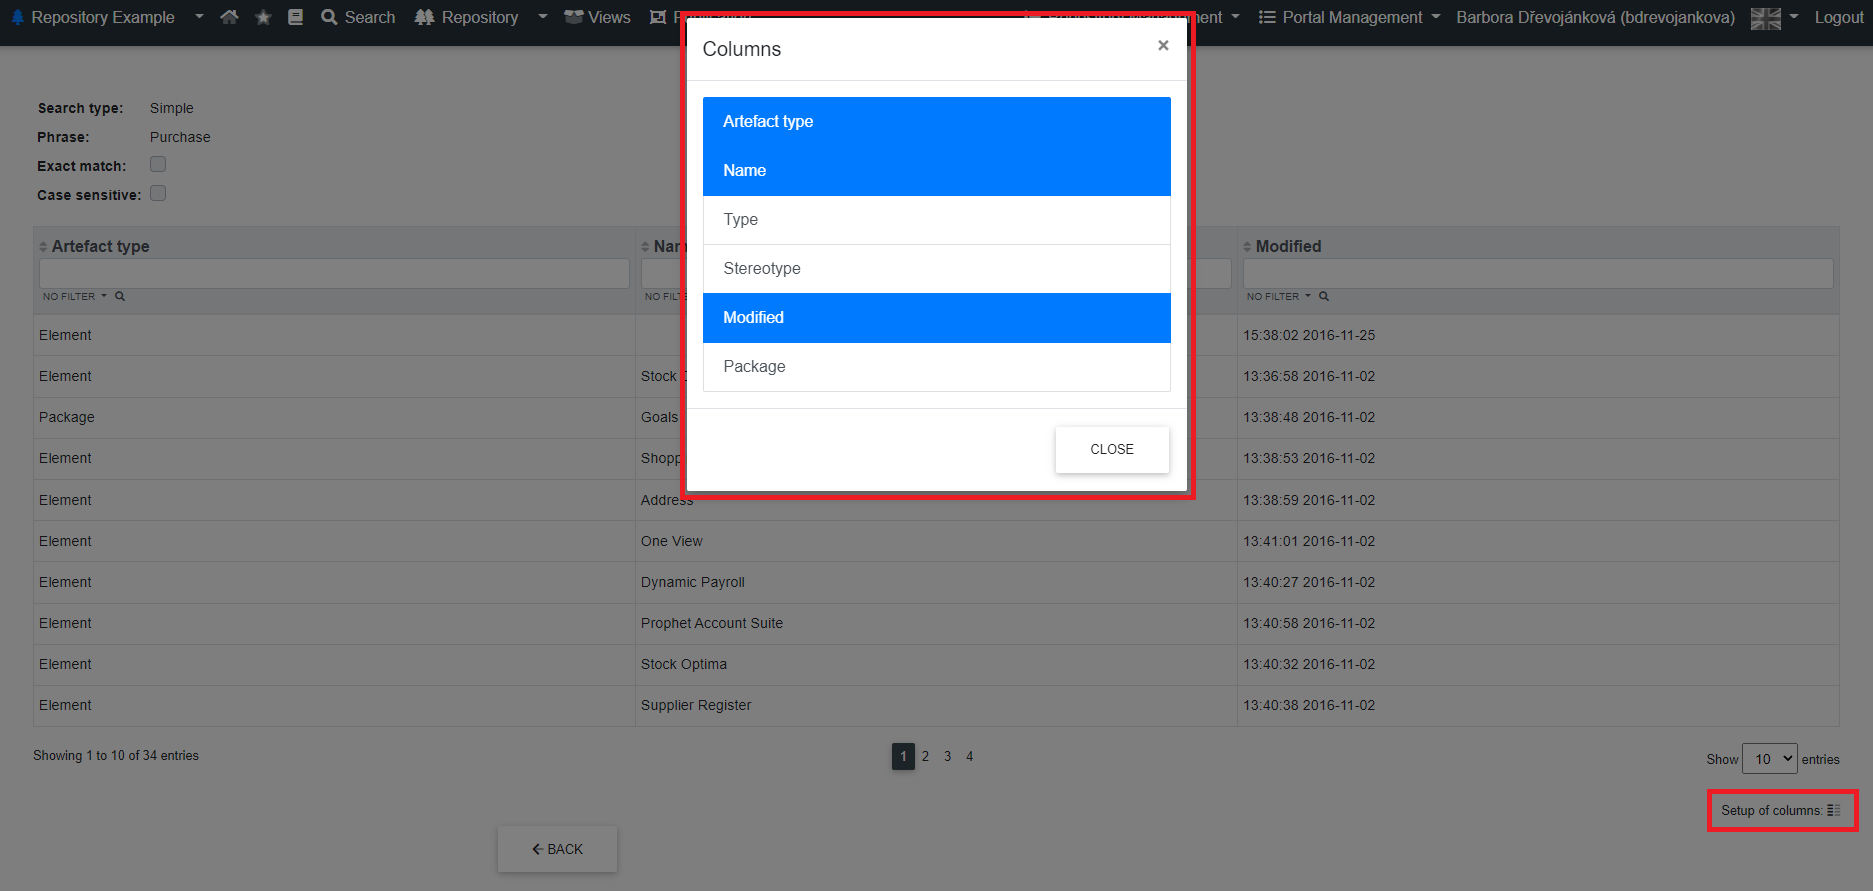
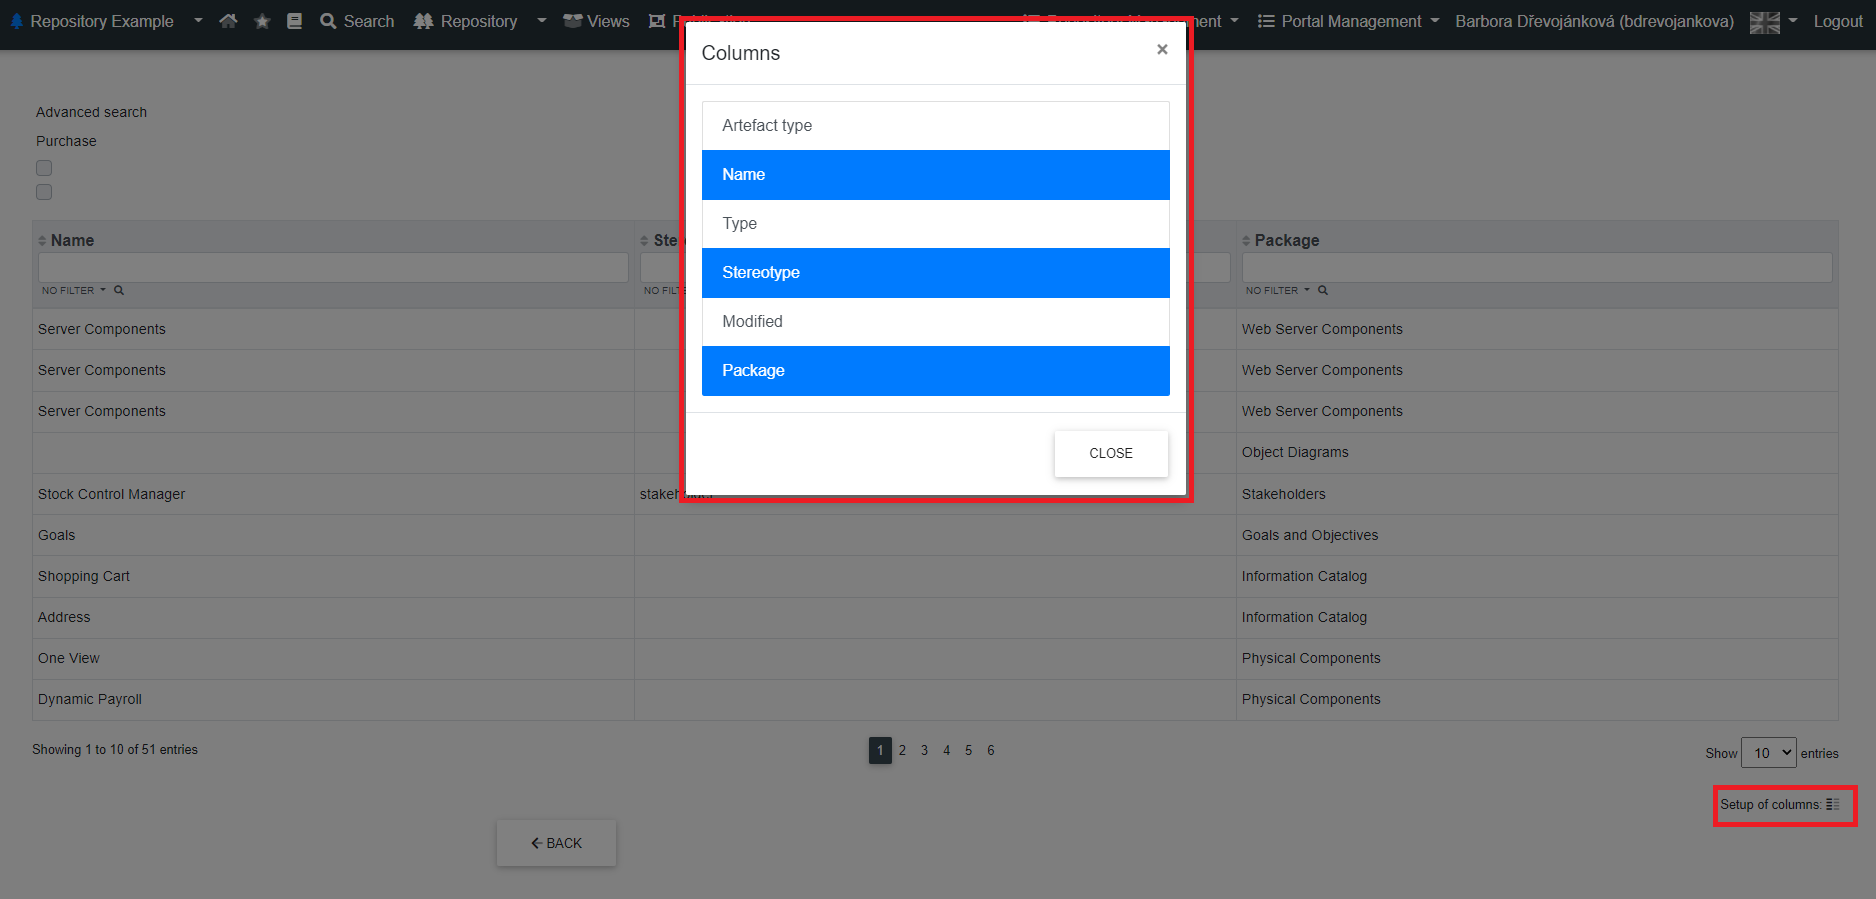
"Columns settings" - if the user clicks on columns, a dialog box pops up where he can click on columns he does not want or need to see in the table, the change will take effect immediately after clicking on a certain row.
The "Close" button closes the dialog box.
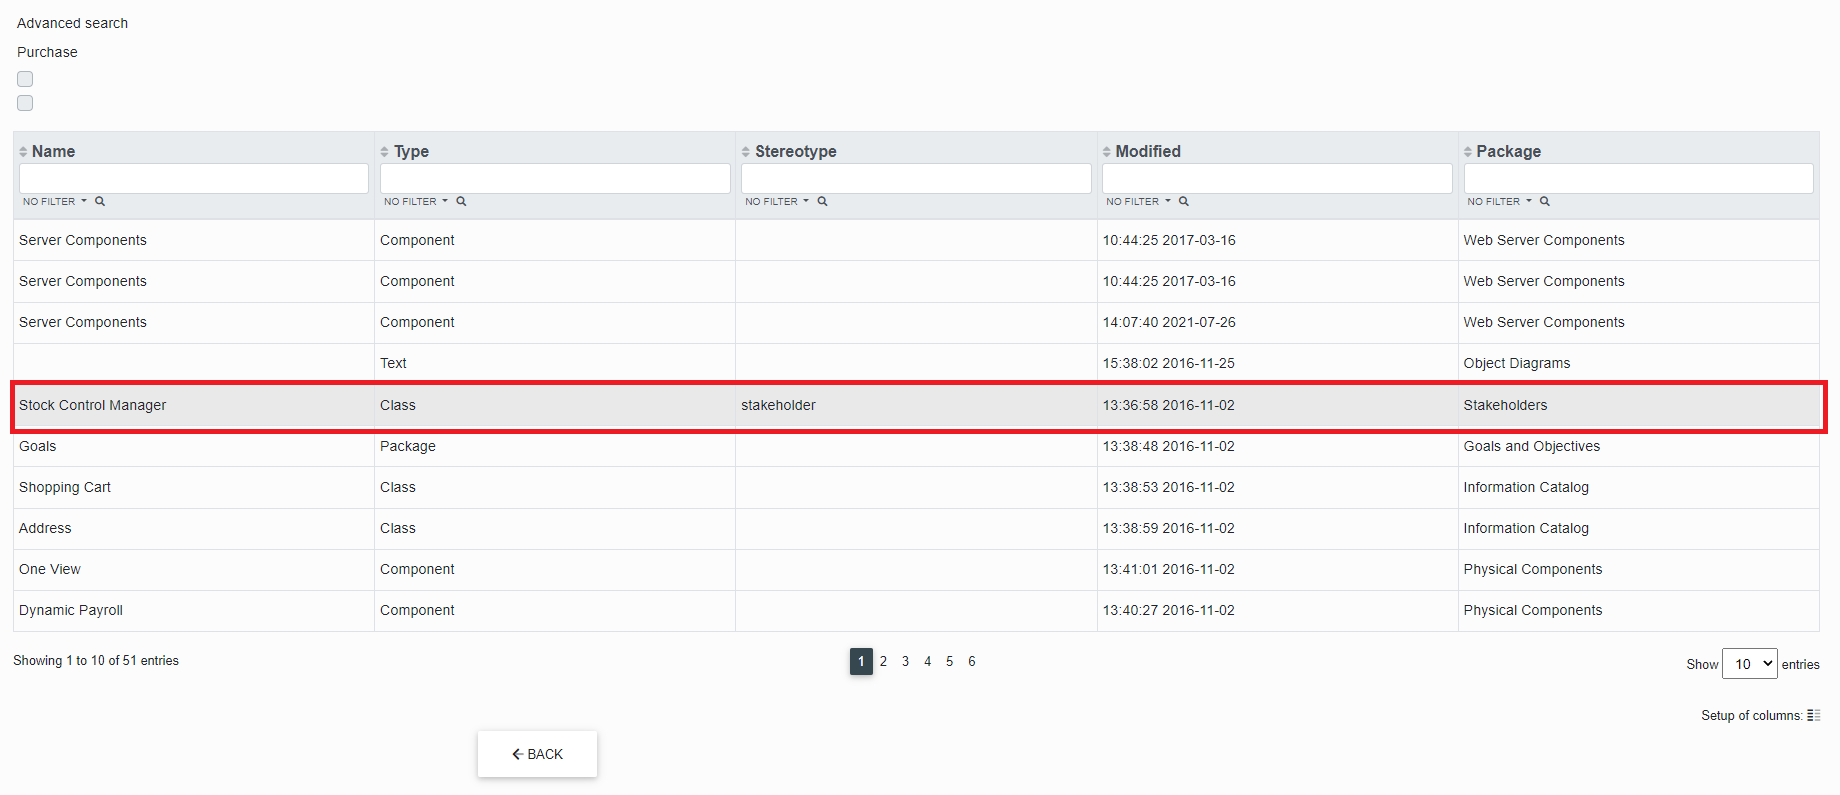
To view a specific artifact, the user can click on that row.
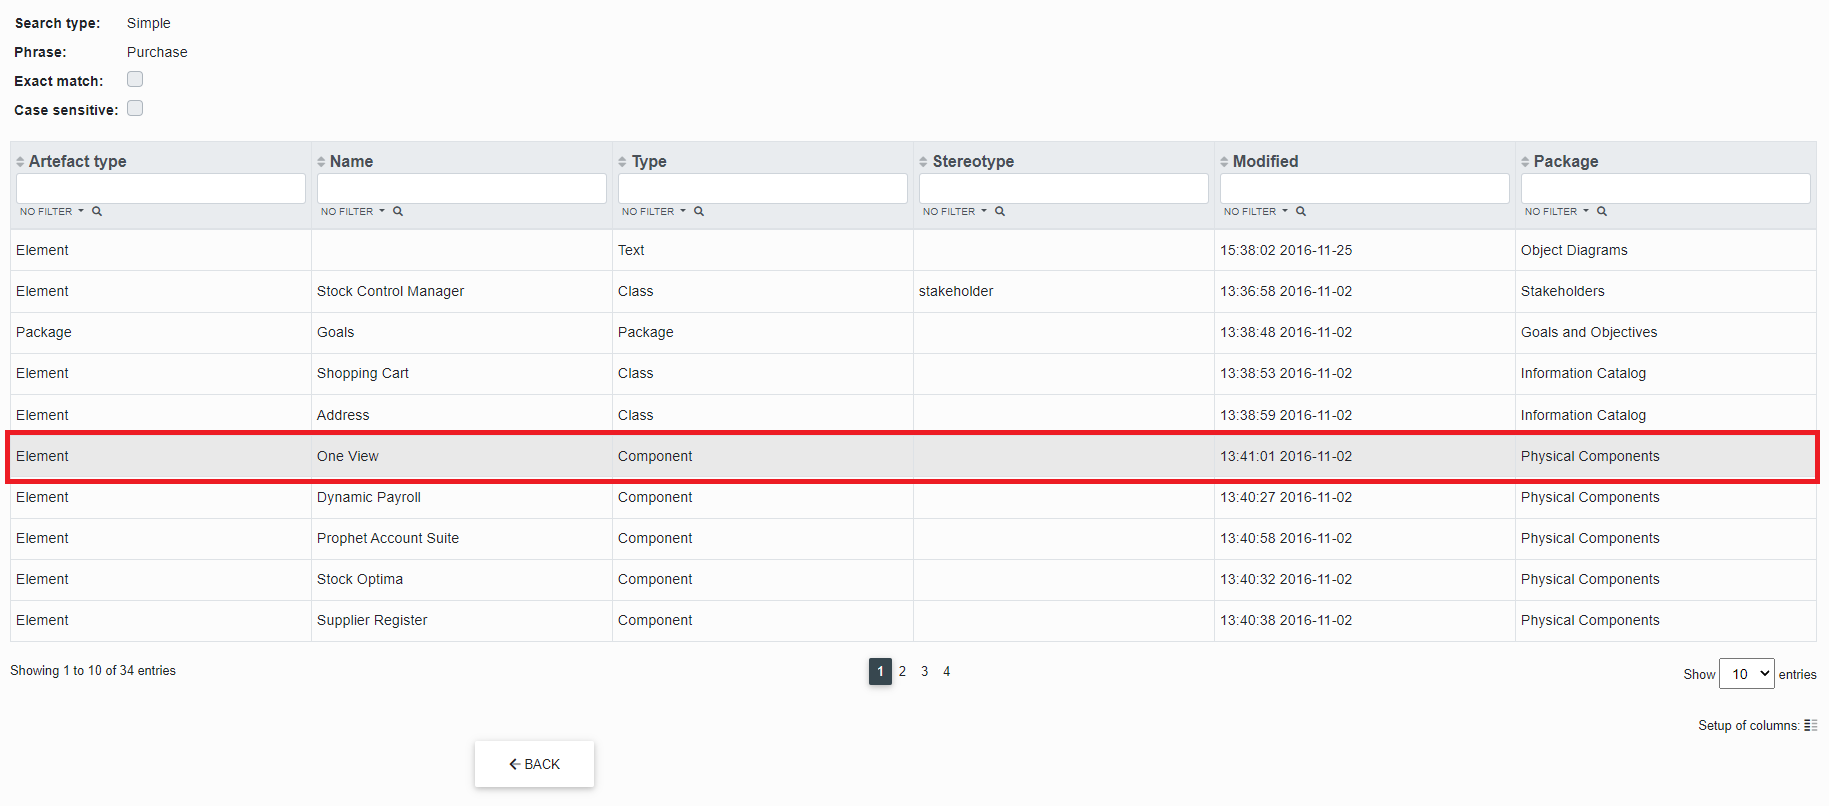
The click redirects the user to the element. The right part shows the artifact detail and the left part shows the artifact marked in the tree.
Advanced search
If the user selects advanced search, elements, diagrams and other elements (attributes, operations, etc.) are searched. All their fields are searched.
The user can also choose whether to search:
- Exact match - searches only for elements that match the search phrase
- Case-sensitive - case-sensitive (works only if the EA database is CaseSensitive)
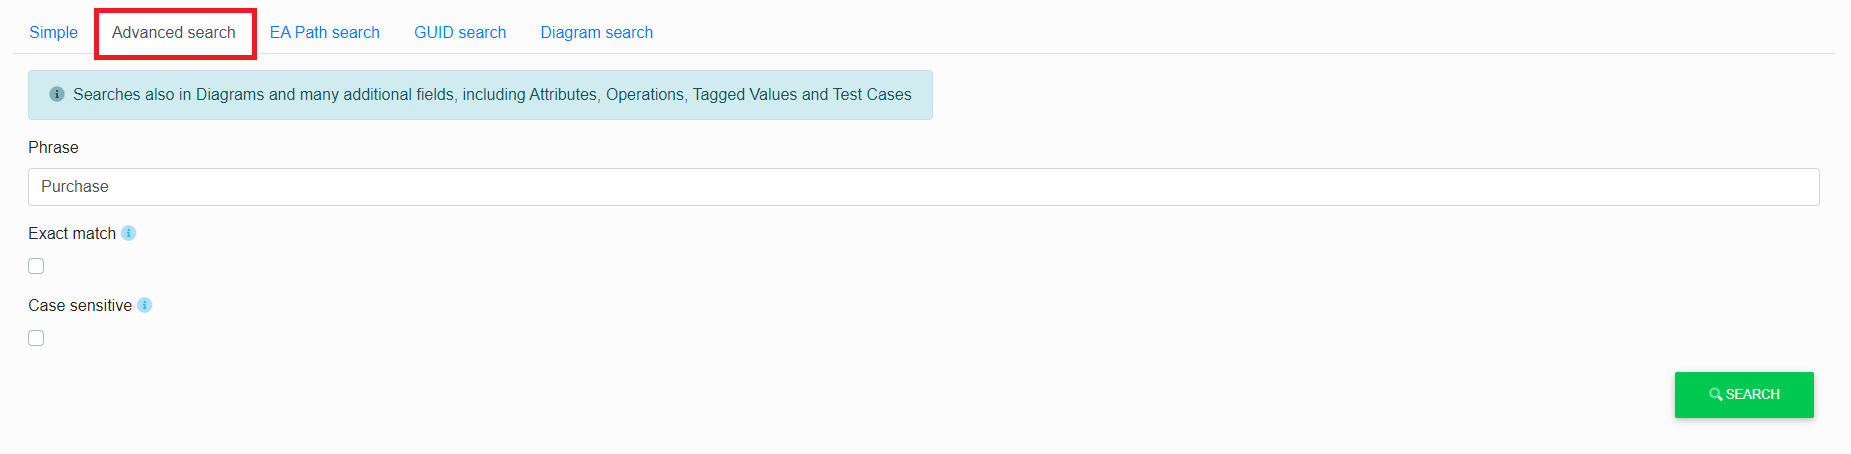
In the "Phrase" field, the user types the artifact being searched for.
If the user wants an exact match, he checks the "Exact Match" box and/or if he wants case sensitive, he checks the "Case Sensitive" box and clicks the "Search" button.

A table is displayed where the user can see "Artifact type, name, type, stereotype, modified and package".
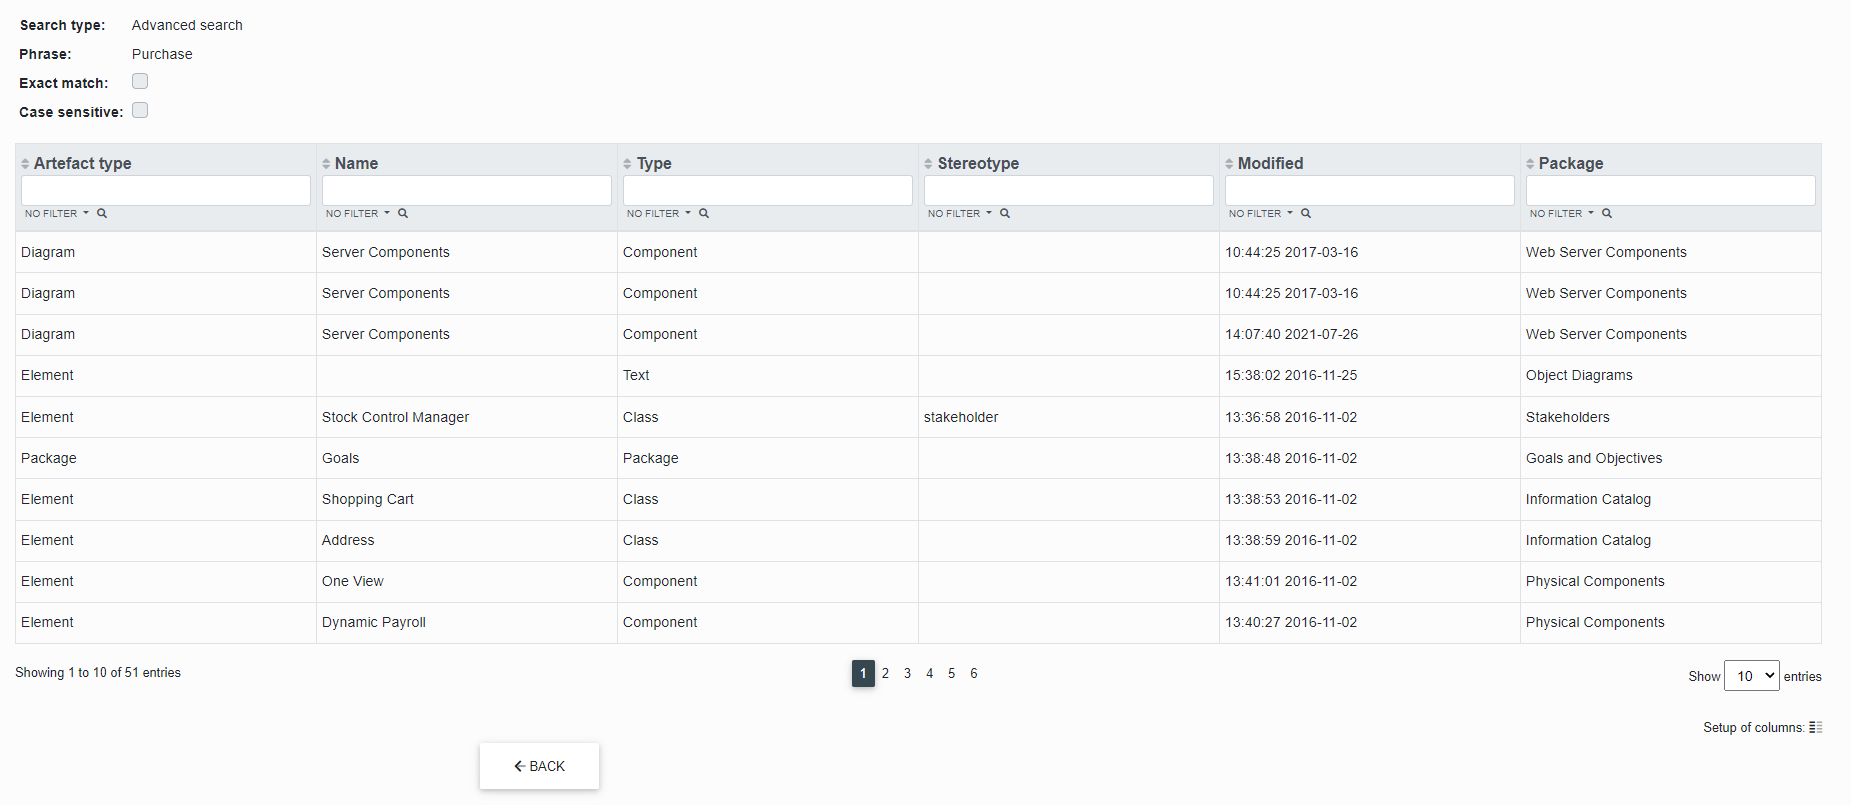
The user can fill in part or all of the name in the highlighted section to find a specific artifact more quickly.
After filling in, just use "Enter" or use the "magnifying glass" under the field and the table will be updated and filtered according to the filled in text.
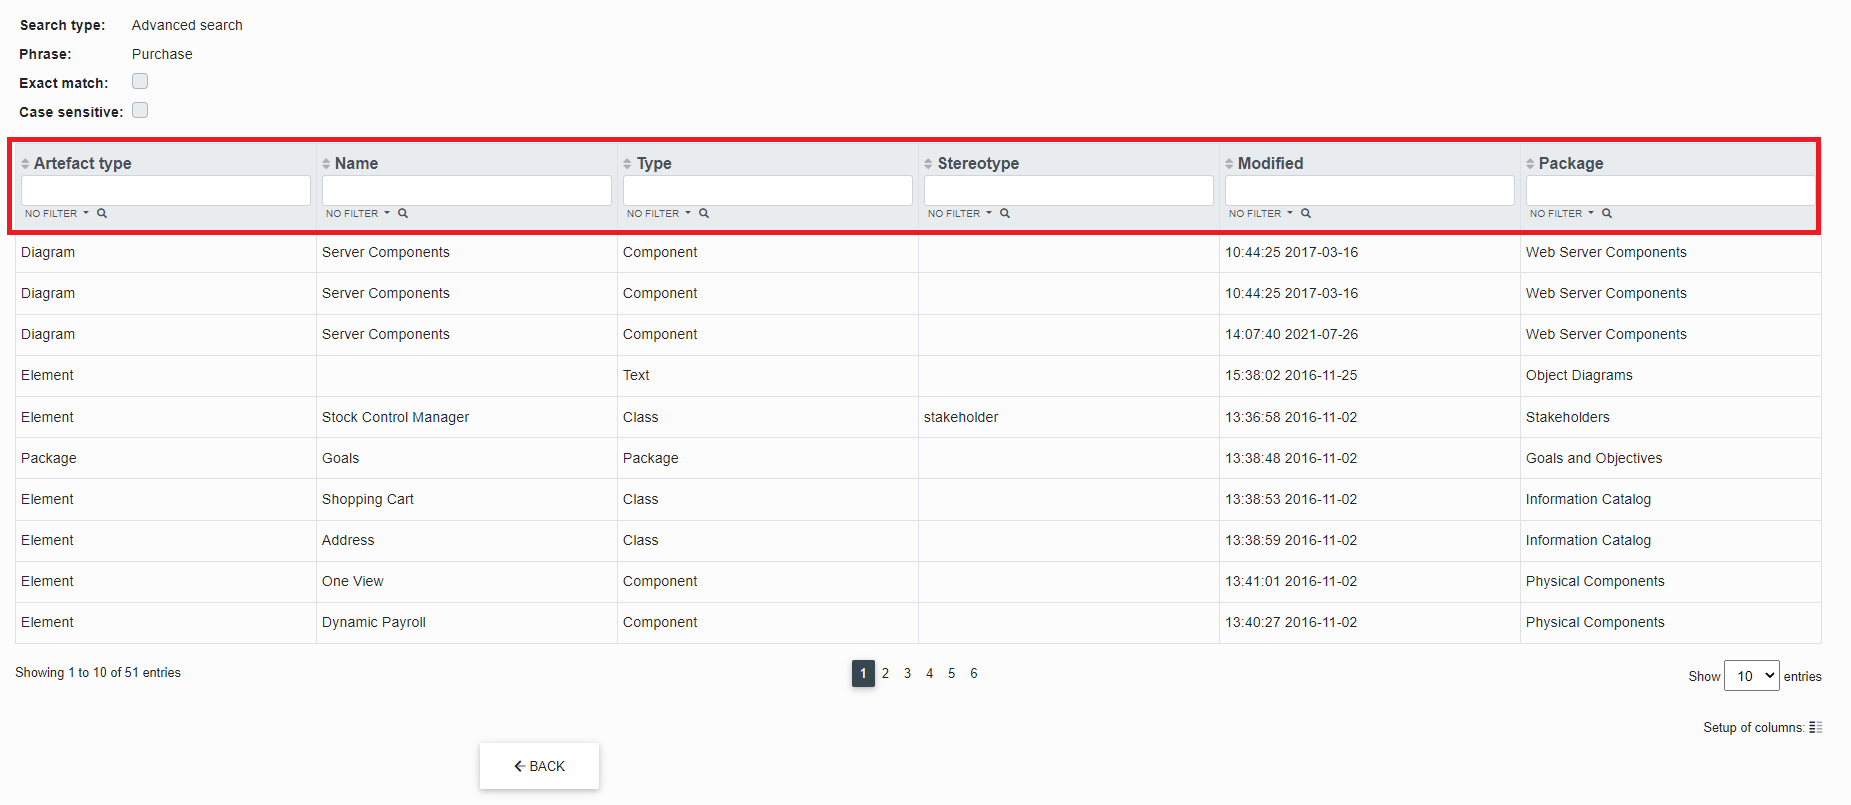
Each column has arrows in the header next to the name to allow sorting (No. 1)
The arrow next to the "magnifying glass" expands a mini dialog where the user can select the type of filtering condition (No. 2)
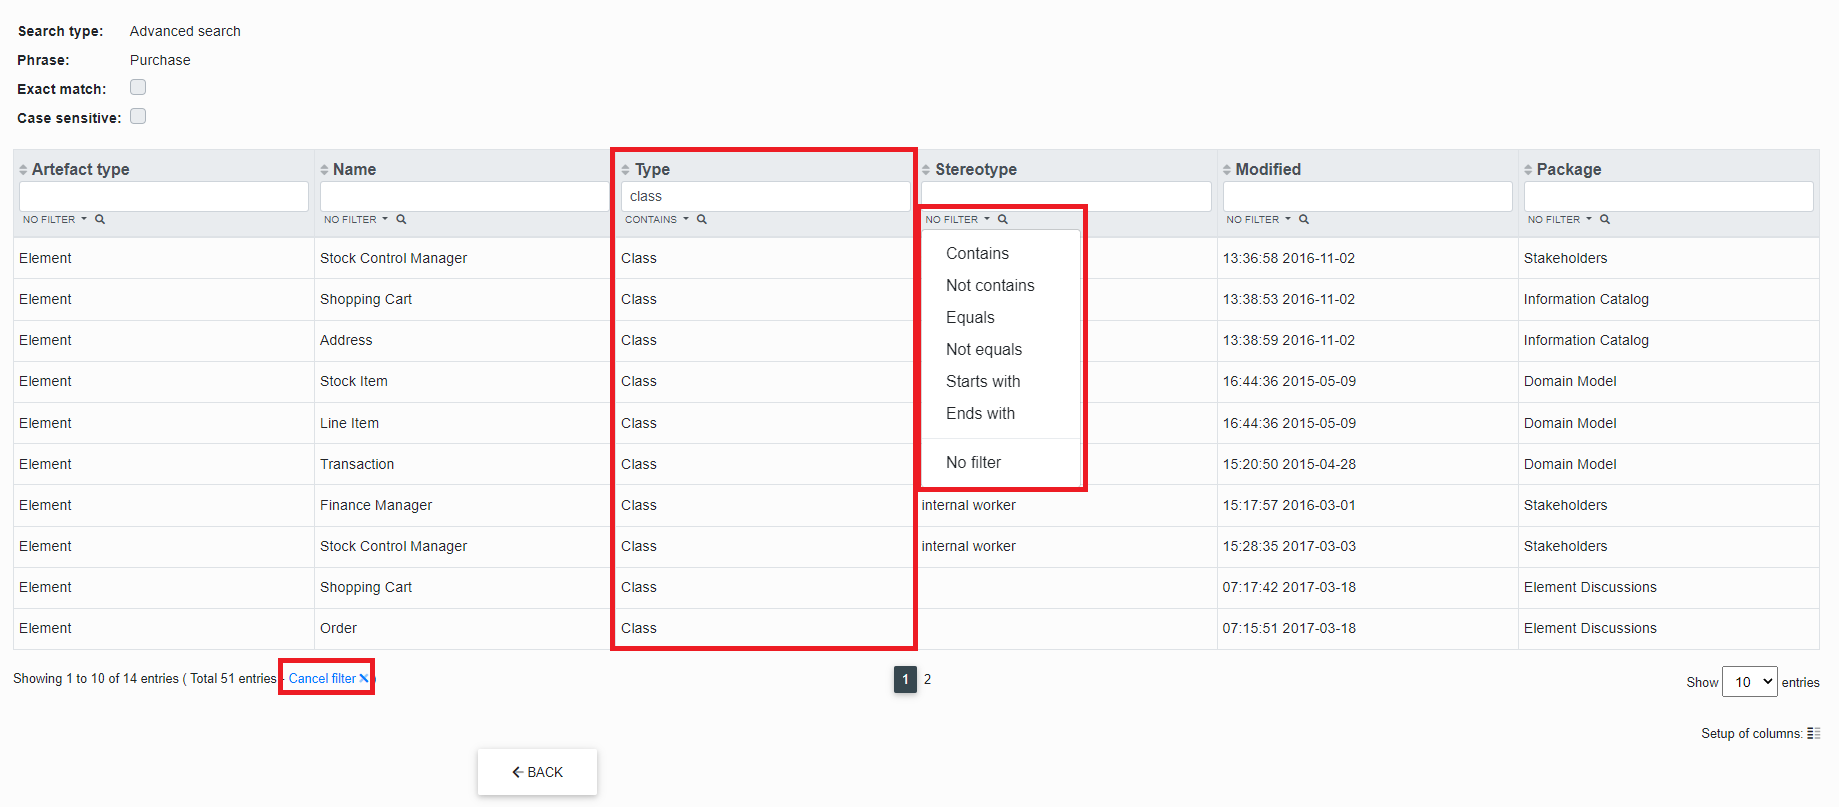
If the user wants to refresh the filtering table, just click on the blue text "Cancel filter" (No. 3).
- Number of artifacts displayed
- Number of pages of displayed artefacts - active area where it is possible to click on the page number to get further in the displayed list
- Setting the columns displayed in the table
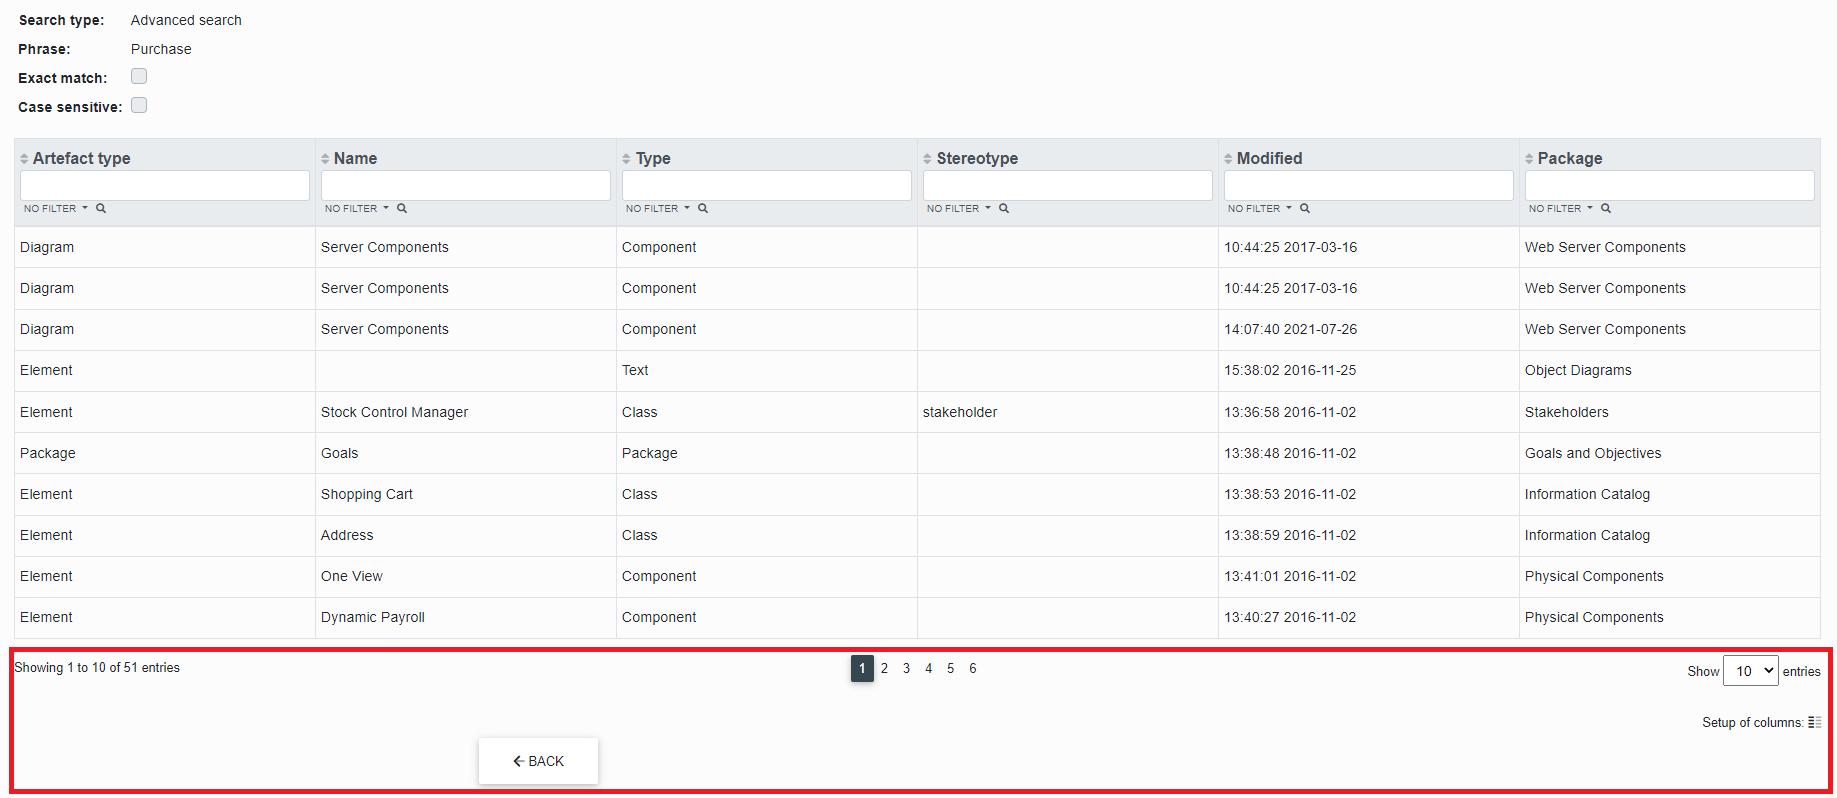
"Displayed records" - you can see how many records are searched and how many are displayed.
"Display settings" - you can set how many records are displayed per page (the number of records can be changed with the arrow). According to the displayed records the number of pages changes.
"Columns settings" - if the user clicks on columns, a dialog box pops up where he can click on columns he does not want or need to see in the table, the change will take effect immediately after clicking on a certain row.
The "Close" button closes the dialog box
To view a specific artifact, the user can click on that row.
The click redirects the user to the element. The right part shows the artifact detail and the left part shows the artifact marked in the tree.
EA Path search
If the user chooses to search by PATH, the element located on the specified path is searched.

In the "Path to element" field the user types or pastes the copied ea path (it is a sequence of packages and elements separated by a dot) and clicks on the "Search" button.

GUID search
If the user chooses to search by GUID, elements with the given GUID are searched.

The user types or pastes the copied GUID into the "Element Guid" field and clicks the "Search" button.

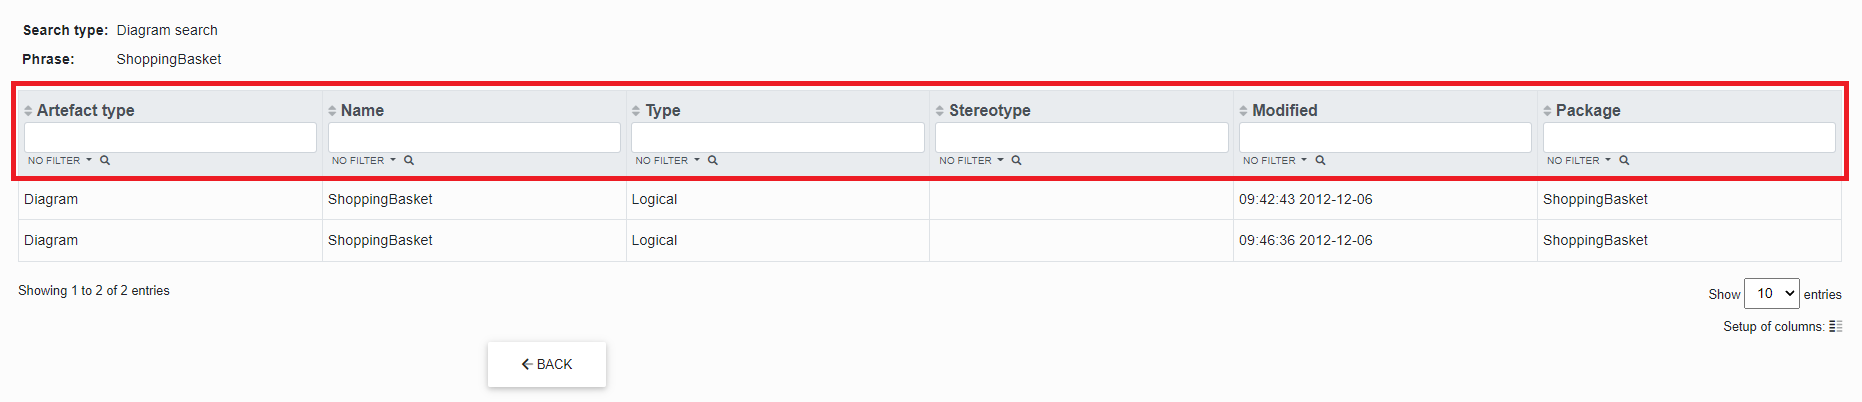
Diagram search
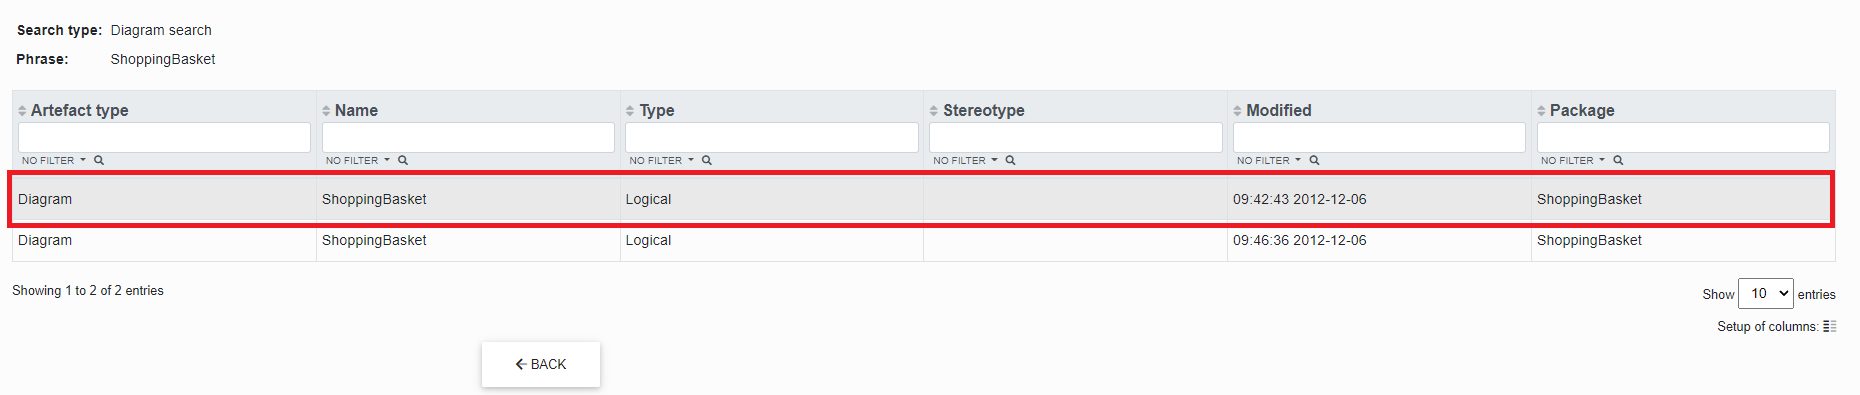
If the user selects diagram search, the title and note of all diagrams are searched.

In the "Phrase" field, the user types the diagram to be searched and clicks the "Search" button.

A table is displayed where the user can see "Artifact type, name, type, stereotype, modified and package".
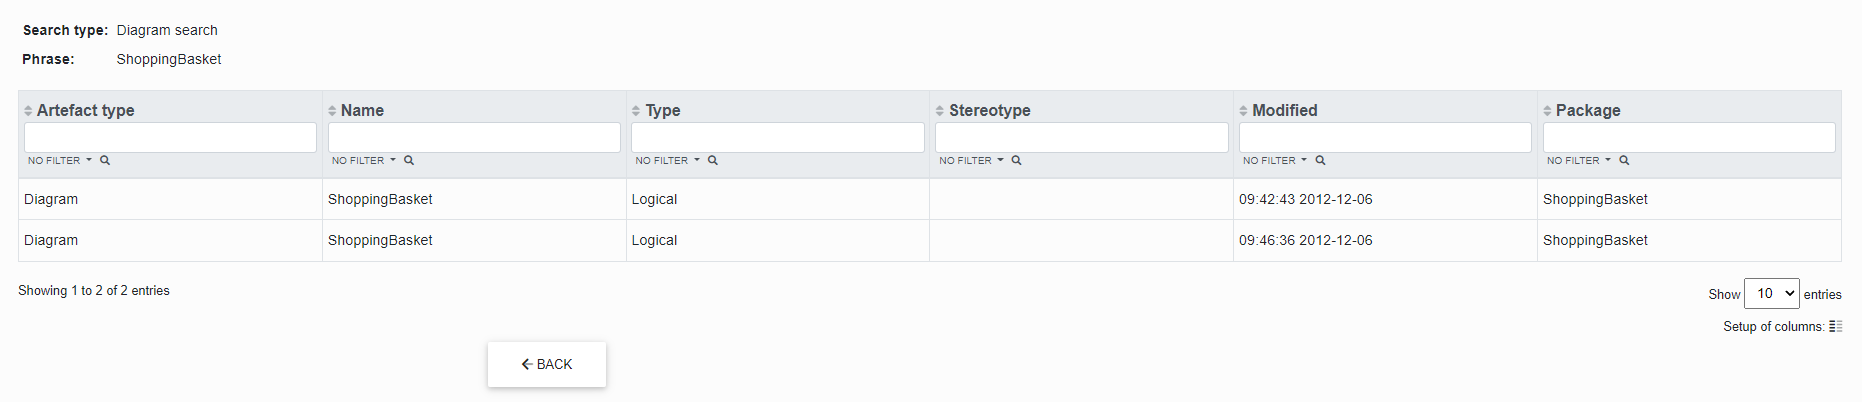
The user can fill in part or all of the name in the highlighted section to find a specific artifact more quickly.
After filling in, just use "Enter" or use the "magnifying glass" under the field and the table will be updated and filtered according to the filled in text.
Each column has arrows in the header next to the name to allow sorting (No. 1)
The arrow next to the "magnifying glass" expands a mini dialog where the user can select the type of filtering condition (No. 2)
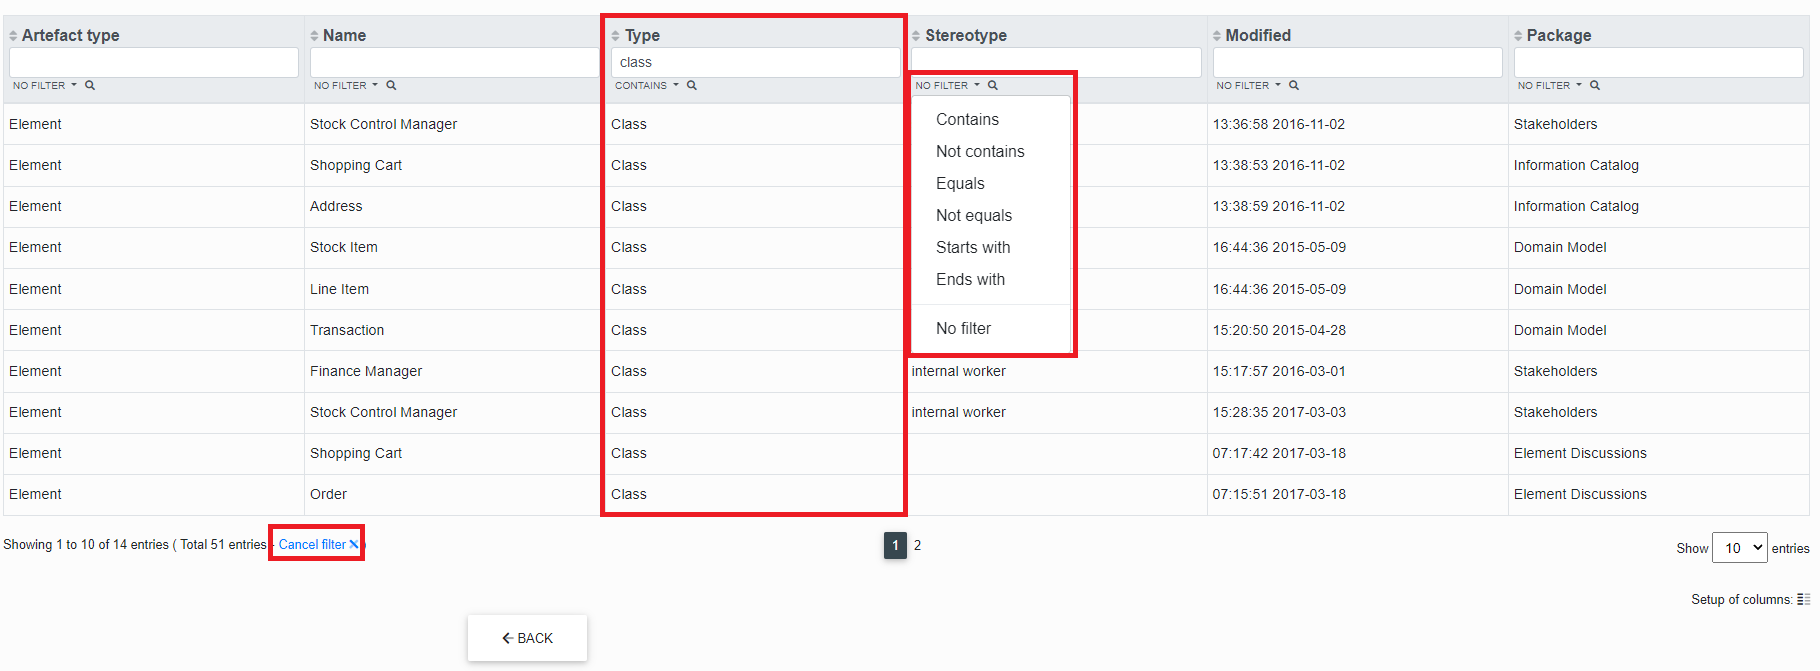
If the user wants to refresh the filtering table, just click on the blue text "Cancel filter" (No. 3)
- Number of artifacts displayed
- Number of pages of displayed artefacts - active area where it is possible to click on the page number to get further in the displayed list
- Setting the columns displayed in the table
"Displayed records" - you can see how many records are searched and how many are displayed.
"Display settings" - you can set how many records are displayed per page (the number of records can be changed with the arrow). According to the displayed records the number of pages changes.
"Columns settings" - if the user clicks on columns, a dialog box pops up where he can click on columns he does not want or need to see in the table, the change will take effect immediately after clicking on a certain row.
The "Close" button closes the dialog box.
To view a specific artifact, the user can click on that row.
The click redirects the user to the element. The right part shows the artifact detail and the left part shows the artifact marked in the tree.
Recently Discussed Elements

If the user selects "Recently discussed artifacts" and fills in how many recent days they want to see discussed artifacts, a list of artifacts will be displayed.
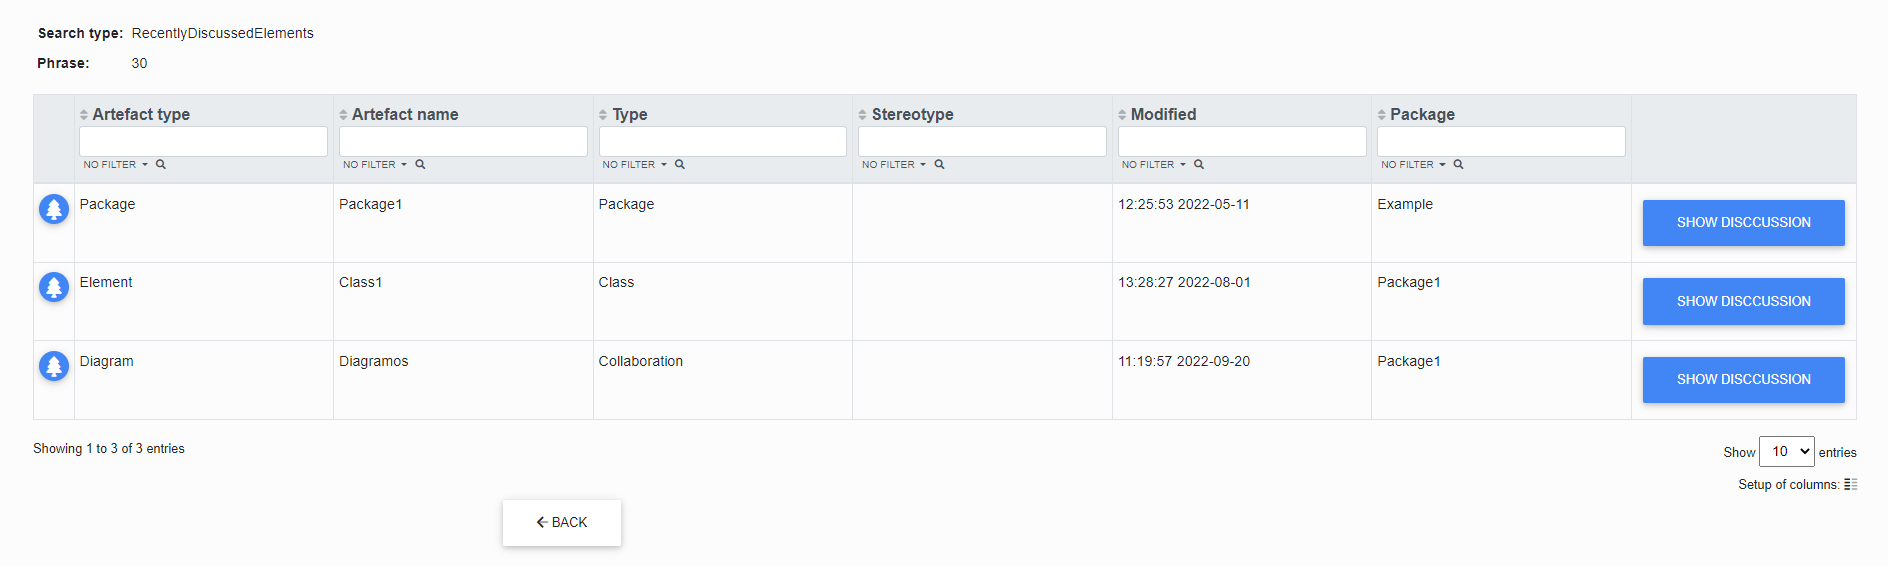
The user can click on the "Tree" icon or the "Show Disccution" button.
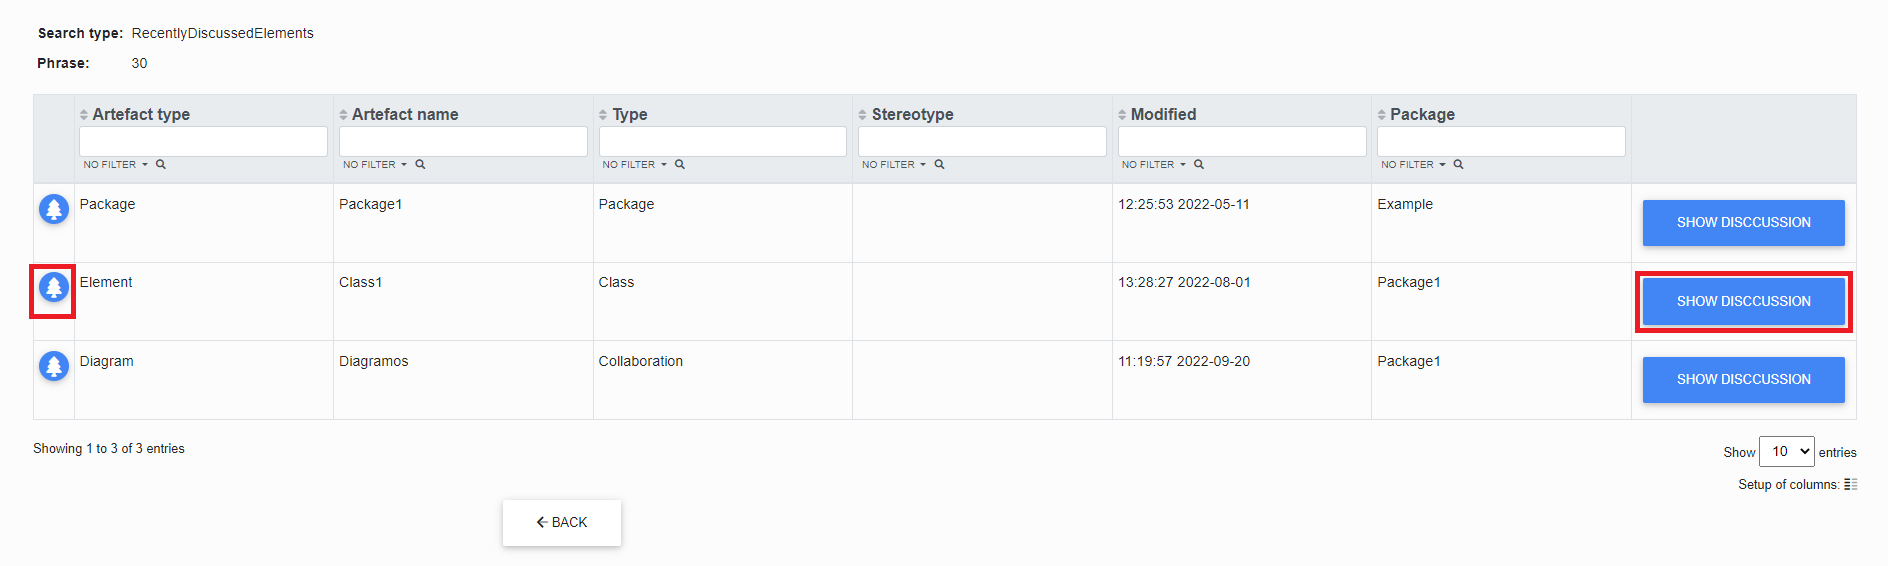
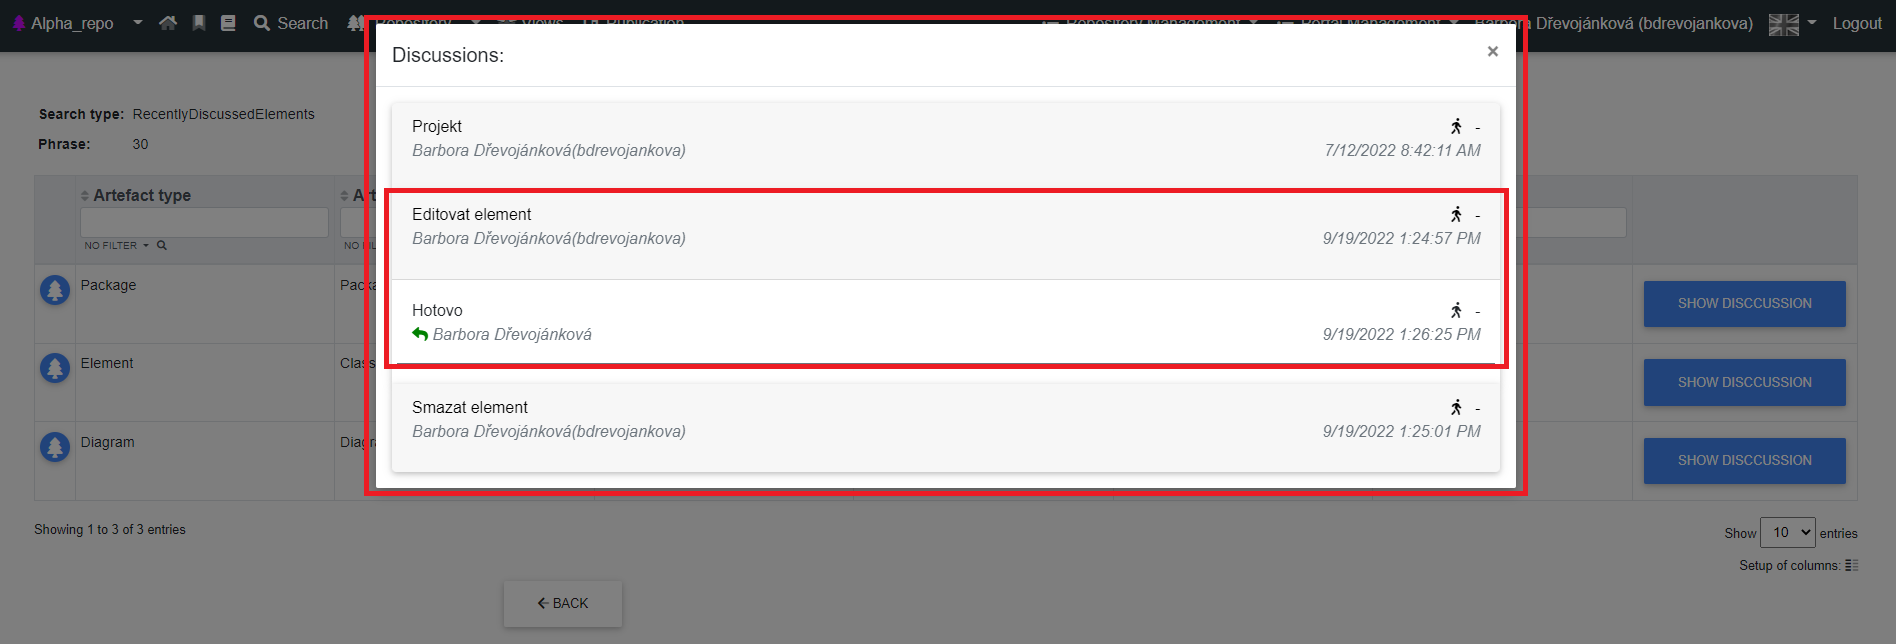
When the user clicks on the "Show Discussion" button, a table with the discussion opens.
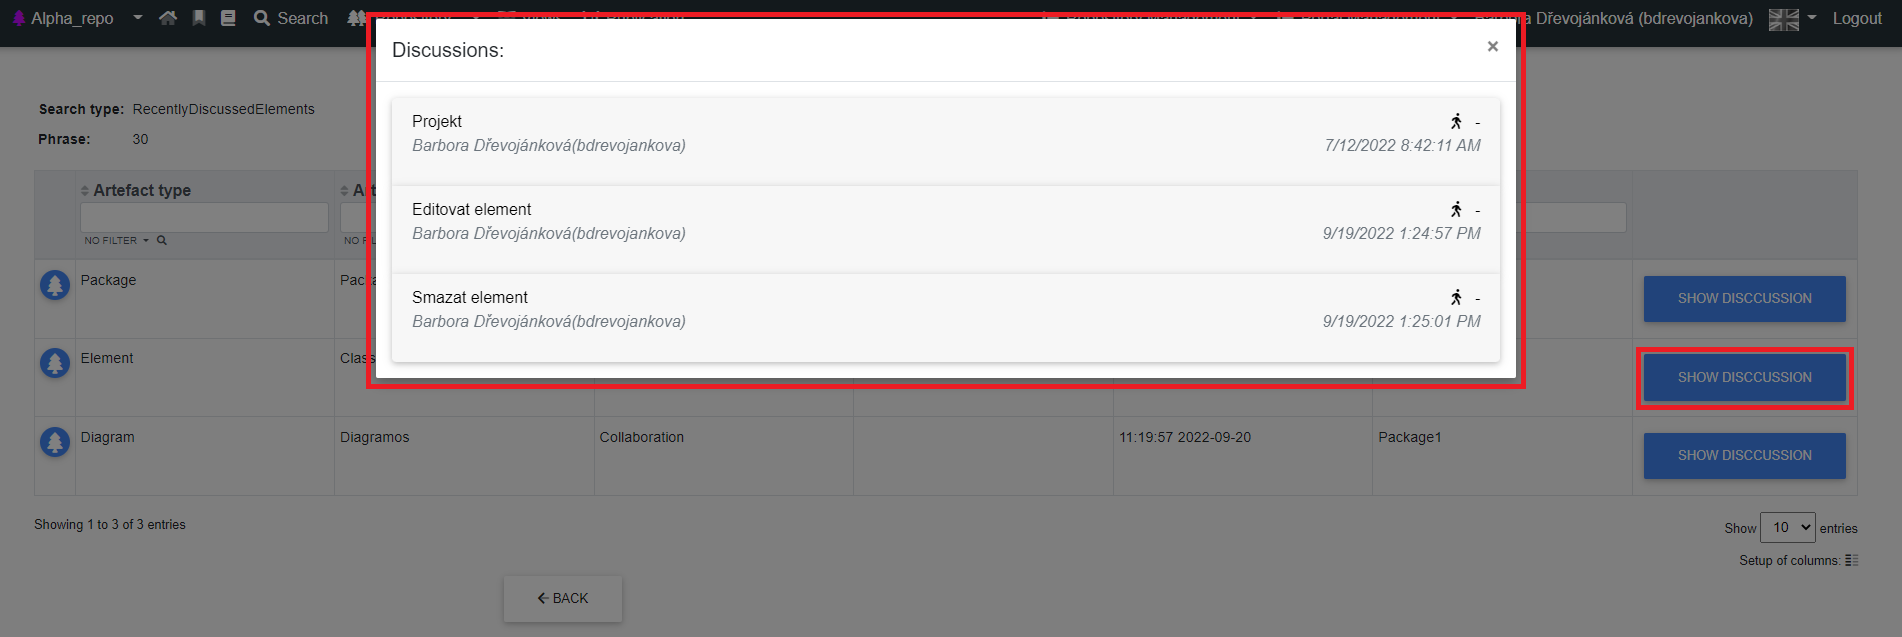
Clicking on a line in one of the discussions will expand another line with a response to that comment (if anyone has responded) or display a line with the message "No Replies"
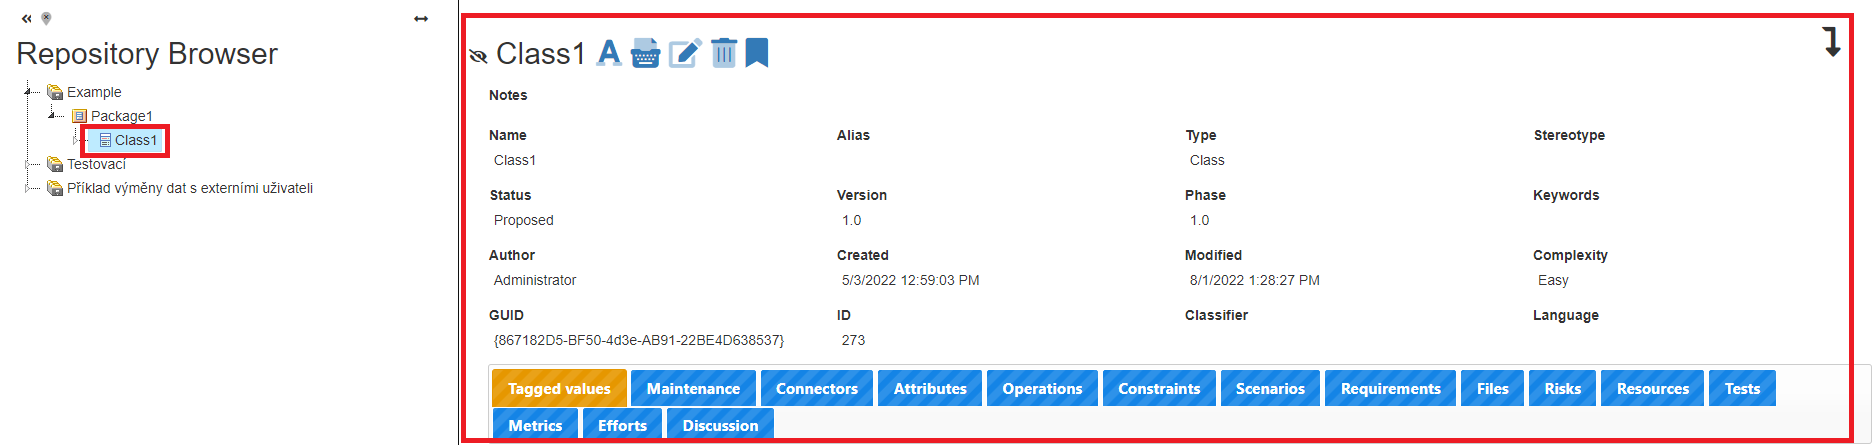
The user can click on the "Tree" icon is redirected to the artifact's repository.
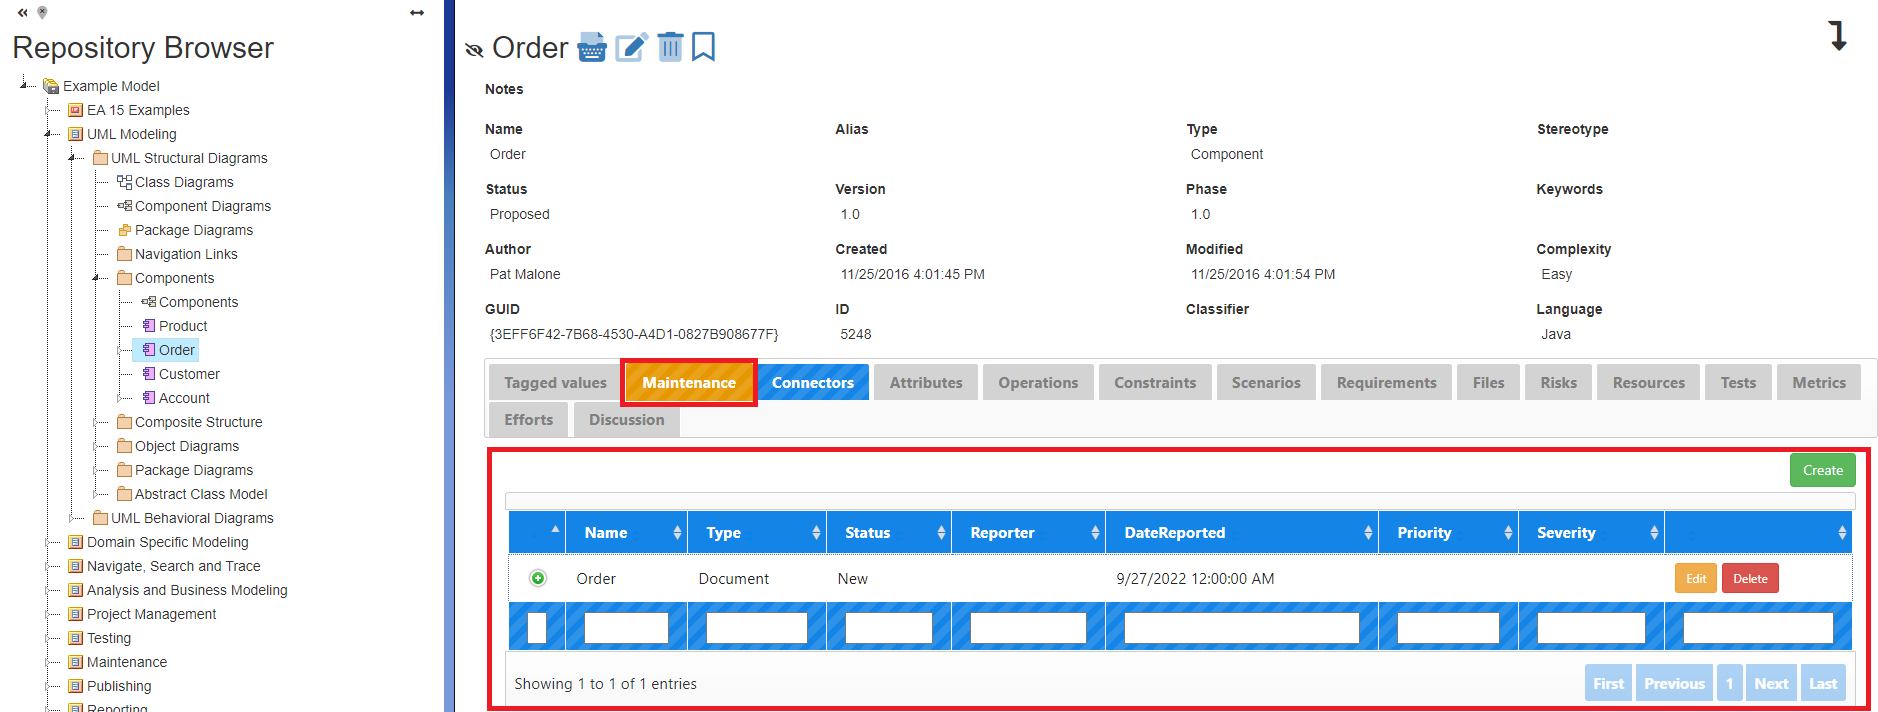
Recent Maintenance

If the user selects "Recent Maintenance" and fills in how many recent days they want to see changes in maintenance, a list of all items in maintenance will be displayed.
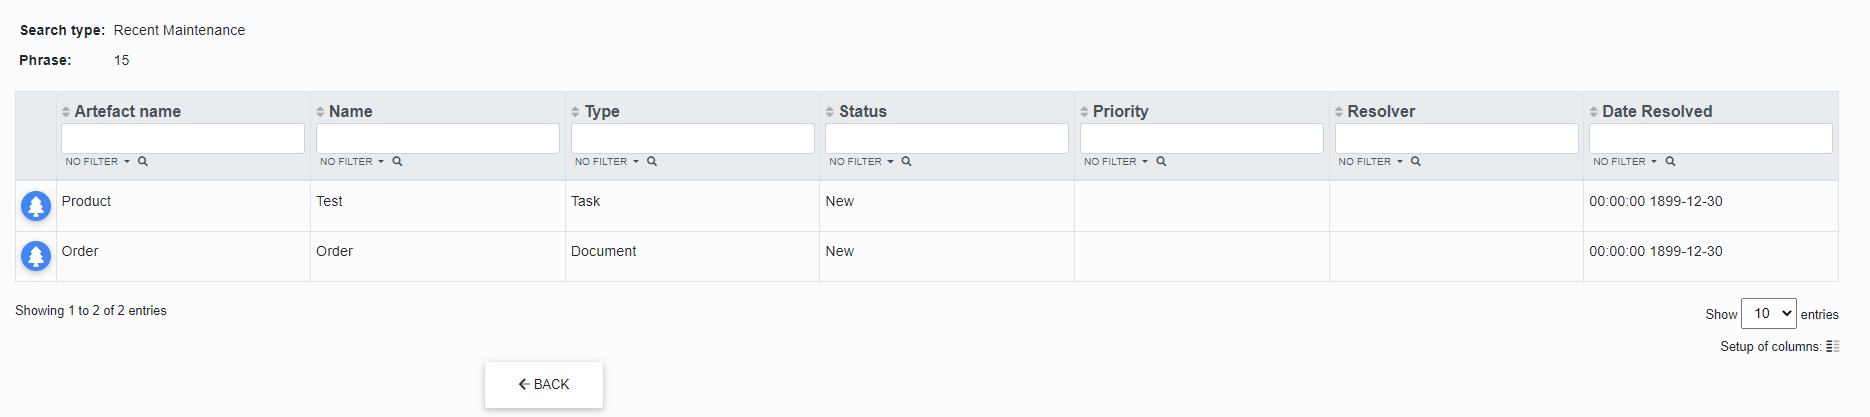
The user can click on the "Tree" icon is redirected to the artifact's repository.
In the "Maintenance" tab, the user can create, edit or delete an artifact.
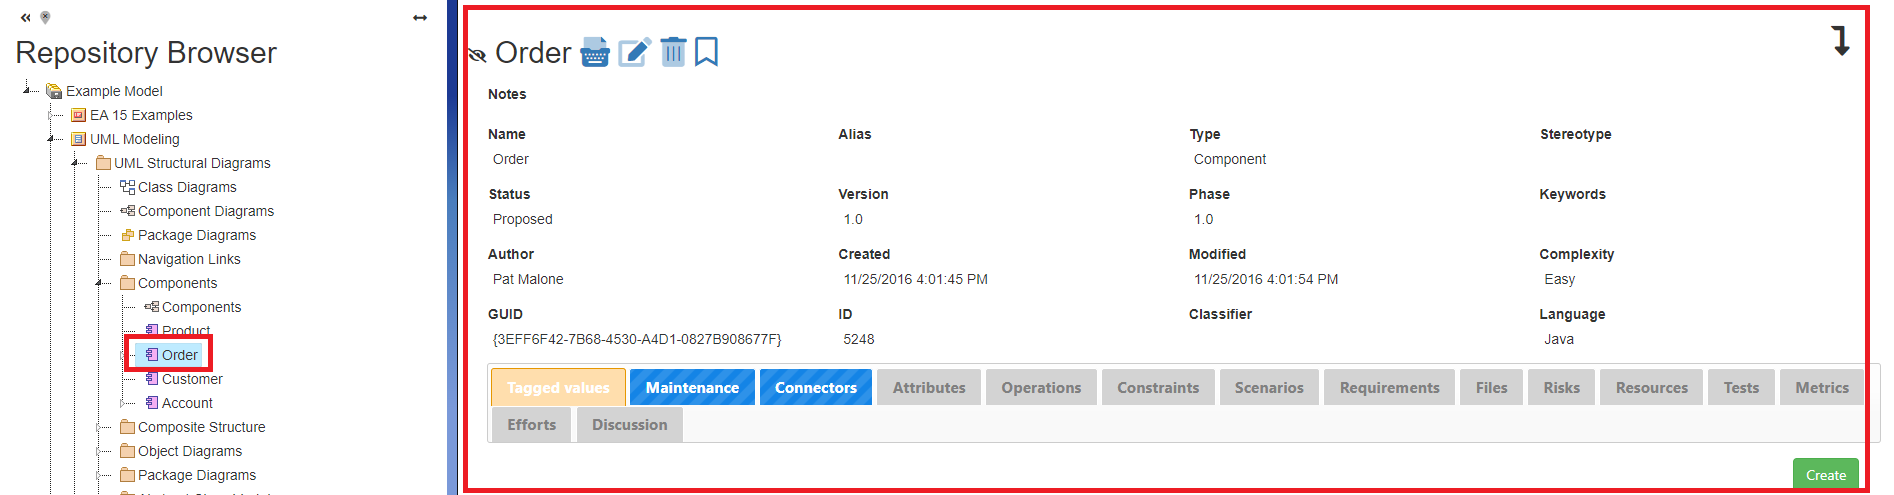
Repository (Repository Browser)
The repository shows the physical structure of the repository, i.e. the hierarchy (tree) of packages, elements, diagrams and other elements. Its functionality is similar to a browser (or repository browser) in the Enterprise Architect tool and it displays data in the same structure with the possibility of additional filtering – see later in this document. Each repository element can be present in the tree only once.
Permissions to parts of the repository
The EA Information Portal supports a package-level permission system (repository browser tree branches) for both read and (as of version 7.5) write permissions.
It is therefore possible to restrict the reading of parts of the model to certain groups or users. This functionality is not available in Enterprise Architect itself.
It is therefore possible to restrict access of certain users to (for example) specific projects, sensitive processes, risk analyses, strategic business models, etc.
This feature fundamentally supports the effort to have all models in one repository.
Permissions can be set for groups and users.
Permissions are applied hierarchically from the package they are set on downwards.
In this context, a new role is introduced in EA Infoport - the owner of a process part. This role will be able to assign read, write (and other) rights to the parts of the model that it owns (tree branches). The owner can be users or groups. This role is introduced so that the repository administrator (admin) doesn't have to set all read or write rights.
Example of use
- Restricting access to external contractors working on a joint project. Everyone sees only what they are allowed to see.
- In case of termination of cooperation with a supplier, it is sufficient to terminate access via the EA Information Portal.

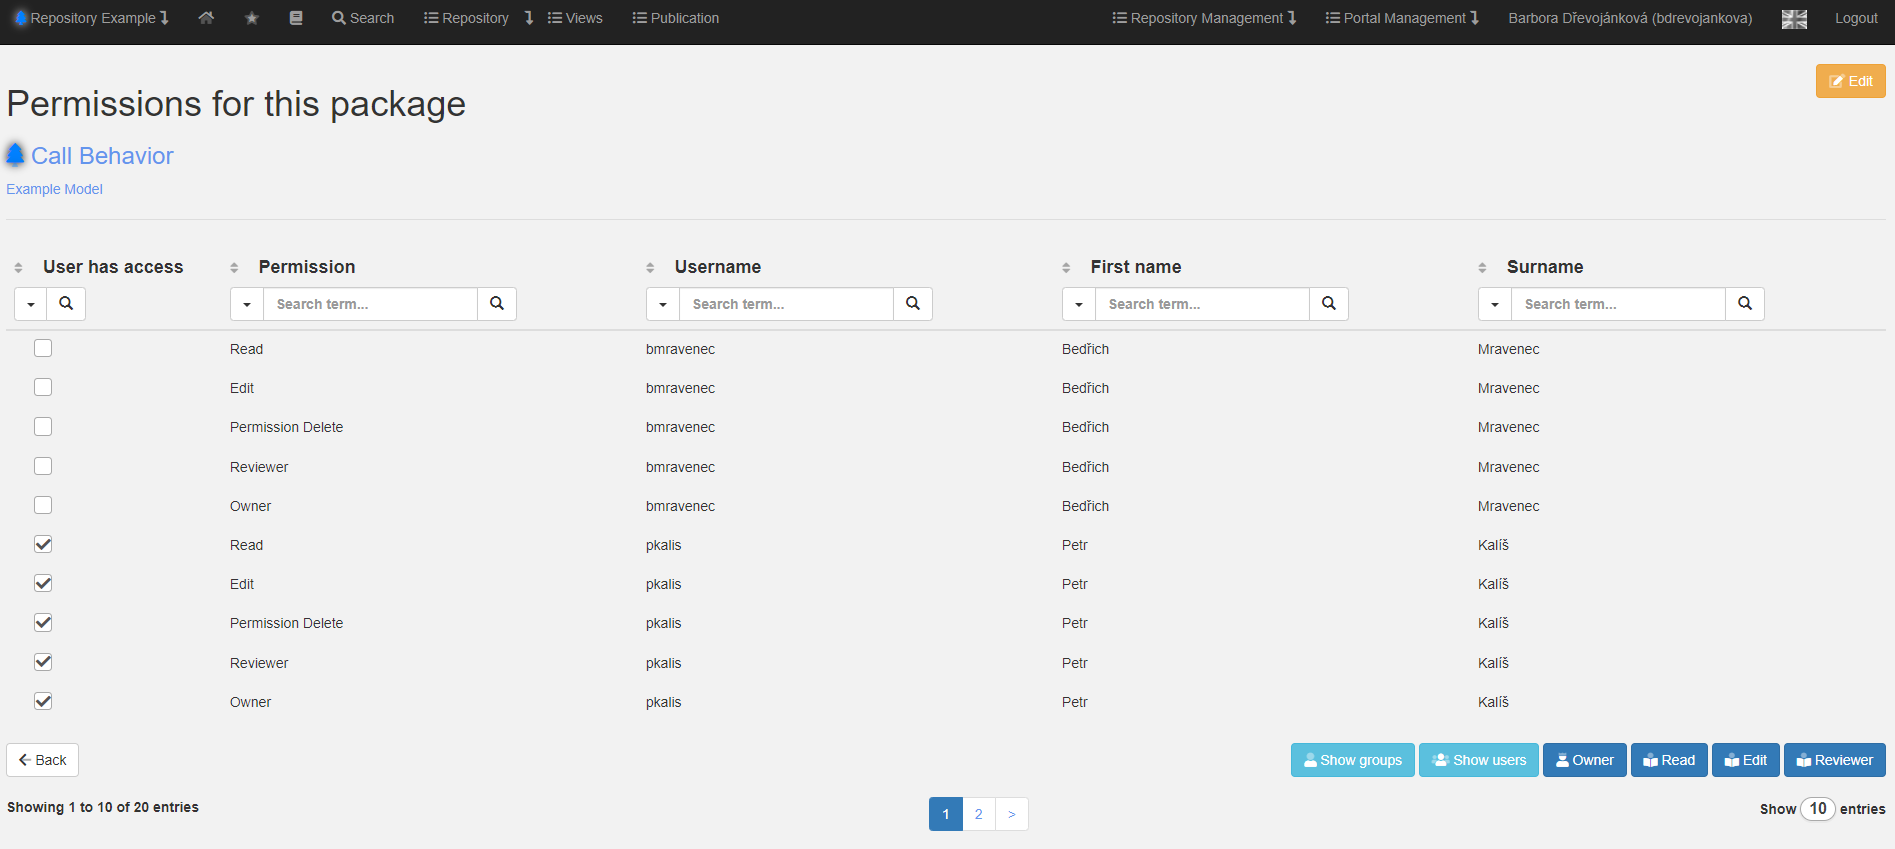
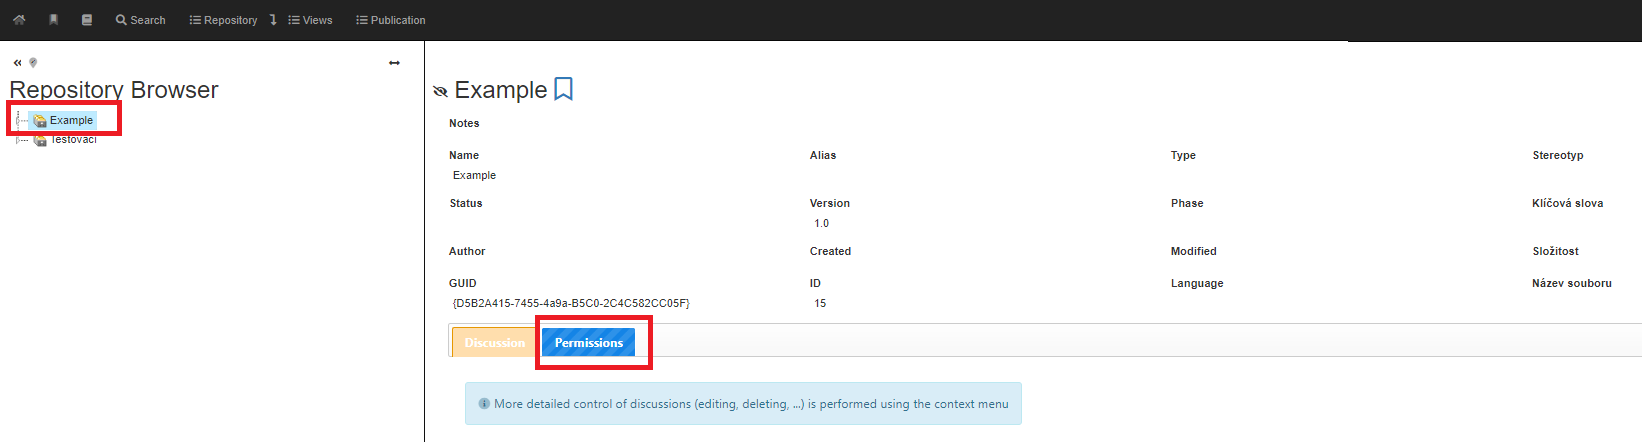
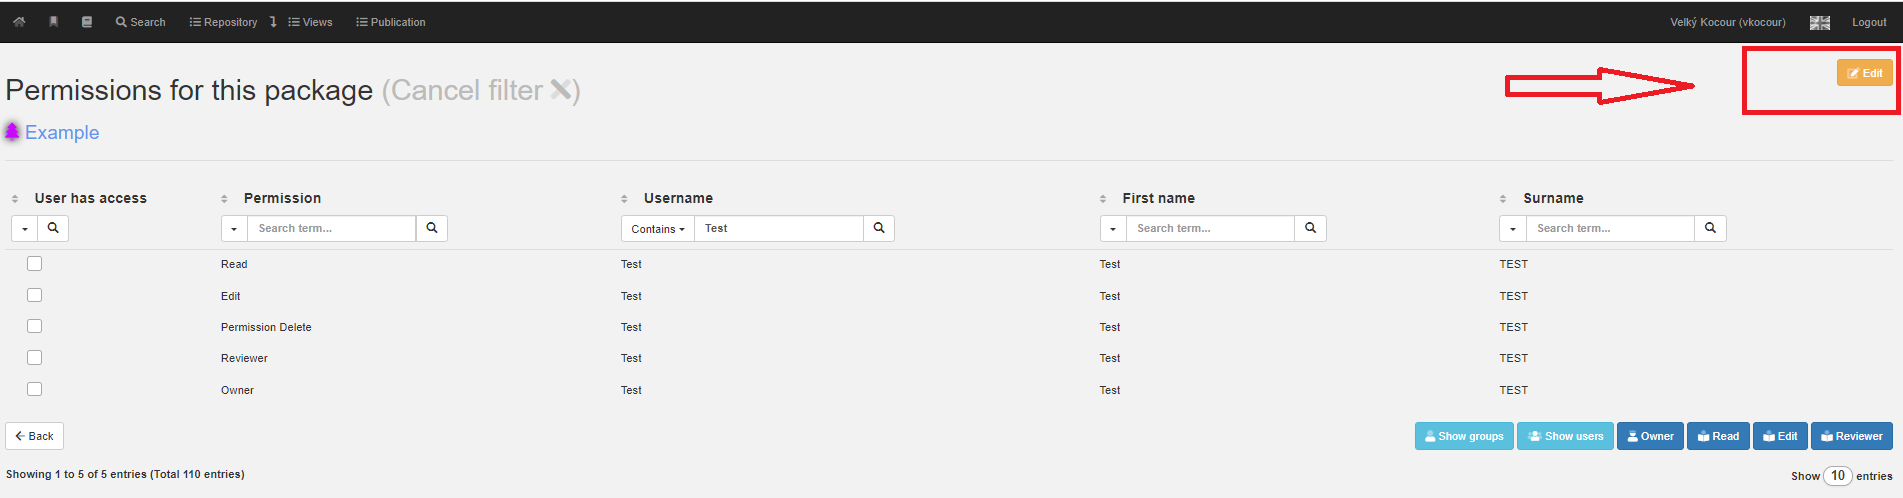
Permissions for this package
Repository View
A user can view the contents of the currently selected repository by clicking on the “Repository” command.

After clicking on the “Repository” command, the corresponding form will be displayed with the repository tree shown in the left half and the contents arranged as it is displayed by Enterprise Architect itself.
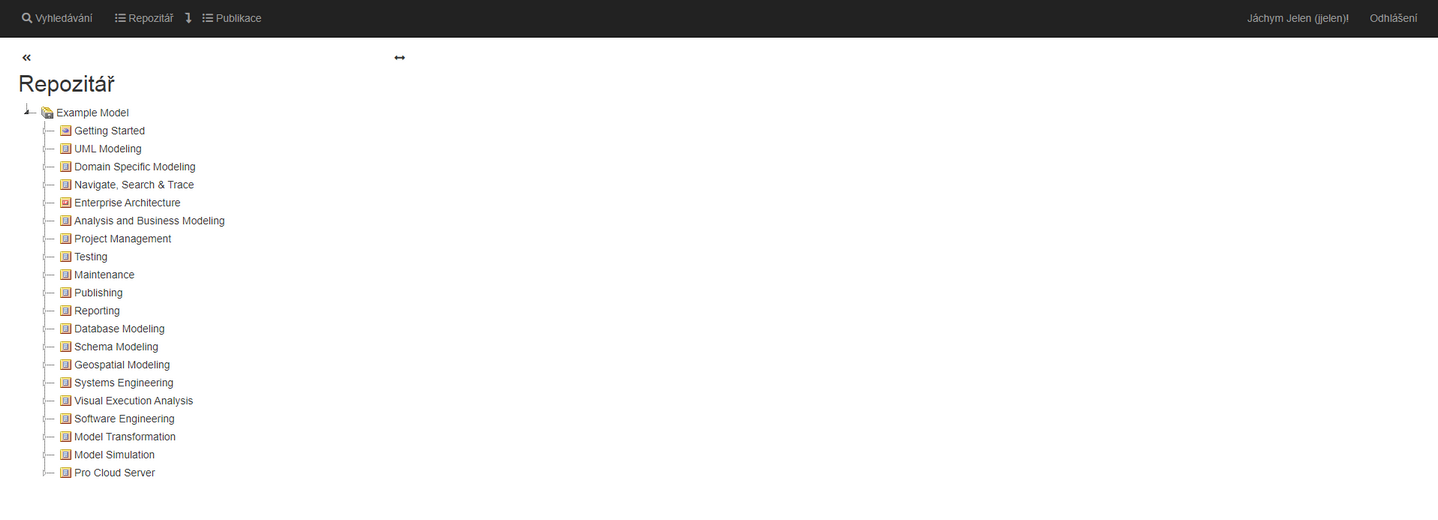
Basic Description of the Repository User Interface
The repository form (screen) contains several basic elements, which are described in detail in later chapters of this document.
Here is an overview and a brief description.
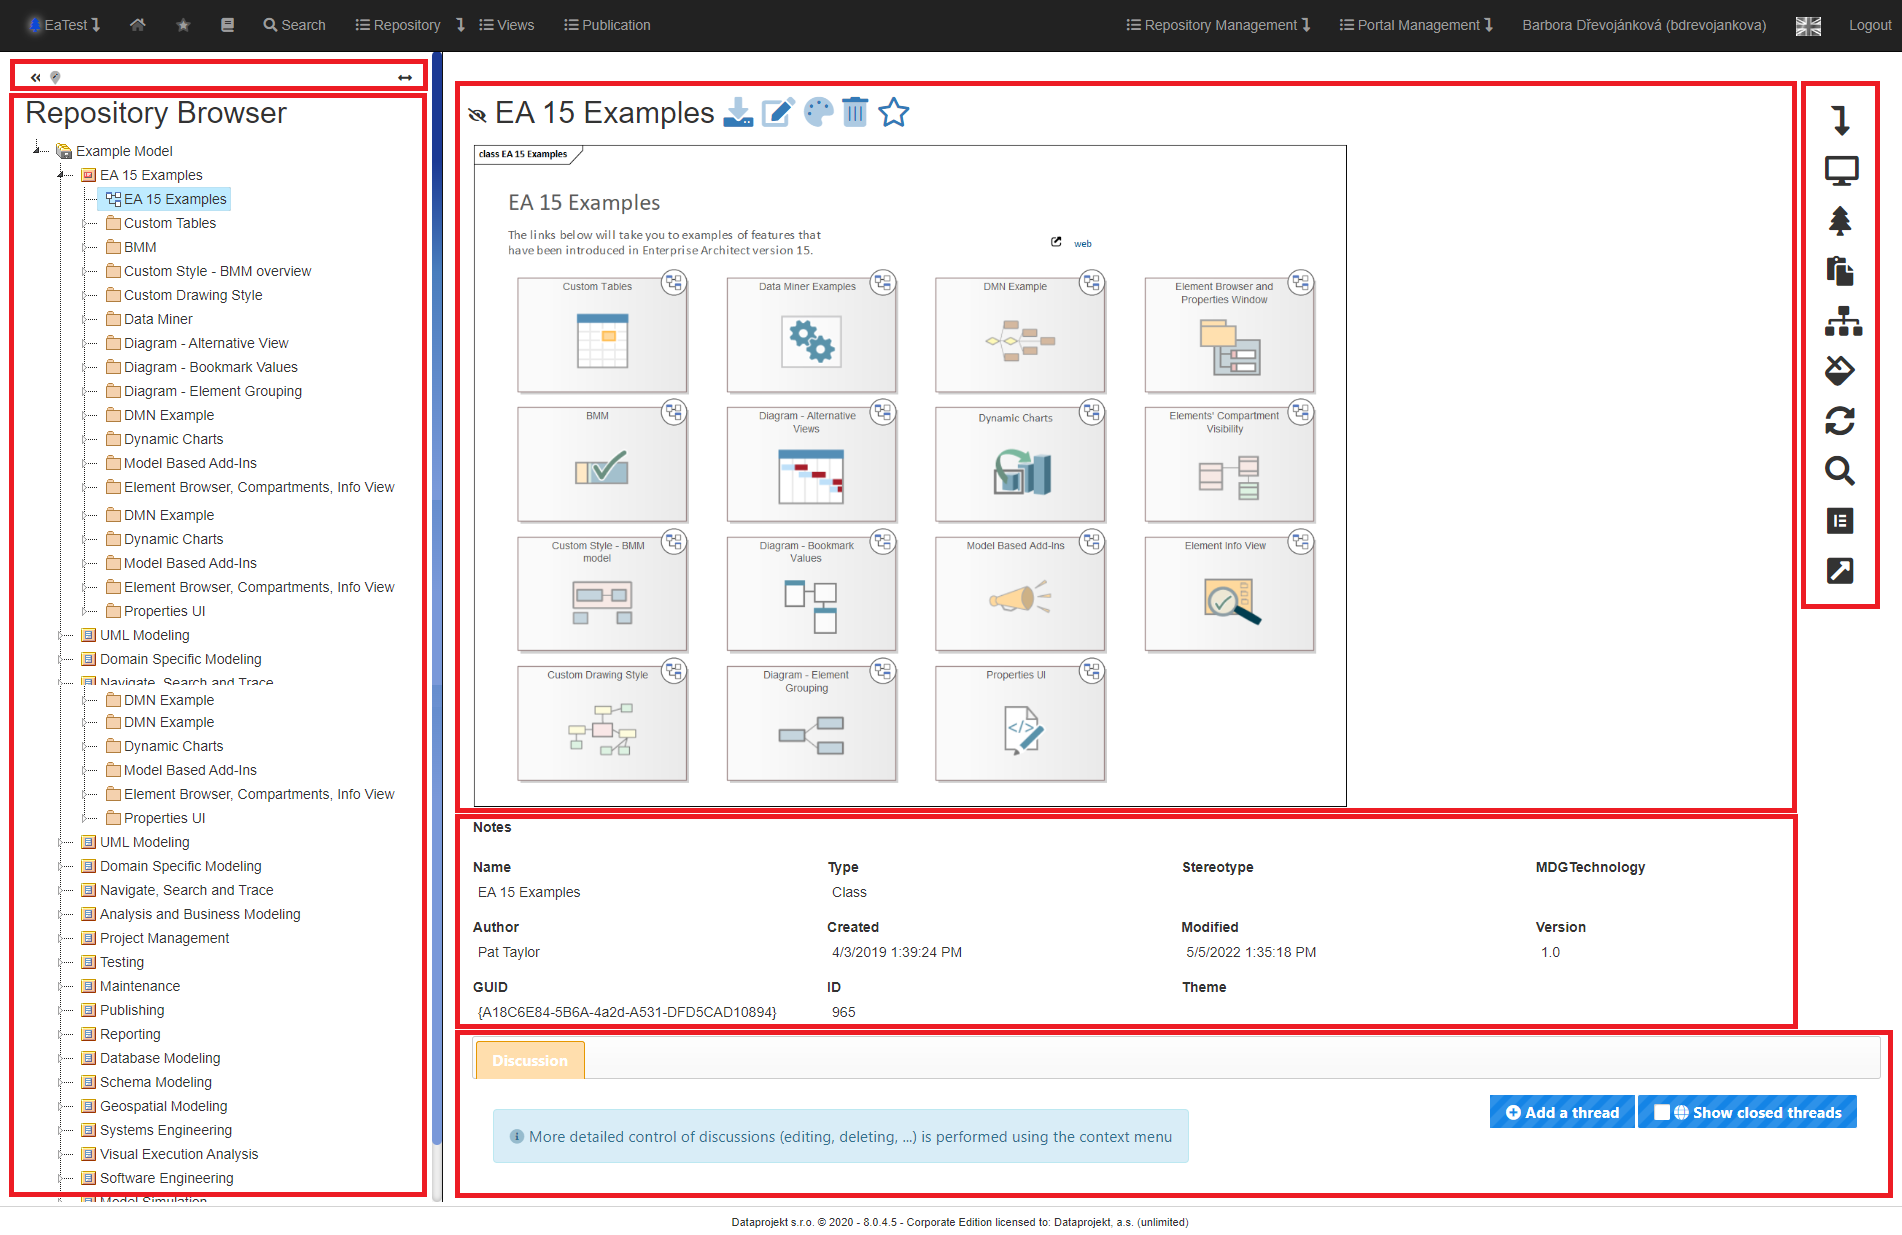
Tree Repository
The repository tree has similar functionality to the browser (repository browser) of the Enterprise Architect tool.
It contains the physical structure of the repository in the form of a clickable tree.
Hiding the Repository Tree
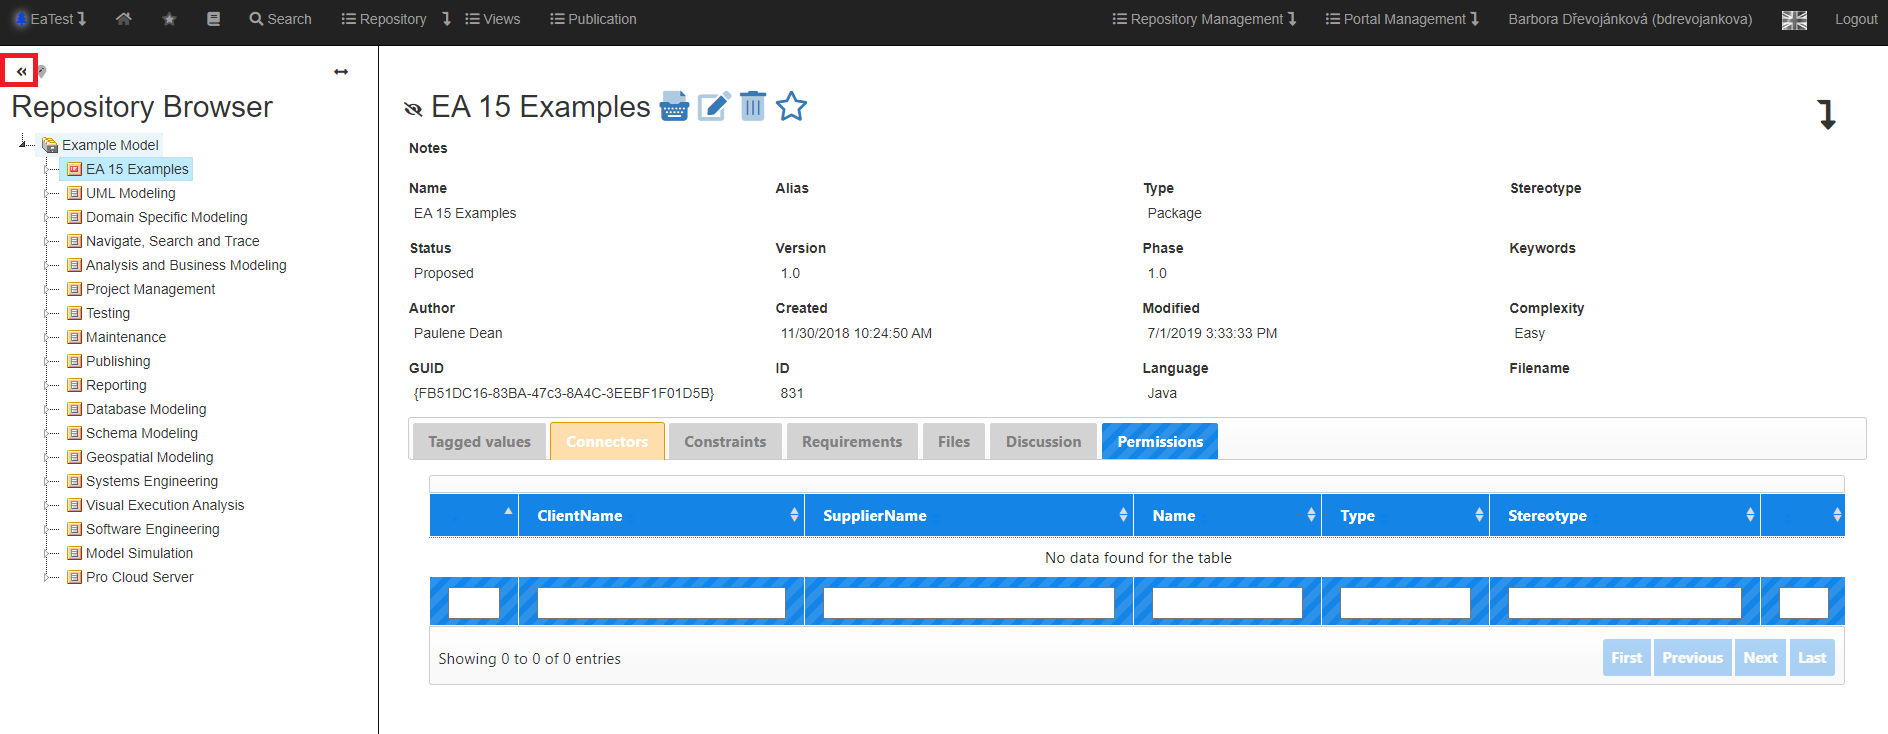
View of the diagram after hiding the repository tree.
Turning repository tree editing on/off
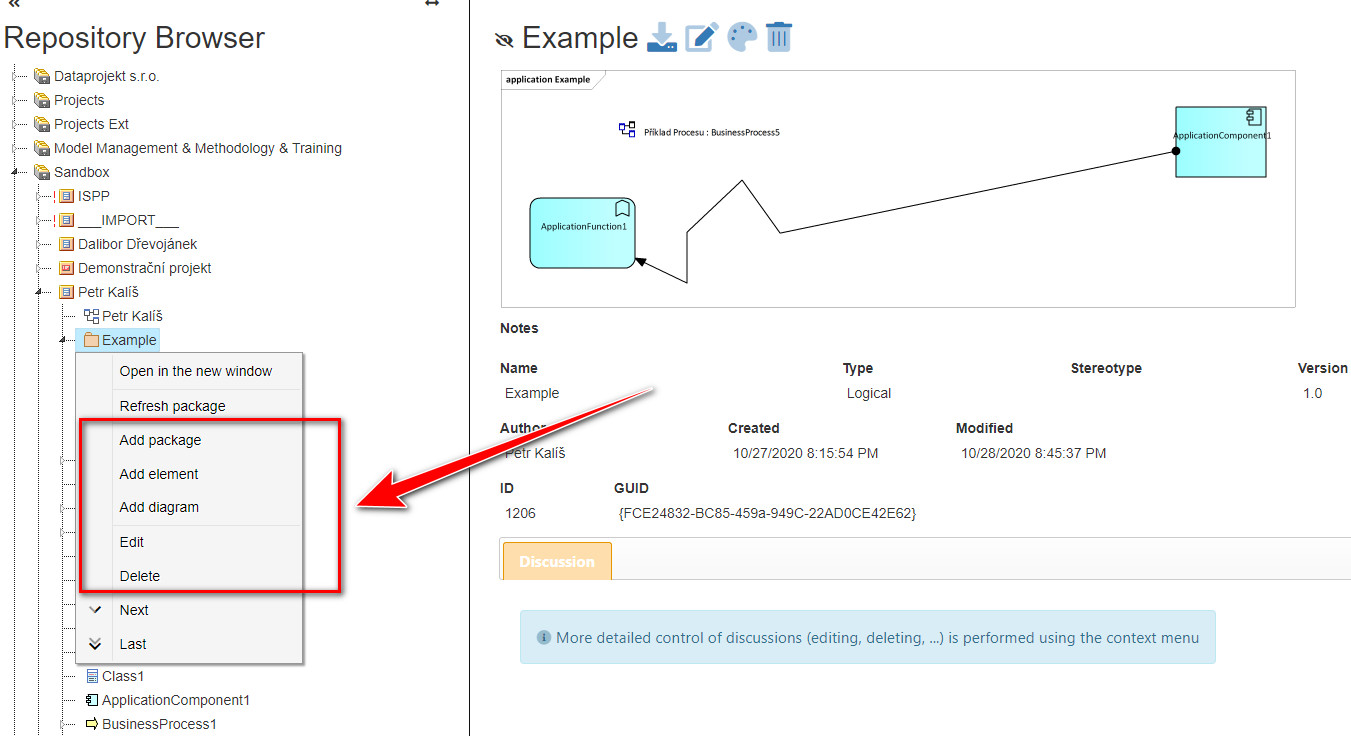
If the user checks the small icon in the upper left part of the tree, the tree will switch to active mode and offer, in the context menu, additional commands.
The available commands also depend on the permissions the user has for that part of the tree (editing, etc.).
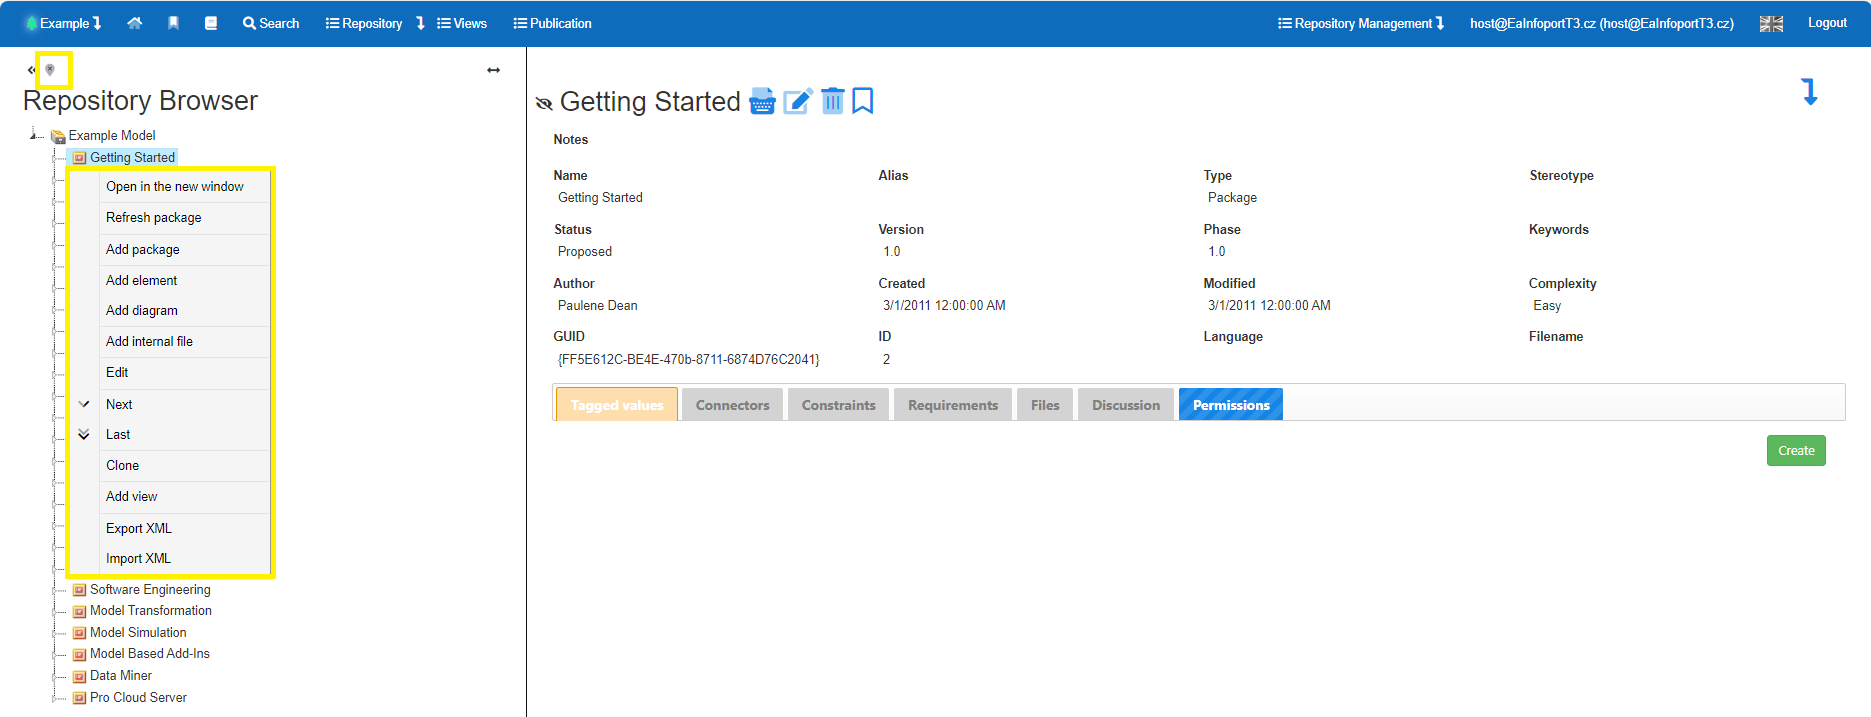
Manipulating the tree repository
The user, if he has the appropriate permissions, can move items in the tree (diagrams, packages, elements but also other artifacts - attributes, operations). The portal respects EA rules when moving (anything can be moved under package, diagrams and other elements can be moved under elements, nothing else can be moved under elements). It also respects locks (blue/red exclamation marks), permissions, etc.
It is also possible, from the context menu, to add artifacts - diagrams, packages, elements, but also attributes, operations and more - depending on which artifact the user clicks on. The user can also delete or edit the selected element. It is also possible to change the order of the elements in the package (move elements up and down).
The user can also pull an element from the tree onto the diagram.
 After pulling the element on the diagram, the change is immediately written to the EA Repository.

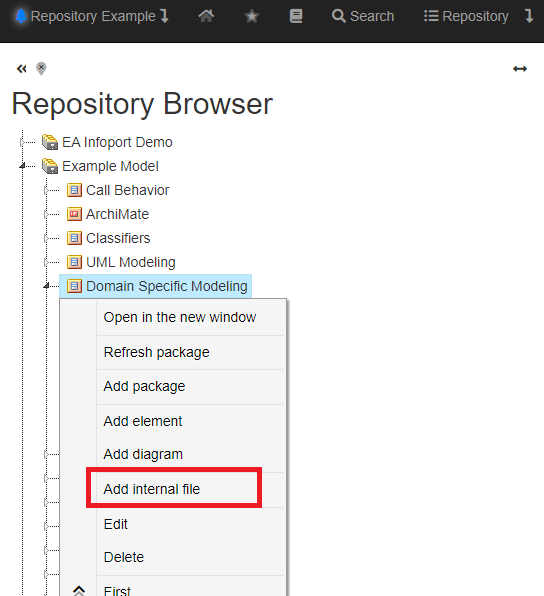
Internal artifacts
The user can create and edit (update) so-called internal artifacts, i.e. objects (documents, tables and any other files) that Enterprise Architect stores in its internal repository and works with them as elements.
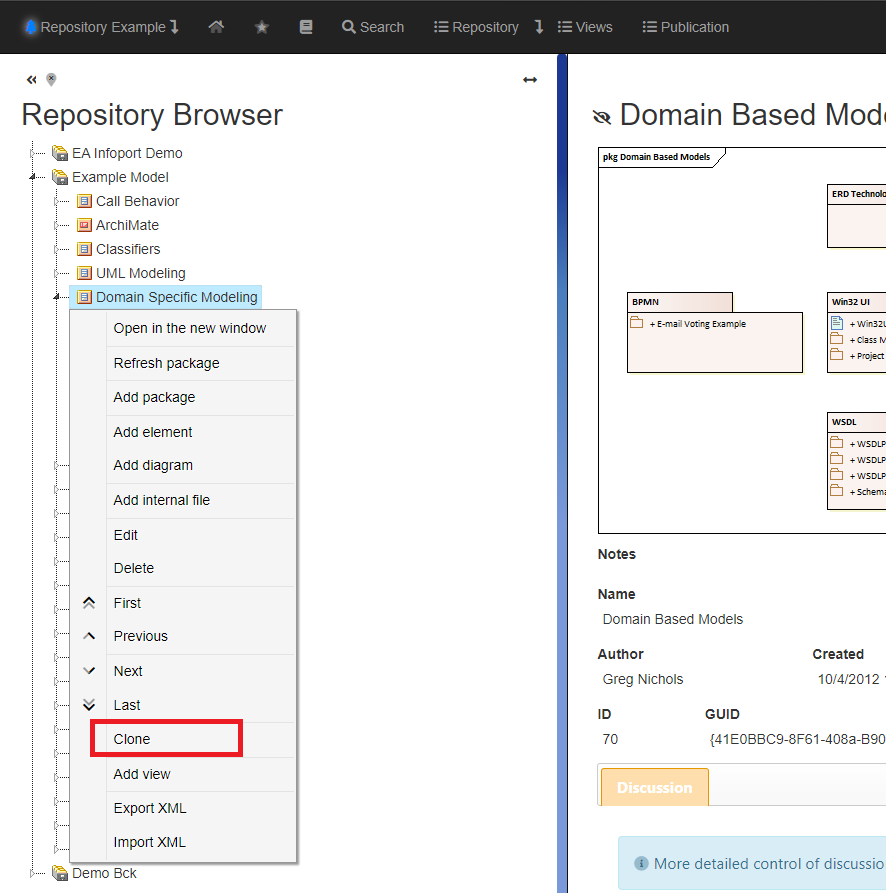
Clone
The user can create a copy of an element, a diagram, a package, or an entire structure. If there is a diagram or other elements under the copied element, they will be copied as well. The package is also copied, including the complete contents.
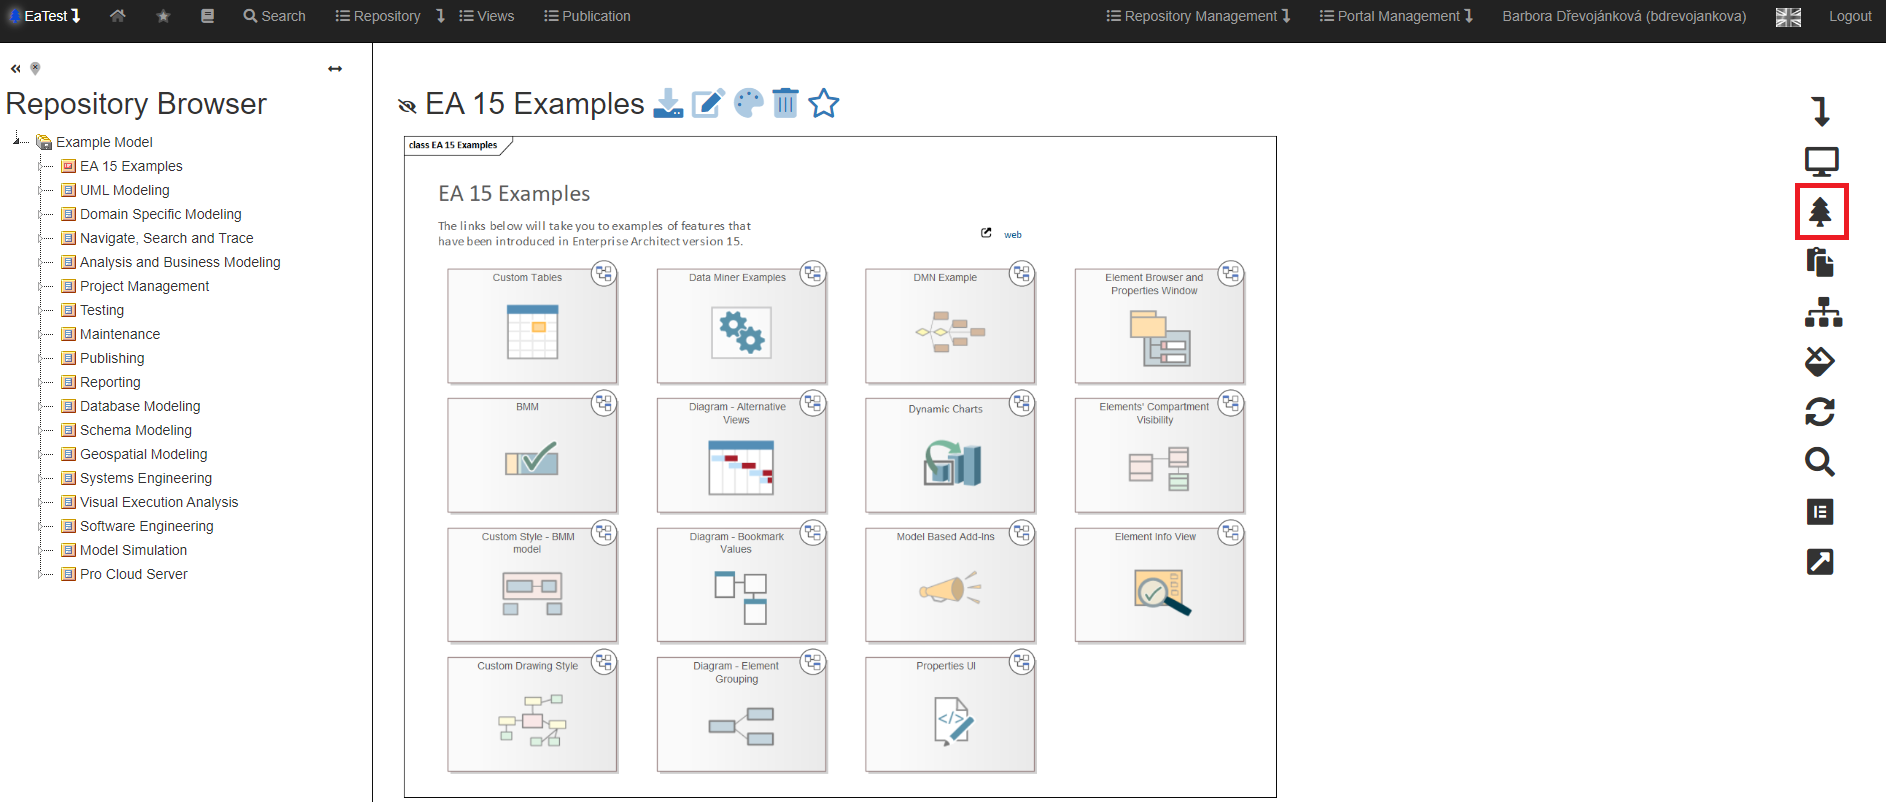
Create a view
Create a view allows you to take a specific part of the tree and display it in a separate section. Thus, if, for example, a company's process model, organizational structure, architecture design, etc. is deeply embedded in the repository structure, this functionality allows you to make it available to readers without having to search for it in a complicated way. Thus, these are views of specific repository packages (trees) and their contents, including the embedded packages.

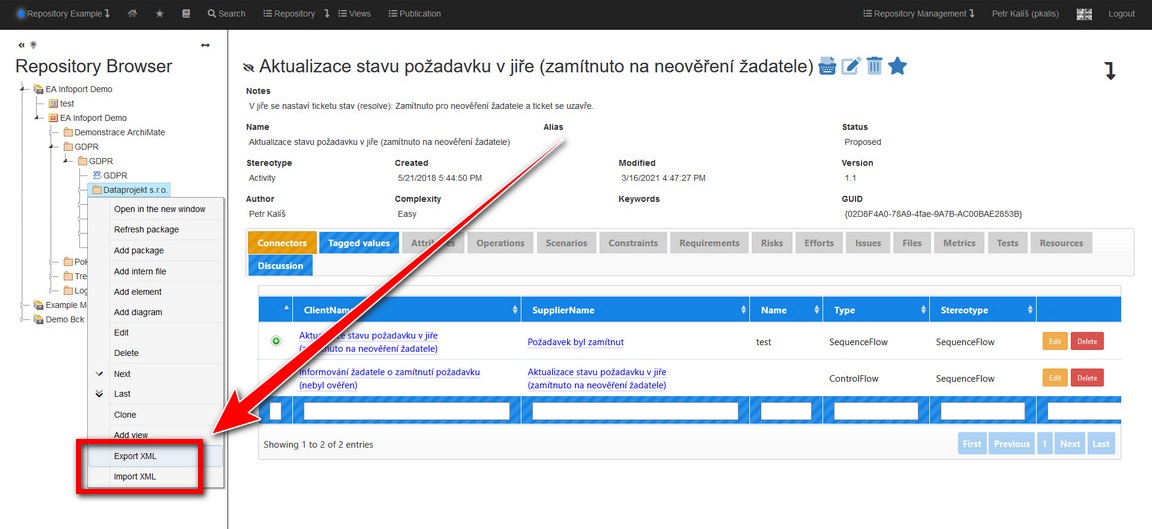
Export/Import XMI
EA Infoport supports exporting the XMI of the selected package (and children) to XMI format, which can be imported into Enterprise Architect, edited, and imported back.
The user must have access to the exported package (read + export and, in case of reimport, import).
During the export and reimport, all bindings between elements will be preserved, even if the elements at one end of the binding are not located in the exported package.
This functionality is especially useful if there are several users/groups that are not allowed to see each other's model parts (located in the same repository) and need to be able to edit them in Enterprise Architect. This problem cannot be solved with Enterprise Architect alone, because if a user accesses the repository, he can see everything (editing can be prevented, viewing cannot, even with the help of the RLS functionality that is accessible, for some DBs, in the Ultimate Edition EA).
Procedure: the user marks the package he/she has access to in the portal tree and clicks on the "Download XMI" command. He imports this XMI into his repository and modifies it as needed (in the EA tool). After this modification, it re-exports the XMI from EA and this, via EA Infoport, to its original location.
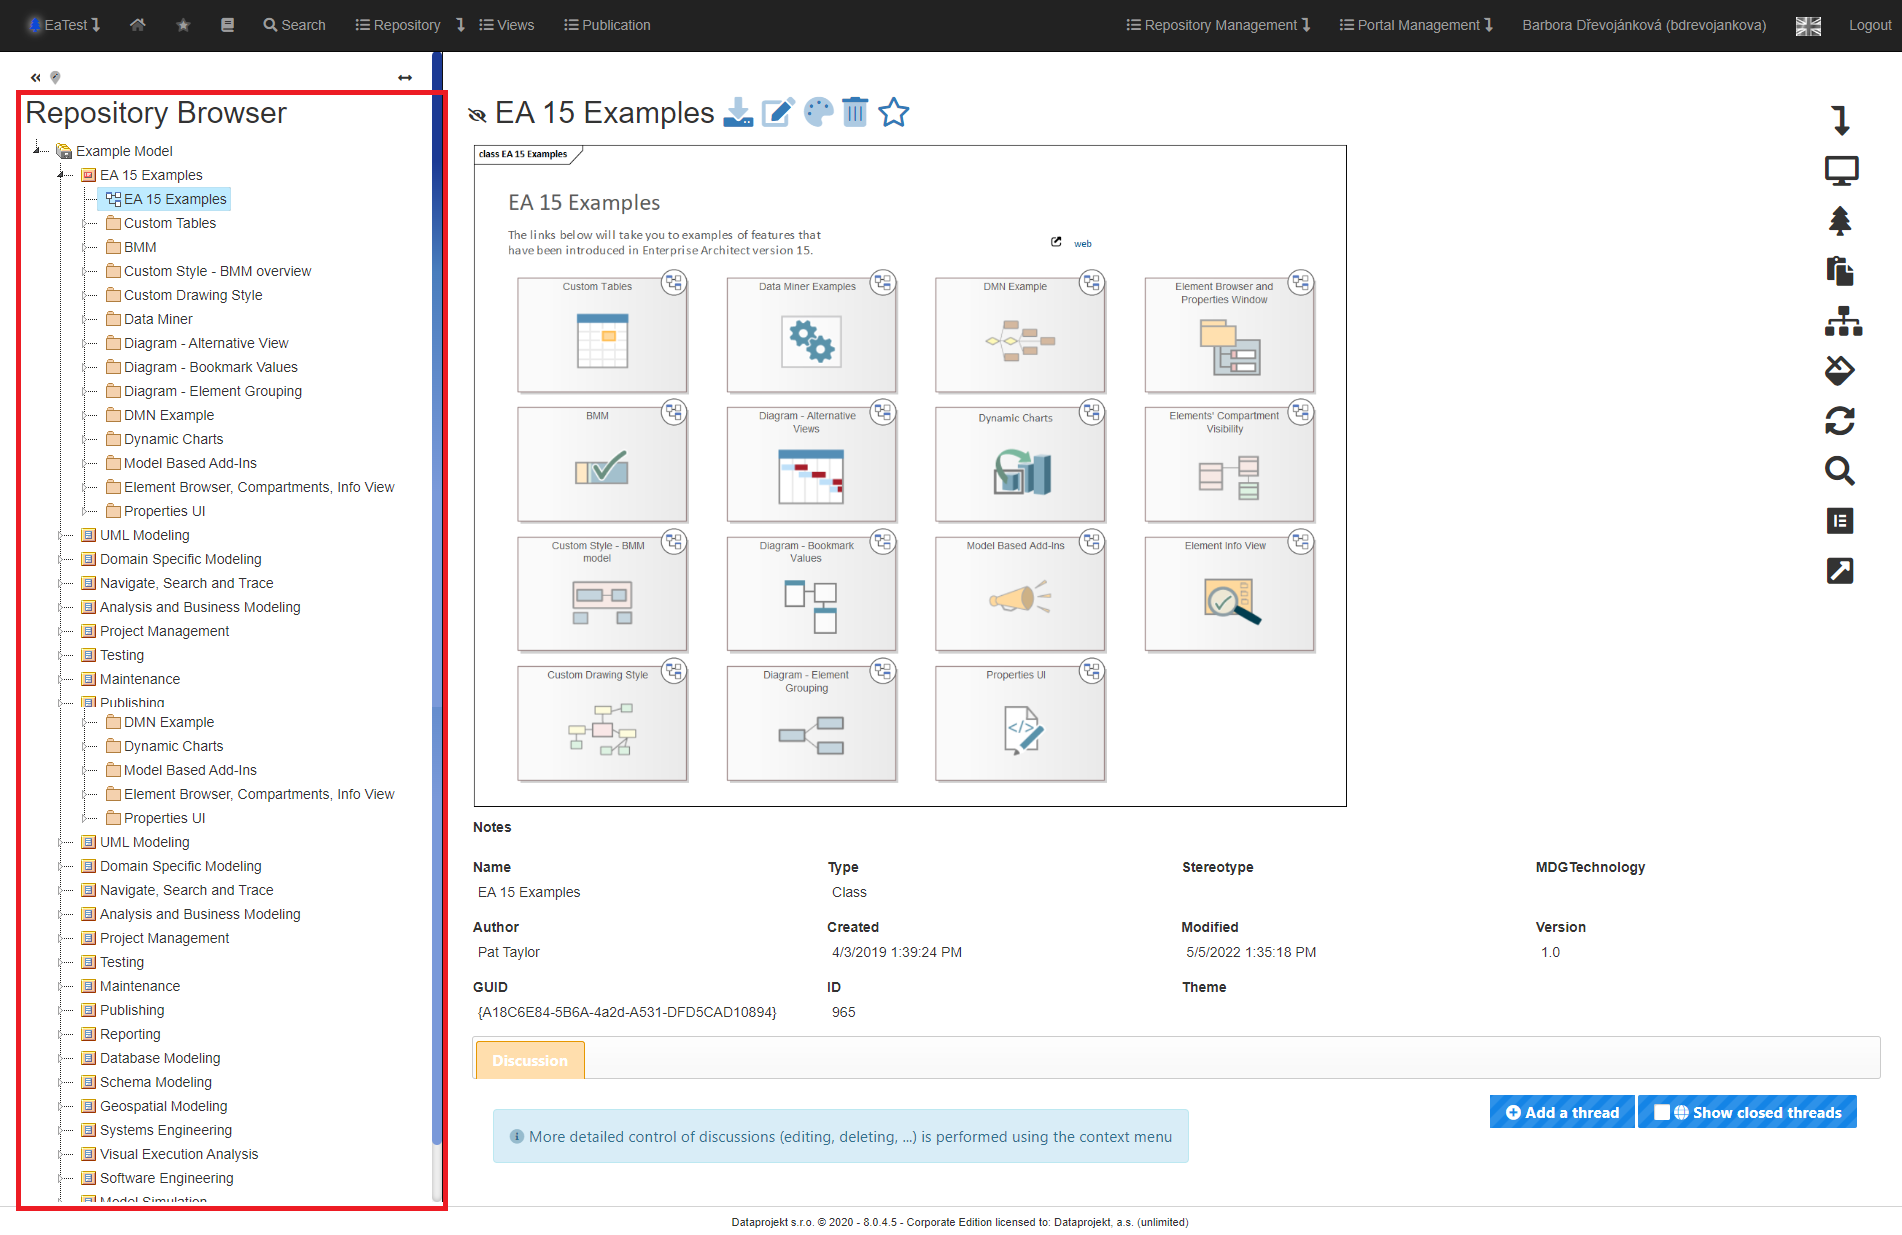
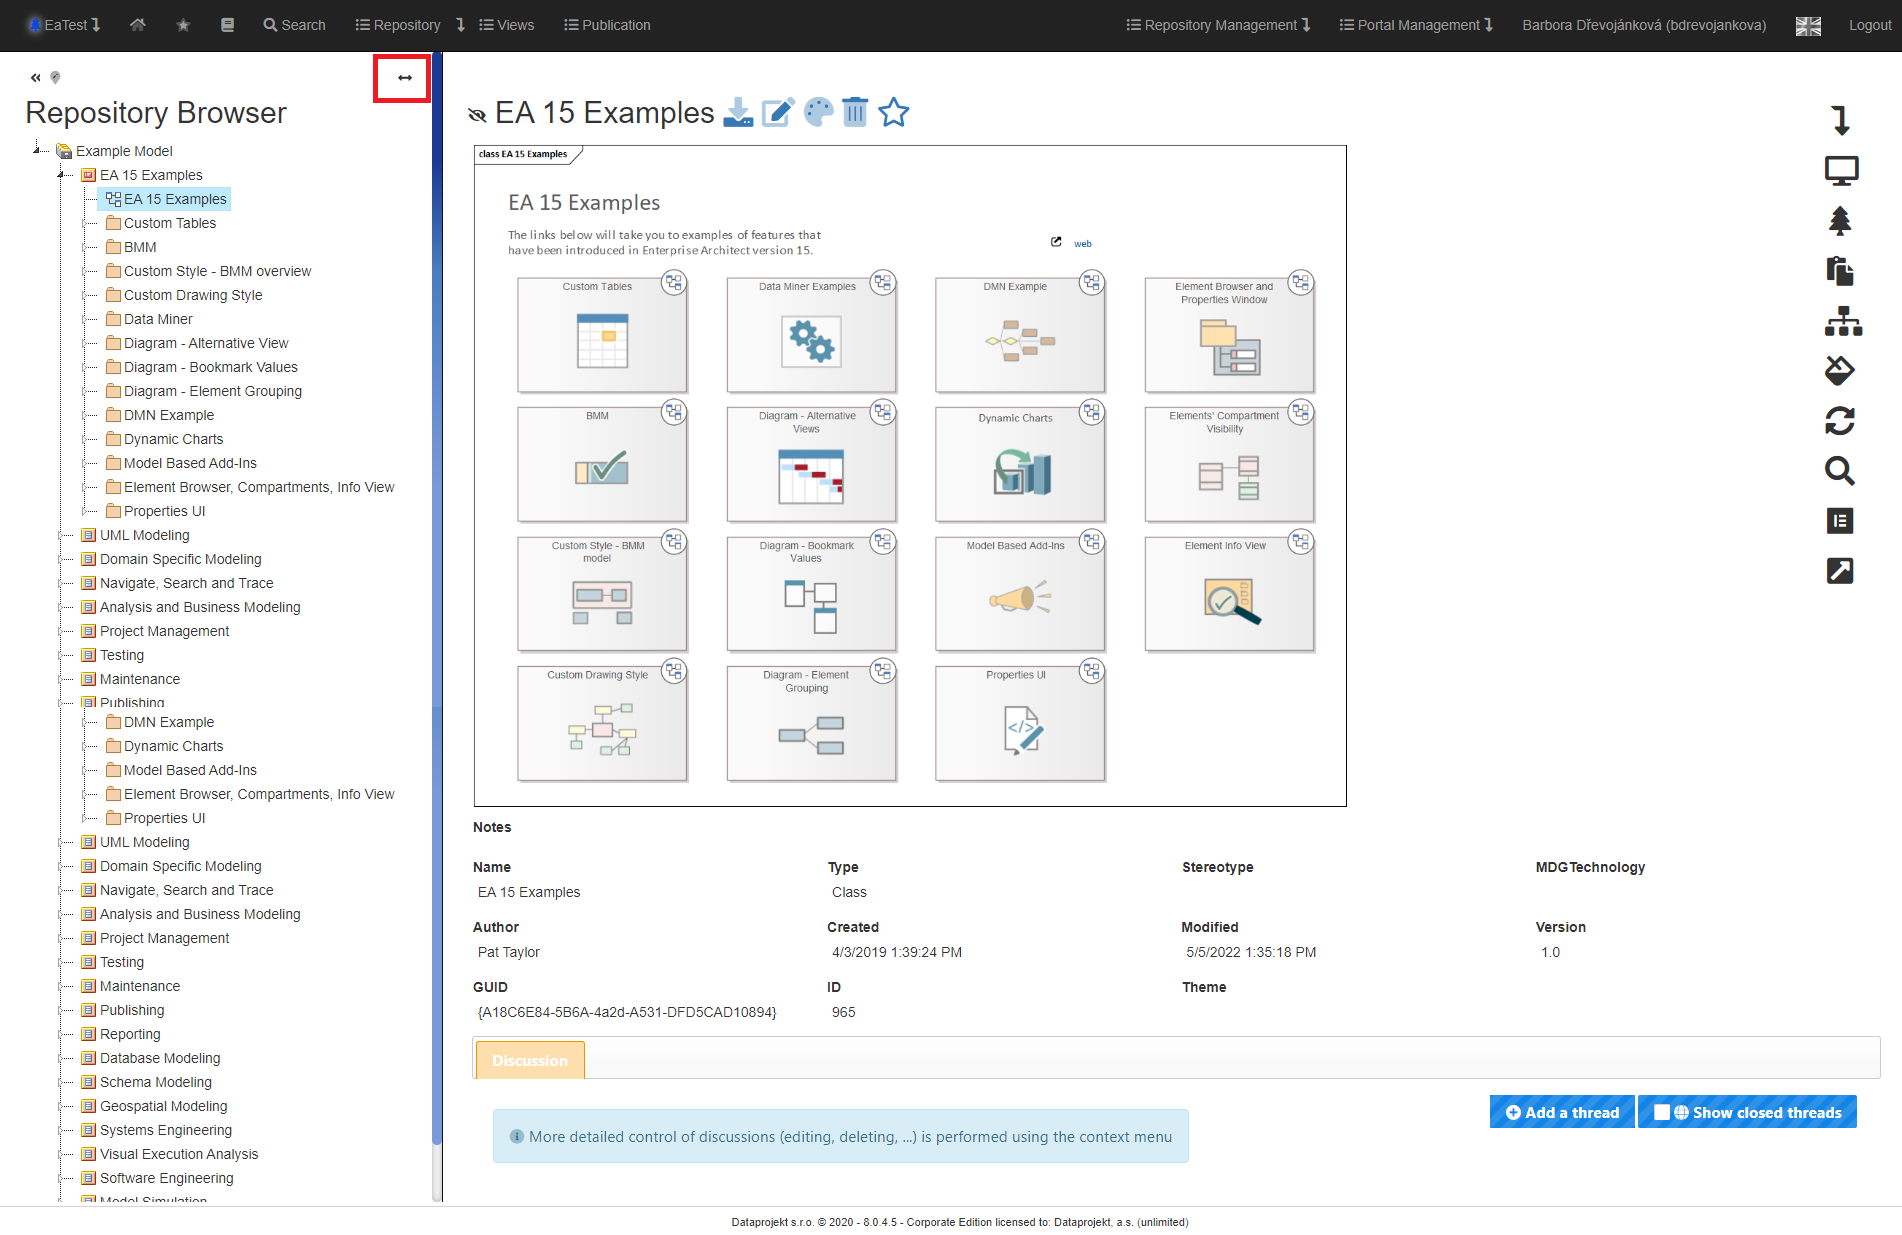
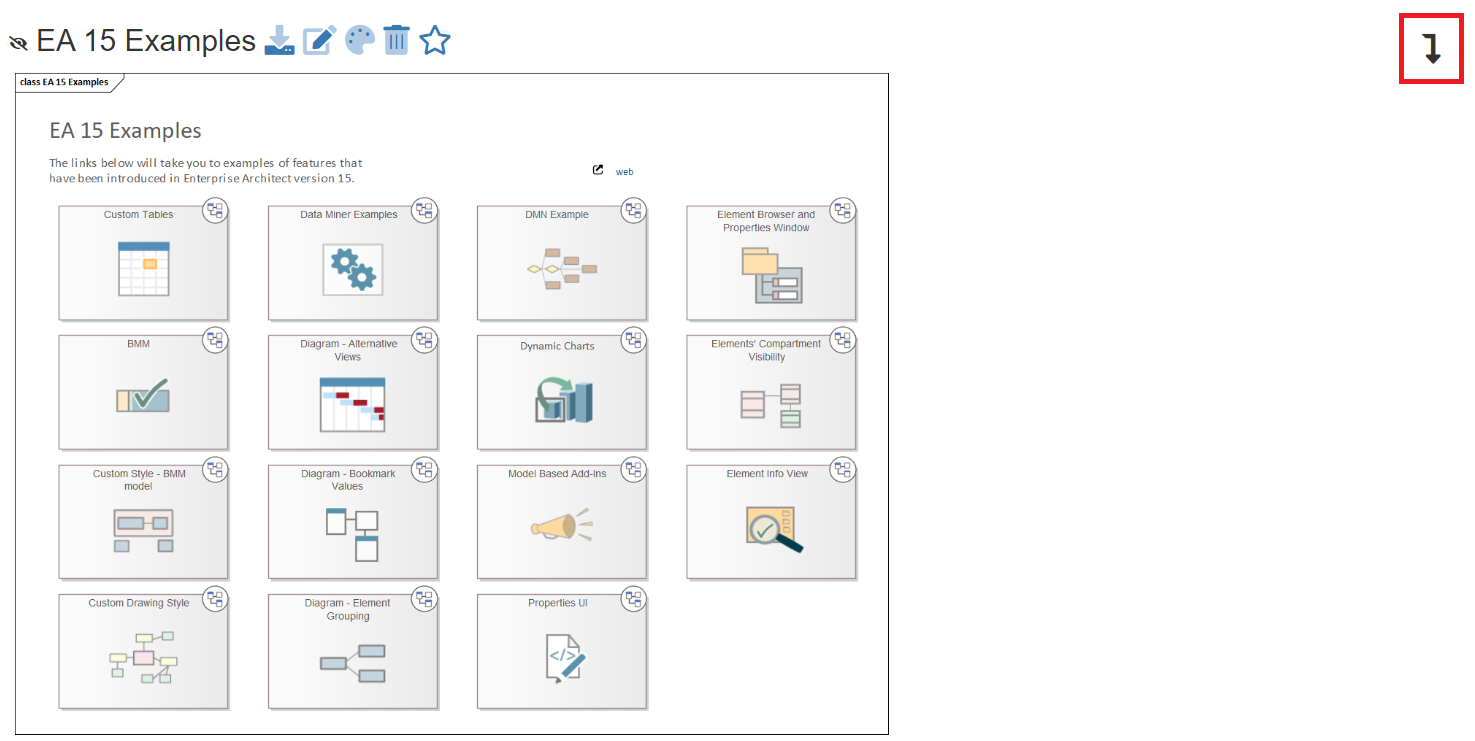
Slider between the Repository Tree and the Detail
The slider allows you to expand the width of the repository tree.
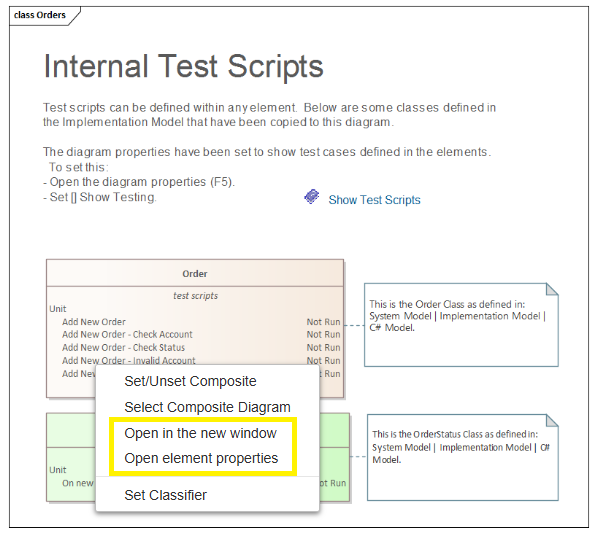
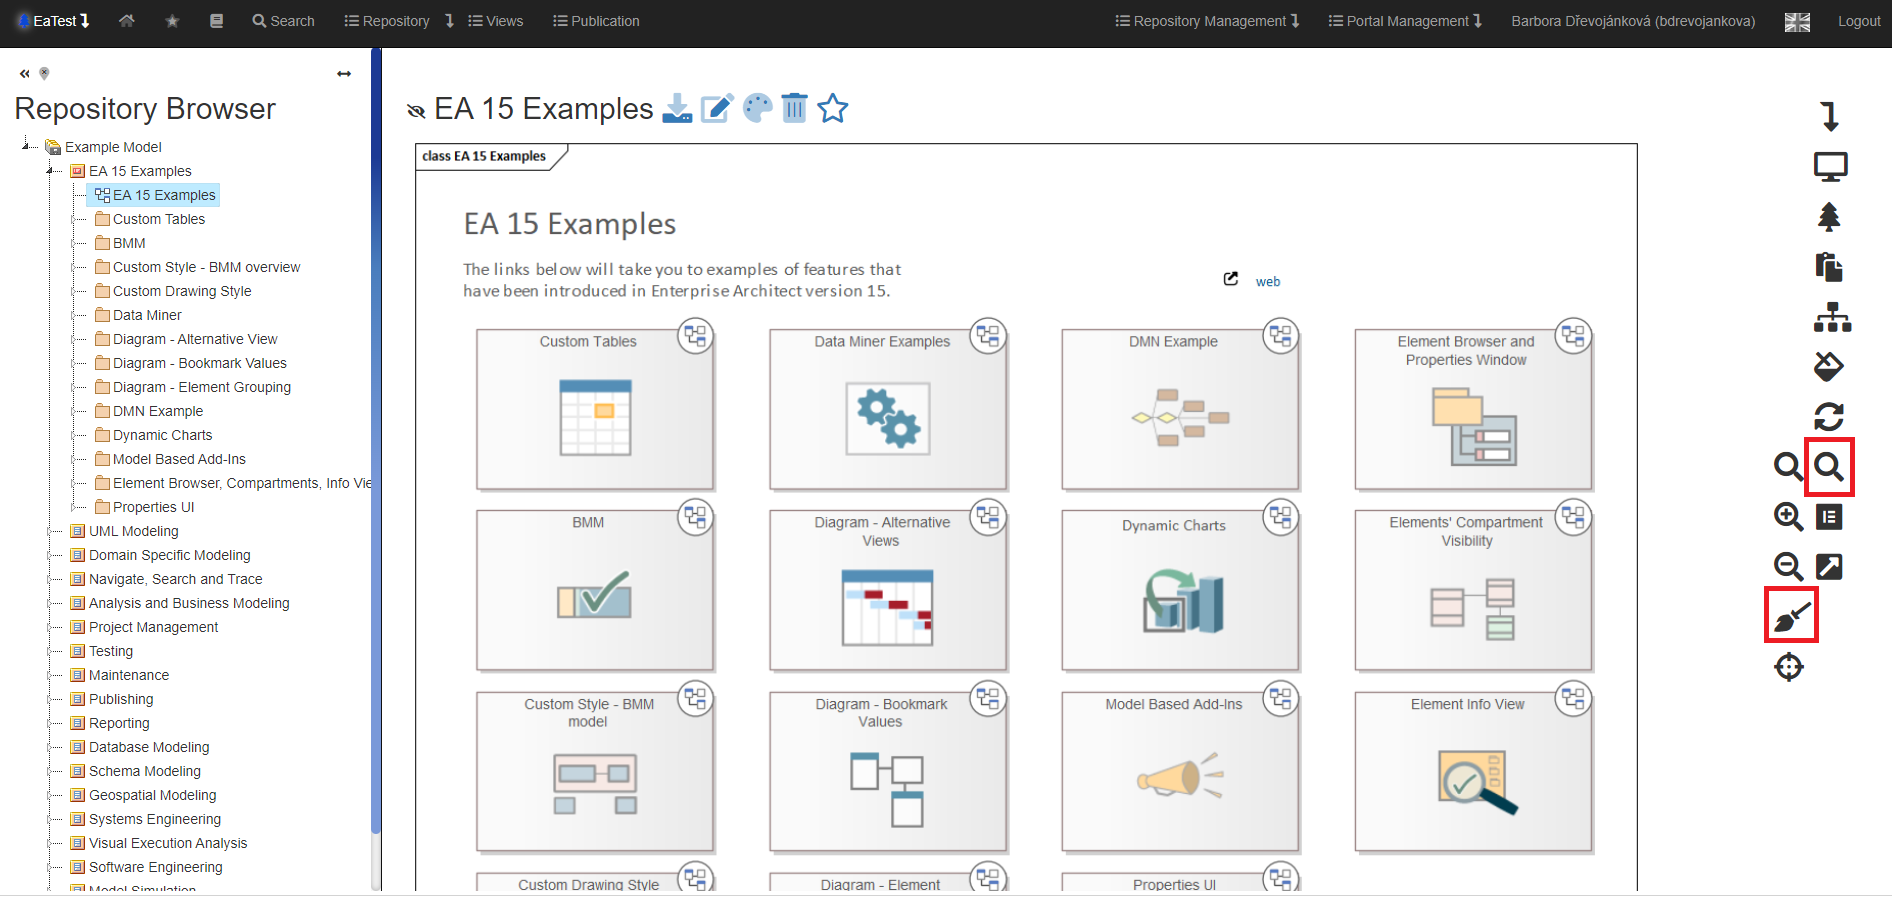
Description of commands in the context menu
Use  to display the context menu.
To open a drop-down menu of options related to an artifact, the user left-clicks on the arrow icon in the upper right corner of the artifact detail.
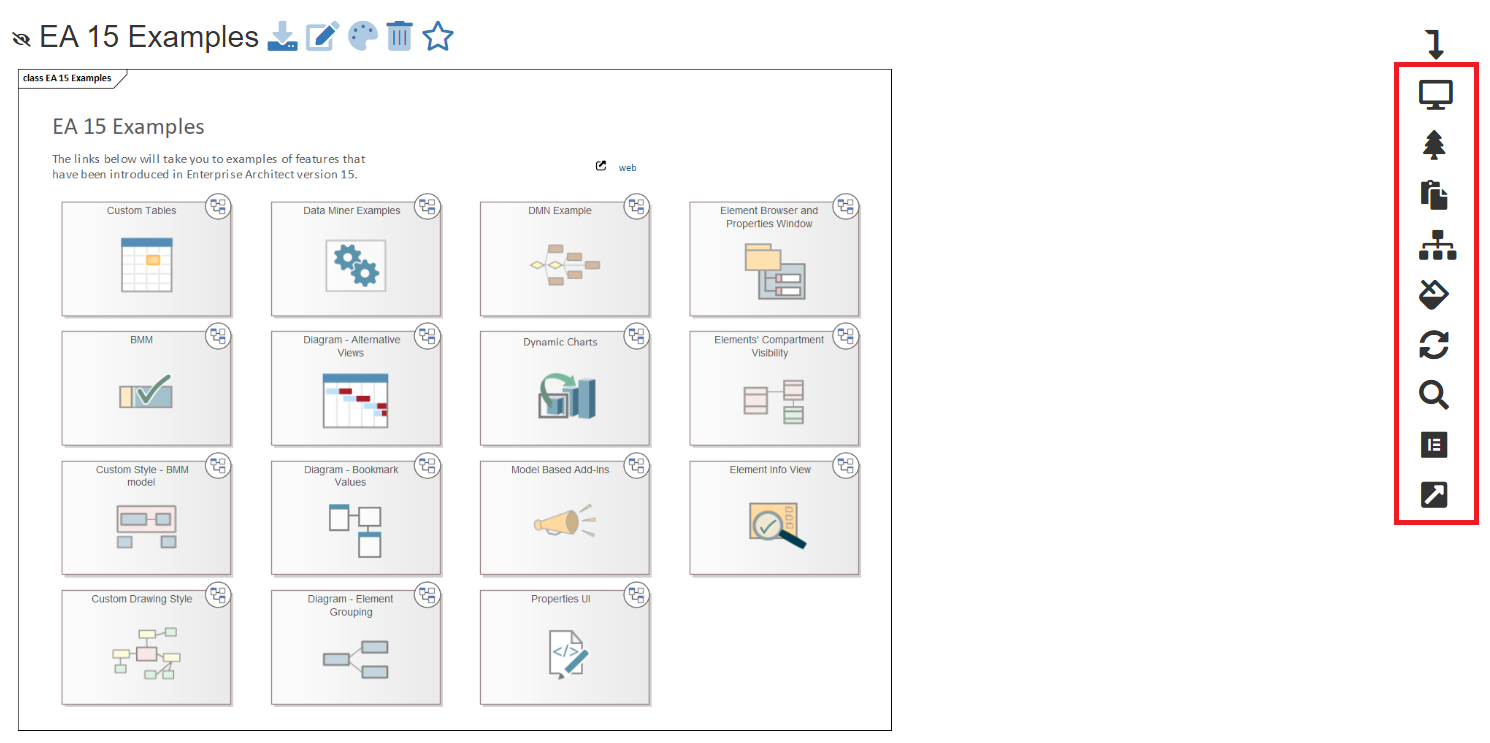
The menu is unpacked.
List of context menu commands:
Full Screen
The functionality is available in the context menu under the symbol 
The full screen allows us to see a detail of an artefact without disruptive elements.
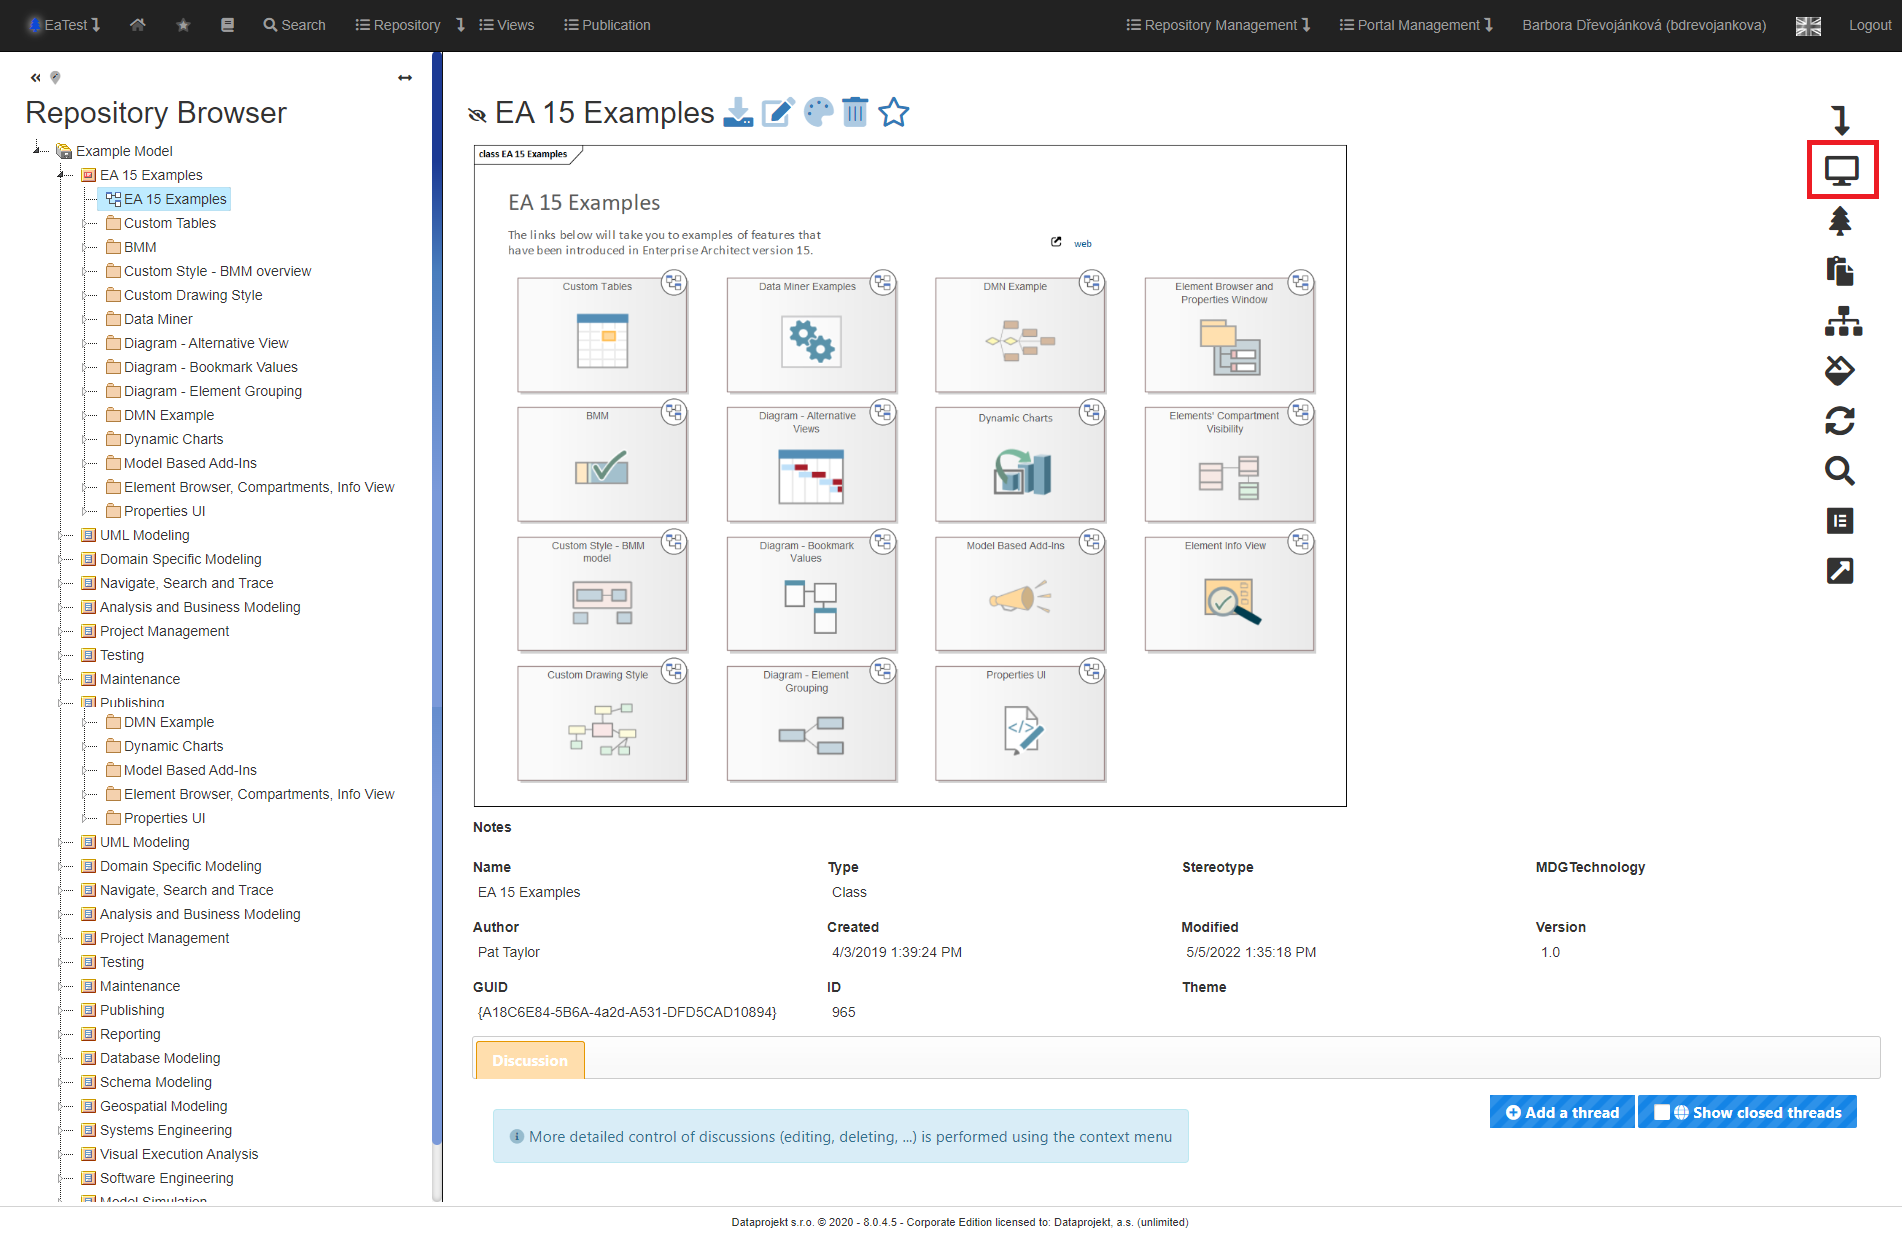
After clicking on the “Full Screen” icon, the disruptive elements will be switched off.
Only the detail of the artefact remained. To call up the other elements again, simply click on the “Full Screen” icon again.
Find in the Repository Browser
For example, if a user searches for any artefact through the “Search”, his/her detail will be displayed, but he/she will not see his/her position in the repository tree.
Thanks to the “Find in the Repository Browser” option, the user has the option to expand the repository tree to the appropriate artefact.
The functionality is available in the context menu under the tree symbol 
After clicking on the “Find in the Repository Browser” icon, the repository tree will expand to the position of the relevant artefact.

The repository tree successfully expanded and found the searched artefact.
Copy URL
A user can copy a URL and send it to a colleague.
The colleague will only be able to view this URL if he/she is logged in; otherwise, he will be directed to the login screen.
This functionality is available in the context menu under the symbol 
After clicking on the “Copy URL” icon, a pop-up chart will appear where the user can get the URL of the relevant artefact.
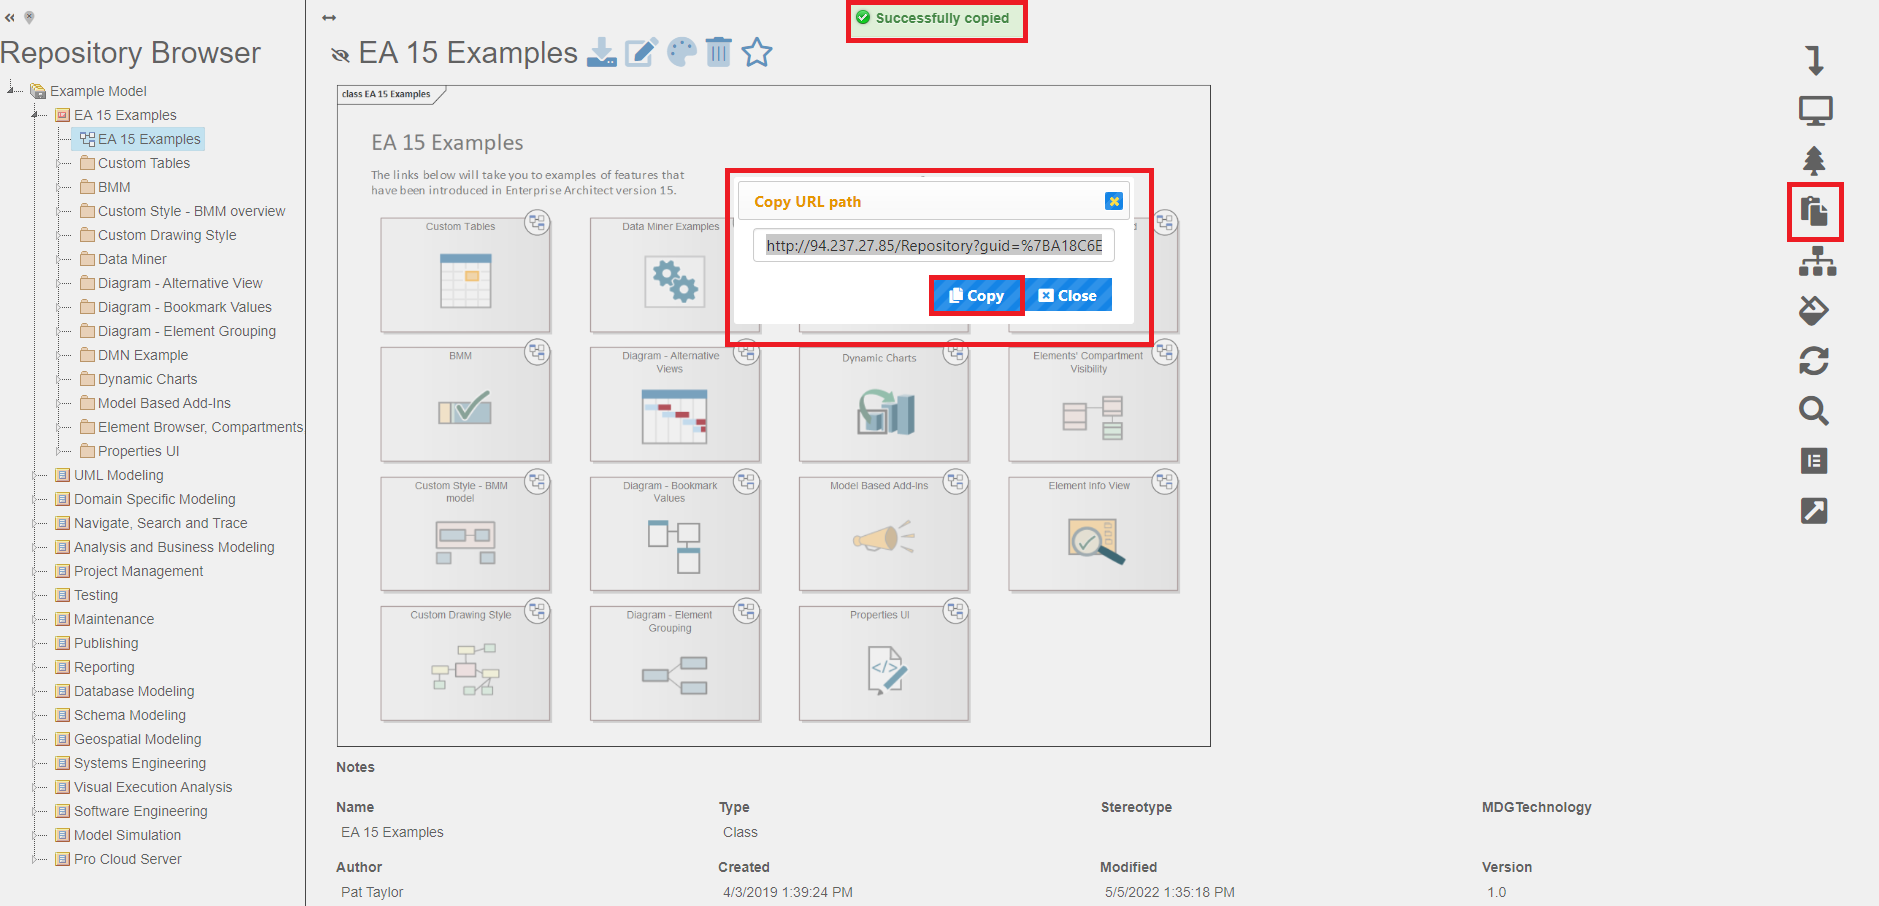
After clicking on the “Copy” button, the user saves the URL to the clipboard.
An identical method is to select the entire line with CTRL+A and copy it to the clipboard with CTRL+C.
Then just paste the URL in the appropriate place.
Copy EA Address
In EaInfoportT3 it is possible to have a path copied through the tree repository to the relevant artefact.
The functionality is available in the context menu under the symbol 

After clicking on the “Copy EA Address” icon, a pop-up chart will appear where the user can get the EA path to the relevant artefact.
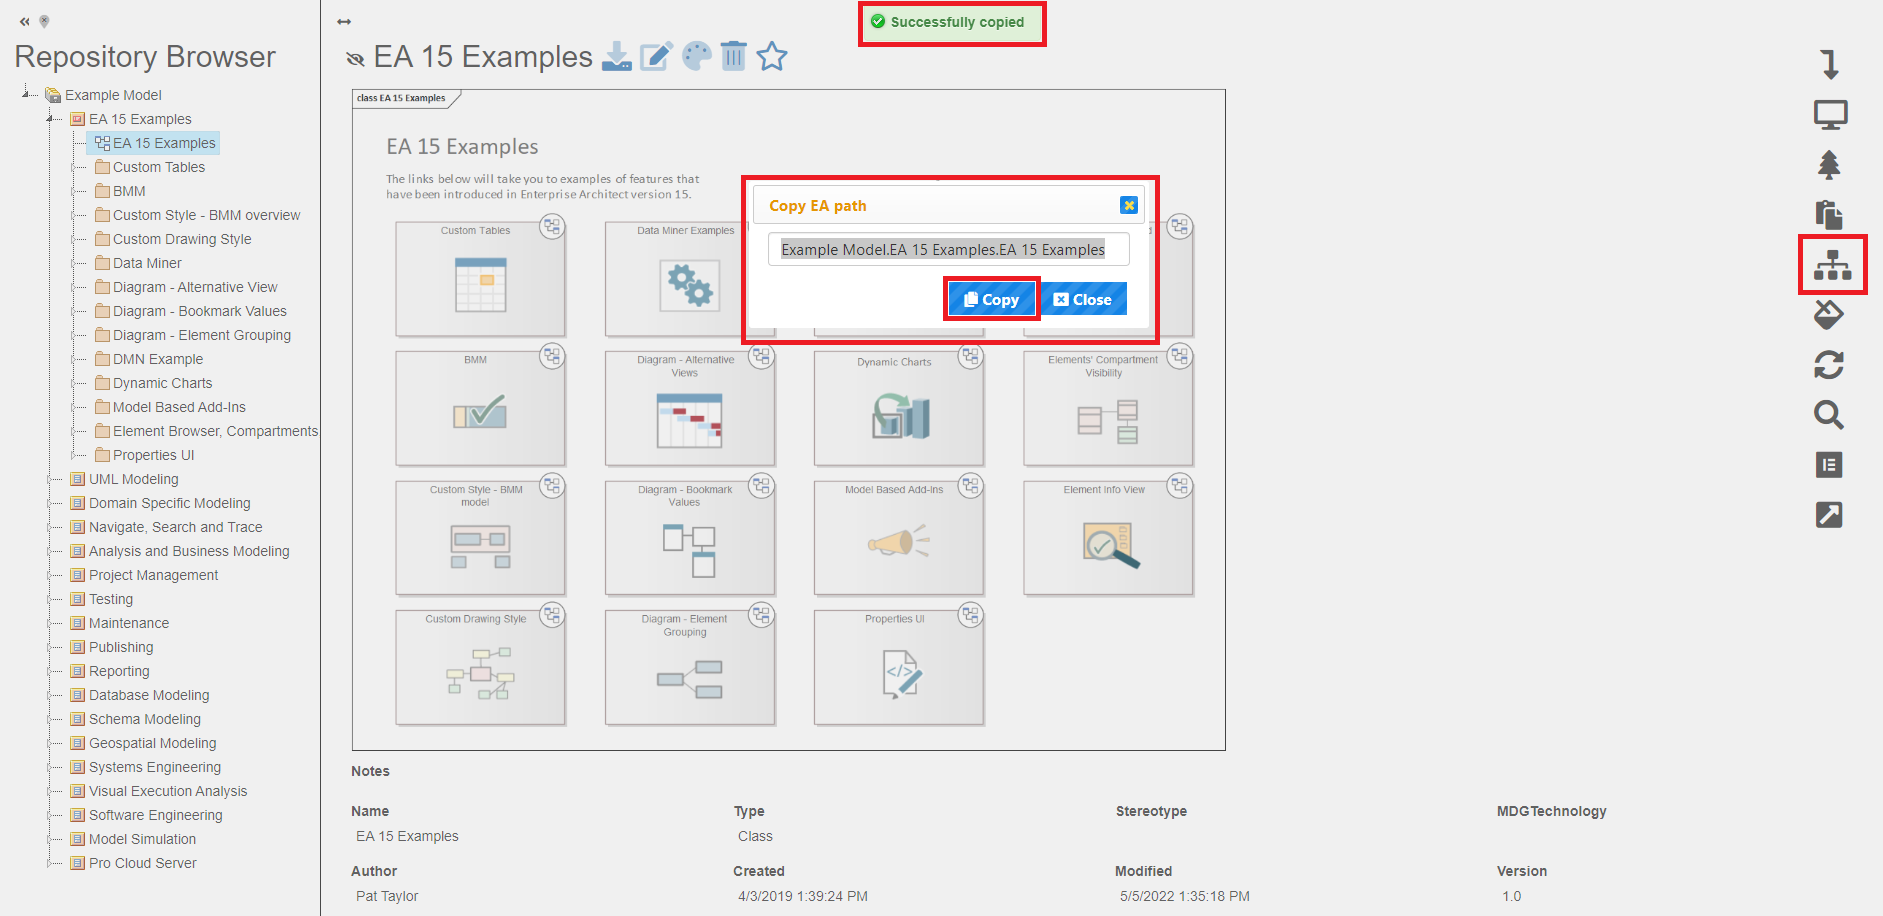
After clicking on the “Copy” button, the user saves the EA to the clipboard.
An identical method is to select the entire line with CTRL+A and copy it to the clipboard with CTRL+C.
Then just enter the EA path in the appropriate place to search by the EA path.
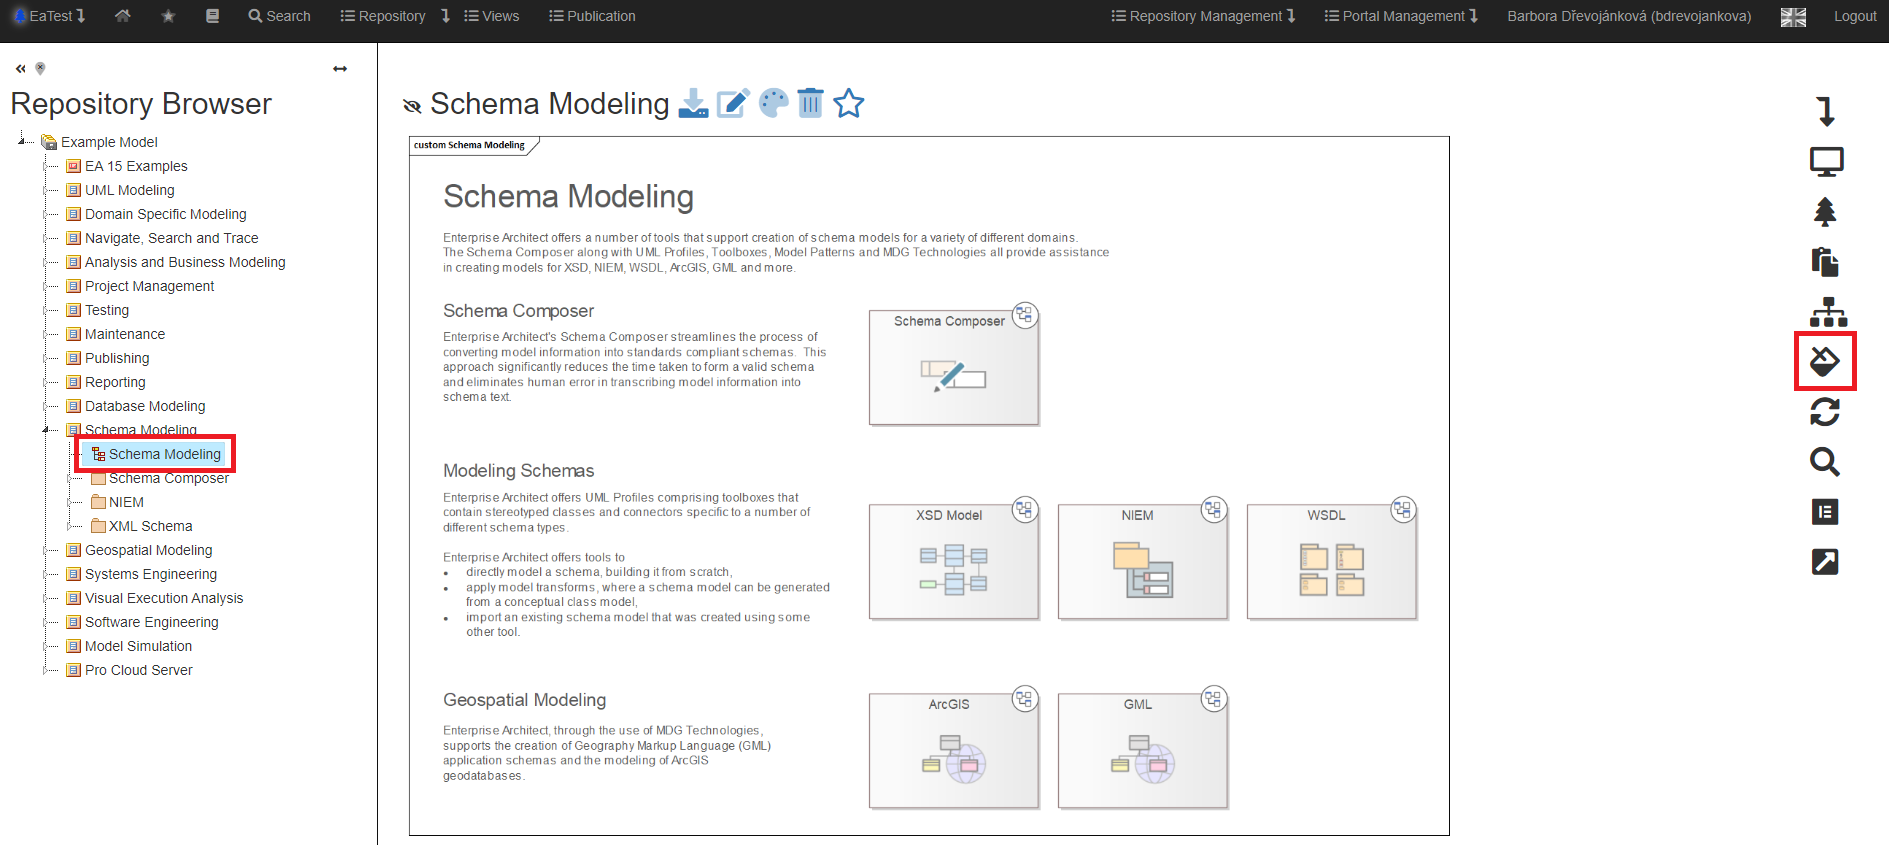
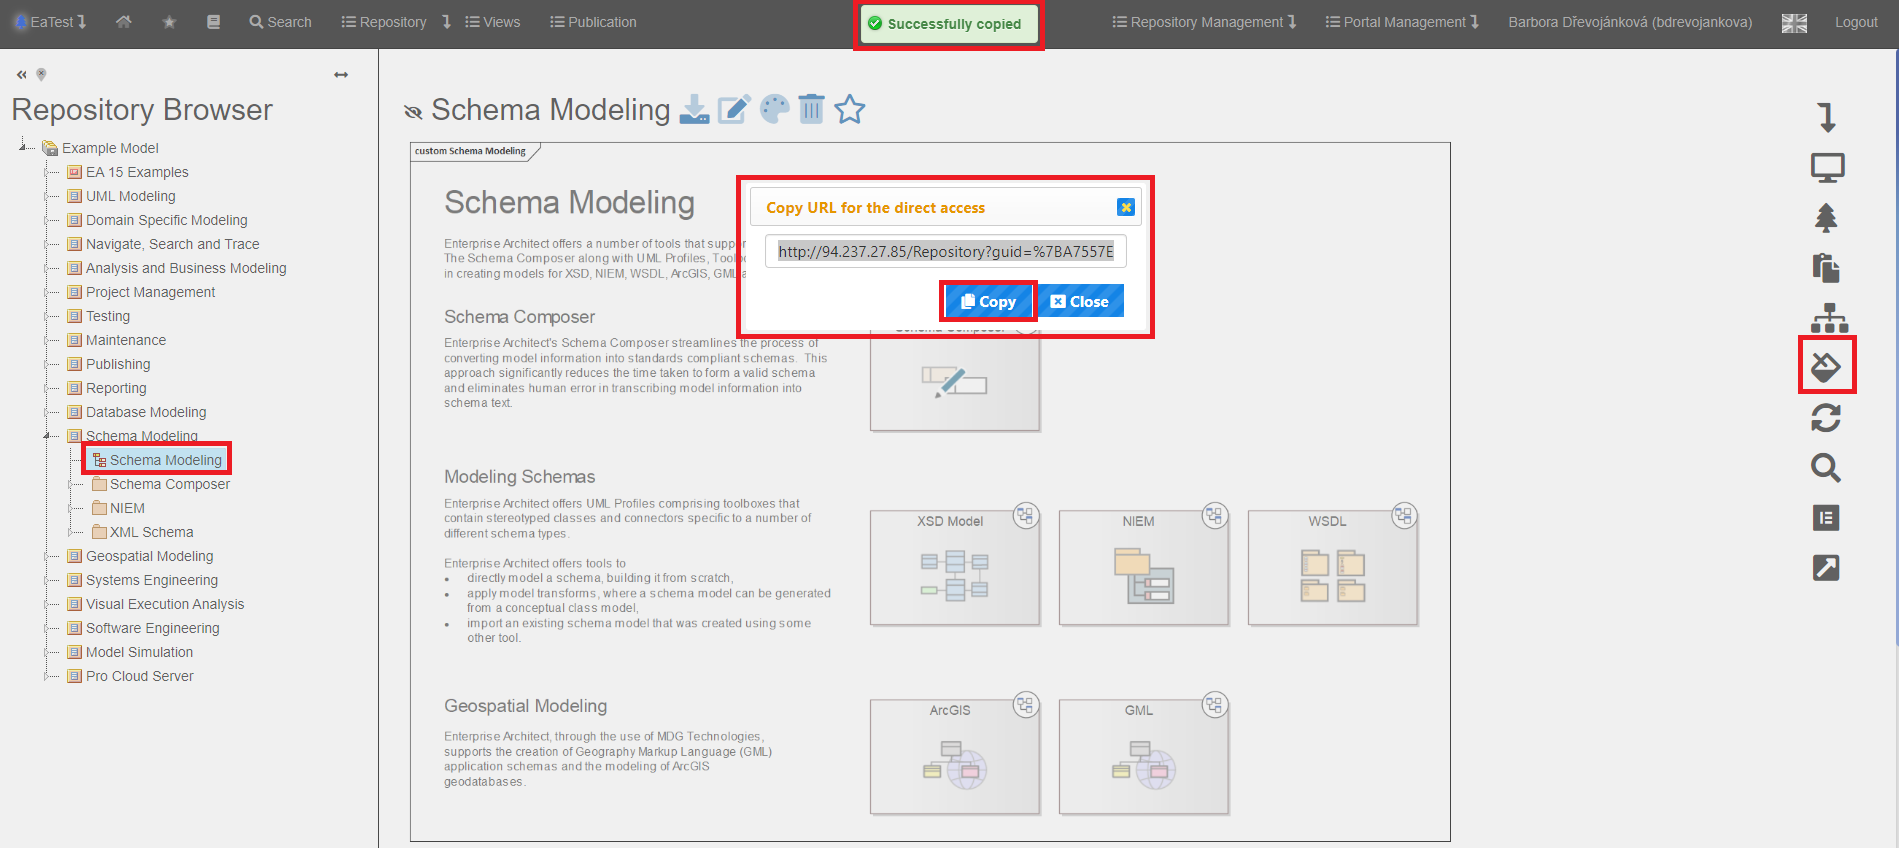
URL for Direct Access
A user can copy a URL for direct access and send it to a colleague.
The colleague will be able to view this URL even if he is not logged in, but he will only see the relevant artefact – for example, he cannot go anywhere else in the repository or to a publication, etc.
The functionality is available in the context menu under the symbol 
After clicking on the “URL for Direct Access” icon, a pop-up chart will appear where the user can get the direct URL of the relevant artefact.
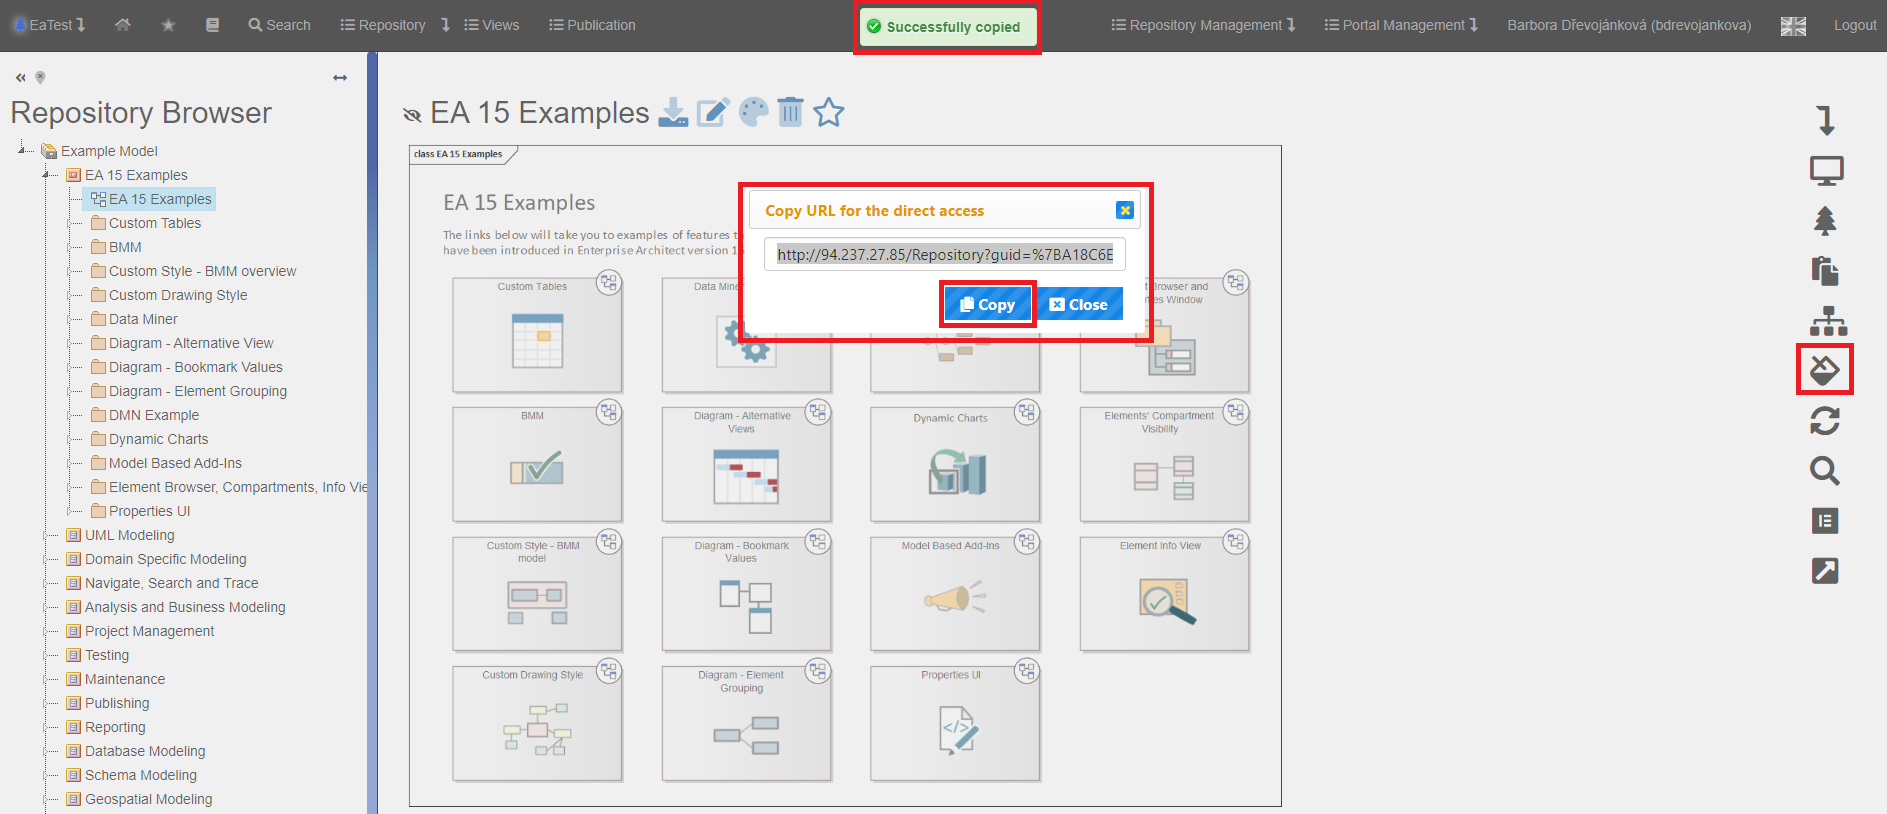
After clicking on the “Copy” button, the user saves the URL to the clipboard.
An identical method is to select the entire line with CTRL+A and copy it to the clipboard with CTRL+C.
Then just paste the URL in the appropriate place.
The recipient of the URL for direct access after entering it in the browser will get the same detail as the user who created the URL.
The user has no permissions. He/she can only view a diagram.
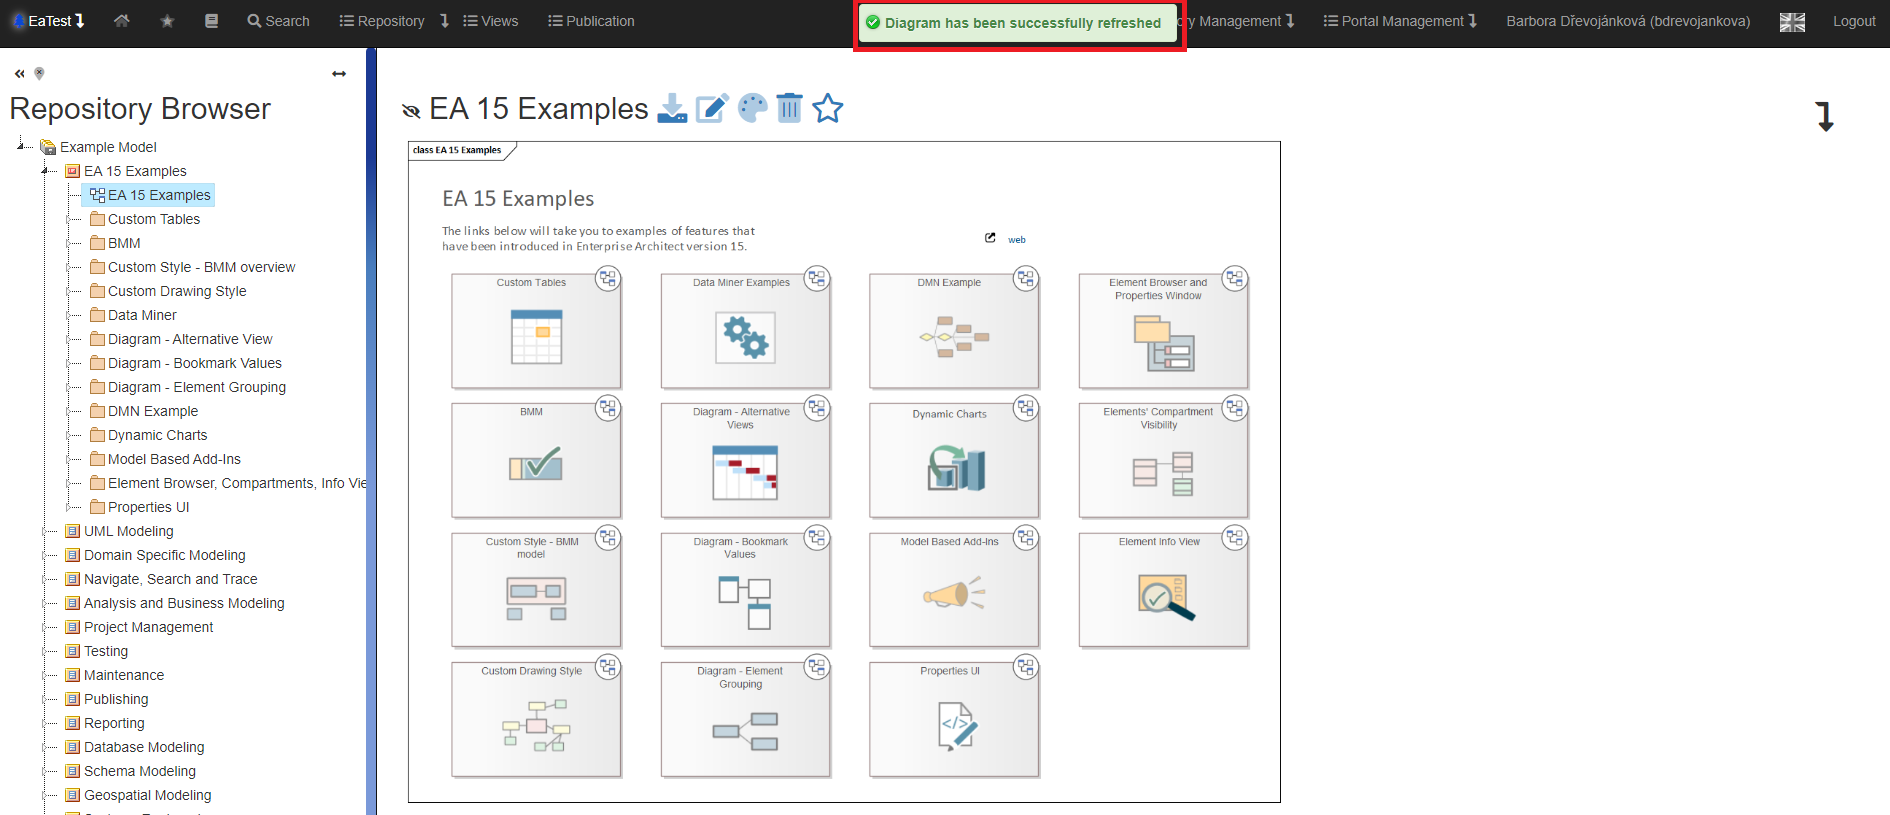
Forced Refresh
Forced refresh is actually “Refresh” and is used if a change has been made to an artefact and has not been applied to EaInfoportT3.
For example, if a user has a diagram open in EaInfoportT3 and changes it in some way in Enterprise Architect. Thus, after clicking on the forced refresh icon, these changes will be immediately applied to EaInfoportT3.
The functionality is available in the context menu under the symbol 

After clicking on the “Forced refresh” icon, the changes of the artefact in EaInfoportT3 compared to Enterprise Architect will be applied.
The diagram shows that the note has been removed.
Zoom
EaInfoportT3 includes several zoom options.
The functionality is available in the context menu under the symbol 
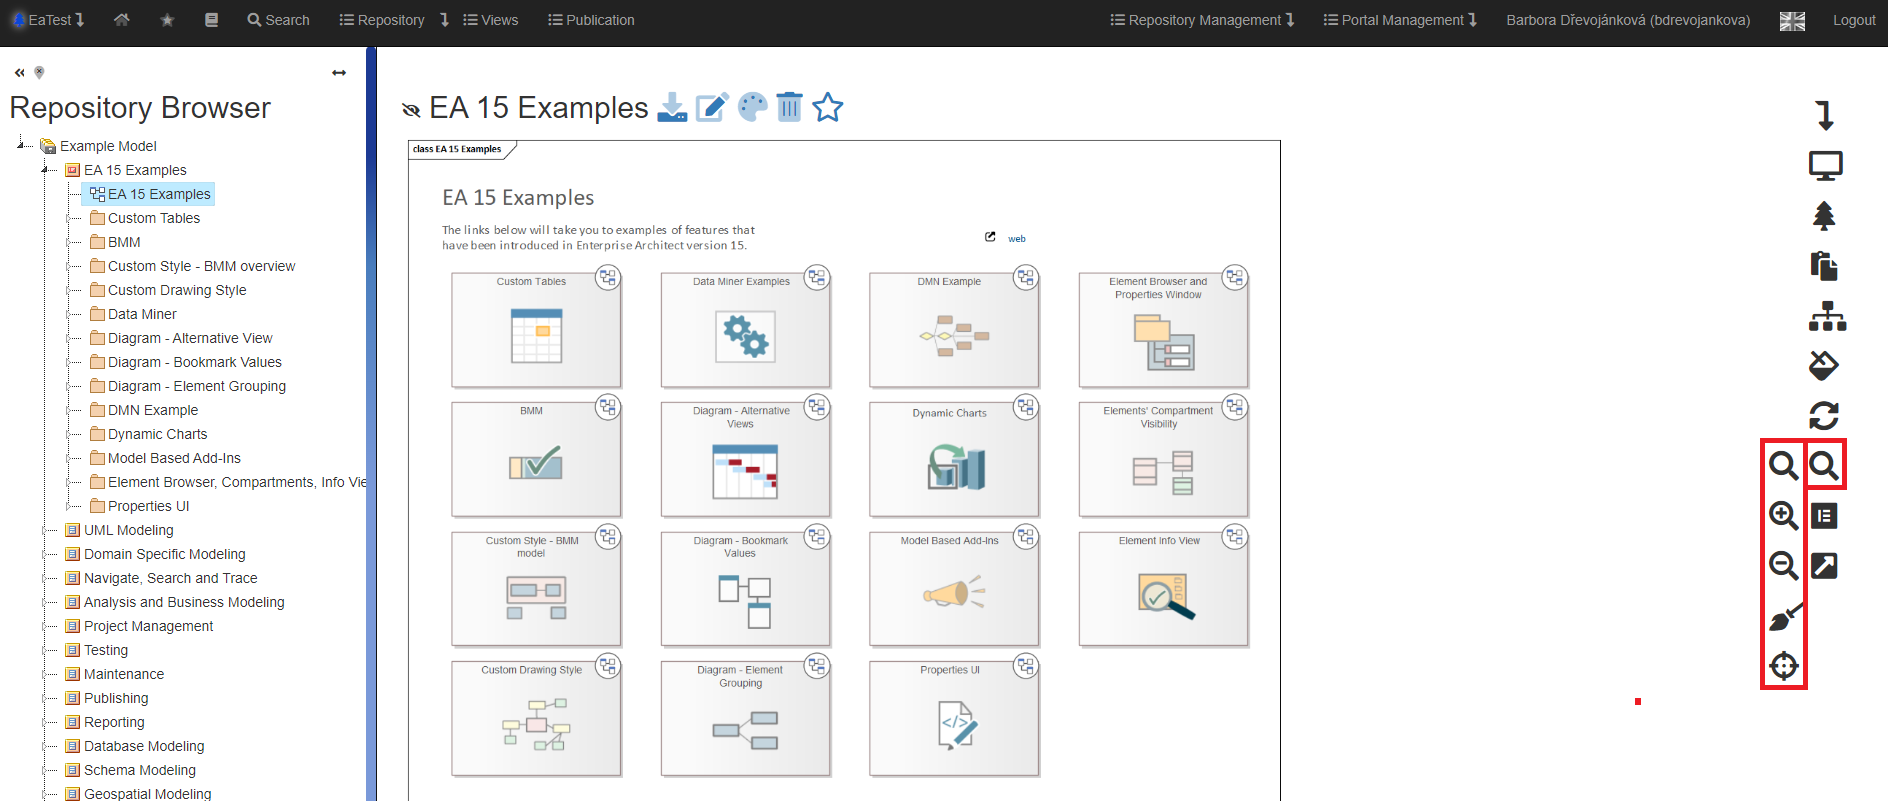
Zoom in
The functionality is available in the context menu under the symbol 
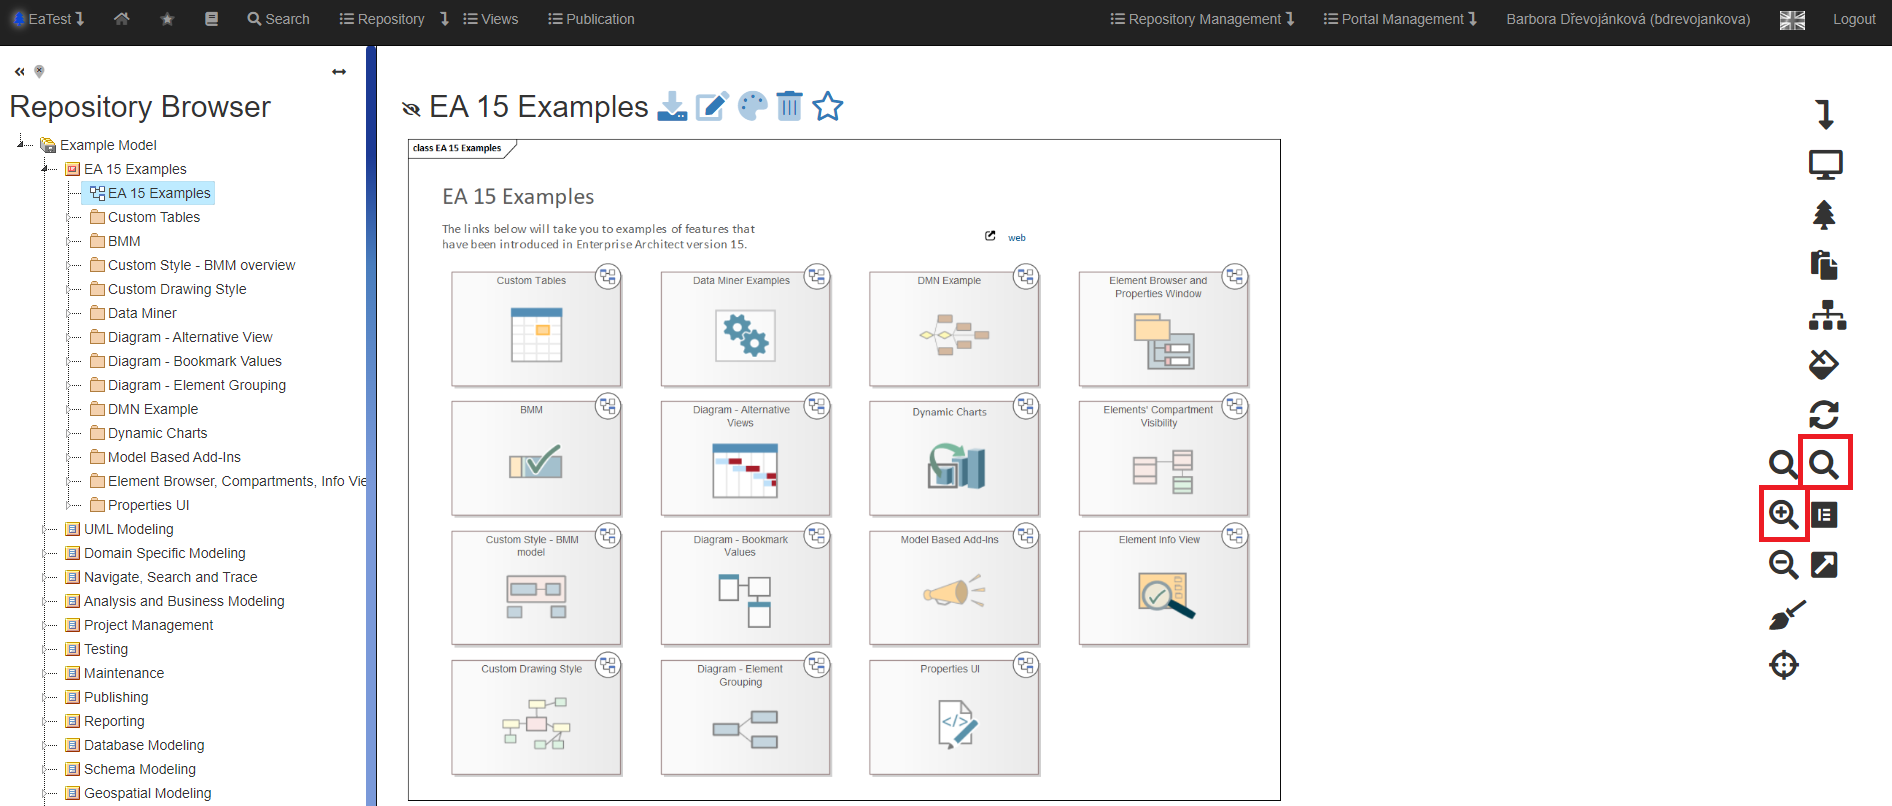
We have 2 options to zoom in the diagram:
- Hold down the CTRL key + scroll the mouse wheel.
- Click on the “Zoom in” icon.
Zoom out
The functionality is available in the context menu under the symbol 
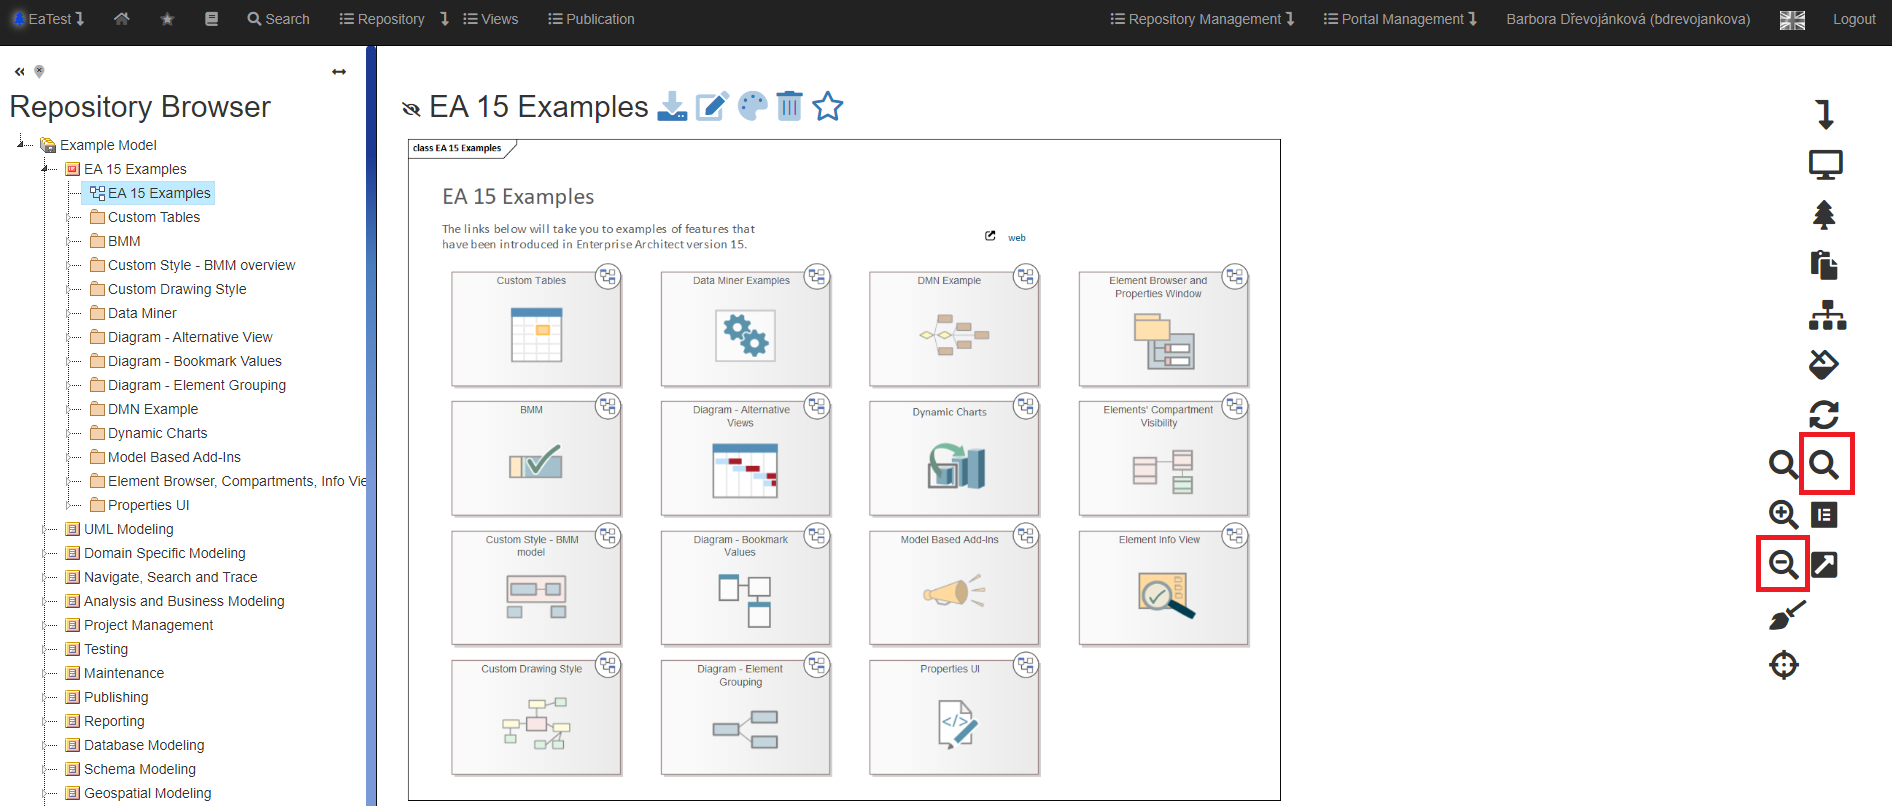
We have 2 options to zoom out the diagram:
- Hold down the CTRL key + scroll the mouse wheel
- Click on the “Zoom out” icon
Reset Diagram Zoom
The functionality is available in the context menu under the symbol 
If you want to return to the default zoom (100%), click on the “Reset Diagram Zoom” icon.
The diagram will zoom out to the original 100%.
Reset Diagram Position
The functionality is available in the context menu under the symbol 
If you want to return to the default zoom (100%), click on the “Reset Diagram Position” icon.
The diagram will return to its original place.
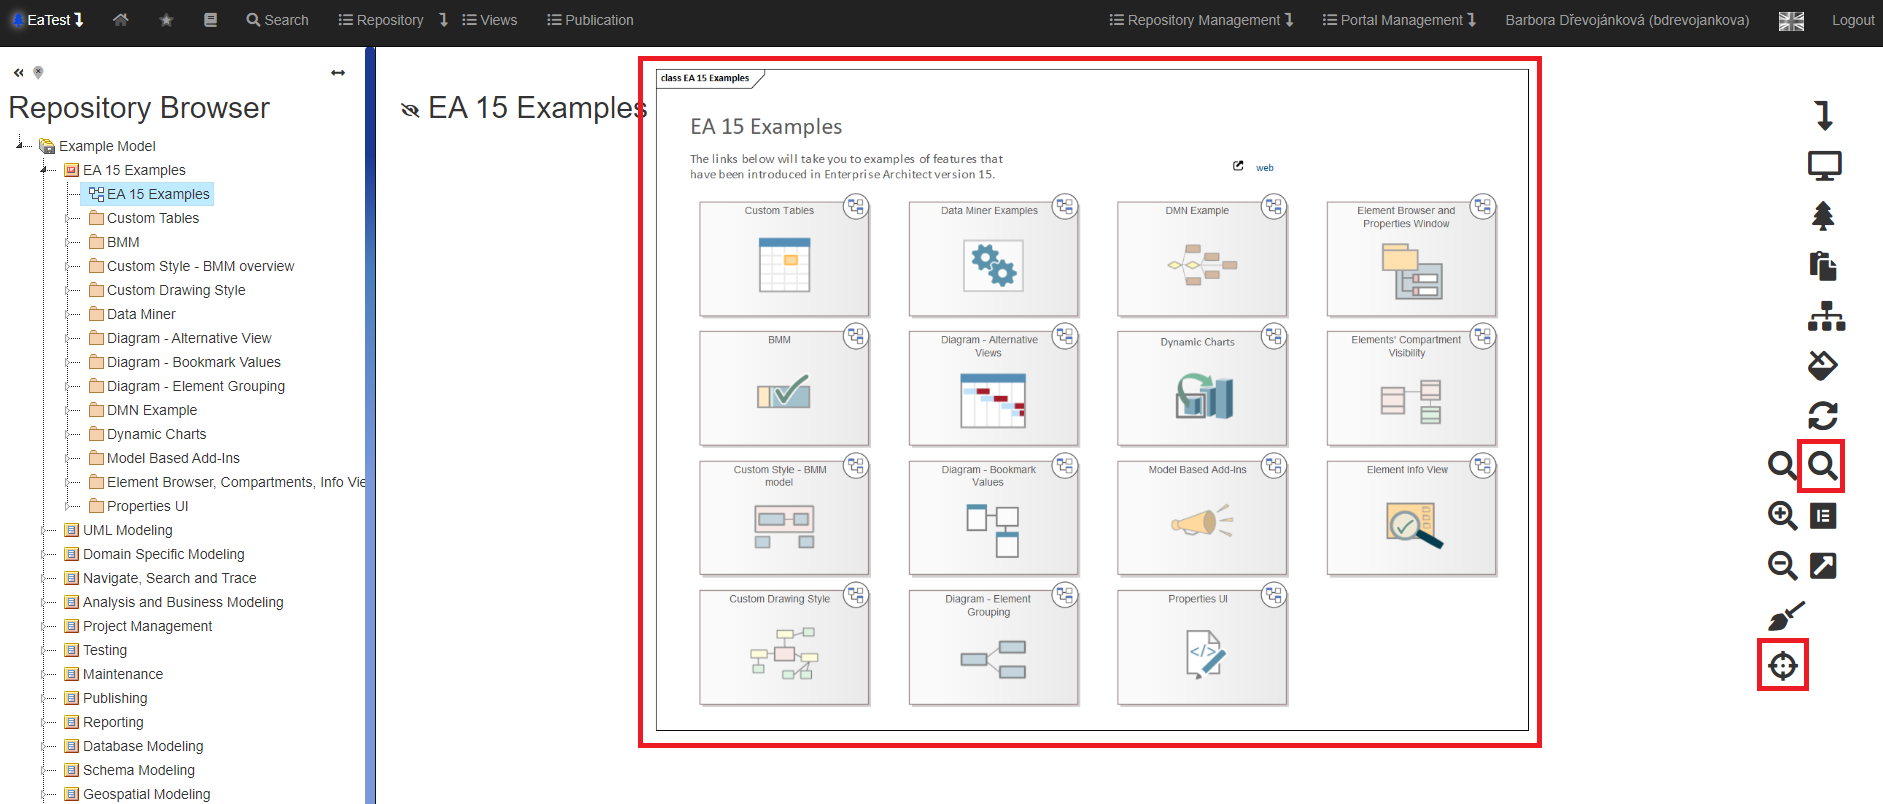
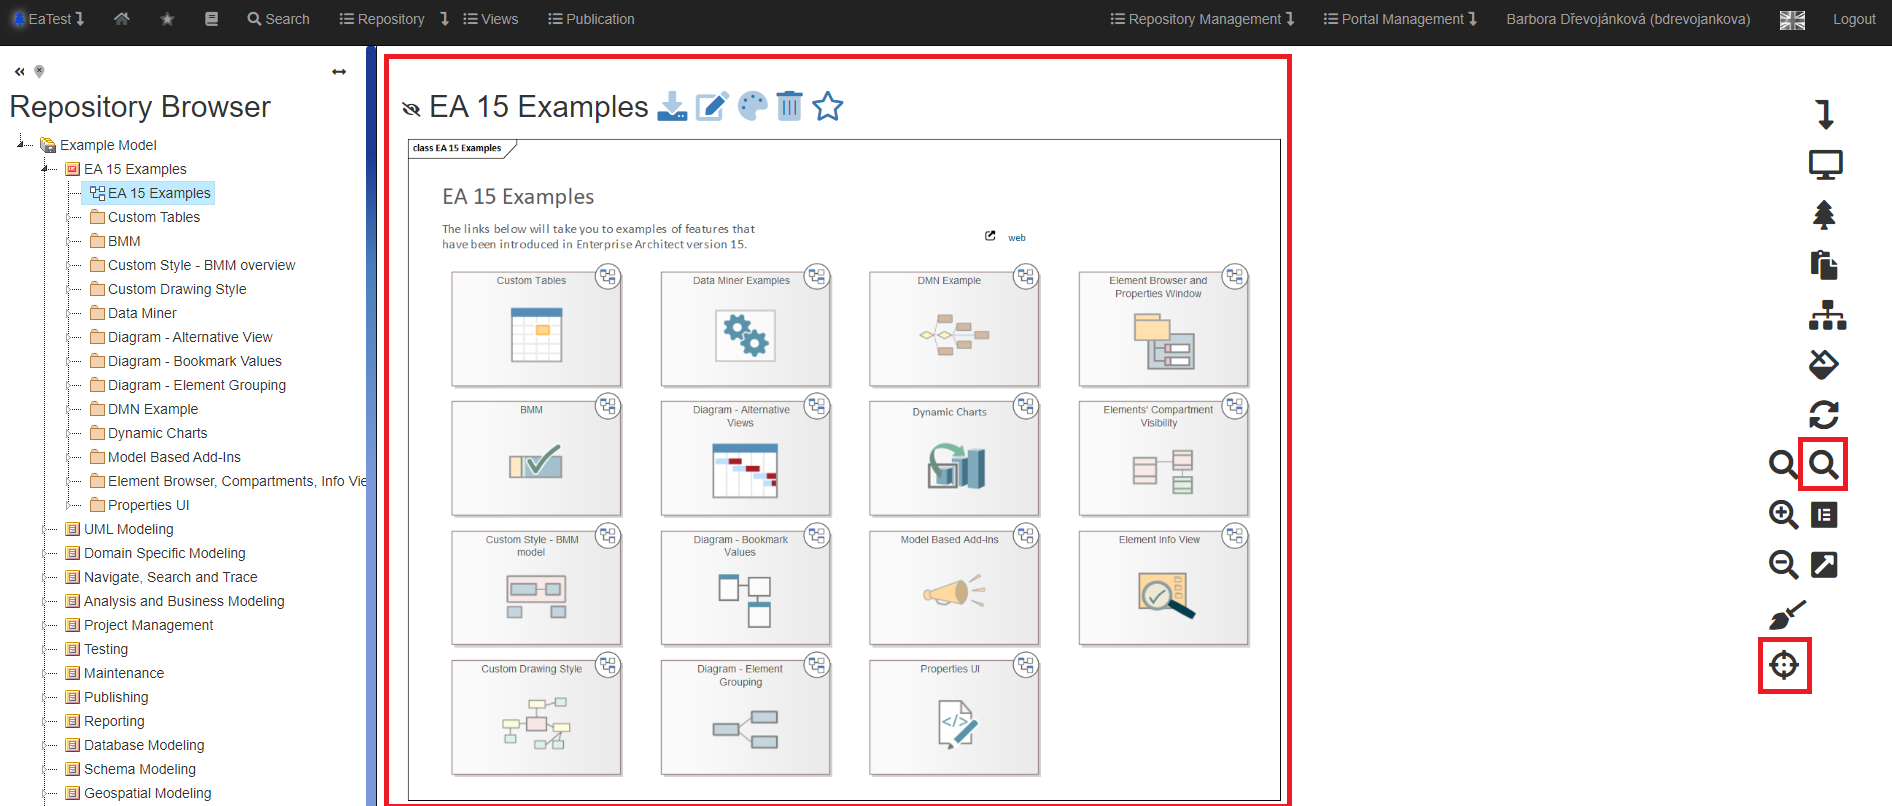
Elements in the Diagram
The functionality is available in the context menu under the symbol 
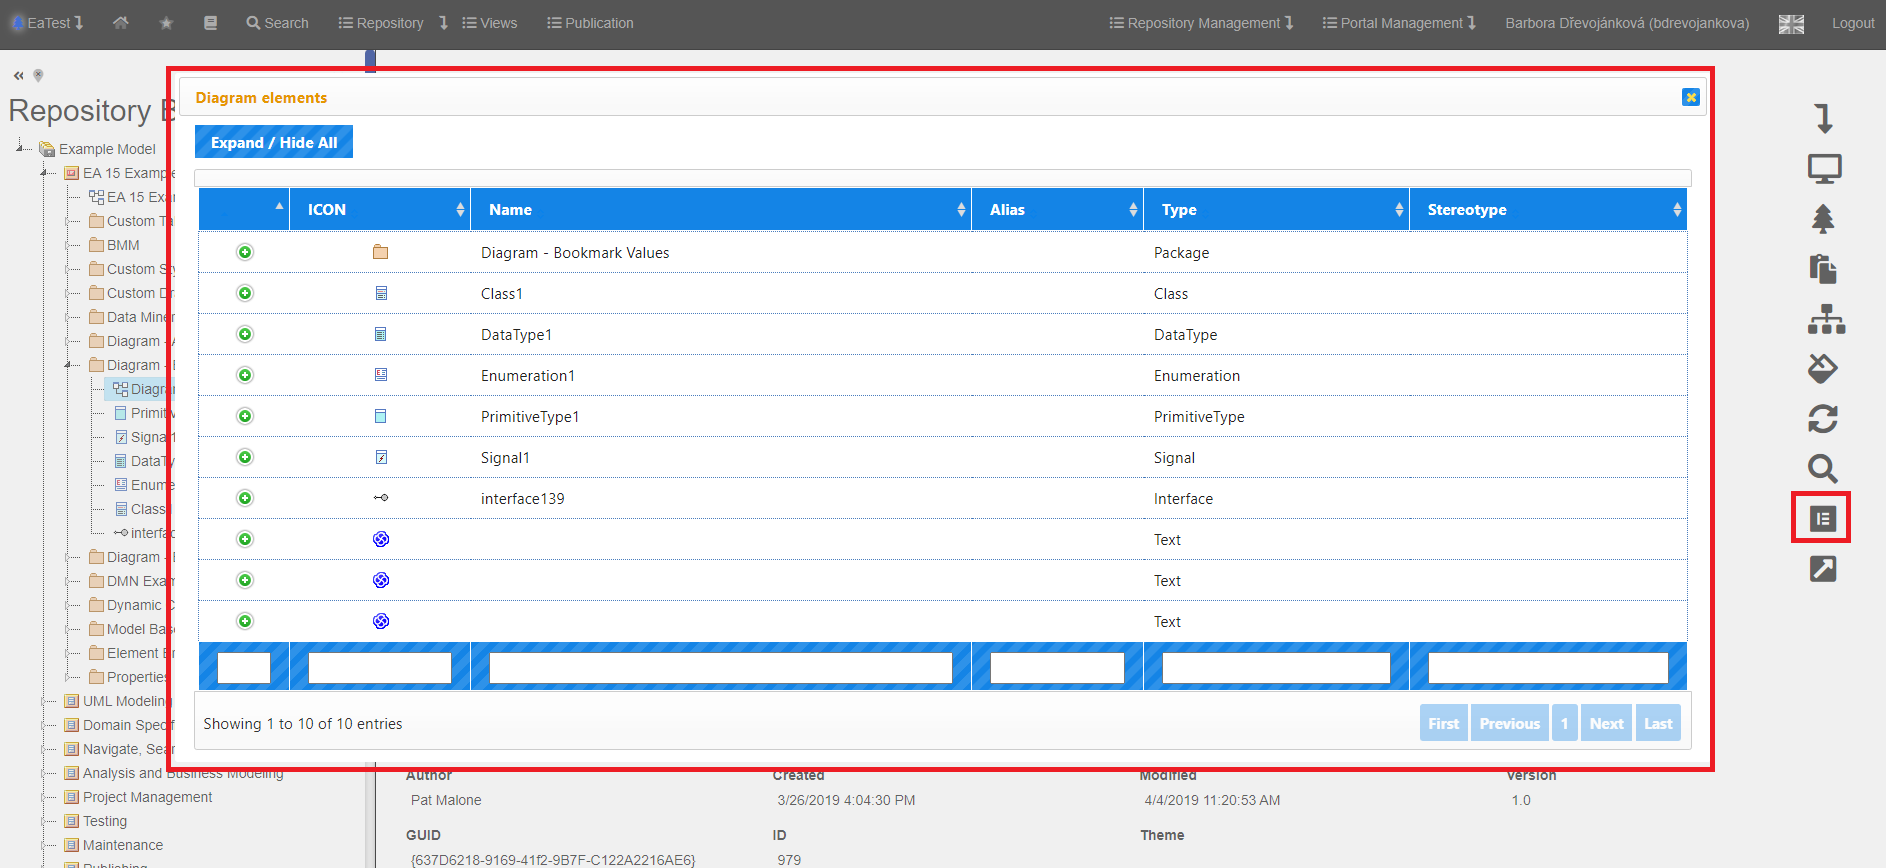
- When a user is in a diagram detail, he/she has the option, after clicking on the “Elements in the Diagram” icon, to display a list of all elements that are in this diagram.
- After clicking on
 the detail of the specified element is displayed.
 - After clicking on
 in the ICON column, you get to the specified element.
We got to the “Account” element and selected “Search diagrams with this element” there.
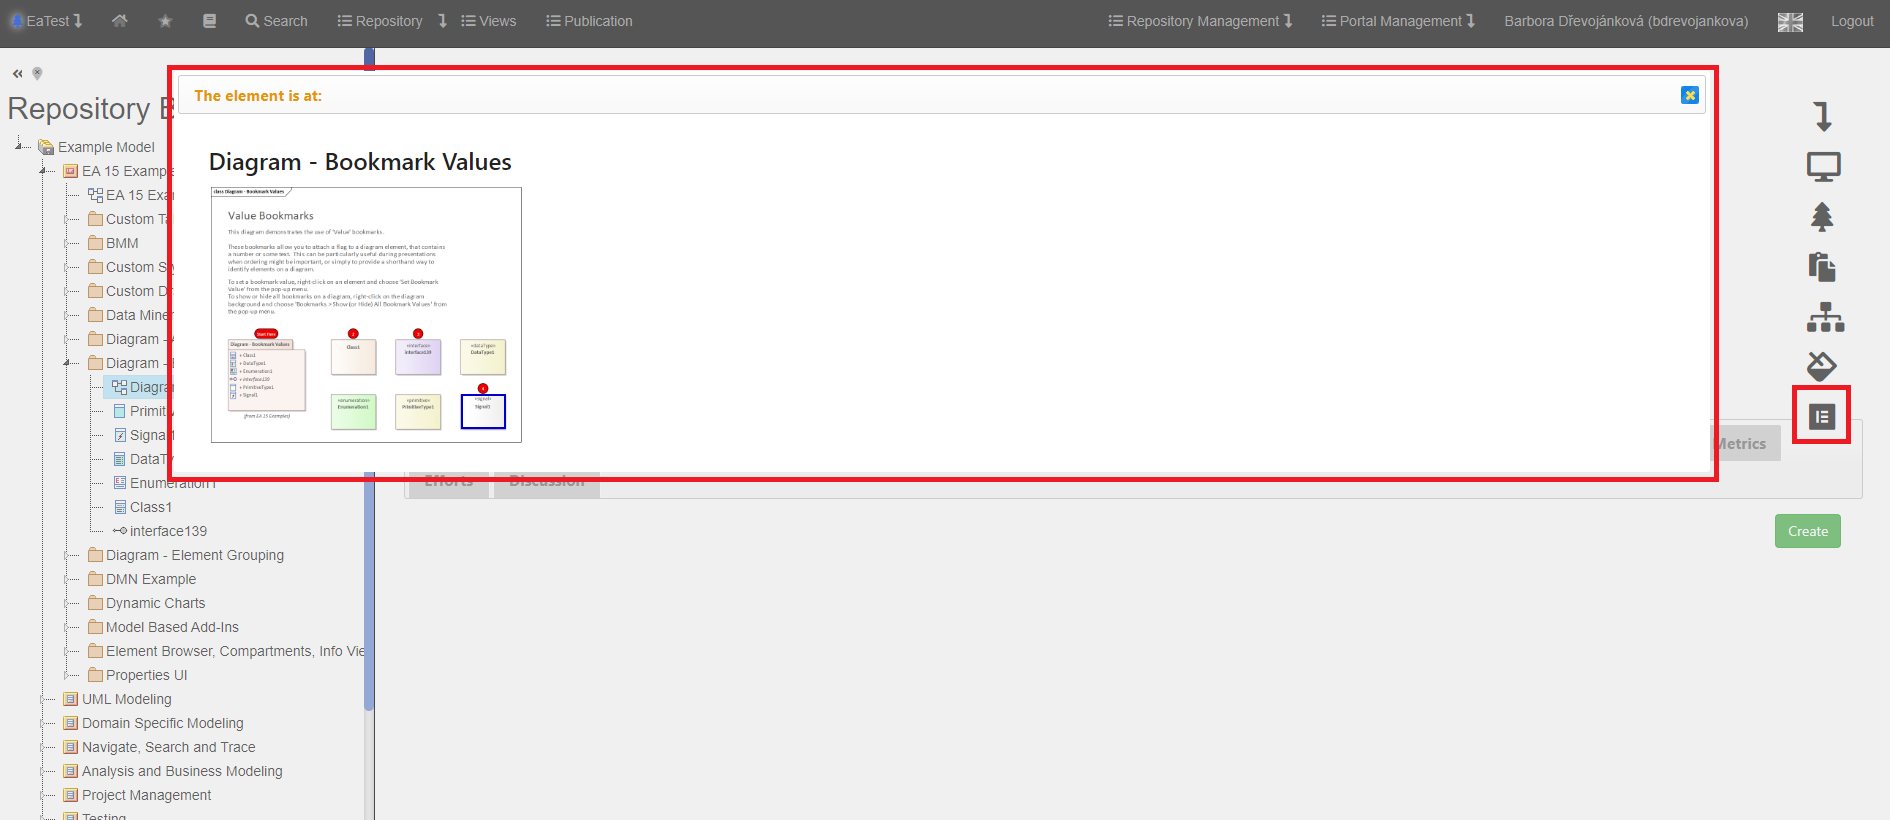
- A list of diagrams in which this element is located is displayed, with a preview and highlighting where it appears in them.
- Double-click on the diagram to get to its detail.
Hiding Text Information in Element Detail
The  button is used to hide the information below the diagram.
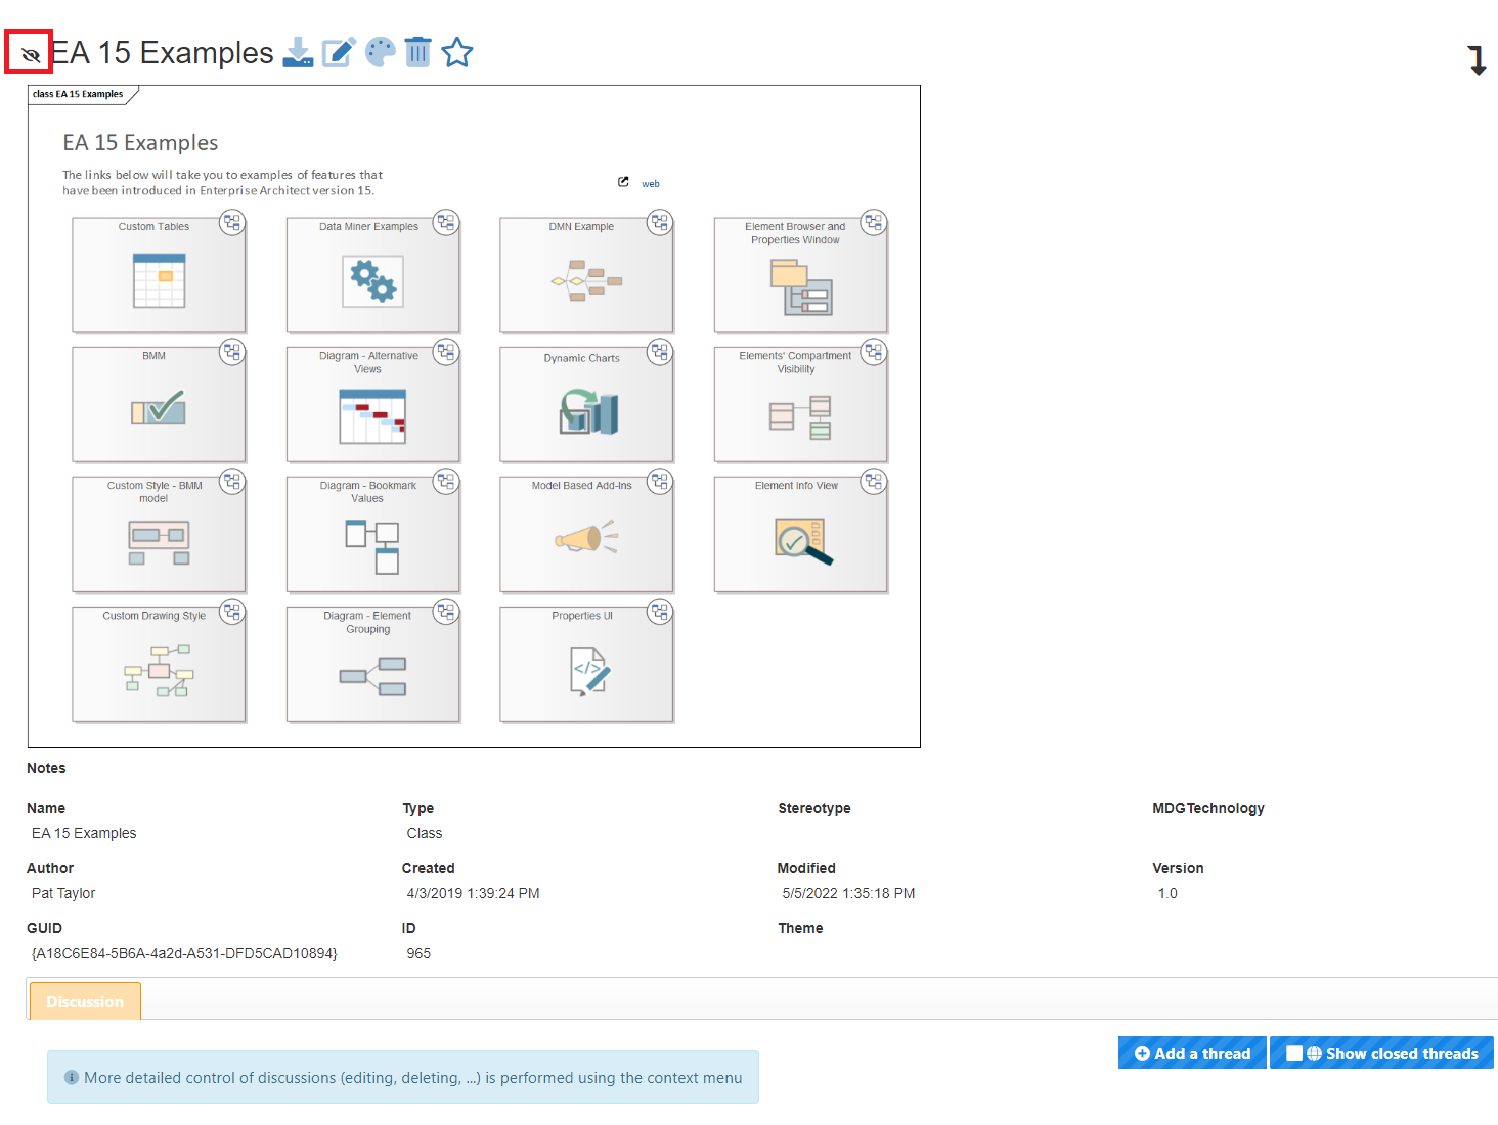
Here you will see the same diagram with hidden detail and discussion.
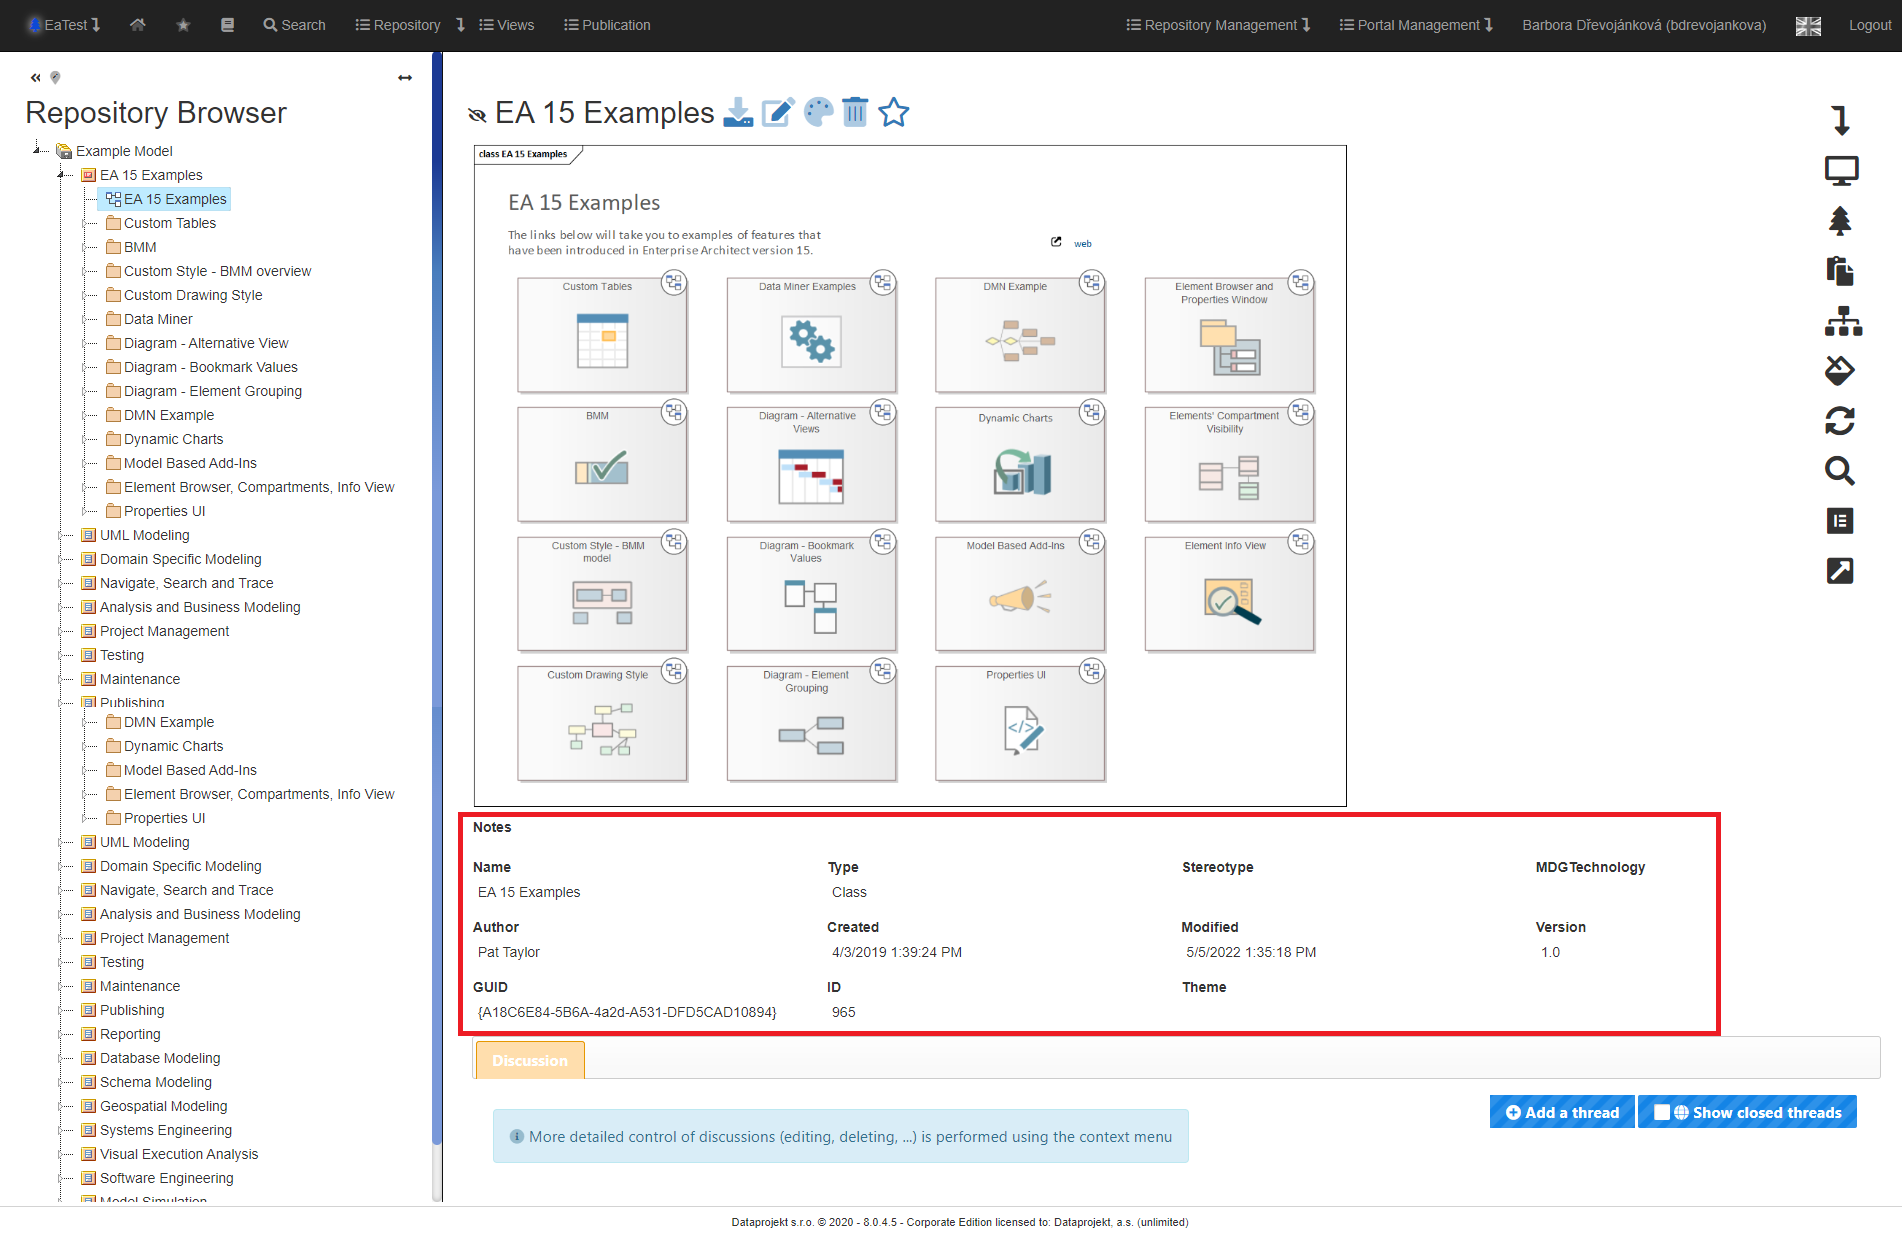
Information about the repository
If the detail displays the package, element, and element elements (such as class attribute, class operation, activity parameter, and more), the detail screen looks slightly different.
It does not, of course, display the diagram image. However, the amount of "textual" information is much greater compared to the diagram.
The above screenshot is only an example - depending on the portal configuration (or the settings of a particular user), it may differ in the number or placement of specific information.
The configuration of the detail, repository element, will be explained later in this document.
Displayable element detail
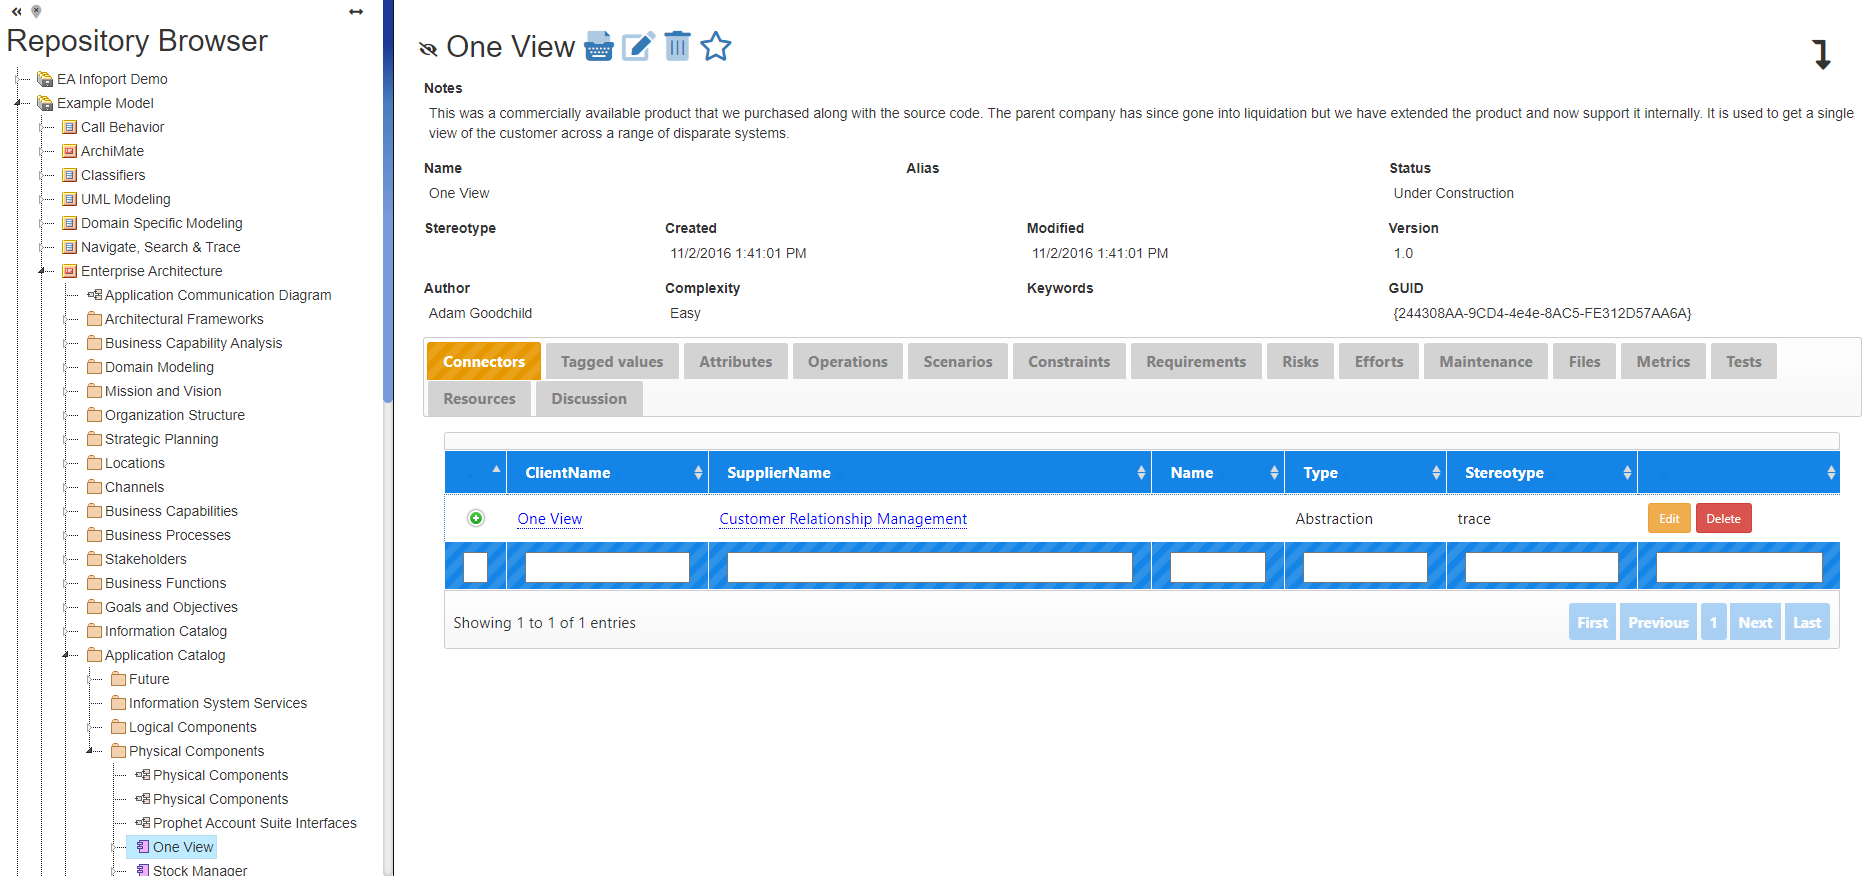
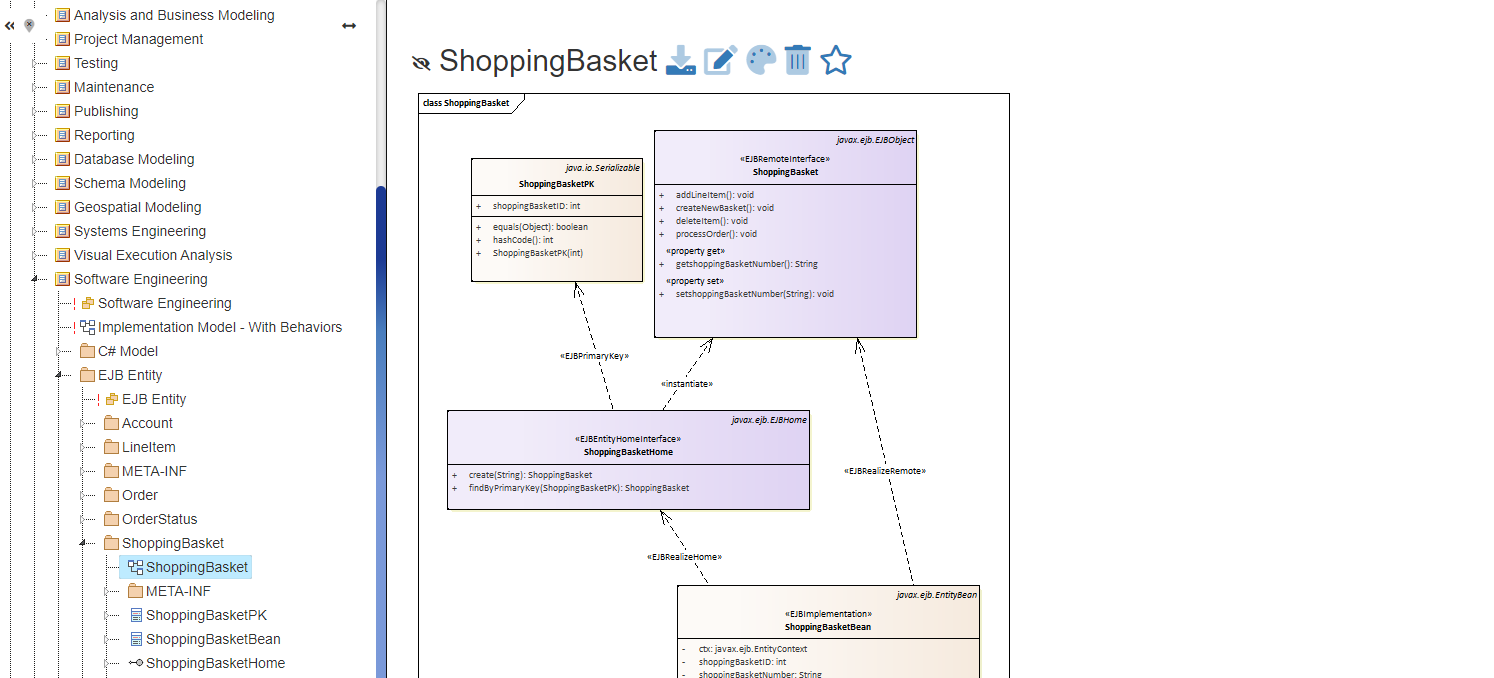
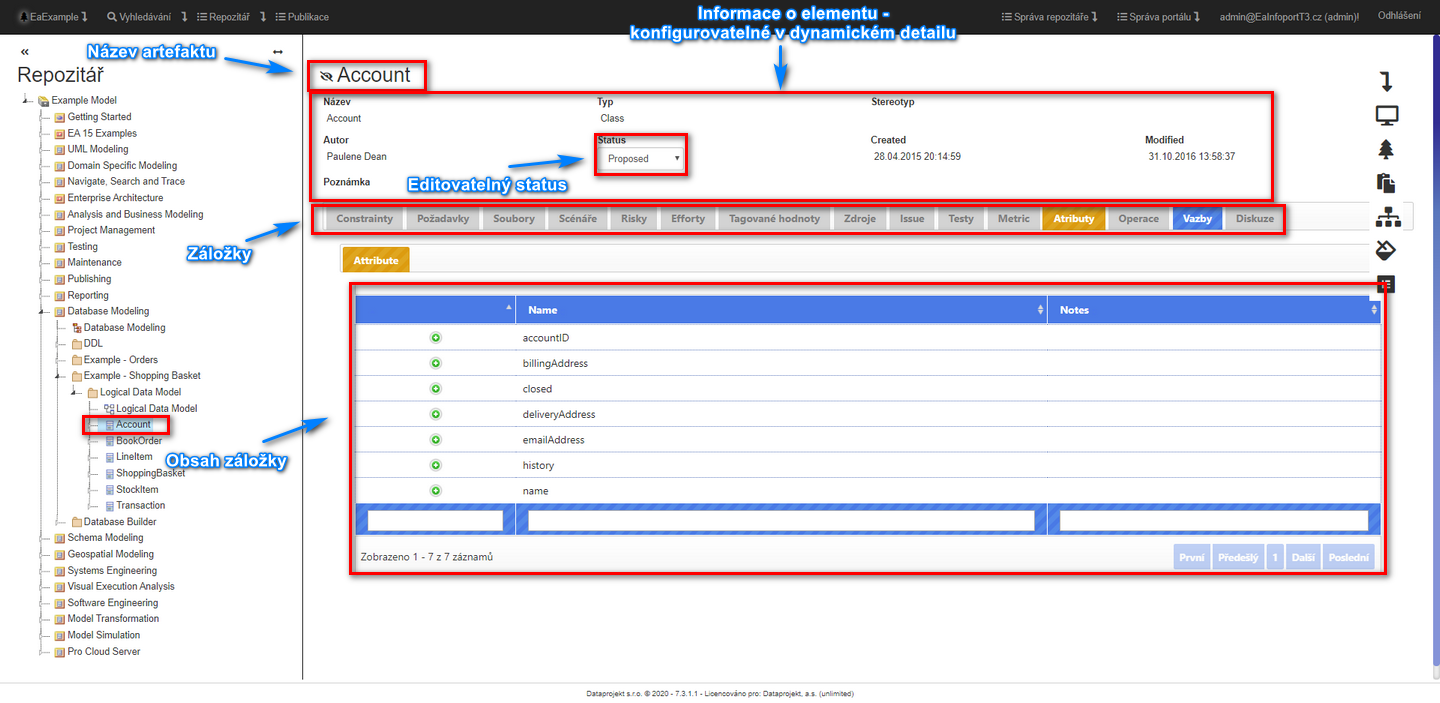
Click on the "Account" element in the tree to see the detail.
In the detail you can see:
Name and information about the element with editable status.
The element may contain properties and discussions that are clickable in the blue tabs. The grey tabs are empty and the orange tab indicates the currently selected tab.
In the tab content, you can see that the "Account" element contains seven attributes.
By clicking on  you can open the detail of the selected attribute.
Package properties
After clicking on the “UML Modeling” package in the tree, the detail will be displayed.

- n the detail, you can see the name and information about the package with editable status.
- A package can contain properties, discussions and permissions. You can click on them in the blue highlighted tabs. The grey bookmarks are empty and the orange bookmark indicates the currently selected one.
- The “Permissions” tab is unique to a package. We can use it to set permissions in the selected package.
Icons on Artefacts
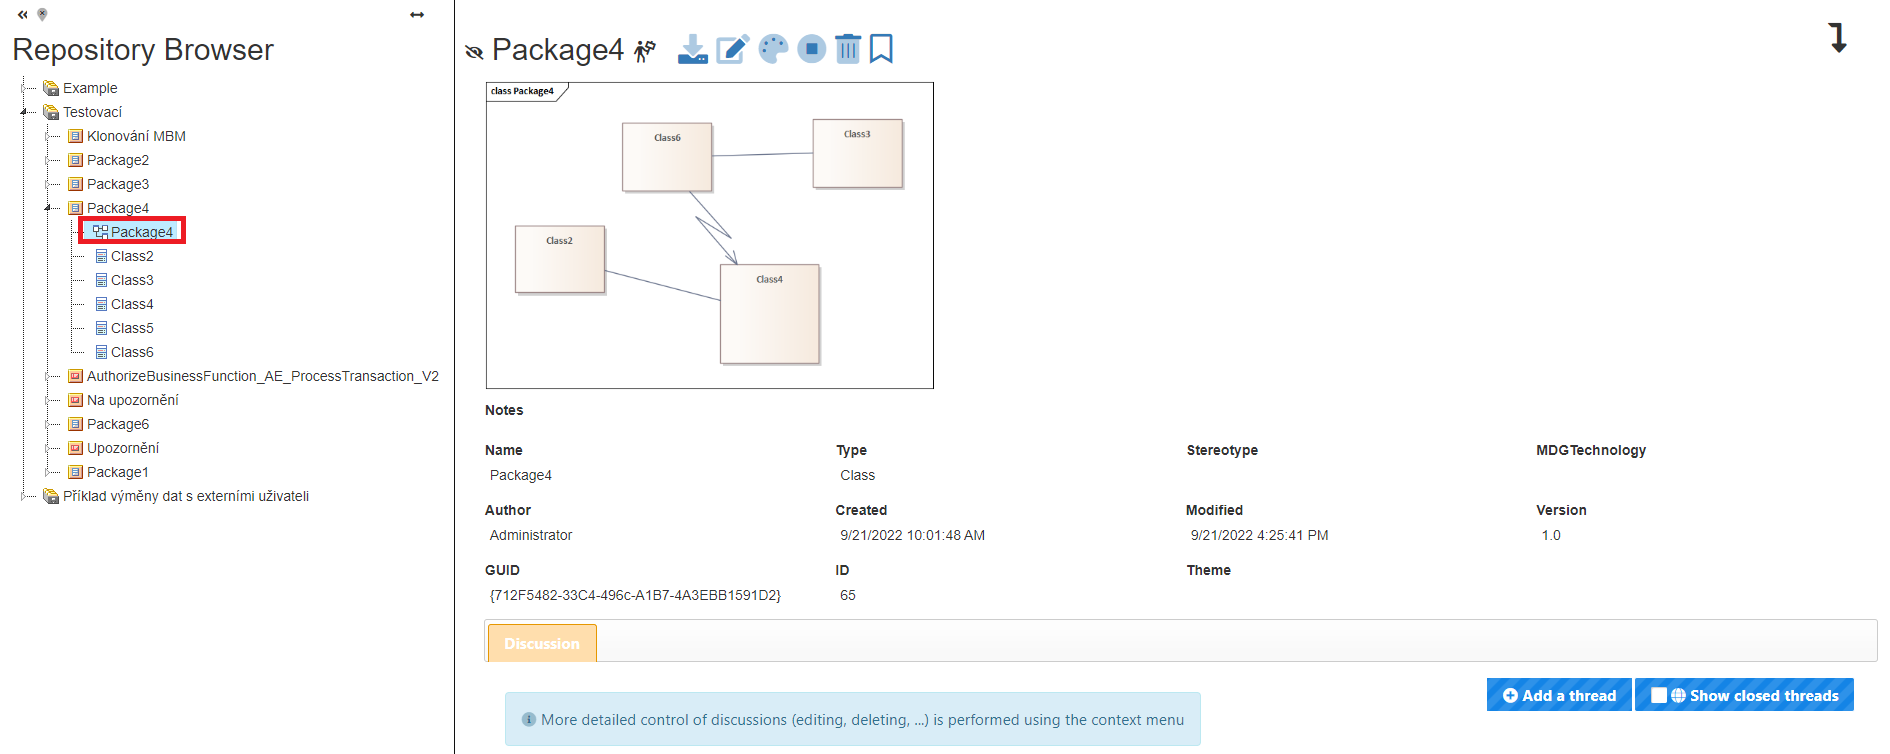
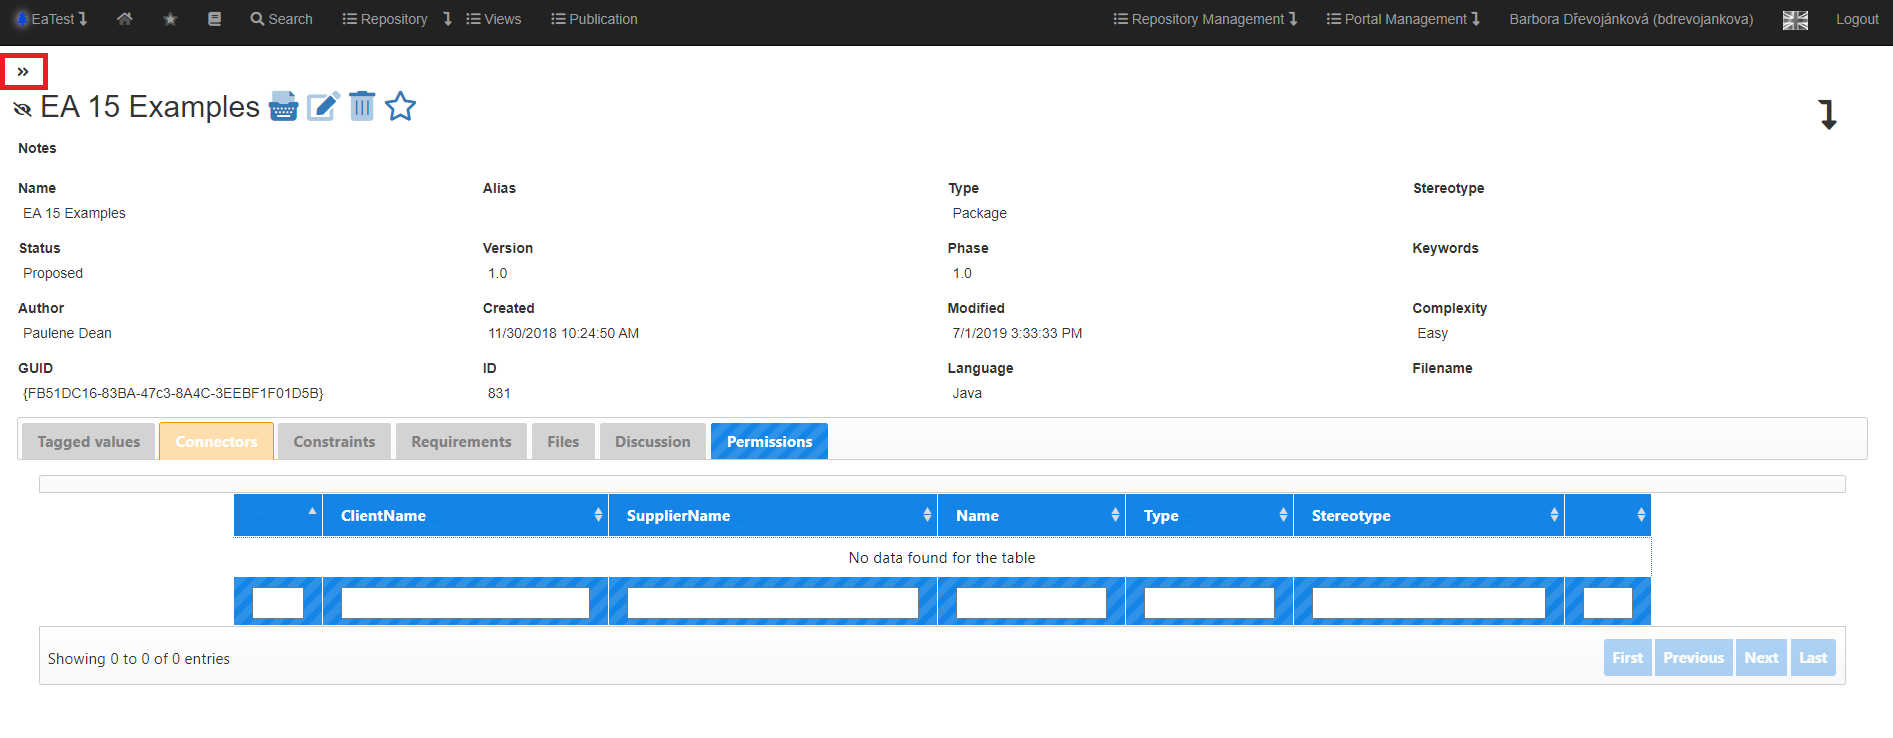
Detail elementu / package / diagramu
This is the largest part of the screen, containing the detail of the item (diagram, element, package and others) that is currently selected in the tree. The exact information varies depending on which element is selected in the tree.
If a diagram is selected, then the diagram itself is displayed at the top and the diagram details below it.
If an element (package and others) is selected, then the information about the selected element is displayed directly.
A detailed description of the diagram/element details is given below.
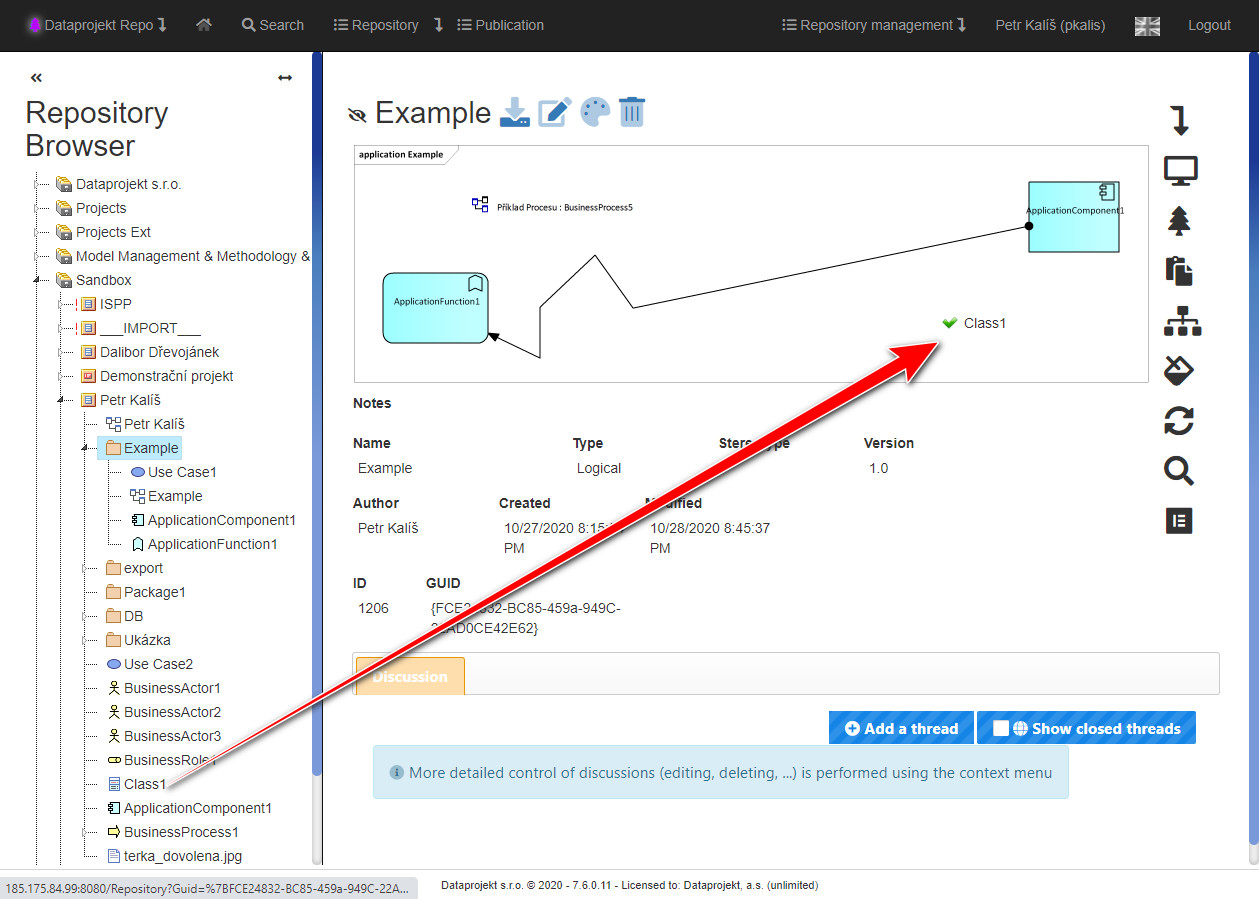
Discussion (comments) in packages, diagrams, elements
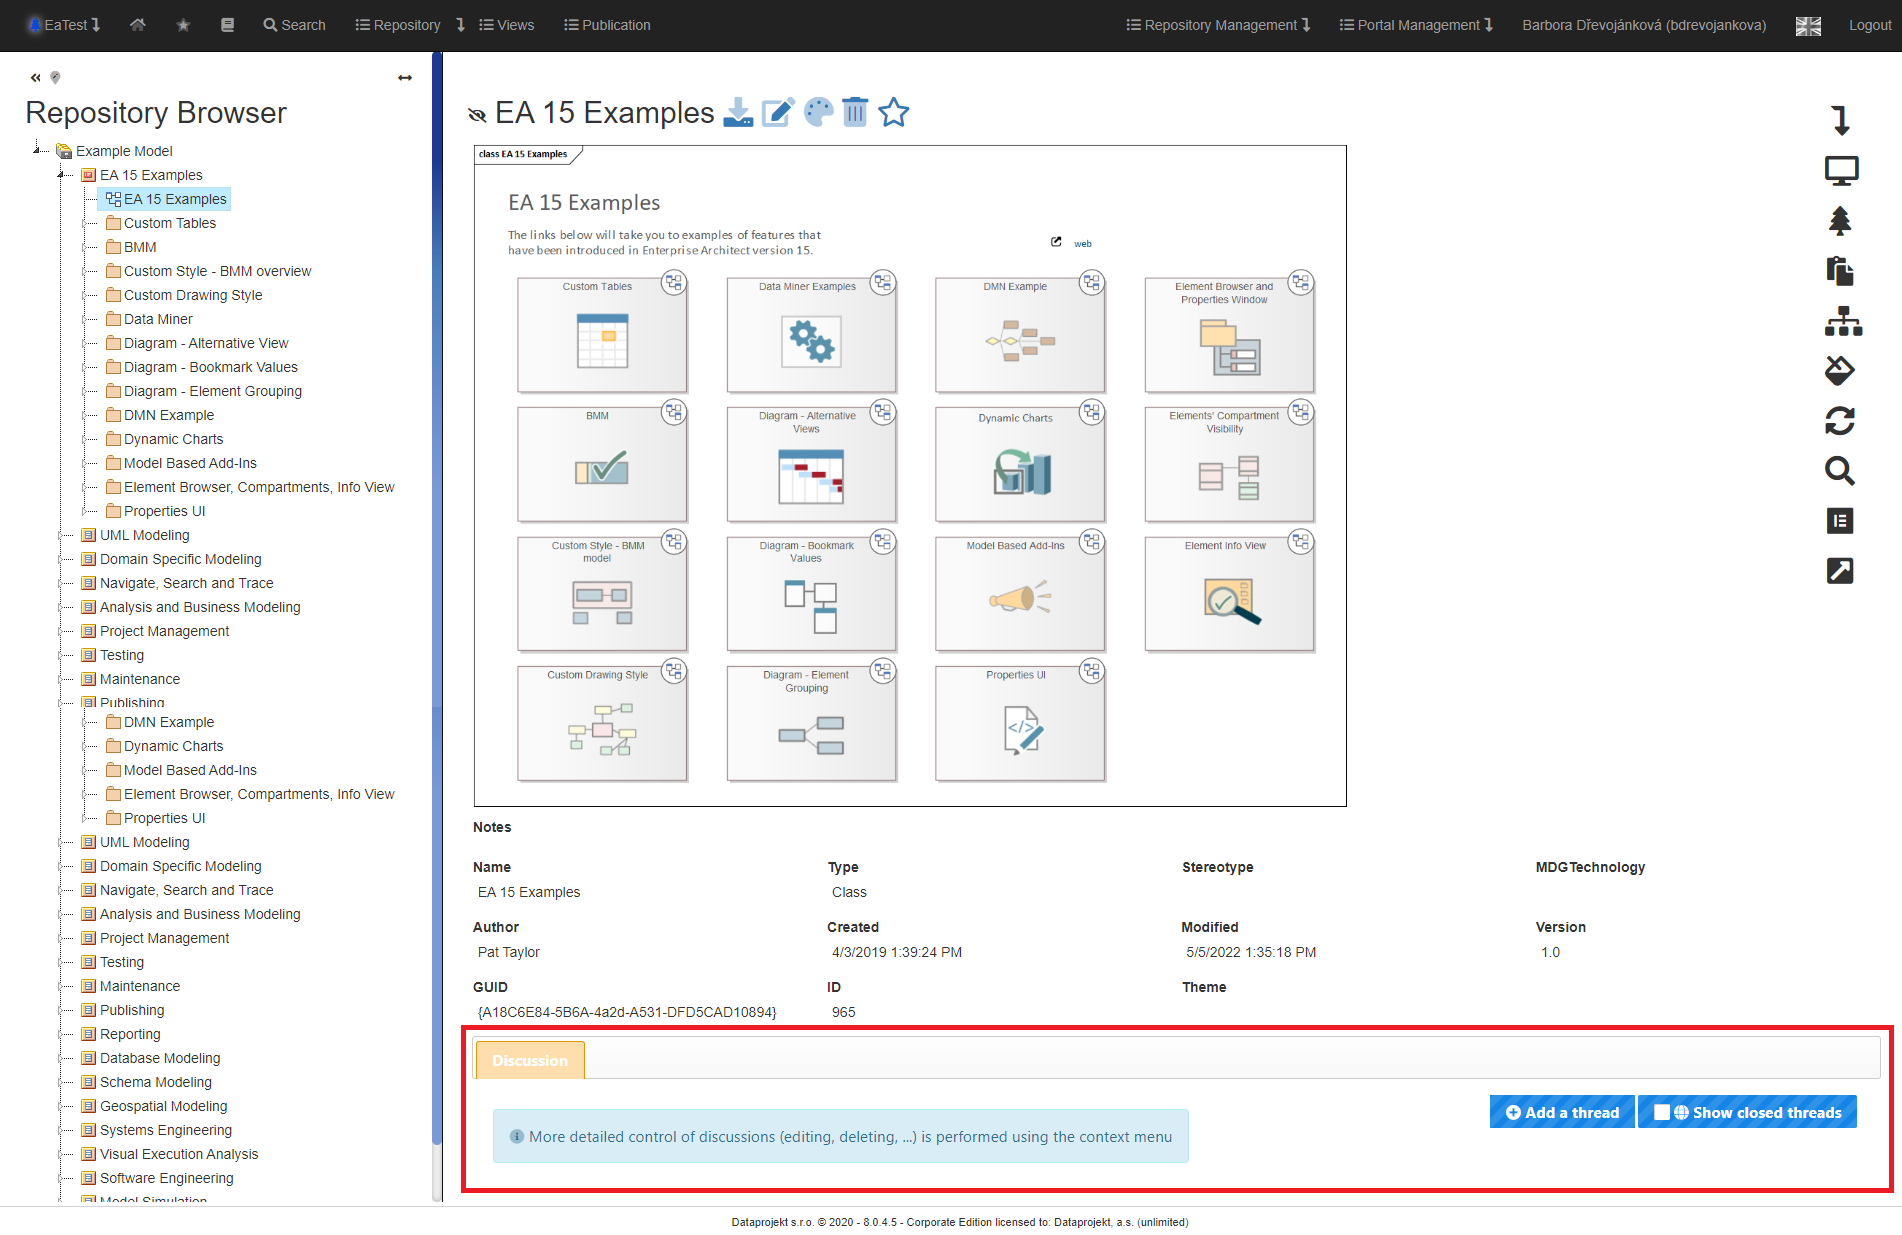
In packages, diagrams and elements, you can see comments from EA and you can also edit and add them.

- To create a new comment, click on “Add a thread”.
- Portal/repository admin can click on "Status change"
- If there is a closed thread, you can check the “Show closed threads” filter.
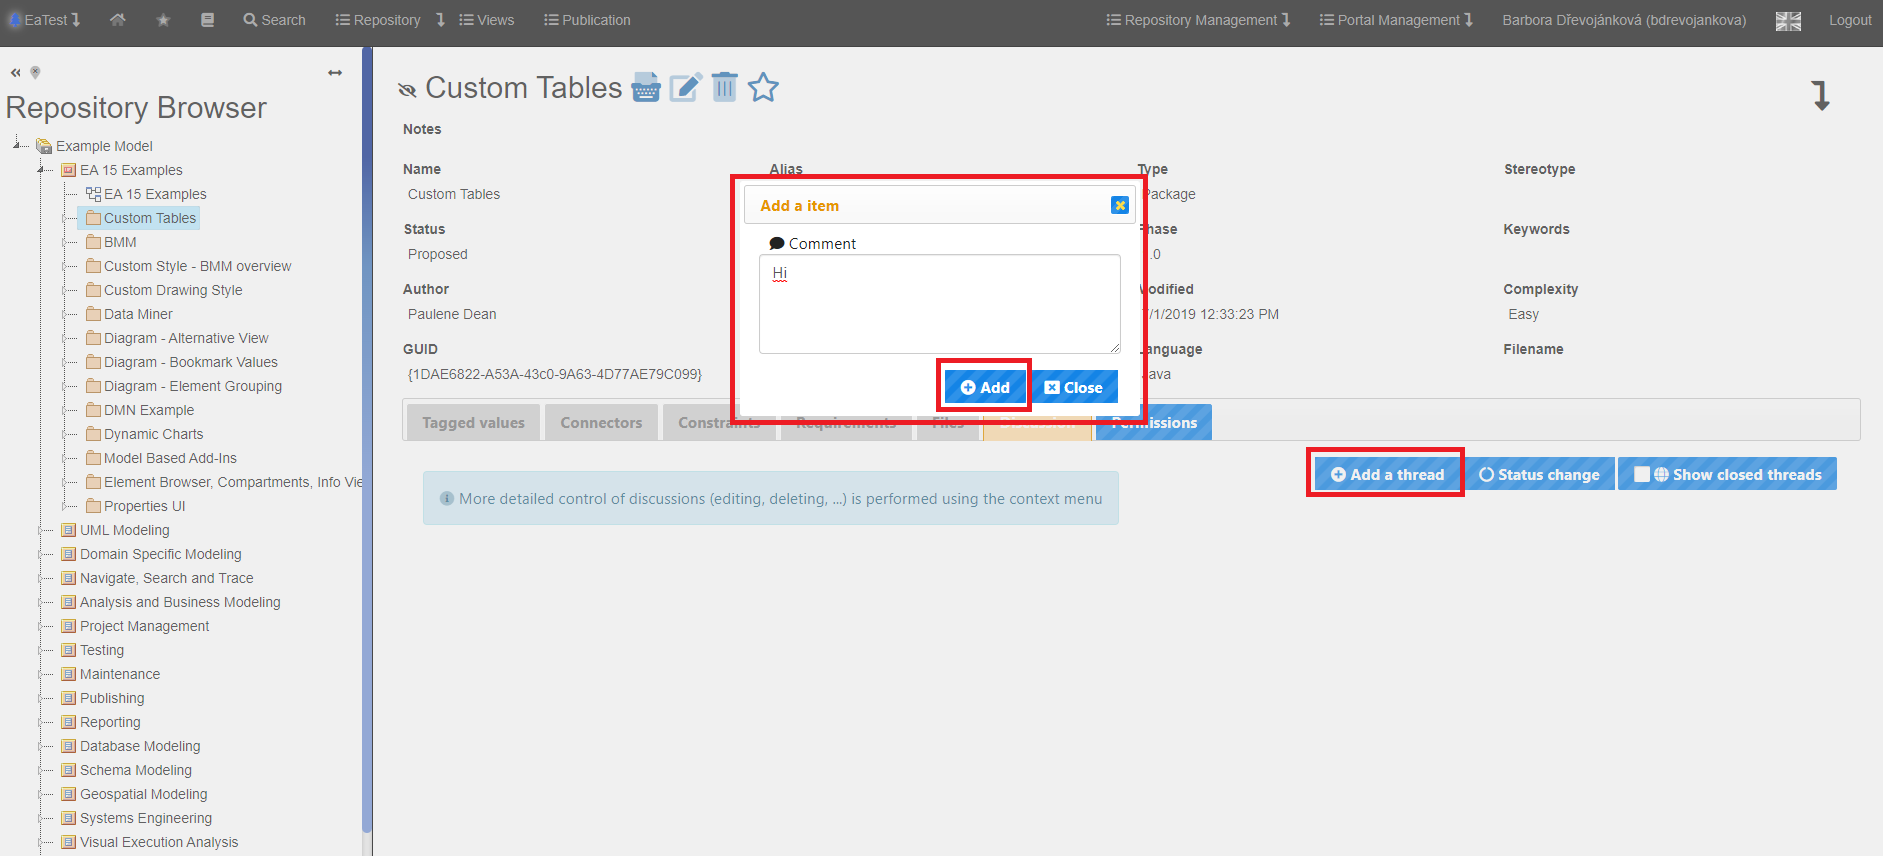
In the picture, you can see that the user admin clicked on “Add a thread”. A window popped up where it is just necessary to fill in a text of a comment and after clicking on “Add” a comment will be created.
In the marked window, we can see a table with four items. The table can be displayed by right-clicking on the selected comment.
In the picture, you can see that the user admin clicked on “Add a thread”.
A window popped up where it is just necessary to fill in a text of a comment and after clicking on “Add” a comment will be created.
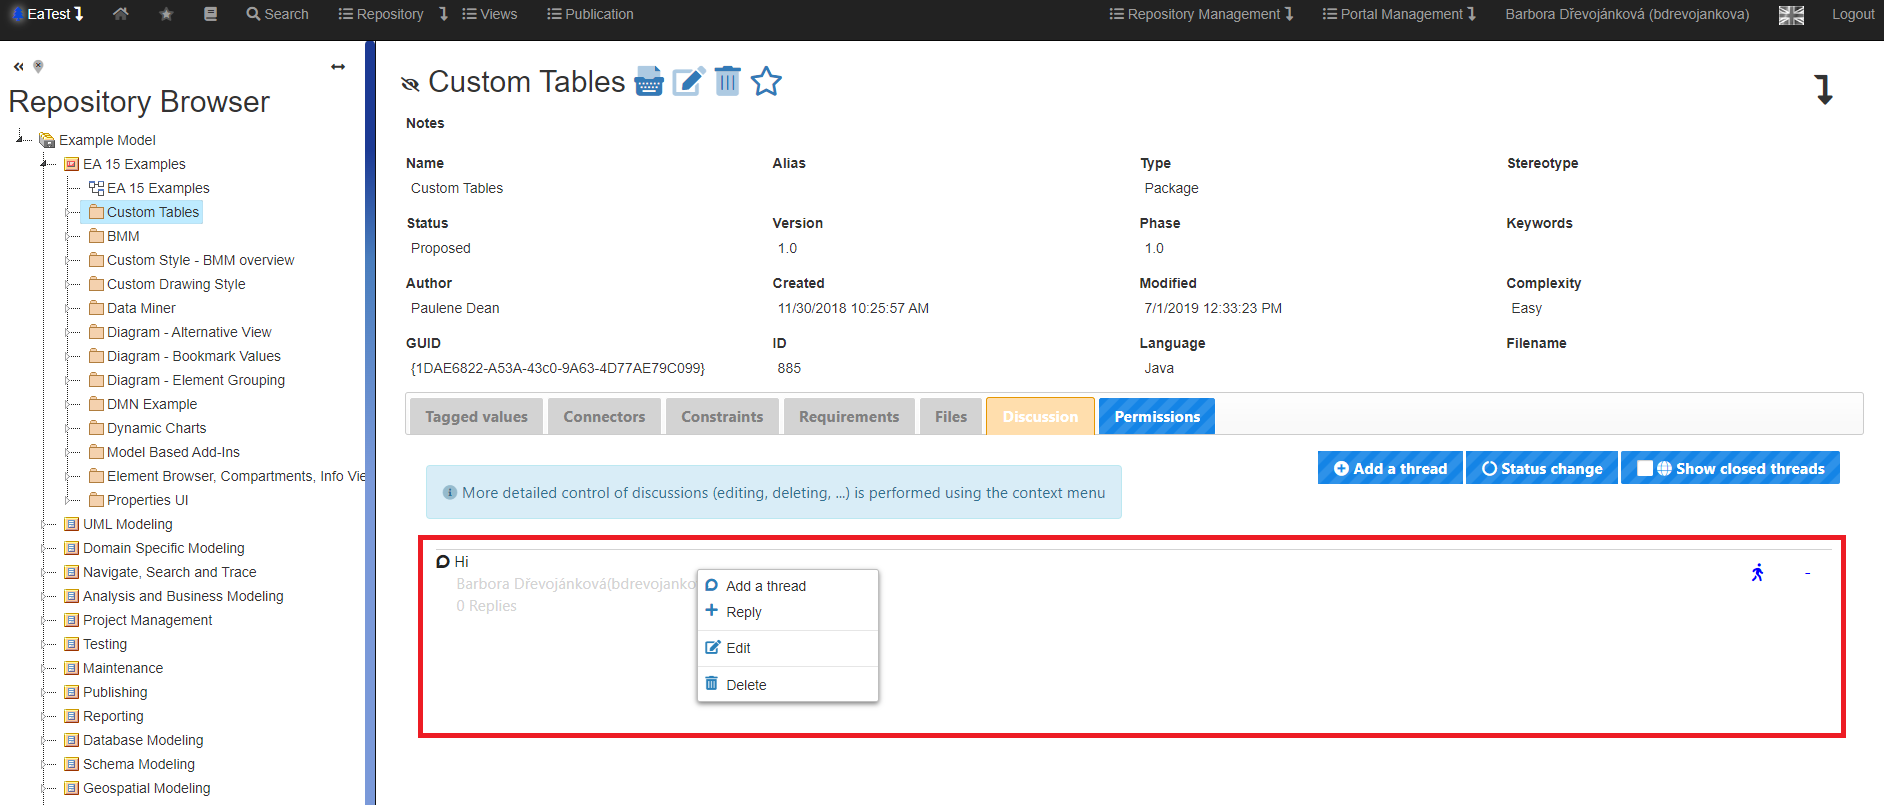
- The “Add thread” option has the same function as the button mentioned above.
- The “Reply” option opens a window for creating a comment. After adding a comment, it will be included under the comment that was selected. An example can be seen above the marked comment.
- The “Edit” option opens a window where you can set Status, Priority or comment text.
- The “Delete” option deletes the comment.
The user has selected the “Edit” option.
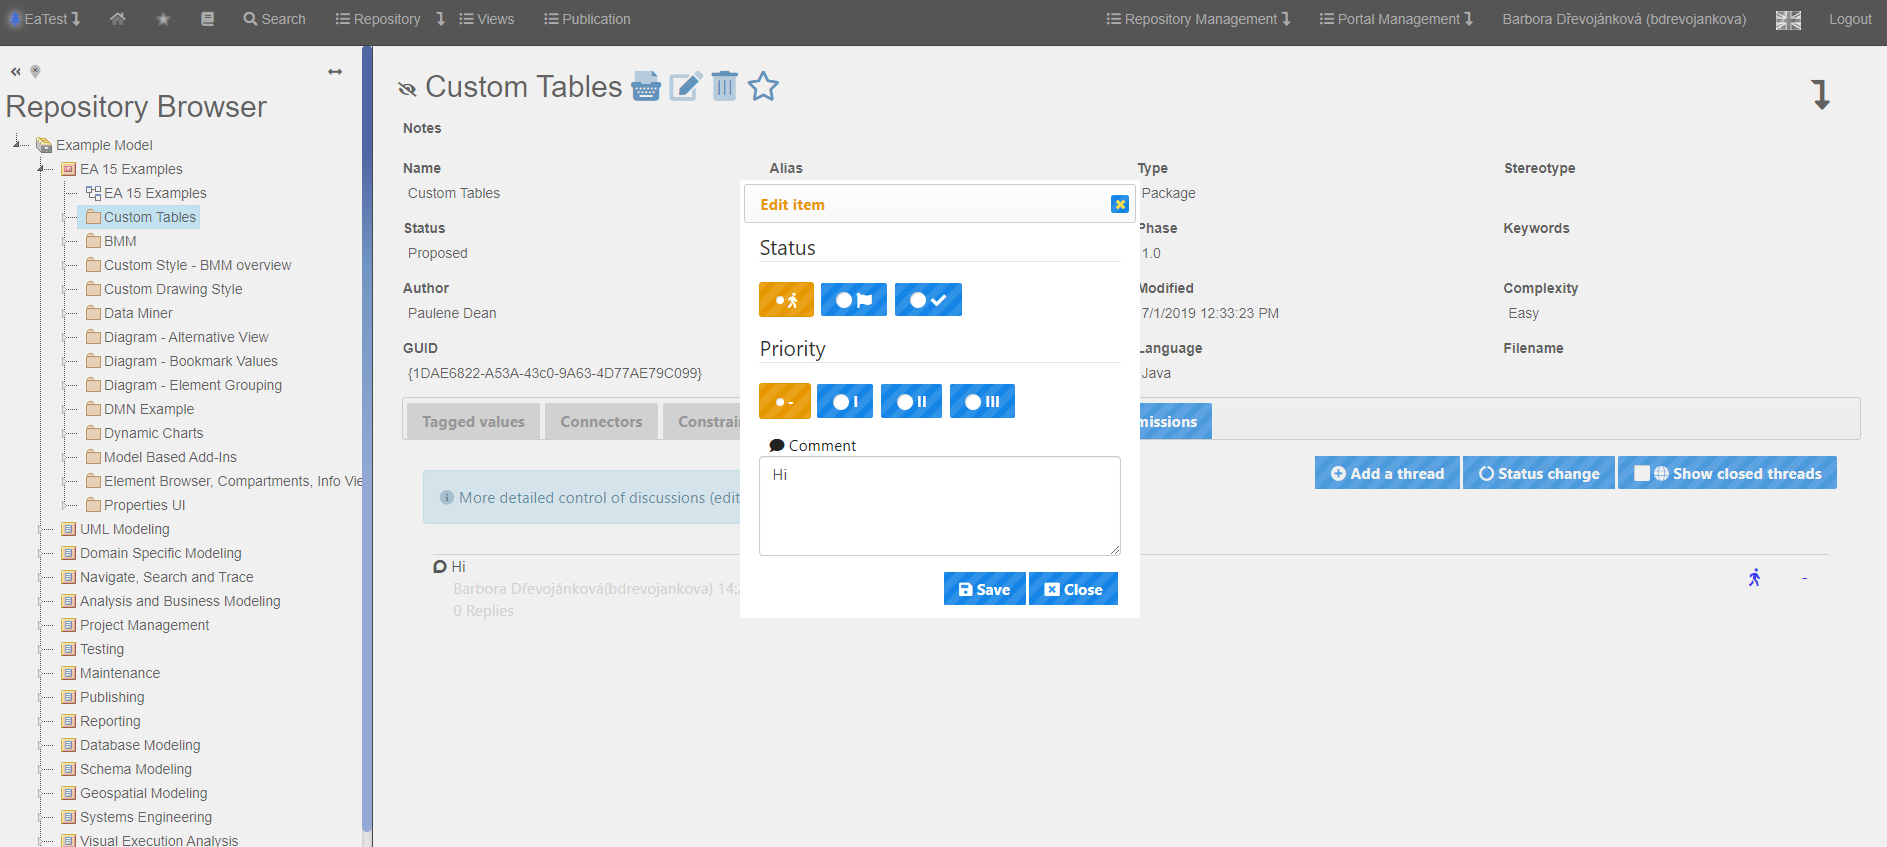
You have the opportunity to choose between three statuses. Open, Awaiting Review, and Closed.
Another option to choose is to set the priority. You can choose Not Specified, Small, Medium and High.
Or you can simply change the text of the comment in the text box.
Setting of Dynamic Detail
The dynamic detail setting allows the user to customize the visibility of various elements in the detail of an element, diagram, tab, etc. That is, which information (element name, description, element binding, tabs such as attributes, operations, bindings, etc.) should or should not be displayed, where they should be displayed, and what size they should be in the detail. For example, it's good to have the element description stretched as much as possible (over all slots), the version over one and the author name over three.
If the displayed text does not fit in the assigned size, it will be wrapped.
EA Infoport le already comes with a default field definition, it can be redefined at the repository, group or user level. The user can set the dynamic detail himself, or an admin can set it for him.

We have a choice:
Setting of Dynamic Detail for Users
Here the dynamic detail is set for the logged in user.
We can set the detail type (artifacts, other, bookmarks).
Setting of Dynamic Detail for Groups
Here the dynamic detail is set for for groups in the repository.
We can set the detail type (artifacts, other, bookmarks).
Setting of Dynamic Detail for Repository
This is where the dynamic detail for the repository is set.
We can set the detail type (artifacts, other, bookmarks).
Repository Tree Filter
The repository tree filter allows a user to hide/show elements and stereotypes in the tree.
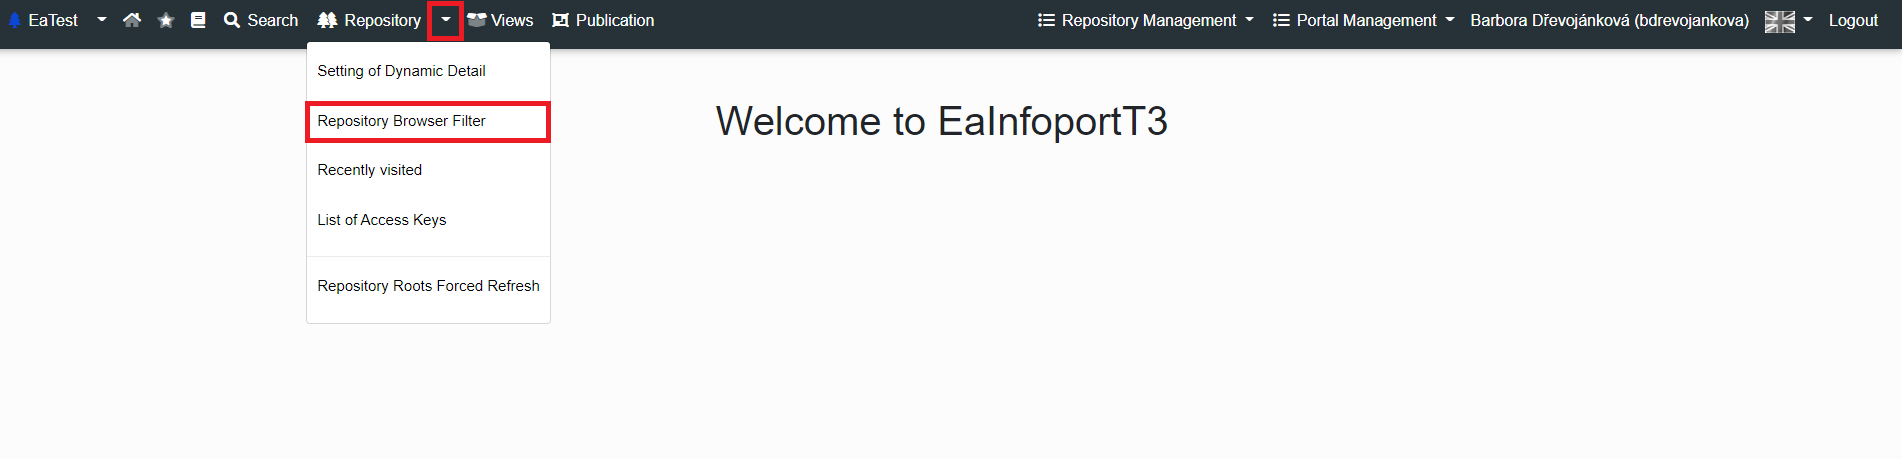
To display the repository tree filters, a user clicks on the arrow next to the “Repository” tab and then on the “Repository Browser Filter” tab.
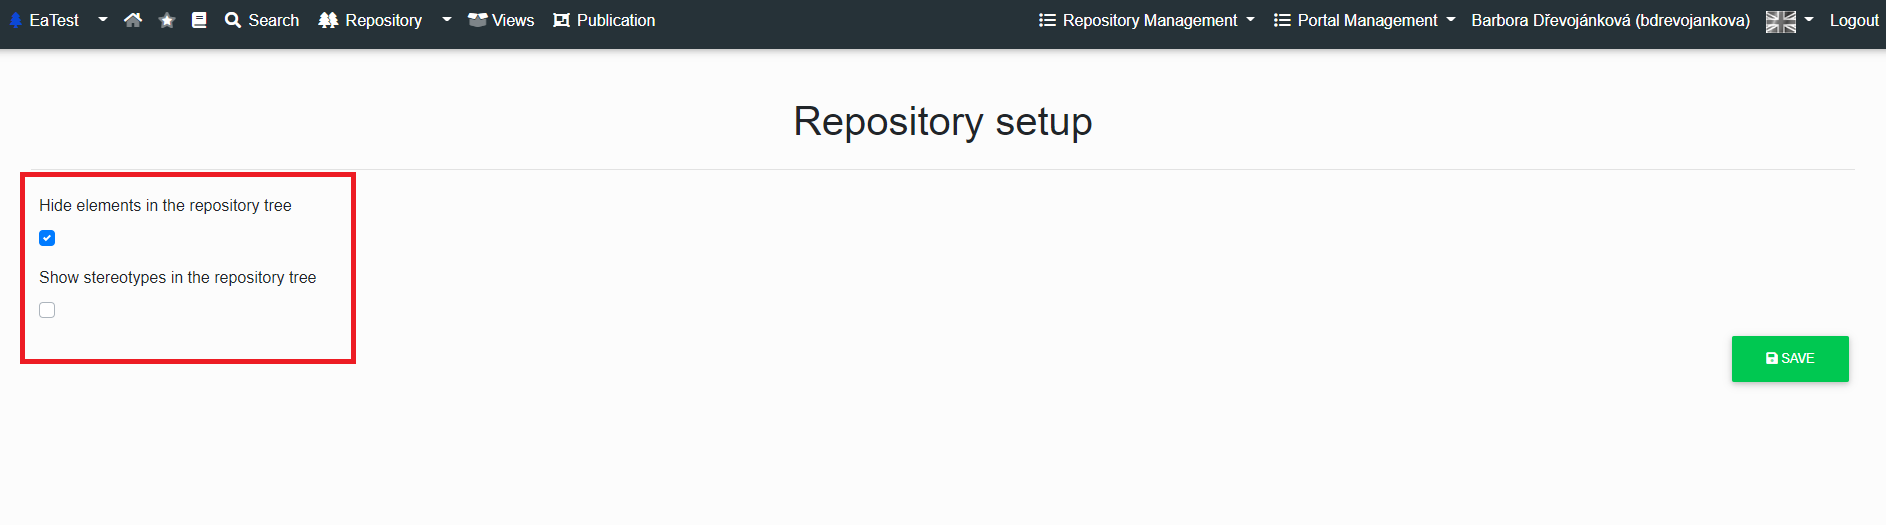
There are currently 2 filters available:
- Hide elements in the repository tree
- Display stereotypes in the repository tree
After checking or unchecking a filter, it is necessary to click on the “Save” button.
Recently visited
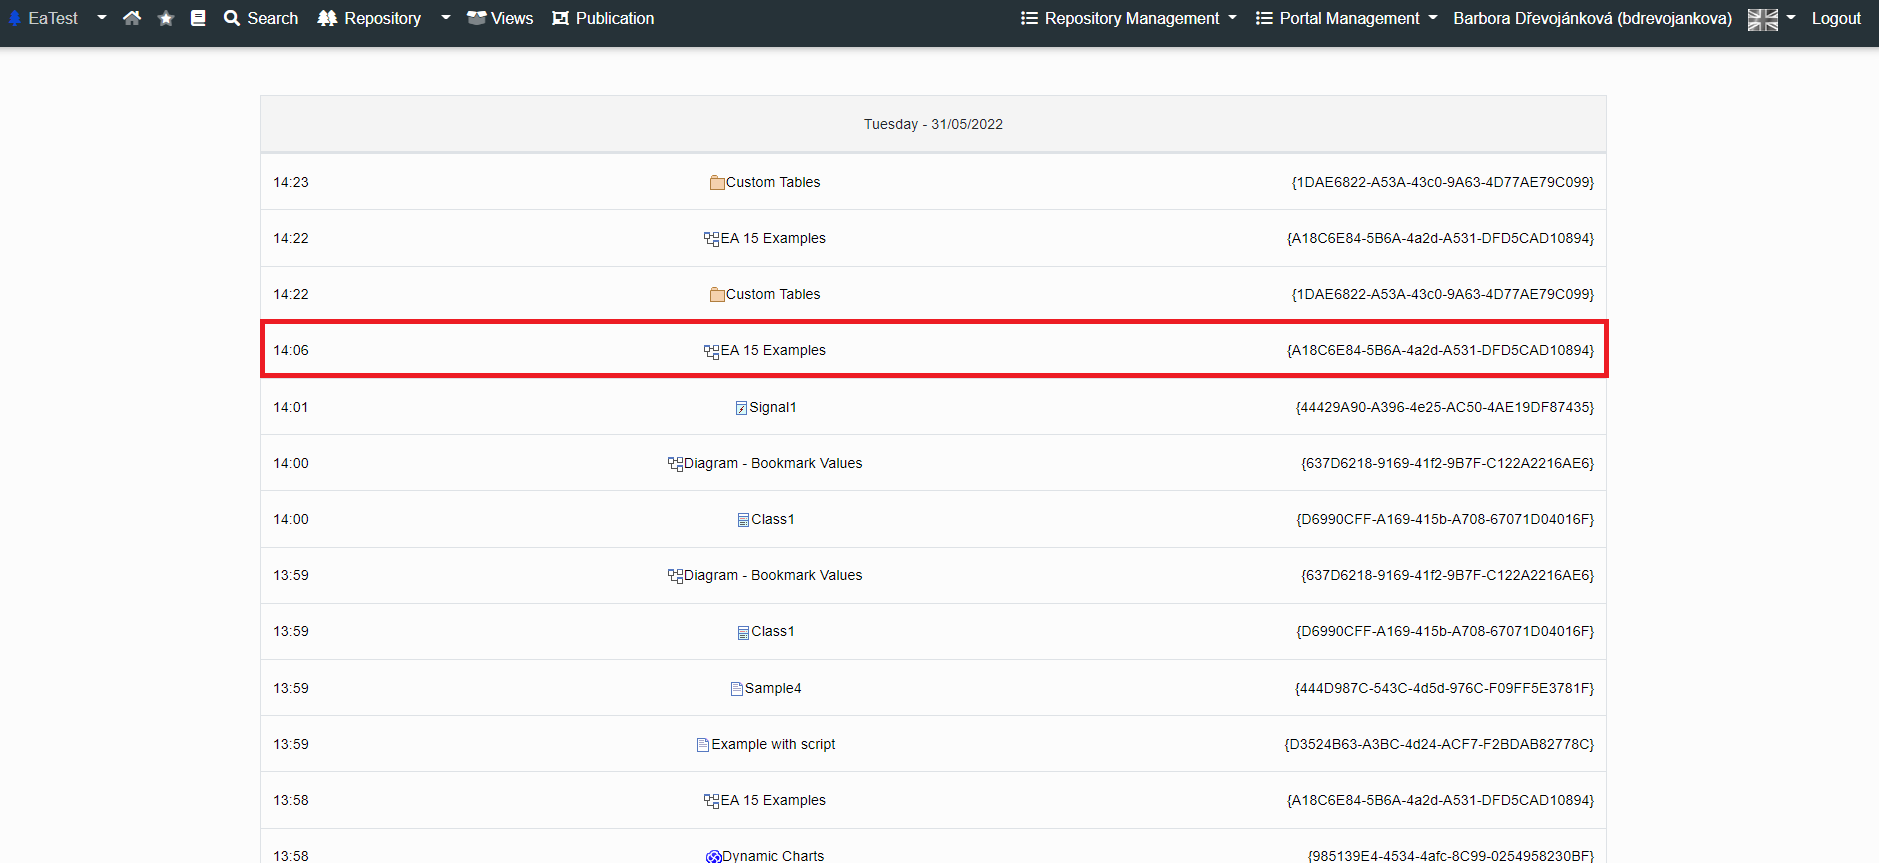
"Recently Visited" allows you to see your click-through history.
In the table we see:
- Date
- Time
- Diagram/element/package/attribute/operation - the line can be clicked on the artifact
- GUID
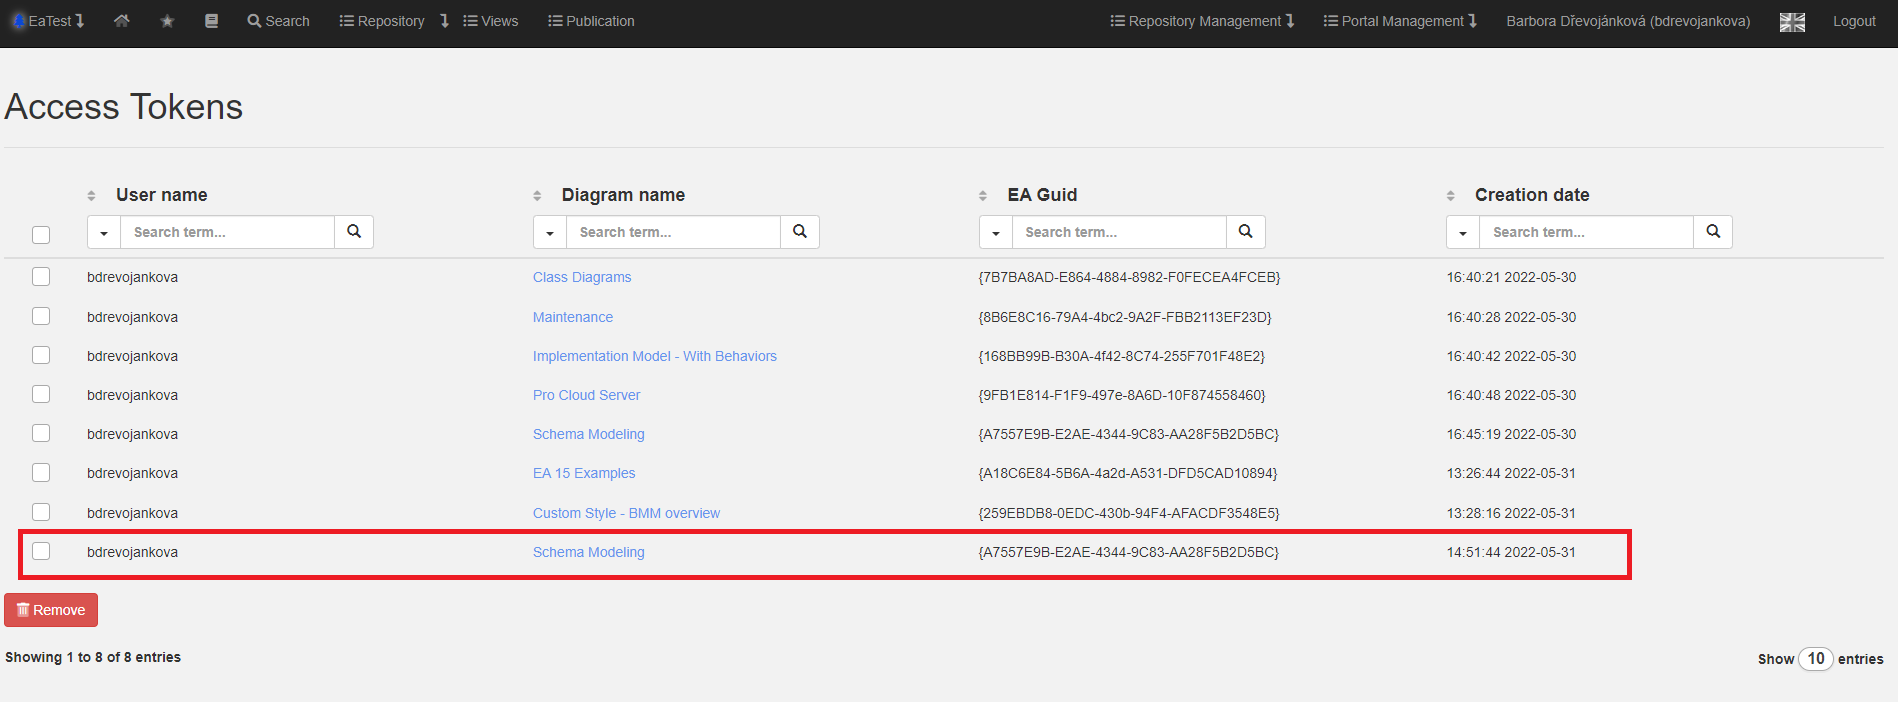
List of Access Keys
newer versions - https://doc.eainfoport.cz/books/user-manual/chapter/access-keys
Whenever a user uses the “Direct Access URL” option, the key for that URL is saved in the access key list.
If a user no longer wants to be able to access the relevant address without a password through this key, he/she has the option to delete it here.
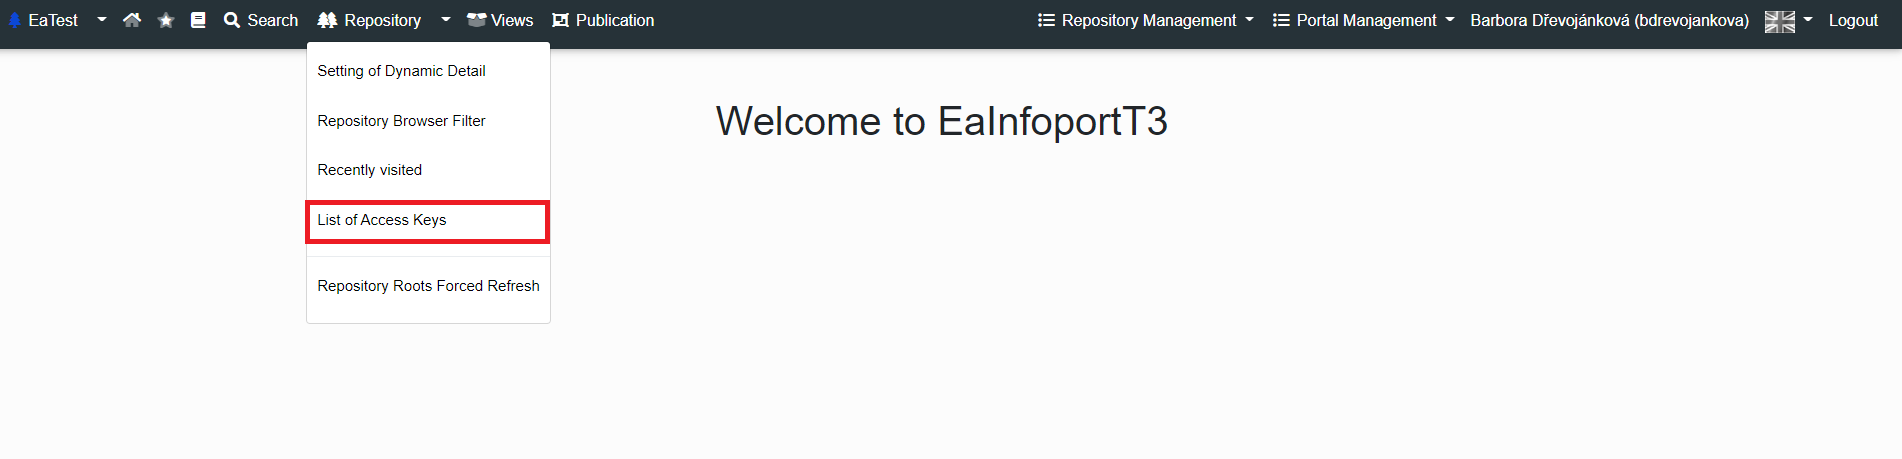
The list of active access keys is available by clicking on the arrow next to the “Repository” tab and in the subsequently expanded submenu on the “Access Key List” tab.
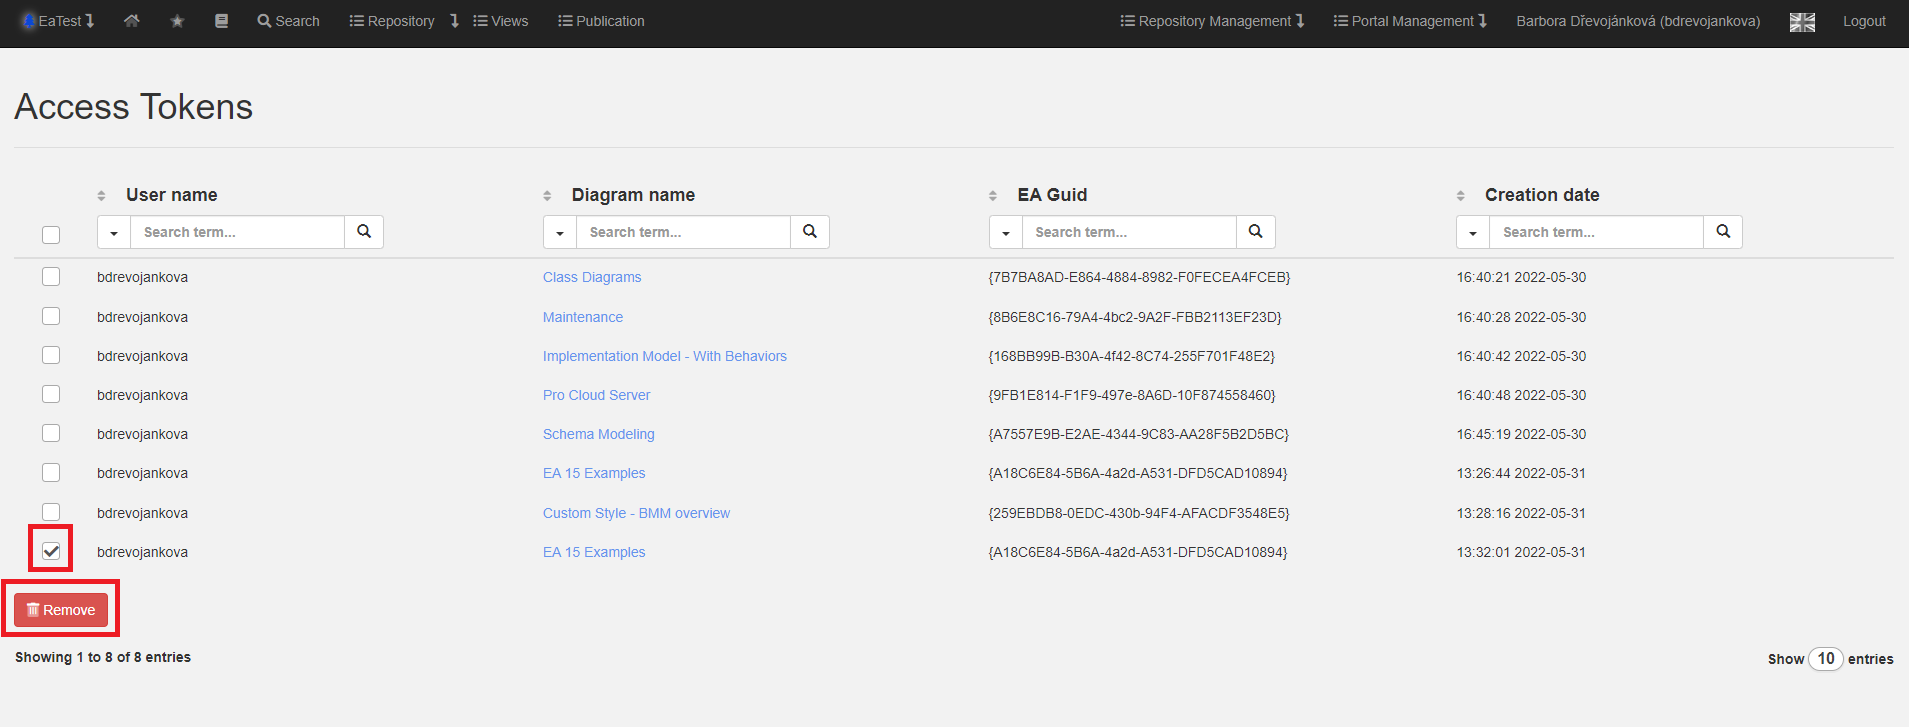
A user sees active keys in the list of access keys.
He/she can use a filter to find the appropriate key, and if he/she wants to remove it, he/she selects this key with the left mouse button and then clicks on the “Remove Keys” button.
To add an access key, a user finds an artefact in the repository and runs the detail – then he/she clicks on the arrow to the right to expand the menu and selects the “Direct Access URL” – then he/she clicks on copy and at this point the key is added to the access key list.
The key has been added to the access key list.
Repository Roots Forced Refresh
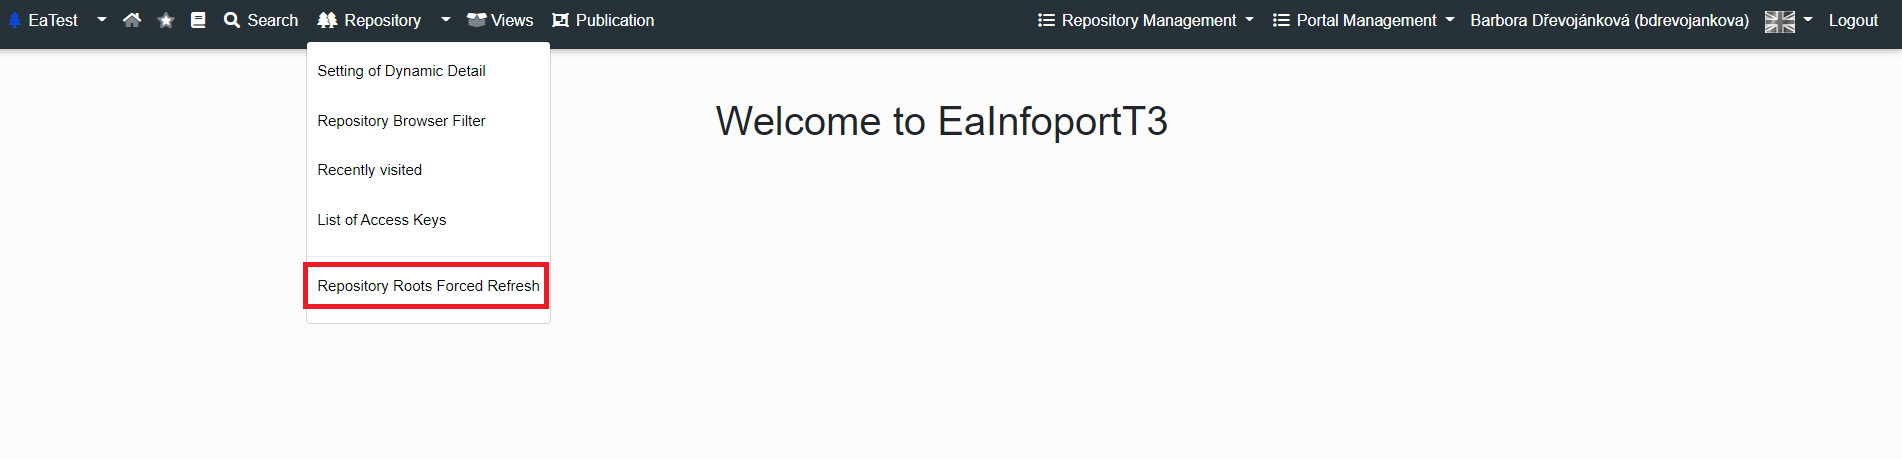
Repository root forced refresh is available by clicking on the arrow next to the “Repository” tab and in the subsequently expanded submenu on the “Repository Root Forced Refresh” tab.

A new root has been added.
Setting the notification interval for diagram subscribers
The administrator must set up an e-mail server in Configuration Manager to send notification e-mails to users.
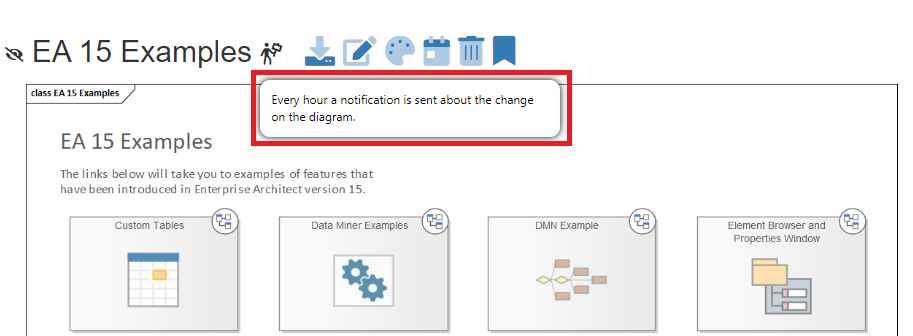
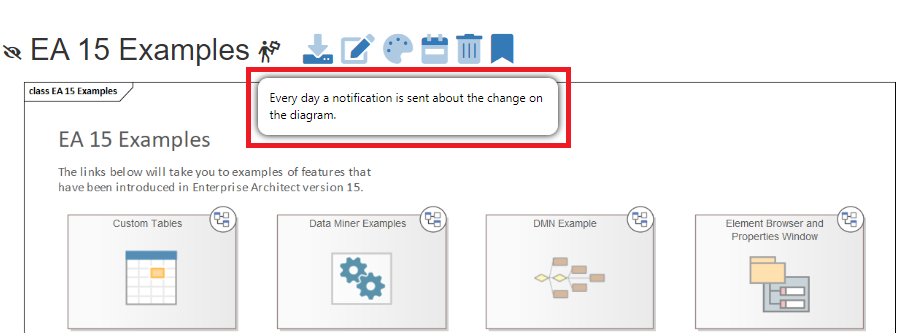
There are three notification services that notify users of changes to the diagram and the regularity is set in Configuration Manager:
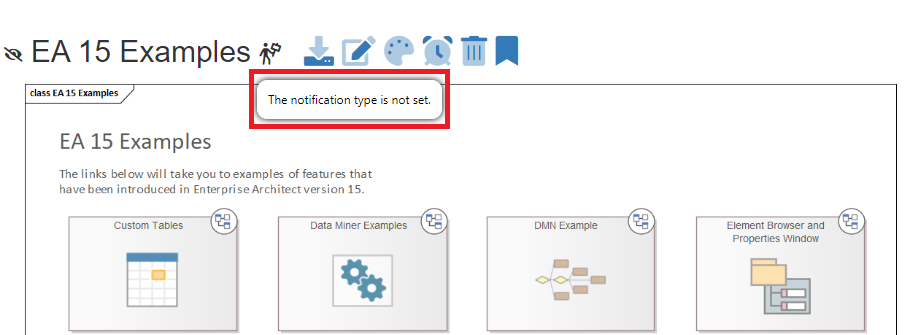
The user can see an "information bar" icon on the diagram which, when clicked, informs what type of notification is set.
The next icon sets the notification types, the button for the next notification type is always displayed!
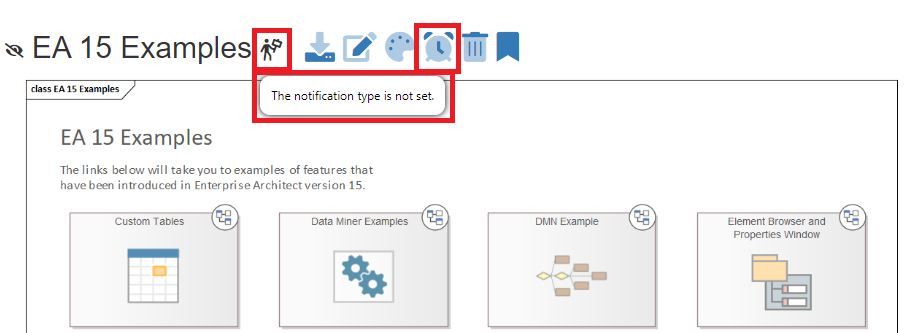
If the user sees the icon  , it means that no function is set.
To set up an hourly notification, the user must click on the icon and when the icon changes the sending of the diagram is set.
To set up an daily notification, the user must click on the icon  and when the icon changes the sending of the diagram is set.
To set up an weekly notification, the user must click on the icon  and when the icon changes the sending of the diagram is set.
To cancel the notification, the user must click on the icon  and when the icon changes the notification is cancelled.
The user can view the list of "Overview of notification subscriptions" in their user account.
The repository administrator "Overview of notification subscriptions" in the entire repository, can see in the repository administration.
The portal administrator "Overview of notification subscriptions" in the entire portal, can see in the portal administration.
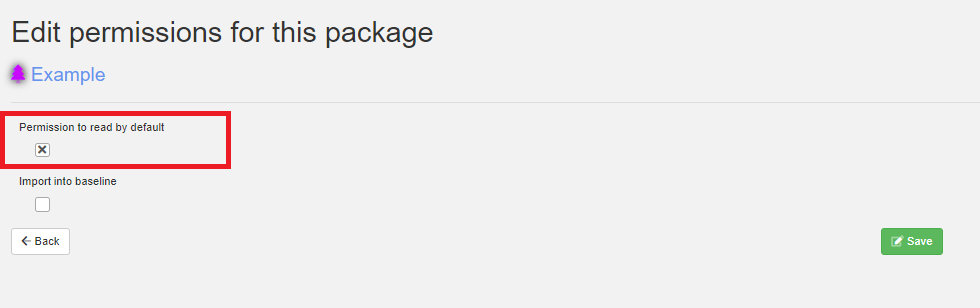
Permissions to parts of the repository - default settings
The EA Information Portal supports a package-level permission system (repository browser tree branches) for both read and (as of version 7.5) write permissions.
It is therefore possible to restrict the reading of parts of the model to certain groups or users. This functionality is not available in Enterprise Architect itself.
It is therefore possible to restrict access of certain users to (for example) specific projects, sensitive processes, risk analyses, strategic business models, etc.
This feature fundamentally supports the effort to have all models in one repository.
If there is no default setting, i.e. the setting is taken from the parent root package, then the repository is not visible by default, or reading is not allowed.
Permissions can be set for groups and users.
Permissions are applied hierarchically from the package they are set on downwards.
EA Infoport allows by default to disable/enable access of users or groups to various packages using the following button:
In the event that the default settings are not sufficient for us and it is necessary to specify the range of other users in more detail, it is possible to specify the roles in more detail and set access directly on the user or group.
An overview of the roles is shown in the table below:
|
|
read |
edit |
deletion |
review |
|
Reader |
✔ |
x |
x |
x |
|
Editor |
✔ |
✔ |
x |
✔ |
|
Authorized to delete |
✔ |
x |
✔ |
x |
|
Reviewer |
✔ |
x |
x |
✔ |
|
Owner |
✔ |
✔ |
✔ |
✔ |
Dynamic detail - tagged values
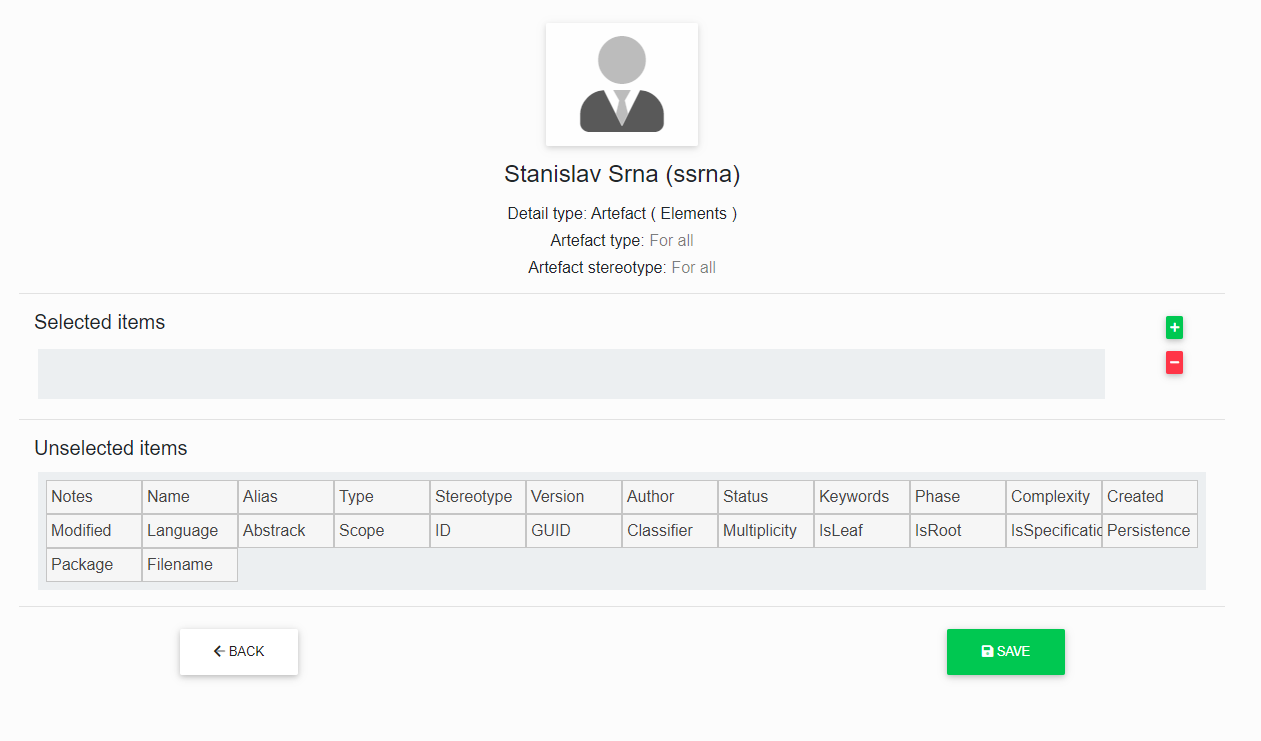
Dynamic detail now has the ability to add a reference to the tagged element value. The user can link to a tagged value or note.
1) The user creates the tagged value in the normal way.
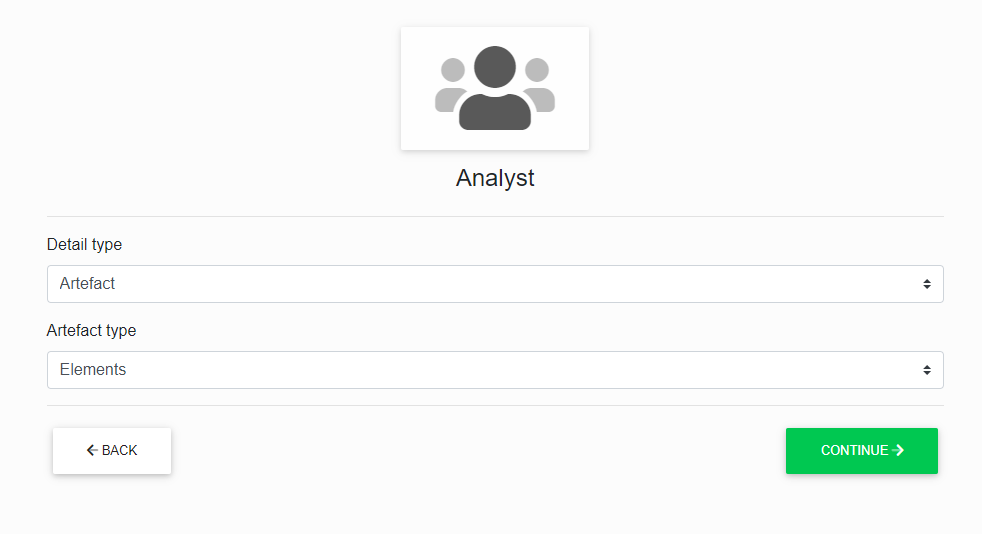
2) Select the desired area (Users, Groups, Repository) via menu >Repository>Dynamic detail settings. In the case of settings on a user or group, you must select the desired user or group.
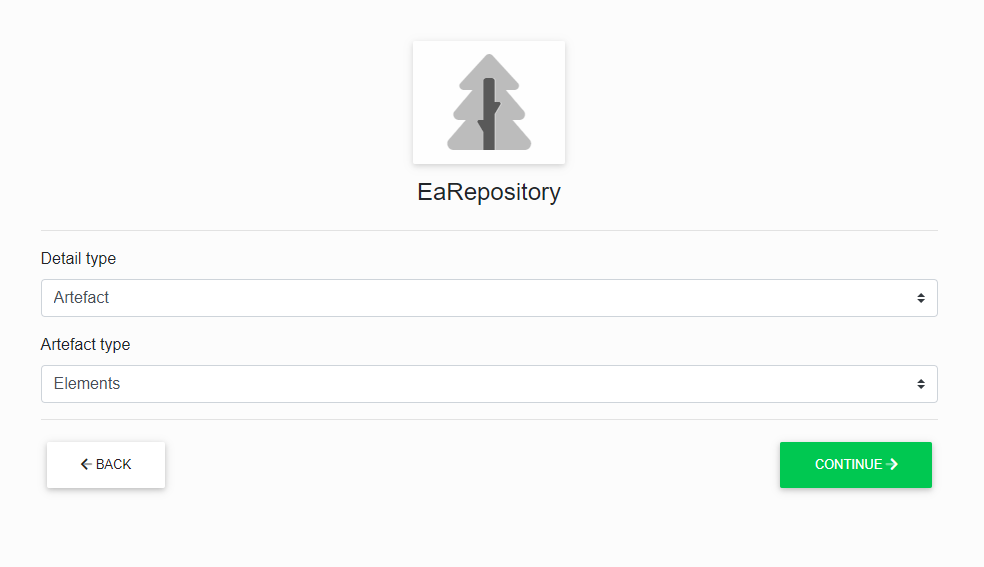
3) Select:
Detail Type >Artefacts
Artefact type >Elements
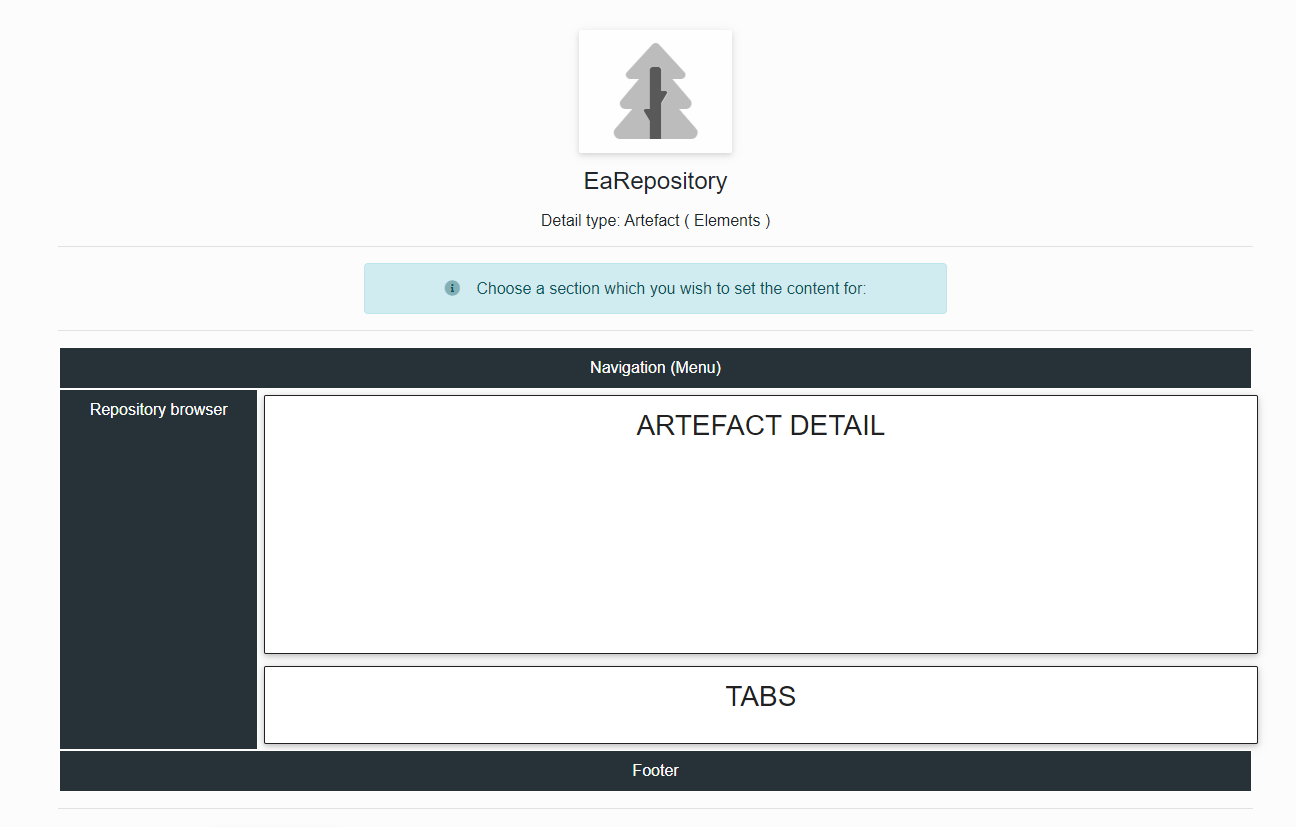
4) Select > ARTEFACT DETAIL
5) The user can specify a specific Stereotype of the artifact.
6) In the DynamicItem field, enter the name of the Tagged value and select TgvNotes (note) or TgvValue (value). Click on the blue plus button to add the value to the "Selected Items" where you can set the width and row where the item will be located.
Finally, save.
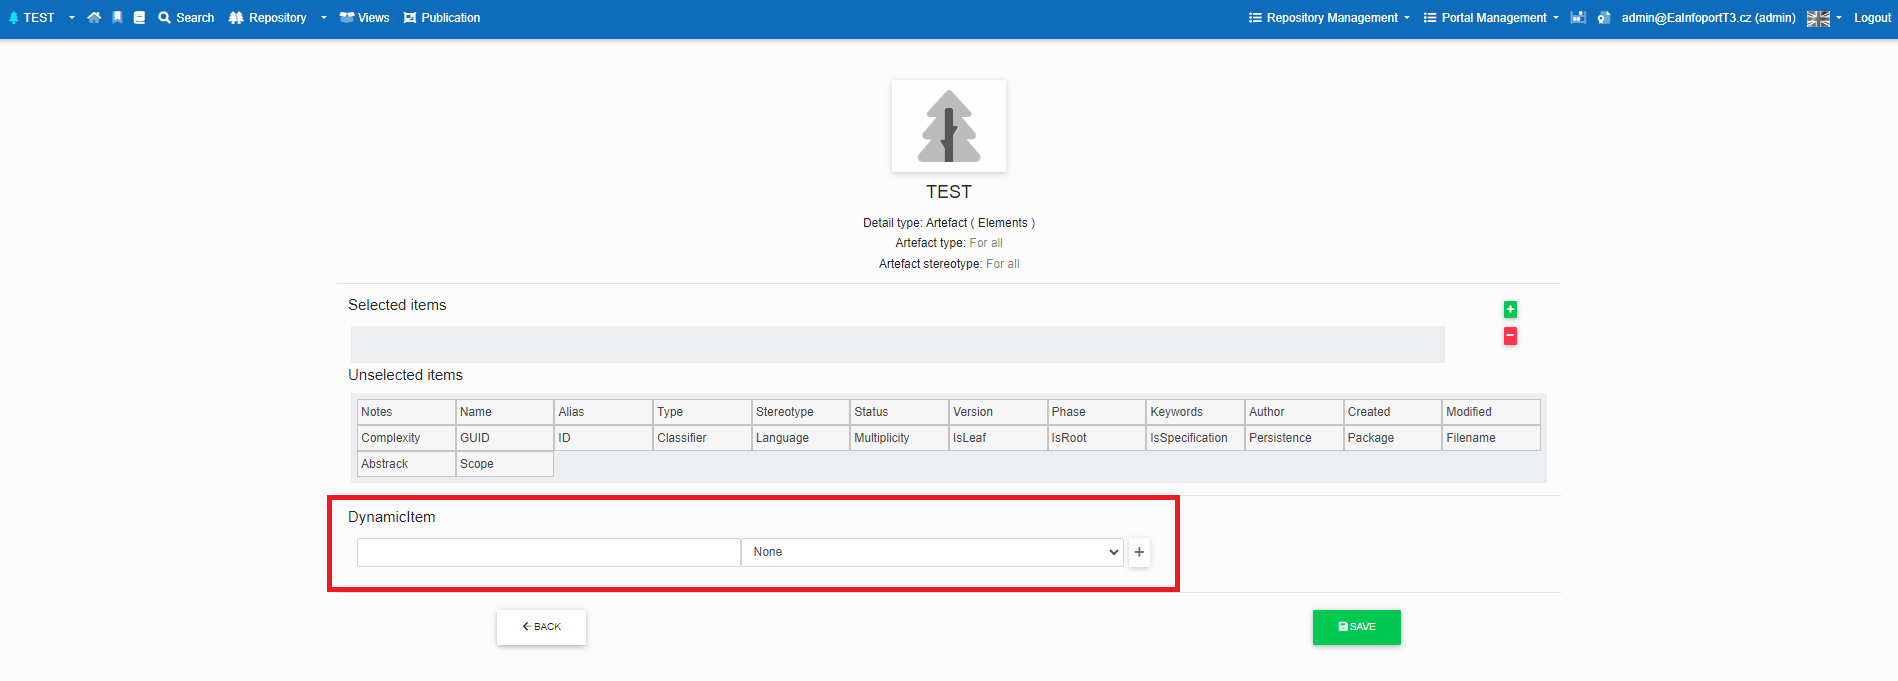
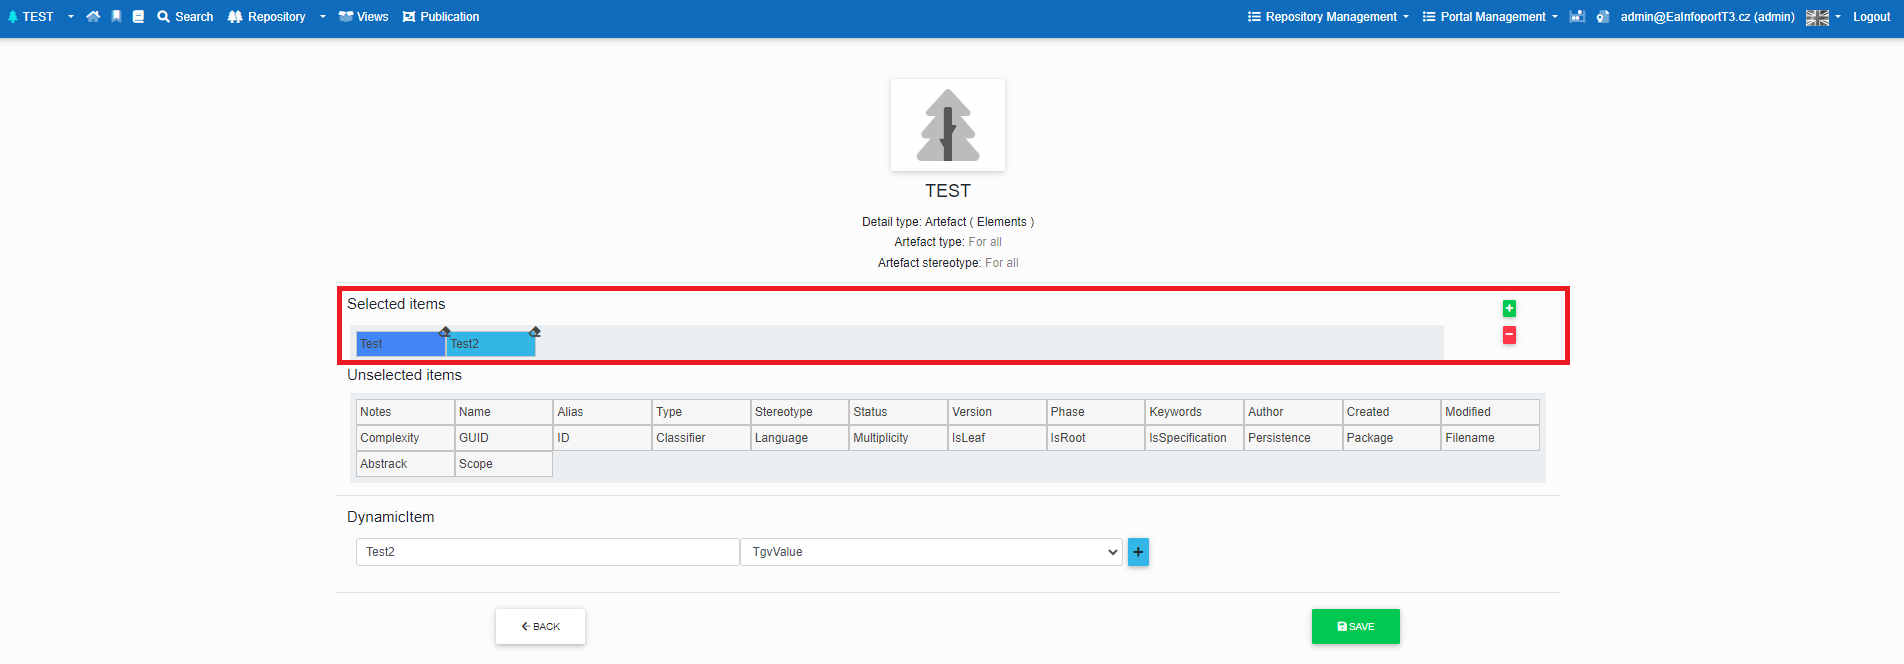
7) After creation, the user will see the selected tagged value on the element detail without the need to search for it on the Tagged Values page.
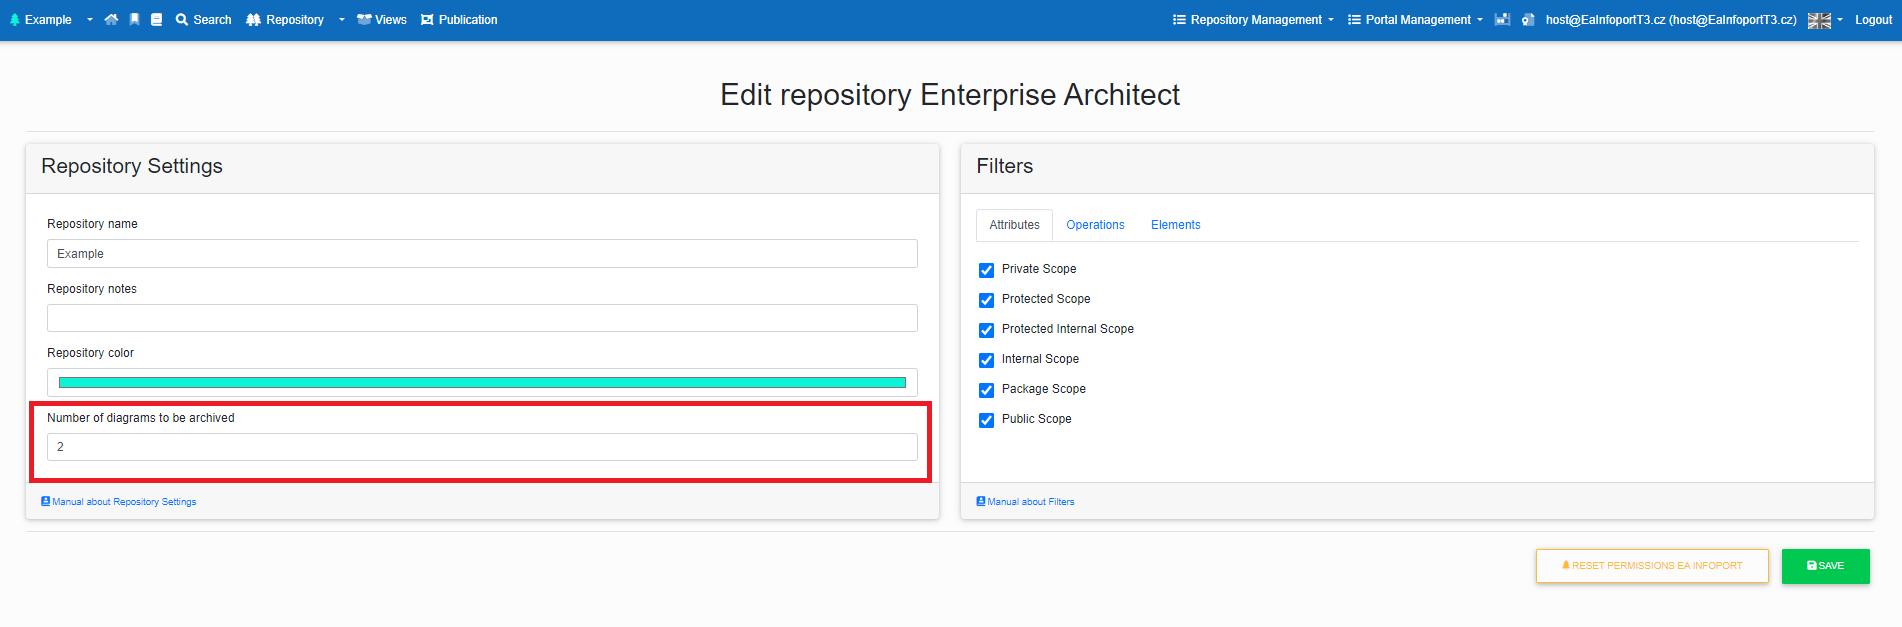
Archiving of diagrams
The repository admin now has a new option to set the number of archived diagrams in the "Repository Details". Then users have the option to see the diagrams before the change. We have added a new button on the diagram detail that redirects users to the archived diagrams, and there is an option to expand the diagram to the original resolution.
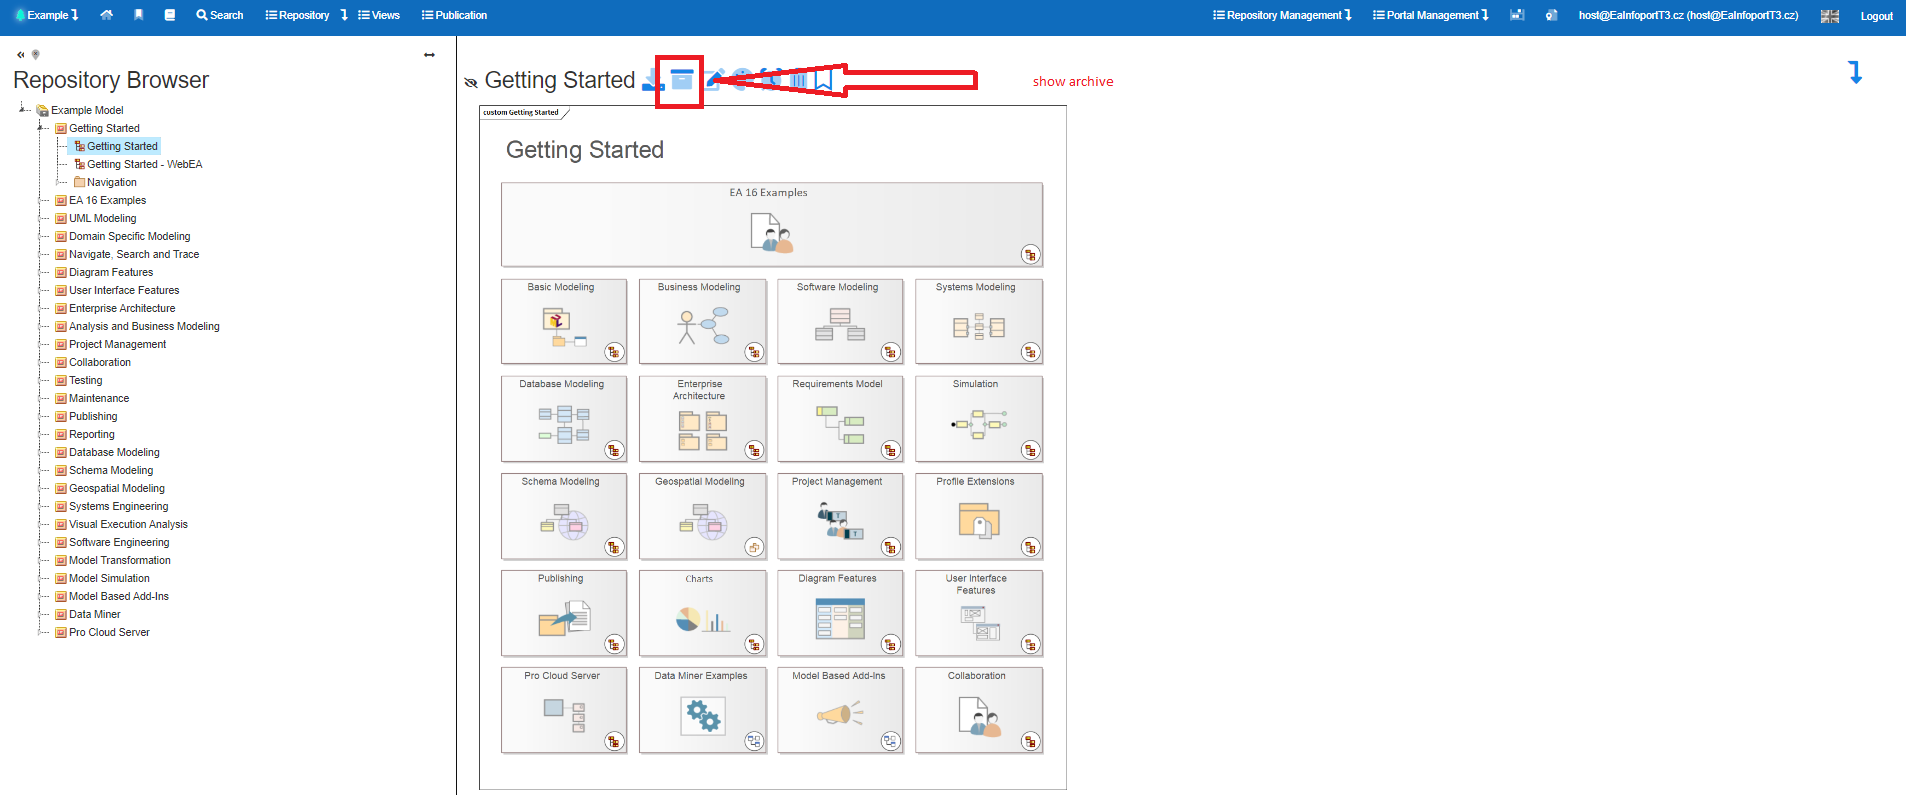
Sharing images
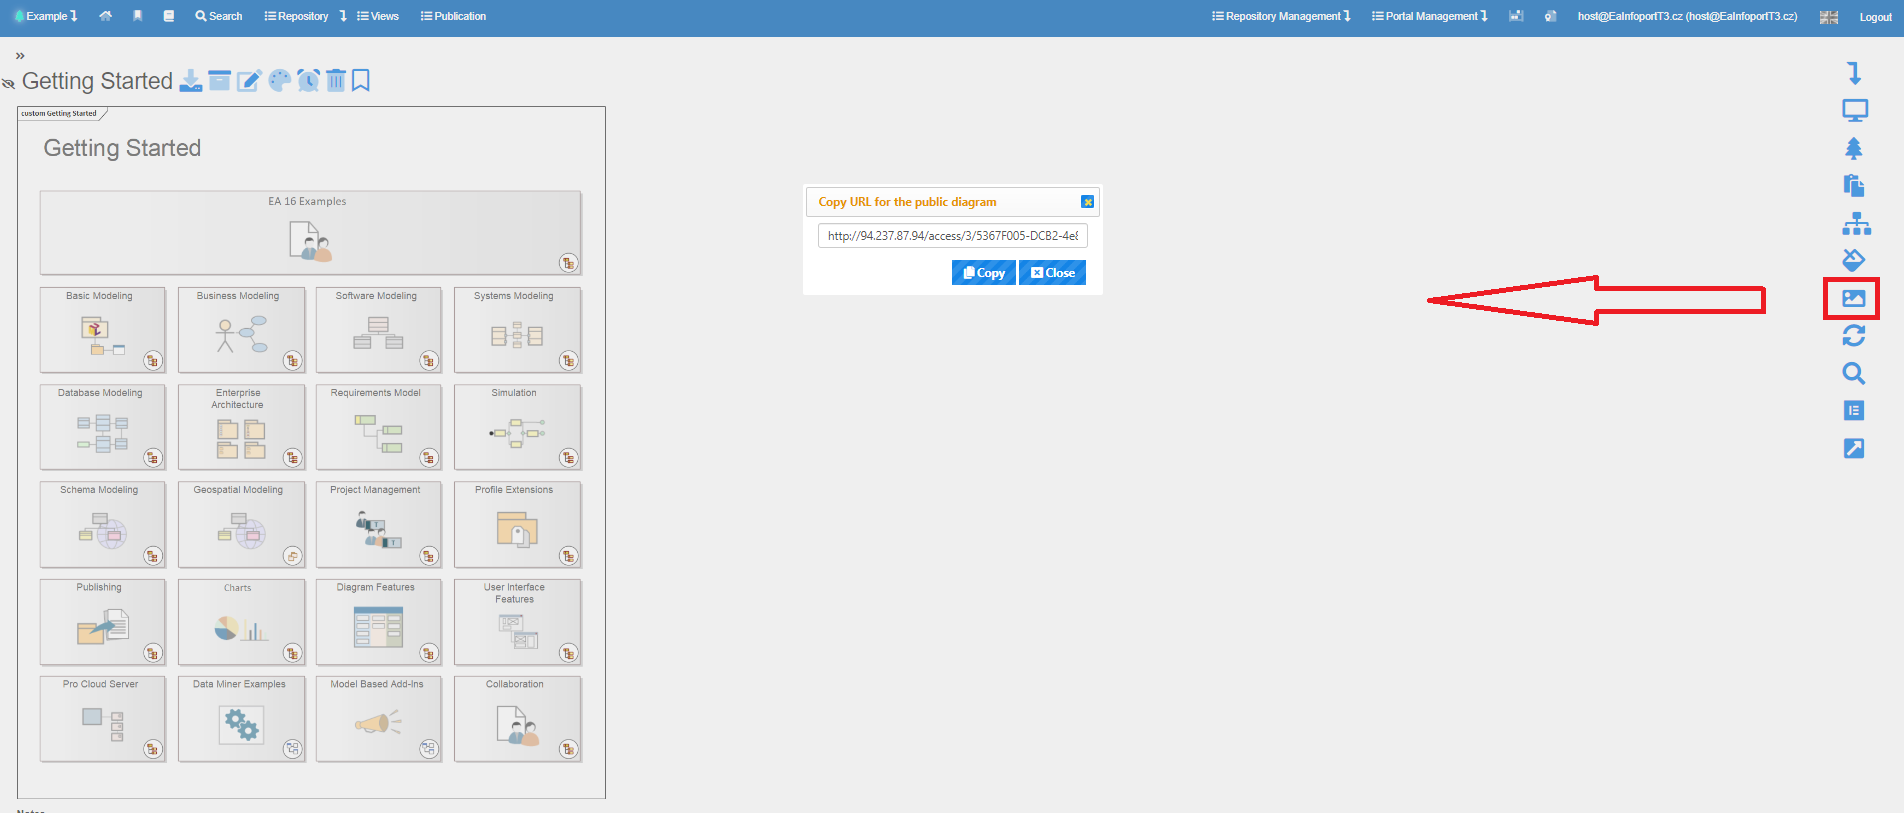
We have added a new button to the side menu on the diagram detail page that creates a link to the .png file of the diagram.
The diagram is now public and anyone can view the link.
Admin can find the link management in the repository pop-up menu in the navigation bar.
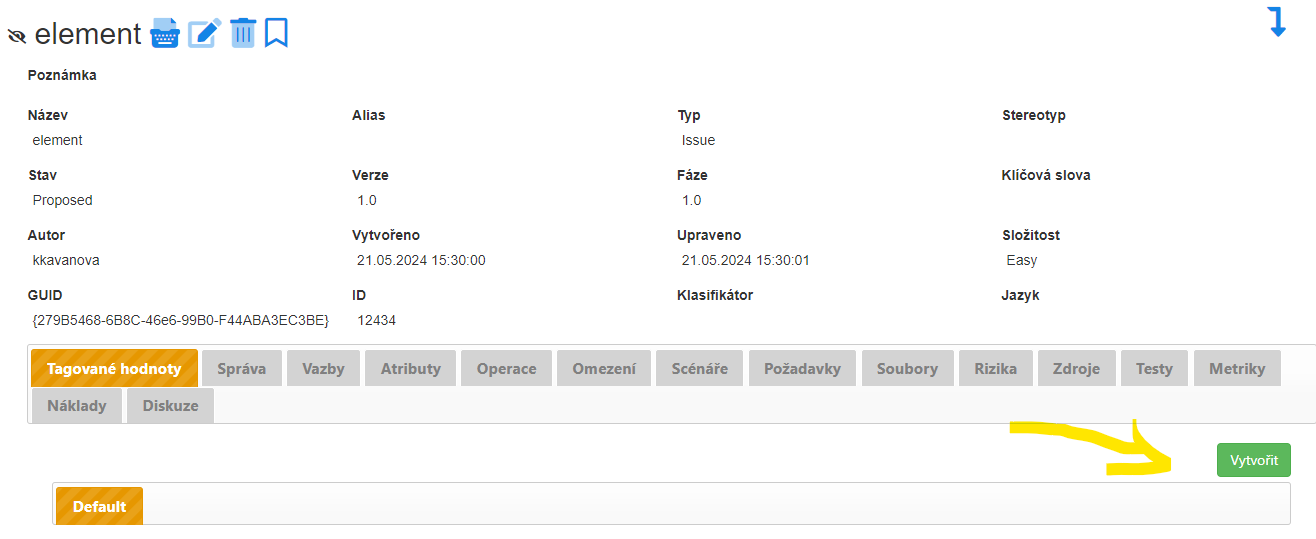
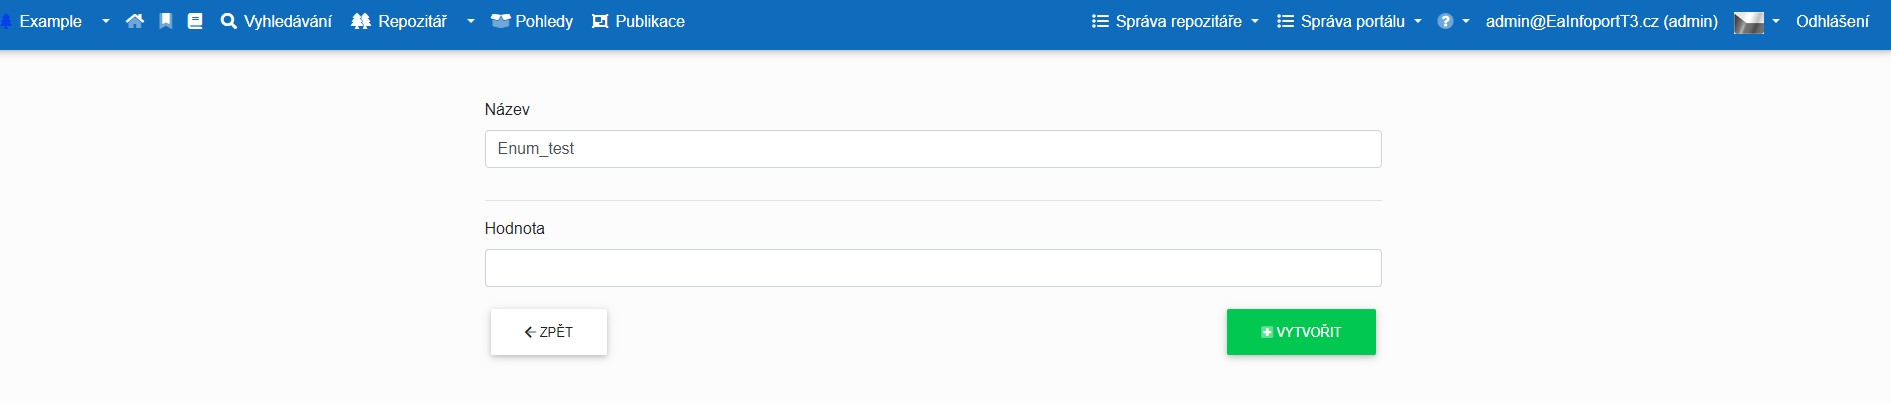
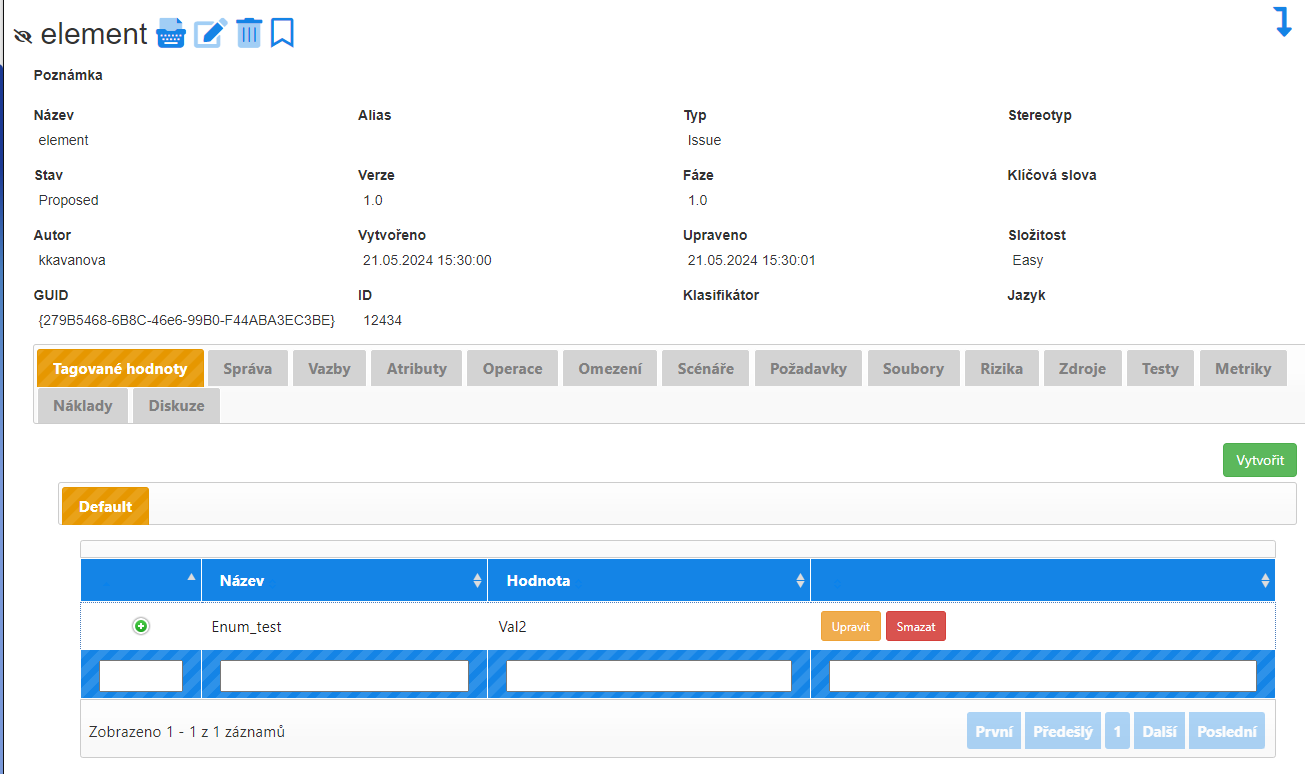
Tagged values - Enum
Tagged values are created in EA Properties > UML Types > via the "Help" button to get to the Sparx page where you can find the predefined Enum types.
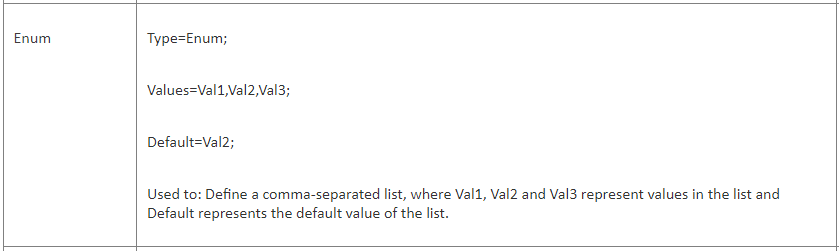
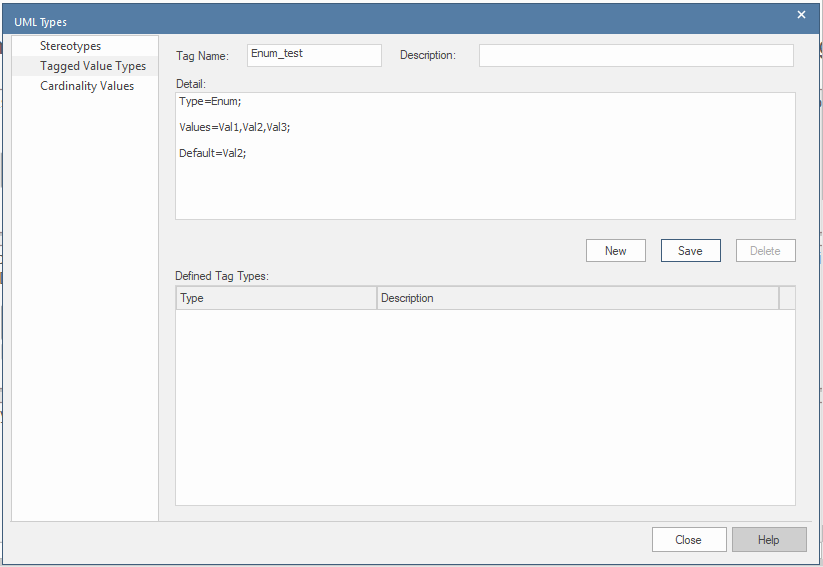
In EaInfoport we create a tagged value with the same name:
Recently visited

Since version 8.7.6.9118, "Recently Visited" has been moved directly to the main menu.
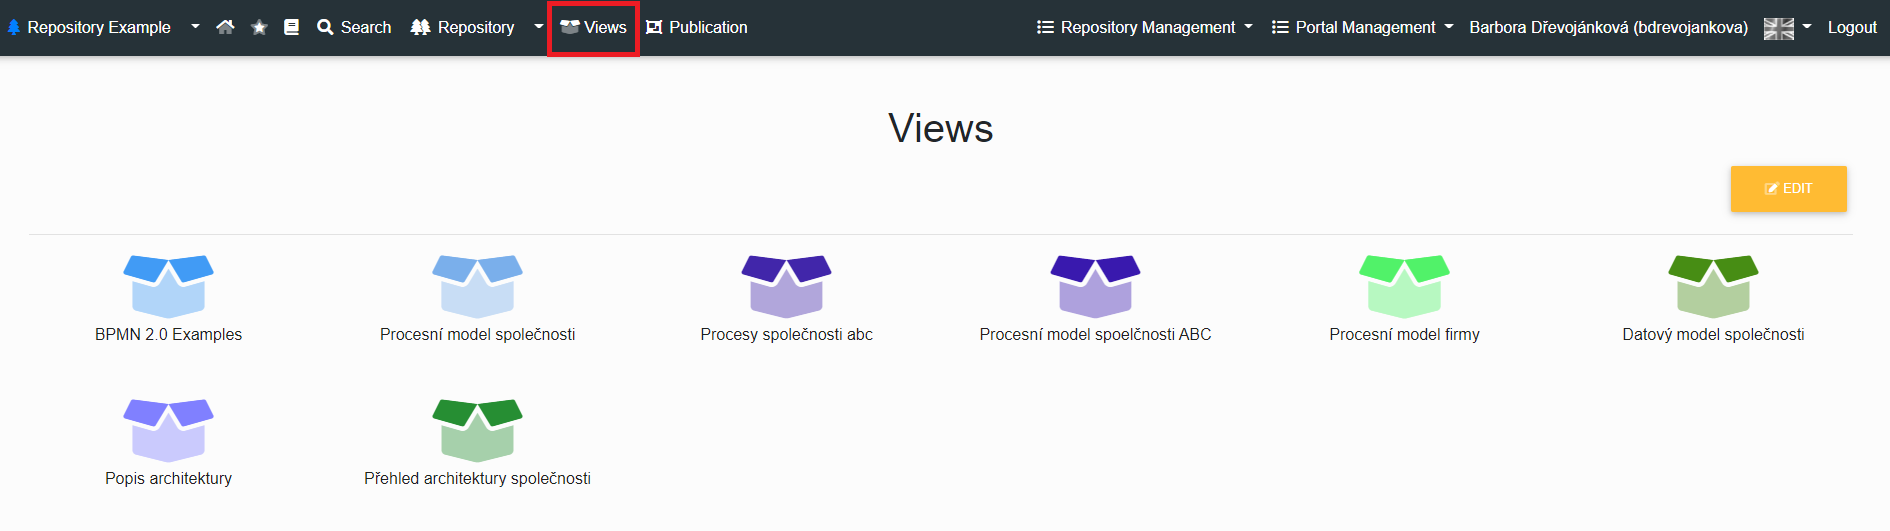
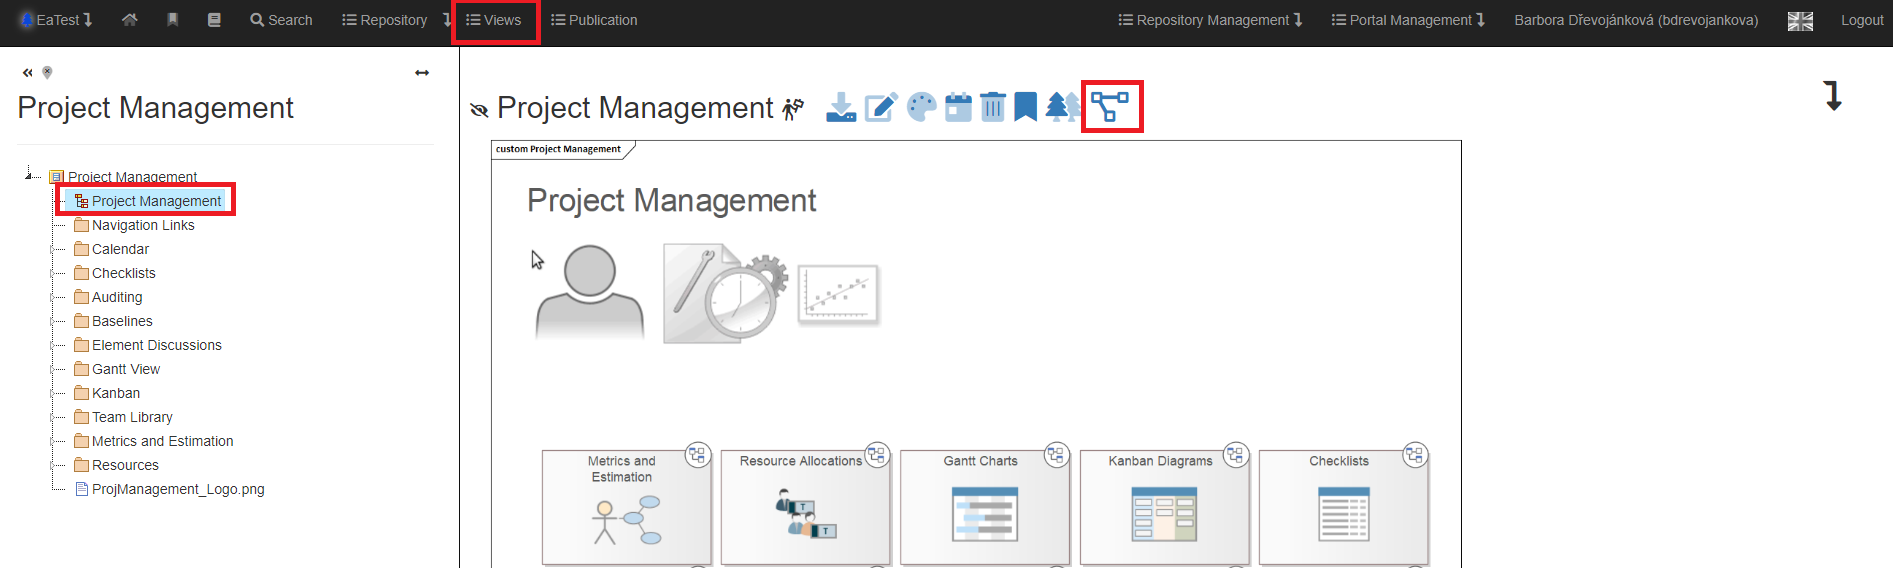
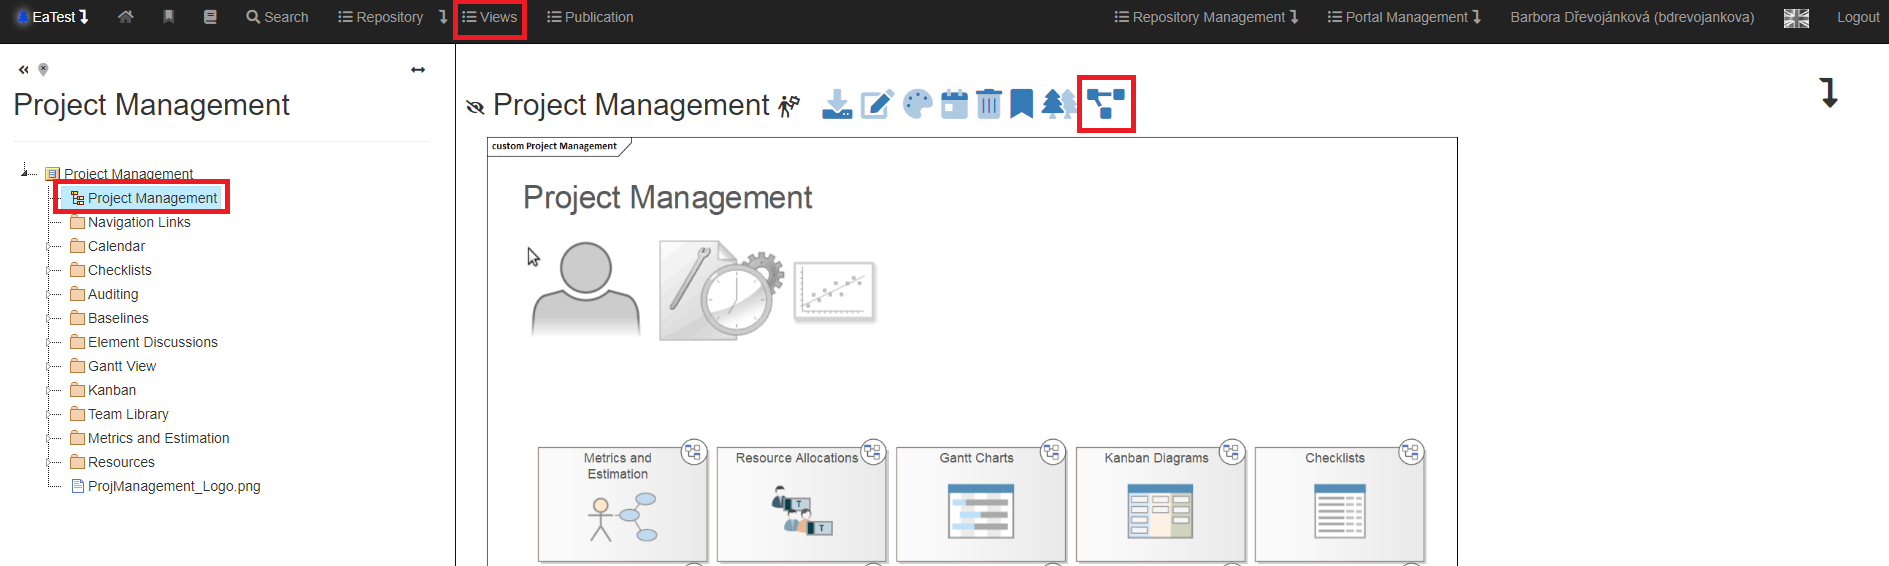
Views
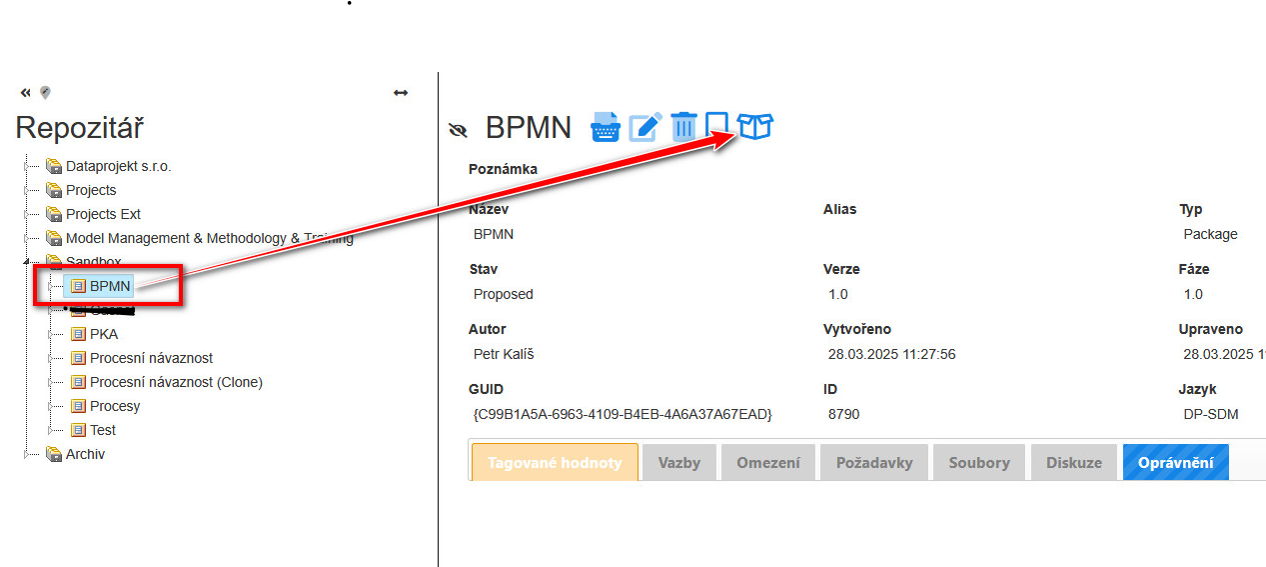
Views allow you to take a specific part of the tree and display it in a separate section. Thus, if, for example, a company's process model, organizational structure, architecture design, etc. is deeply embedded in the repository structure, this functionality makes it accessible to readers without having to search for it in a complicated way. These are thus views of specific repository tree packages and their contents, including the nested packages.
Creating a View
If the user has rights to edit the tree, click on the icone add a view.
The message "Successfully saved" appears and the program creates a view.
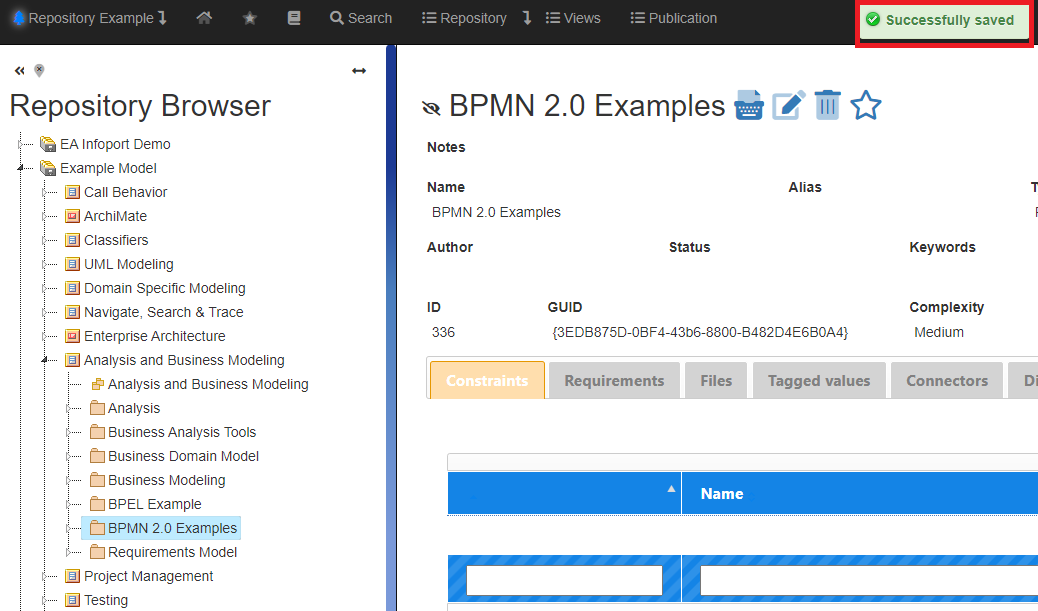
The created view is included among the views that are available in the main menu.
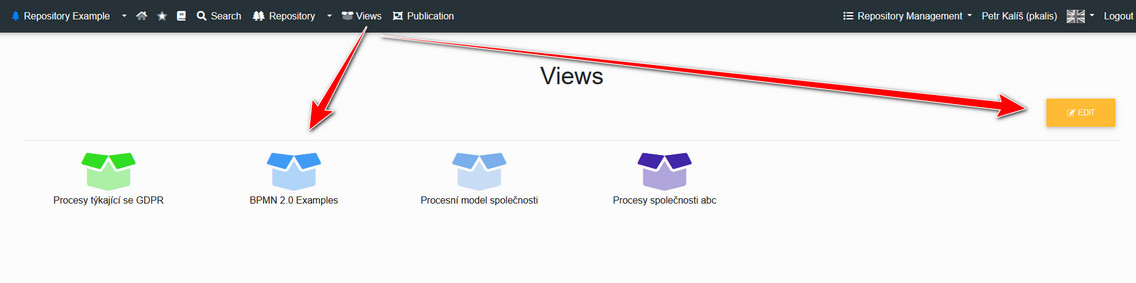
If the user clicks on the view, it is displayed in the form of a tree. Thus, he sees only the package that has been marked as a view and its complete contents. In this way, it is possible to "pull up", for example, a process model, organizational structure, etc. that is otherwise embedded in the repository structure.
Editing and deleting a view
The views created by the user are then displayed in the view list, where they can be further described, named and assigned a color.
To edit a view, the user clicks on the "Edit" button.
The user will see the following table where they can see the color, name, package description, "Edit" and "Delete" buttons.
If the user clicks on the "Edit" button, the "Edit View" dialog will appear.
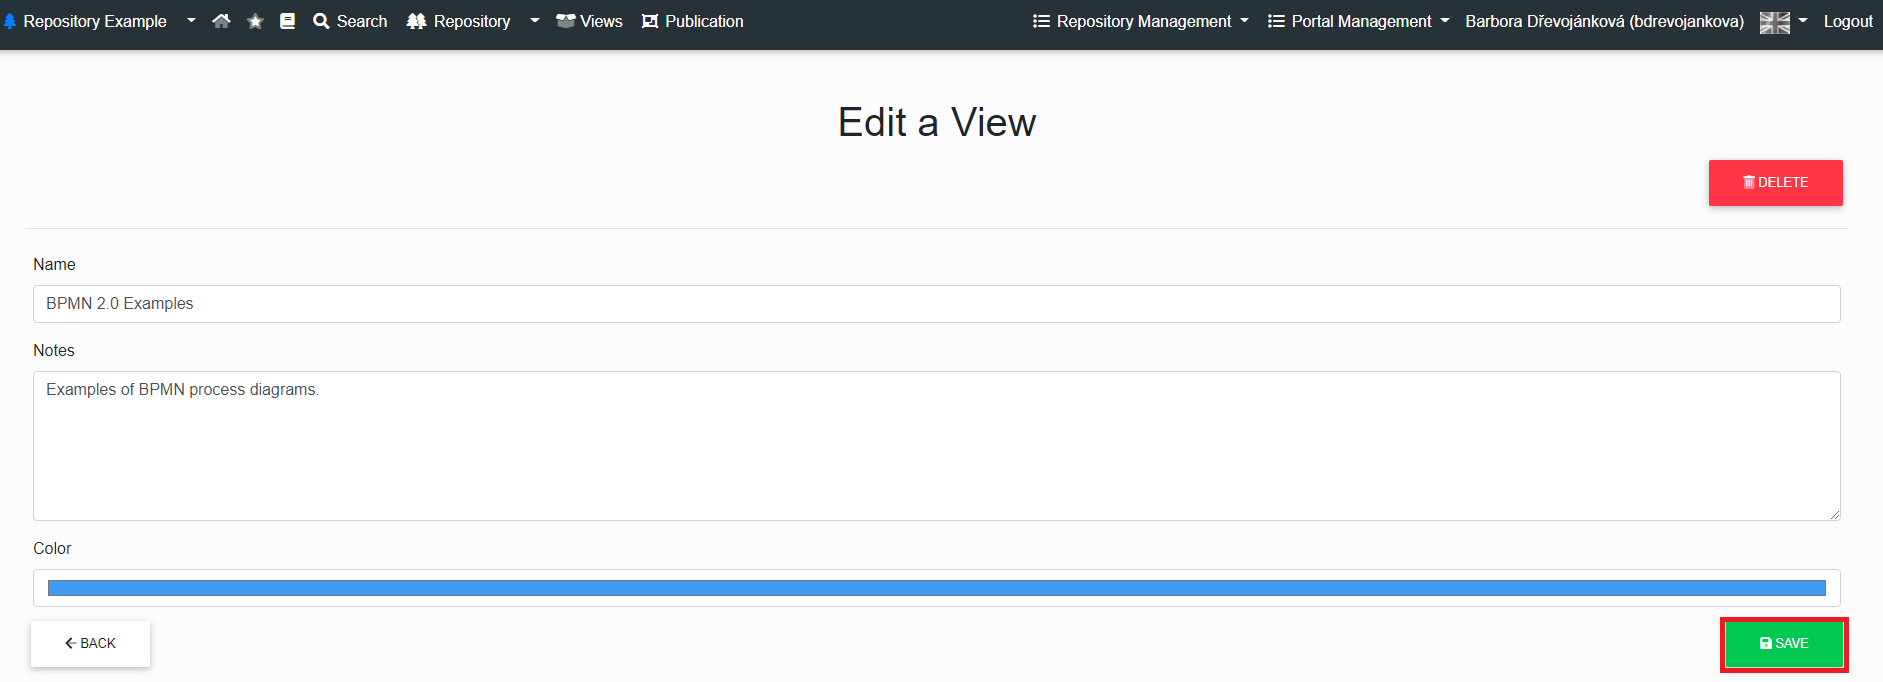
The user can edit:
- View name
- View description
- View color
- To change the color, the user clicks on the color label, then a mini dialog pops up to set the color
- The color selection dialog responds in two ways
- Left click and hold
- Left click
If everything is set, the user clicks the "Save" button.
To delete a view, the user clicks on the "Delete" button.
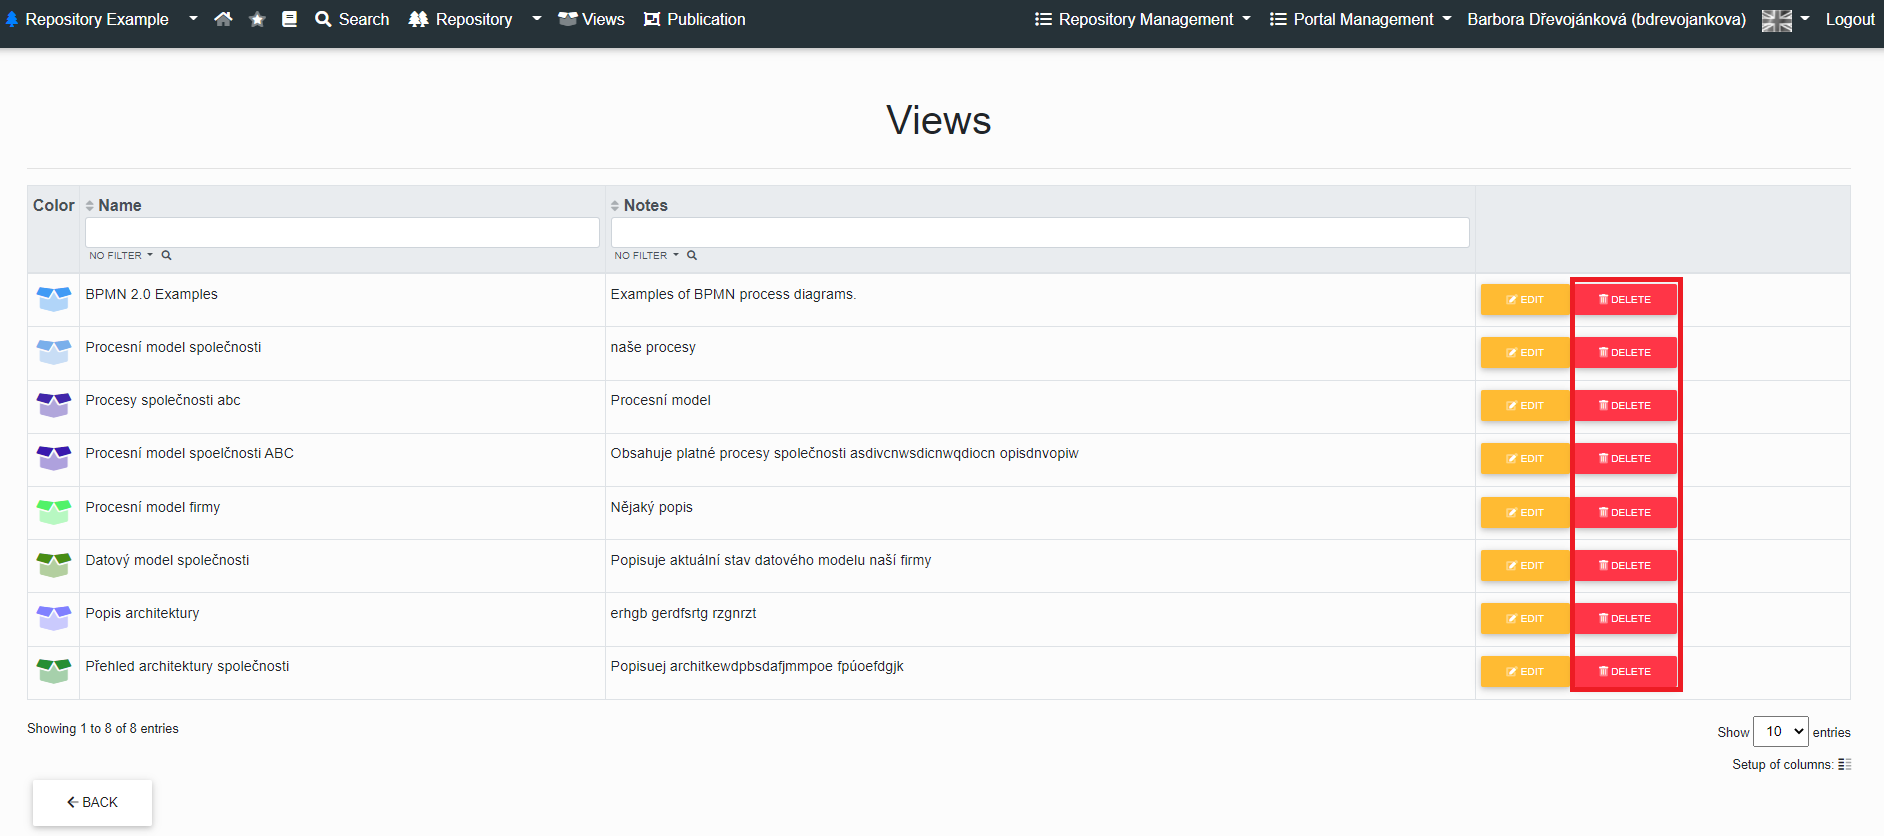
If the user clicks on the "Delete" button, the "Delete View" dialog will appear.
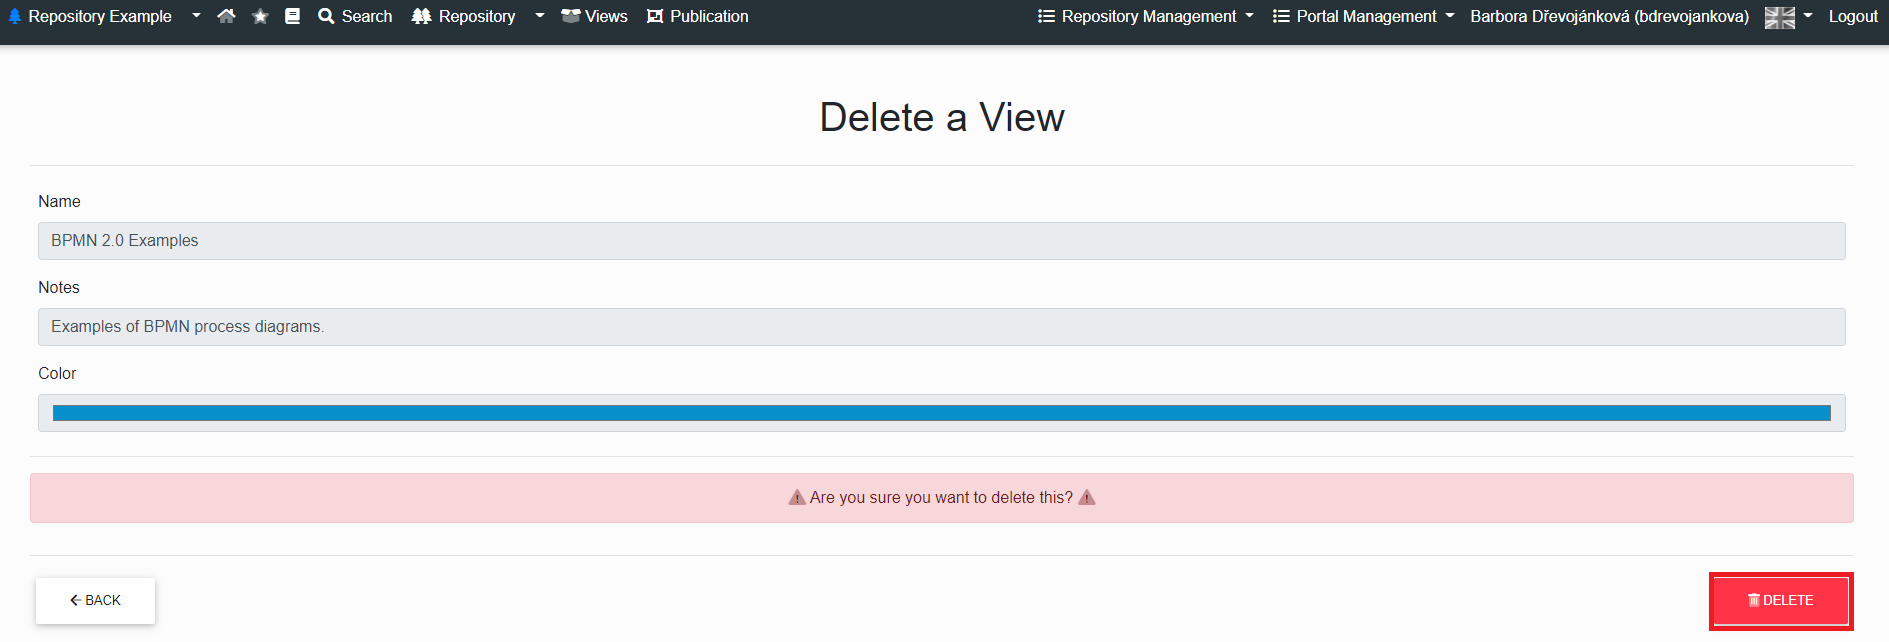
The dialog shows the name, description and color of the view the user wants to delete.
A warning message verifies whether the user really wants to delete the view. If not, the user will click the "Back" button and if the user really wants to delete the view, the user will click the "Delete" button.
You can also delete a view in the view editing dialog, see above, when the user clicks the "Delete" button and the "Delete View" dialog appears.
Default diagram settings
By clicking on the icon the administrator can set a default diagram for the view.
Once the icon is clicked (filled in) the default diagram is set for all users who open the view.
Access to views
New functionality allows you to set limited access to the repository through views.
The repository manager can set up new "access to views" and remove "access to repository tree" to users.
Permissions can be assigned to the user or group.
Other specifications of the authorization can be set in permission on a specific package.
For example, if you have a user or a group access group and one of the views is a package in which a group or user has a ban on access, the view will not be displayed.

Reorder in views
You can change the sort order in the views. Just hold down the left mouse button and drag the View to the desired position.

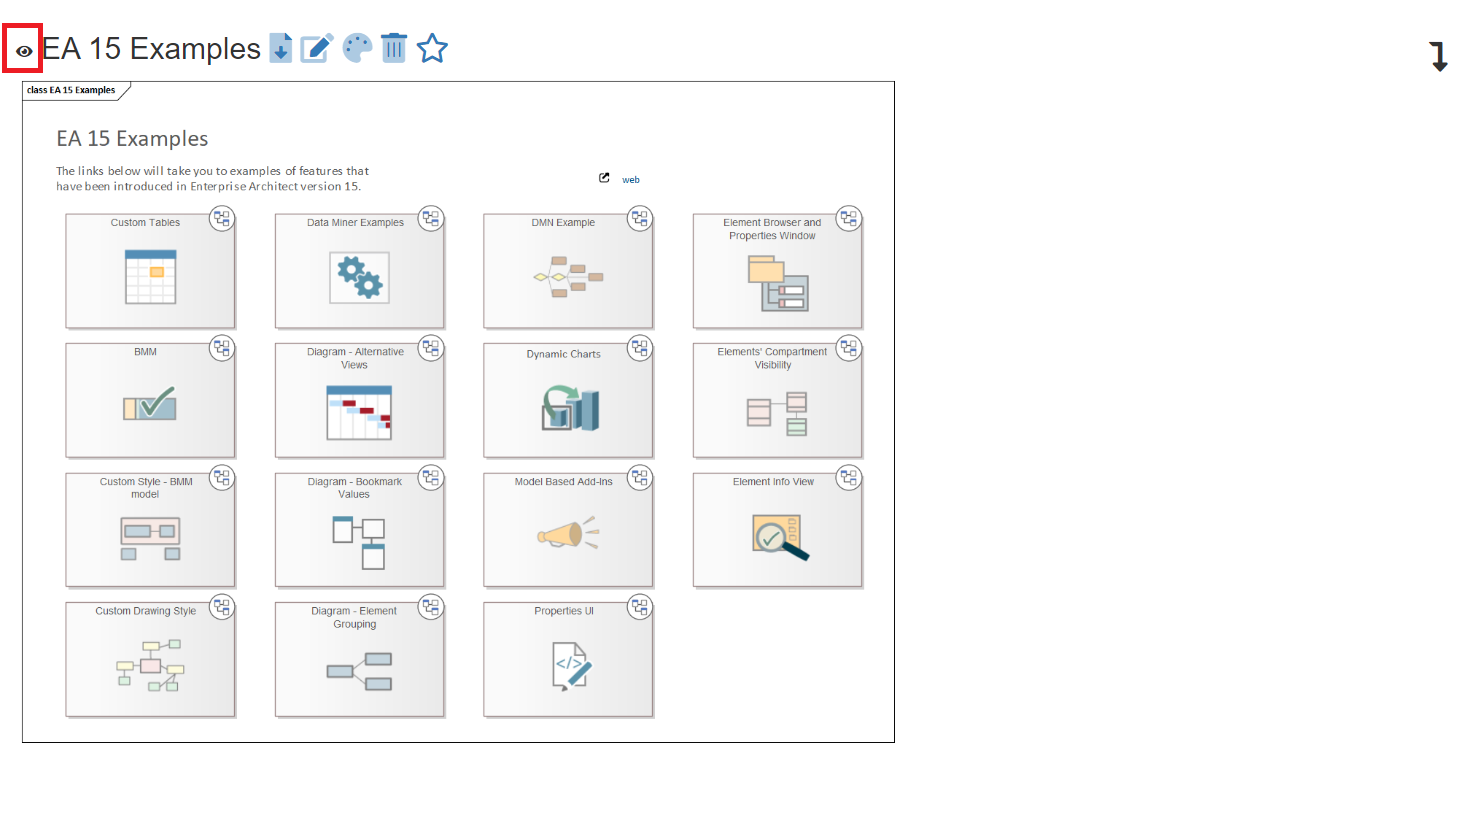
Publication
This is a completely different view of the EA repository - publishing selected diagrams in an arbitrarily defined structure. By using this feature, business users can be shielded from the often convoluted model structure in EA and view models in a structure that is close to their own. This structure can be arbitrarily defined by department, project, customer or otherwise.
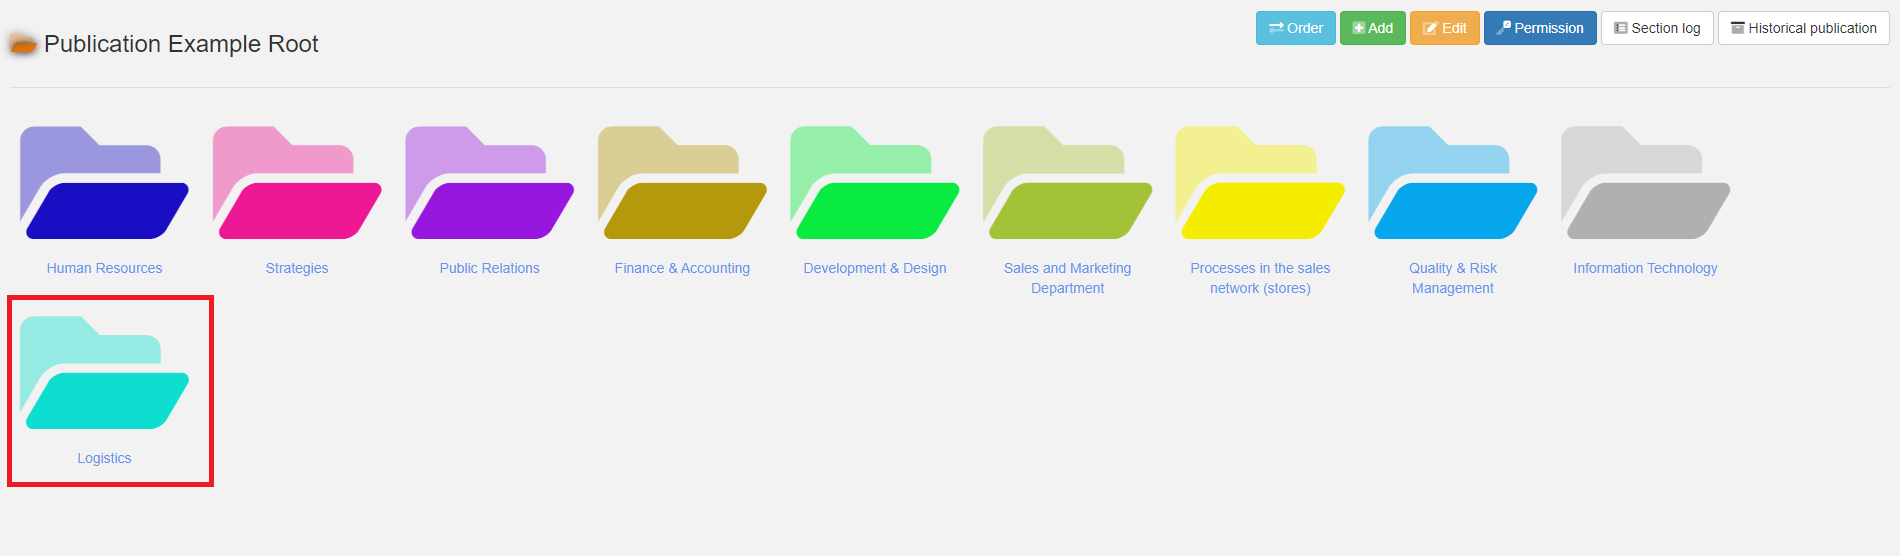
Sections
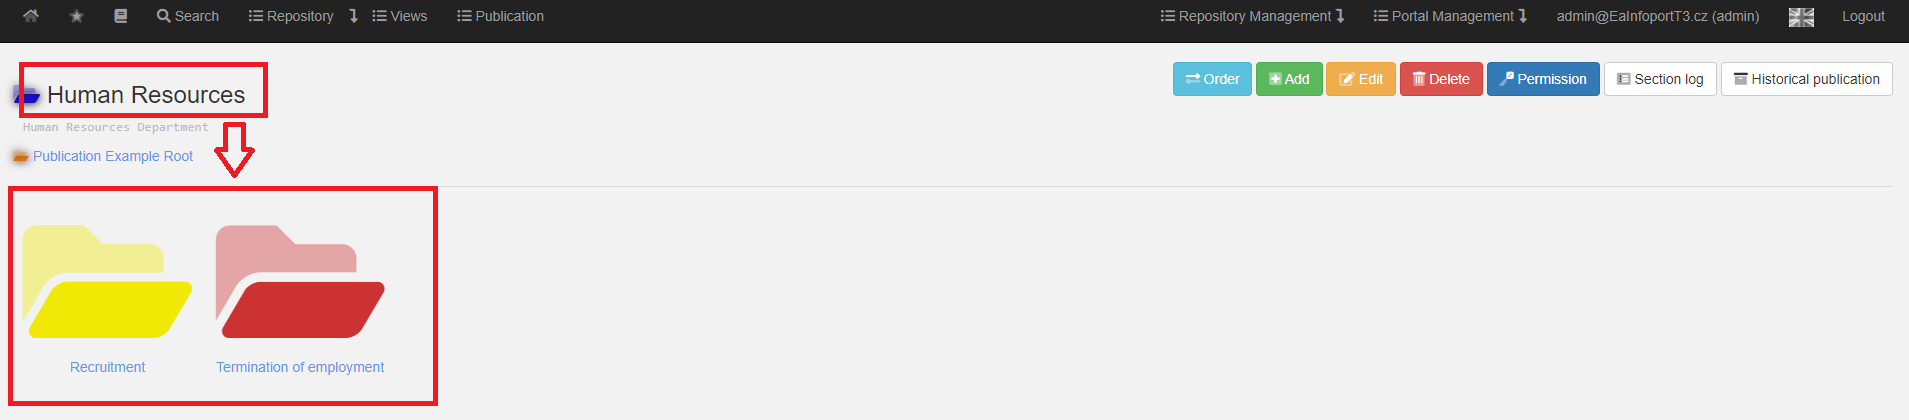
The basic building block of the publication are the so-called "Sections", which correspond to different departments in the company structure and into which the diagrams are published.

Publication Module Structure
The use of the publishing module is suitable, for example, for process books, company IS architecture, organizational structure publishing - wherever there is a need to publish information in a different structure than in the EA repository.
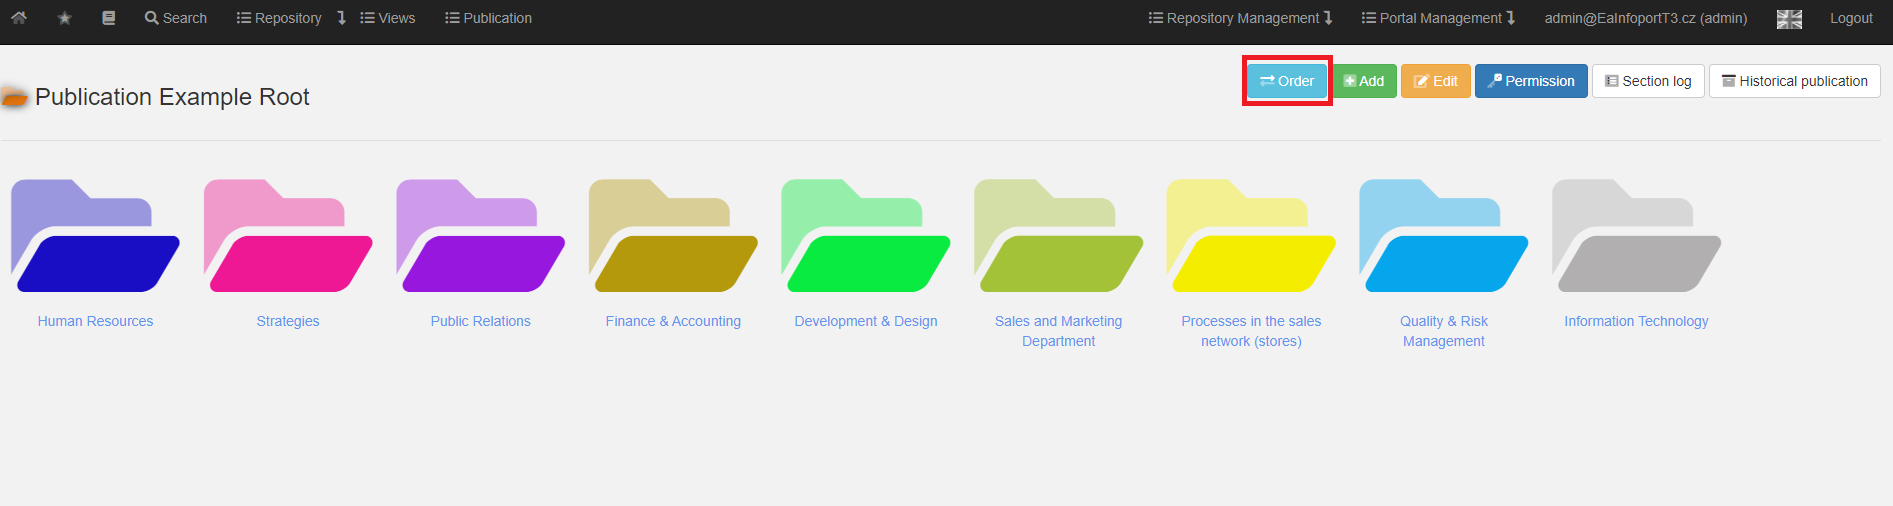
The publication module consists of so-called sections and has a hierarchical structure - its root is Publication.
Diagrams can be included (published) in a section. The publishing of diagrams is governed by a workflow, see below
A section can be divided into further subsections.
Each section can have a color, a name, a description and other details (see below).
Each section has a title, description, date and time of creation, as well as a configurable color.
Move the section
The user can change the order of each section.
To change the order, the user clicks on the "Order" button.
The user will see arrows next to each section.

Clicking on the arrow will move that section one section to the left or right.

After moving a section to the desired order, click on the "Order" button again, see the first picture, and further moving of sections will not be available.
Creating a Section
Sections can only be created by a user who has been assigned the "Owner" role in the current or parent section.
The section can be configured whether read access is enabled by default - then users or groups that cannot read can be explicitly selected, or whether read access is disabled by default - then users and groups are explicitly enabled. Another configurable feature of the section is whether published diagrams are immediately displayed in the section or whether approval is required (before publication).
To create a section, the user clicks on the "Add" button.

The following dialog will be displayed to the user.
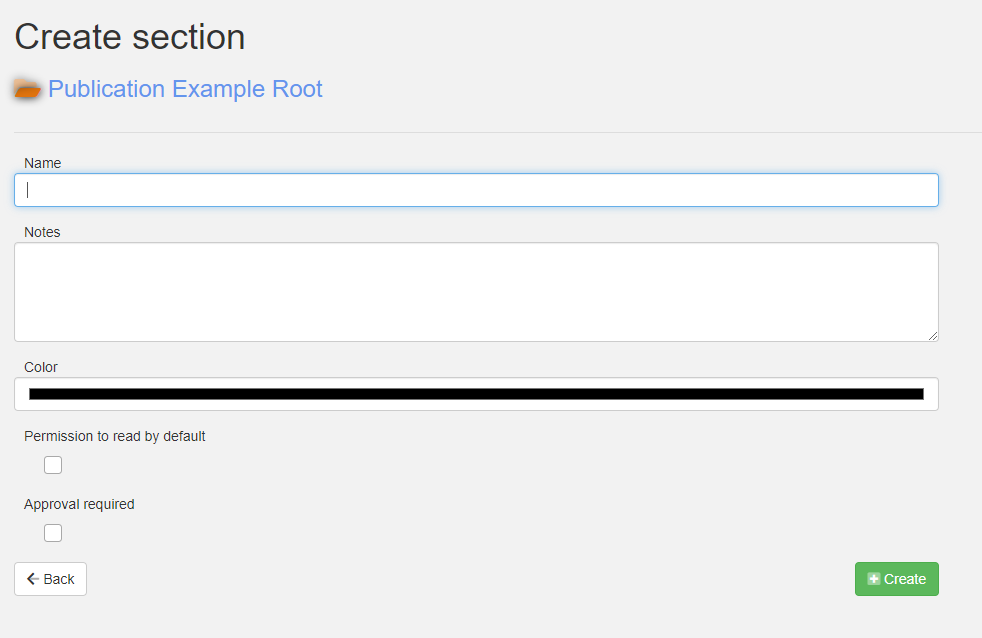
In the dialog, the parameters of the newly created section are entered and the rights are set.
- Section name
- Section description
- Section color
Rights
- Reading is allowed:
- When checked, users/groups can default to read the package and any child packages that do not have the default read disabled.
- When checked with an "x", users/groups cannot default read a package and all its child packages that do not have default read enabled.
- With an "empty square", the user/group inherits default privileges from the parent packages.
- Approval required":
- When checked, diagrams are added to the publication in the "To be approved" state. When unchecked, the status is "Approved.
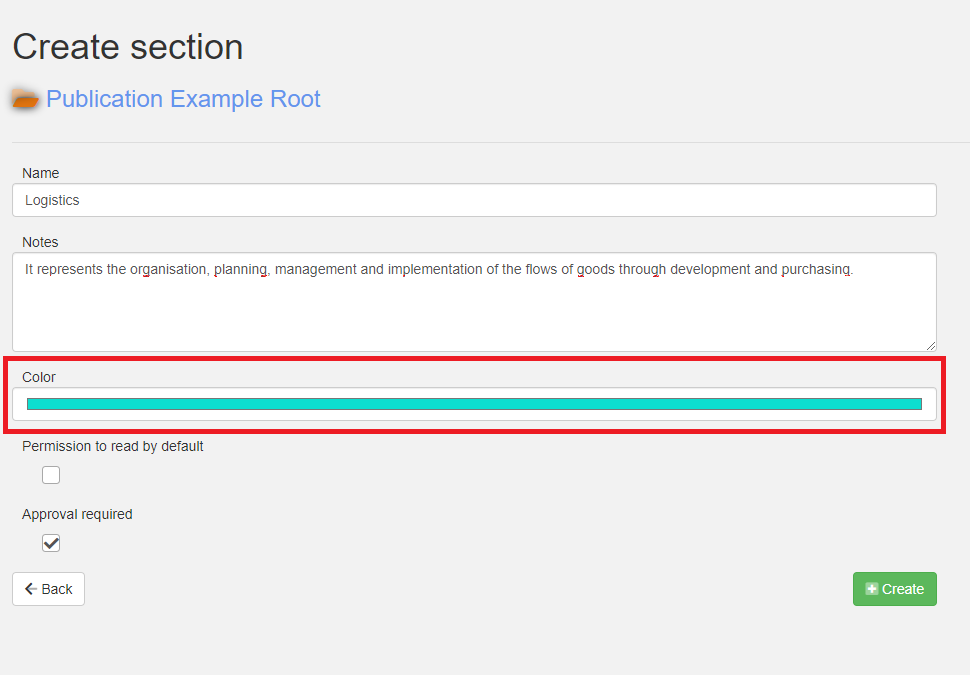
To change the color, the user clicks on the color label, then a mini dialog pops up to set the color.
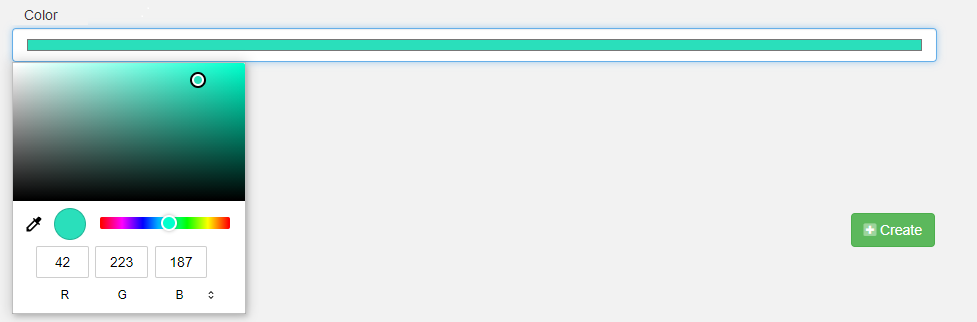
The colour selection dialog responds in two ways:
- Left-click and hold
- Left-click and hold the mouse button.
If everything is set, the user clicks on the "Create" button.
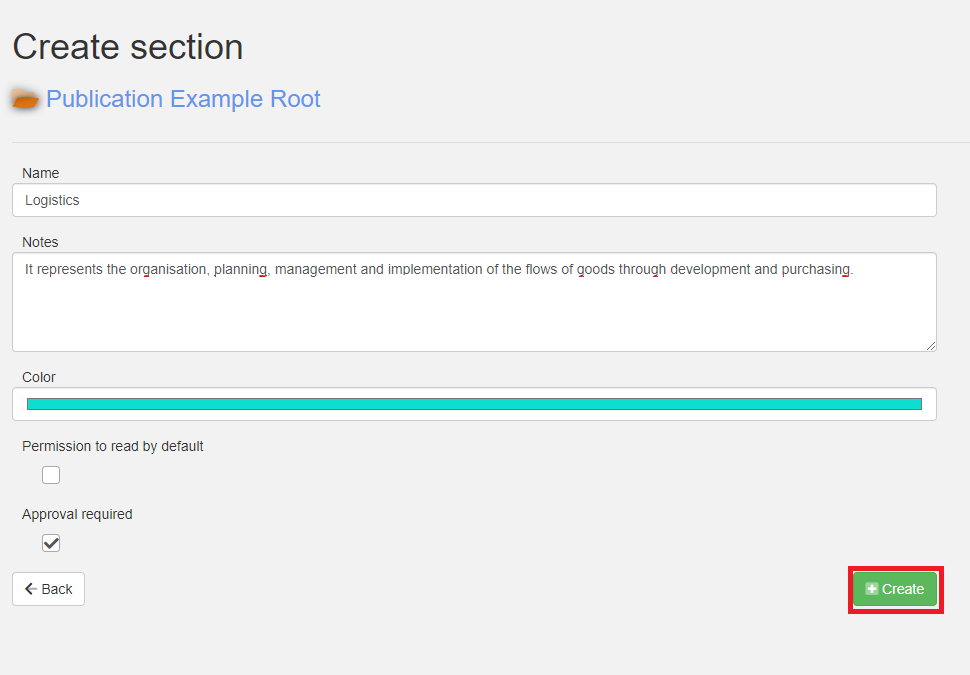
The section has been added.
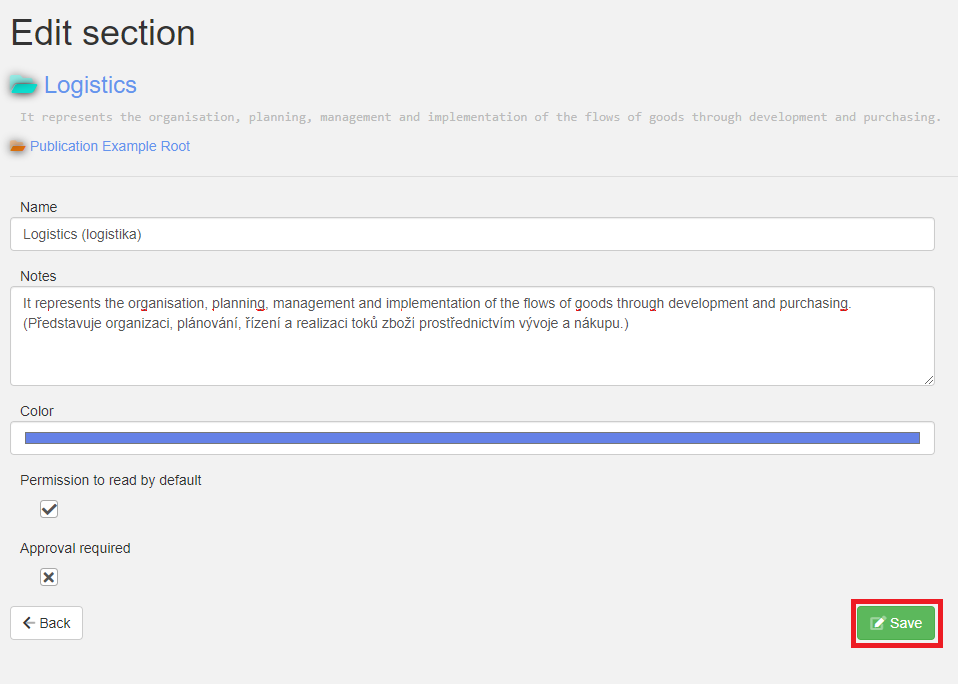
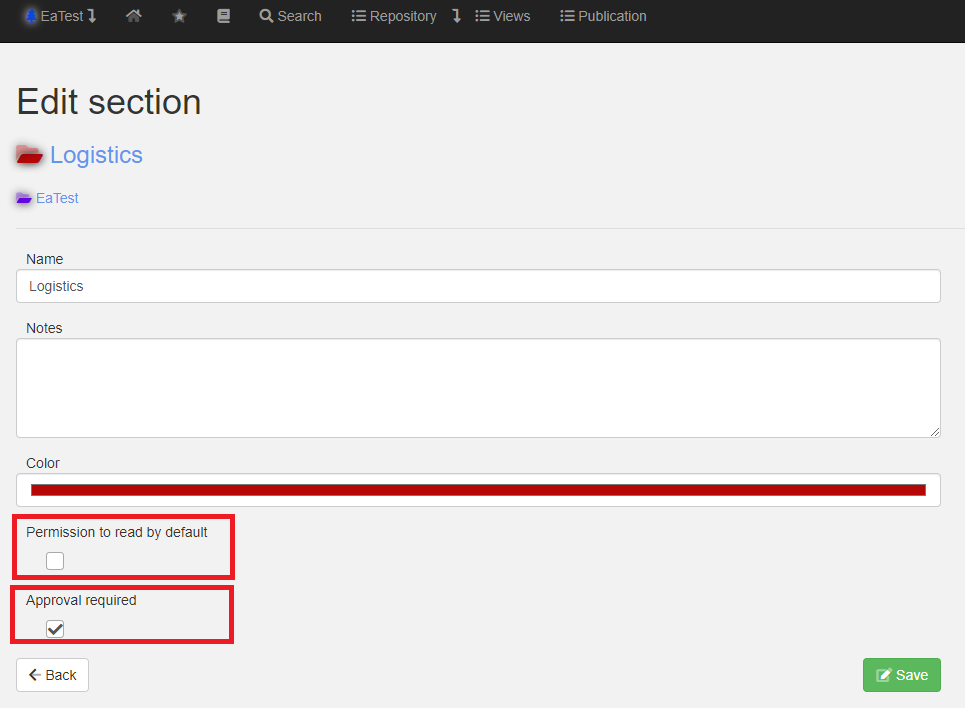
Edit a Section
In the section being edited, the user can edit the "section name", "section description", "section color", can change the "Reading allowed" and "Approval required" rights.
To edit a section, the user clicks on the "Edit" button.
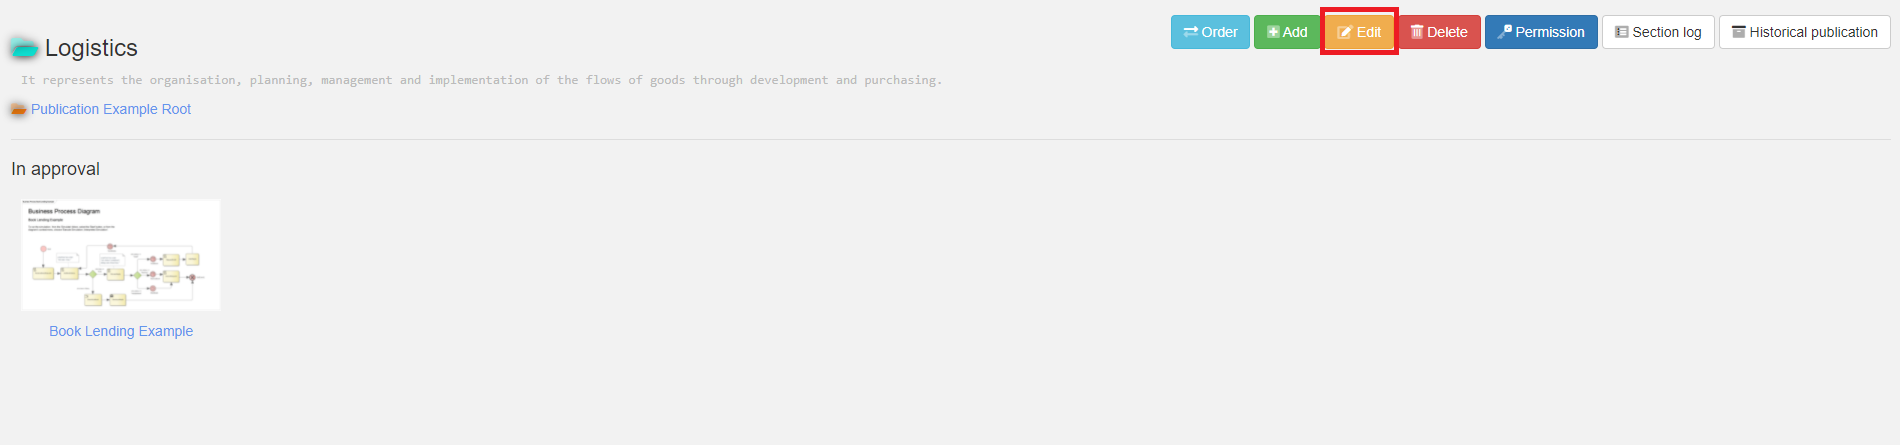
The user is presented with the following dialog where he can edit the "title, description and colour" of the section, as well as change the "Reading allowed" and "Approval required" rights.
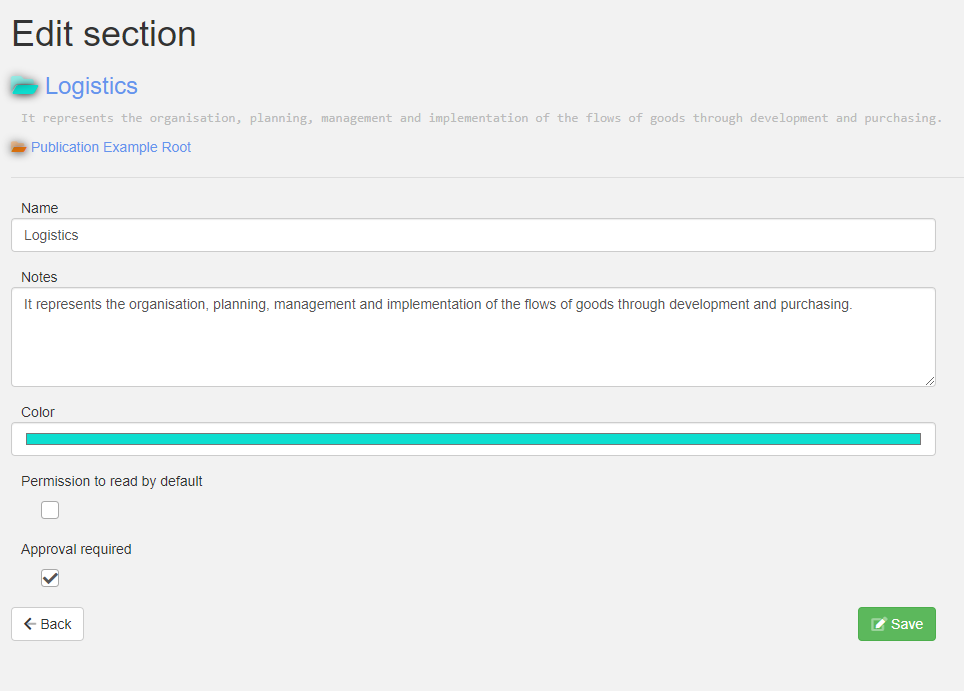
If everything is set, the user clicks the "Save" button.
After clicking on the "Save" button, an editing dialog will appear with the warning message "After saving, the settings in the child sections will be deleted".
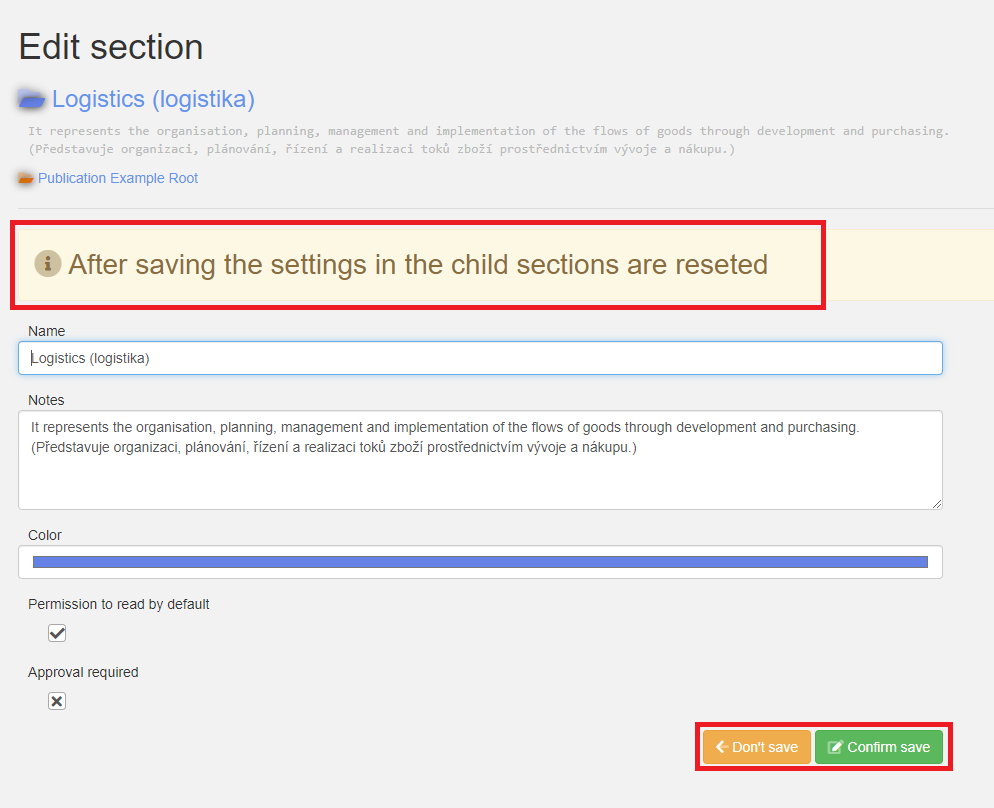
If the user does not want to confirm the save, he clicks on the "Do not save" button and this returns the user to the "Edit section" dialog.
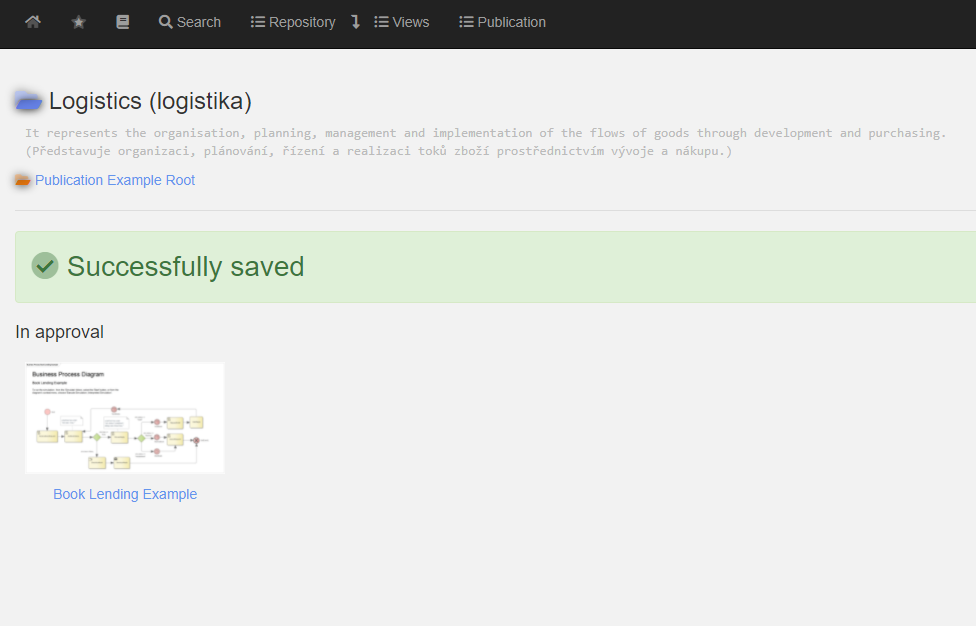
If the user wants to confirm the edit, he clicks on the "Confirm save" button and the user is redirected to the edited section where he can see the message "Successfully saved".
Delete a Section
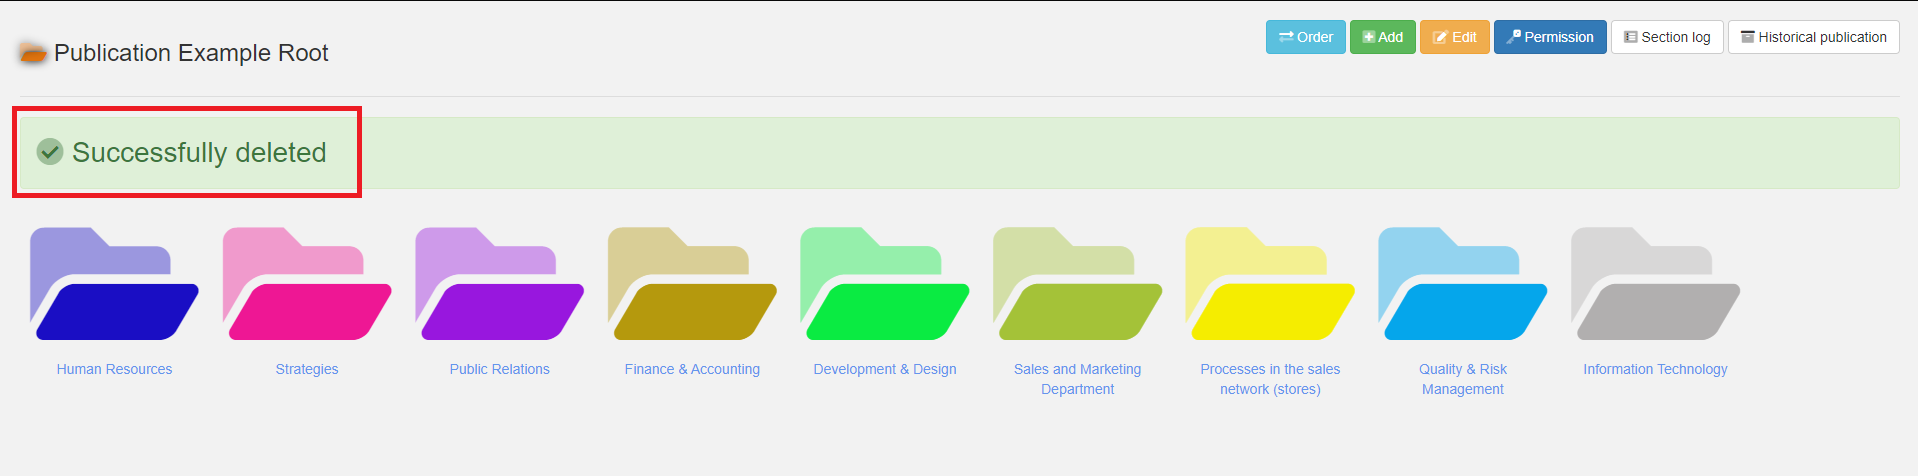
Deleting a section is used to delete that section, while also deleting subordinate sections and publications.
If the user wants to delete a section, he clicks on the "Delete" button and the "Delete Section" dialog is displayed.
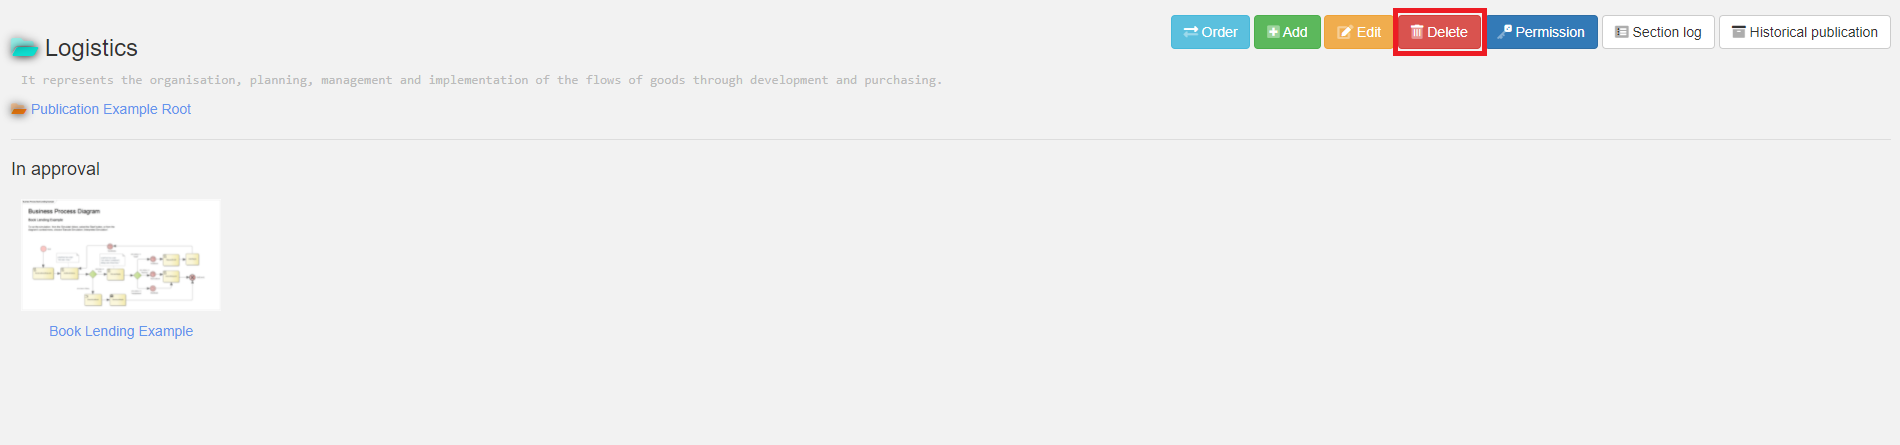
The dialog shows the name, description, section color, and rights of the section the user wants to delete.
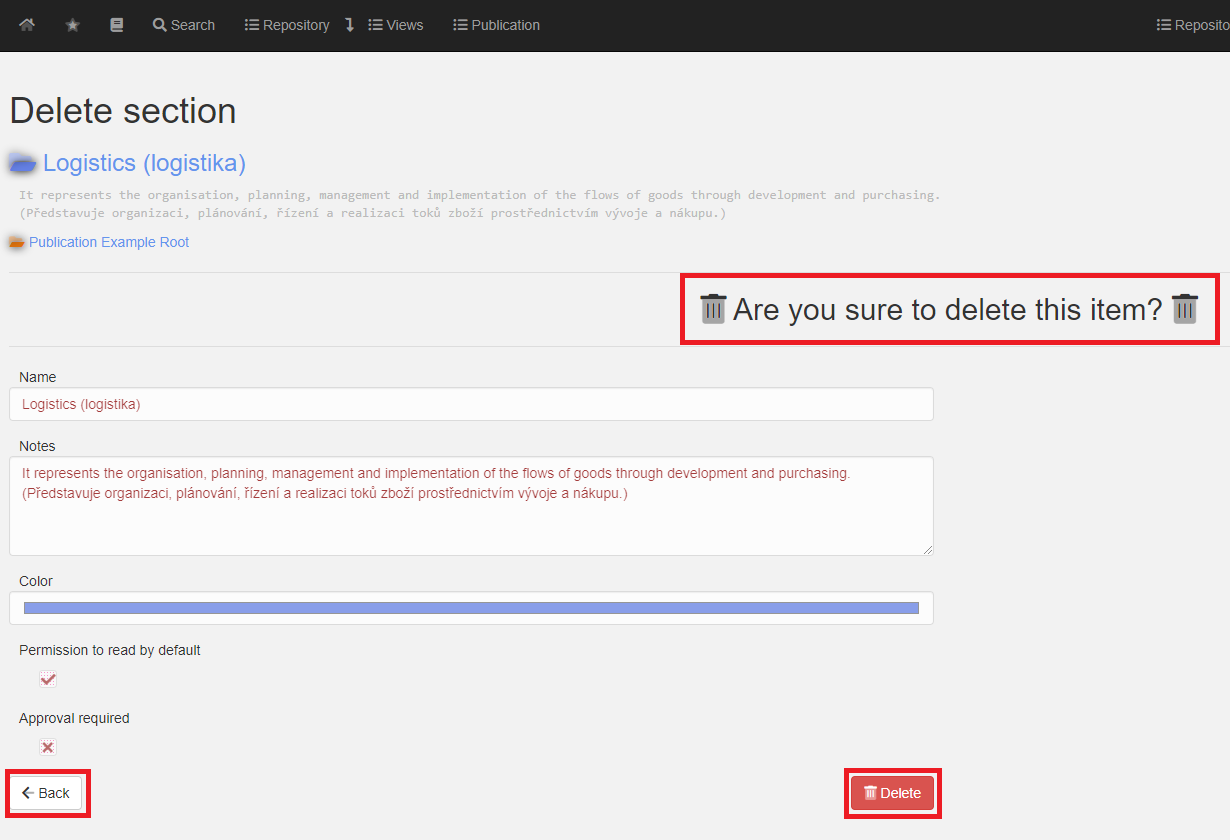
The warning message makes sure that the user really wants to delete the section. If not, the user will click the "Back" button which will return the user to the section and if the user really wants to delete the section, the user will click the "Delete" button, then the user will see a dialog with the warning message "Successfully deleted".
Publication statuses
Publishing a Diagram
The publishing of the diagram is done from the repositories. Publication can be done by any user with access rights to the repository.
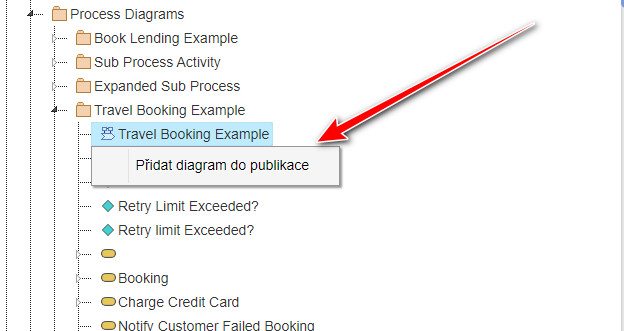
The publishing dialog is accessible via the right button in the repository tree.
The dialog for publishing the diagram appears.
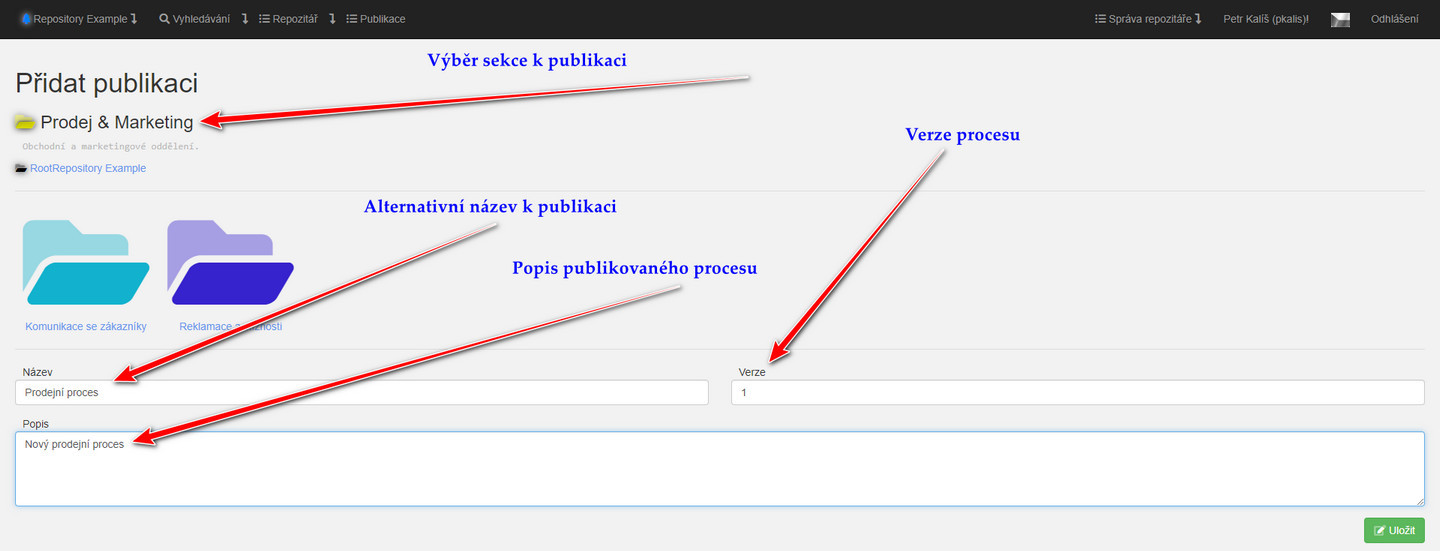
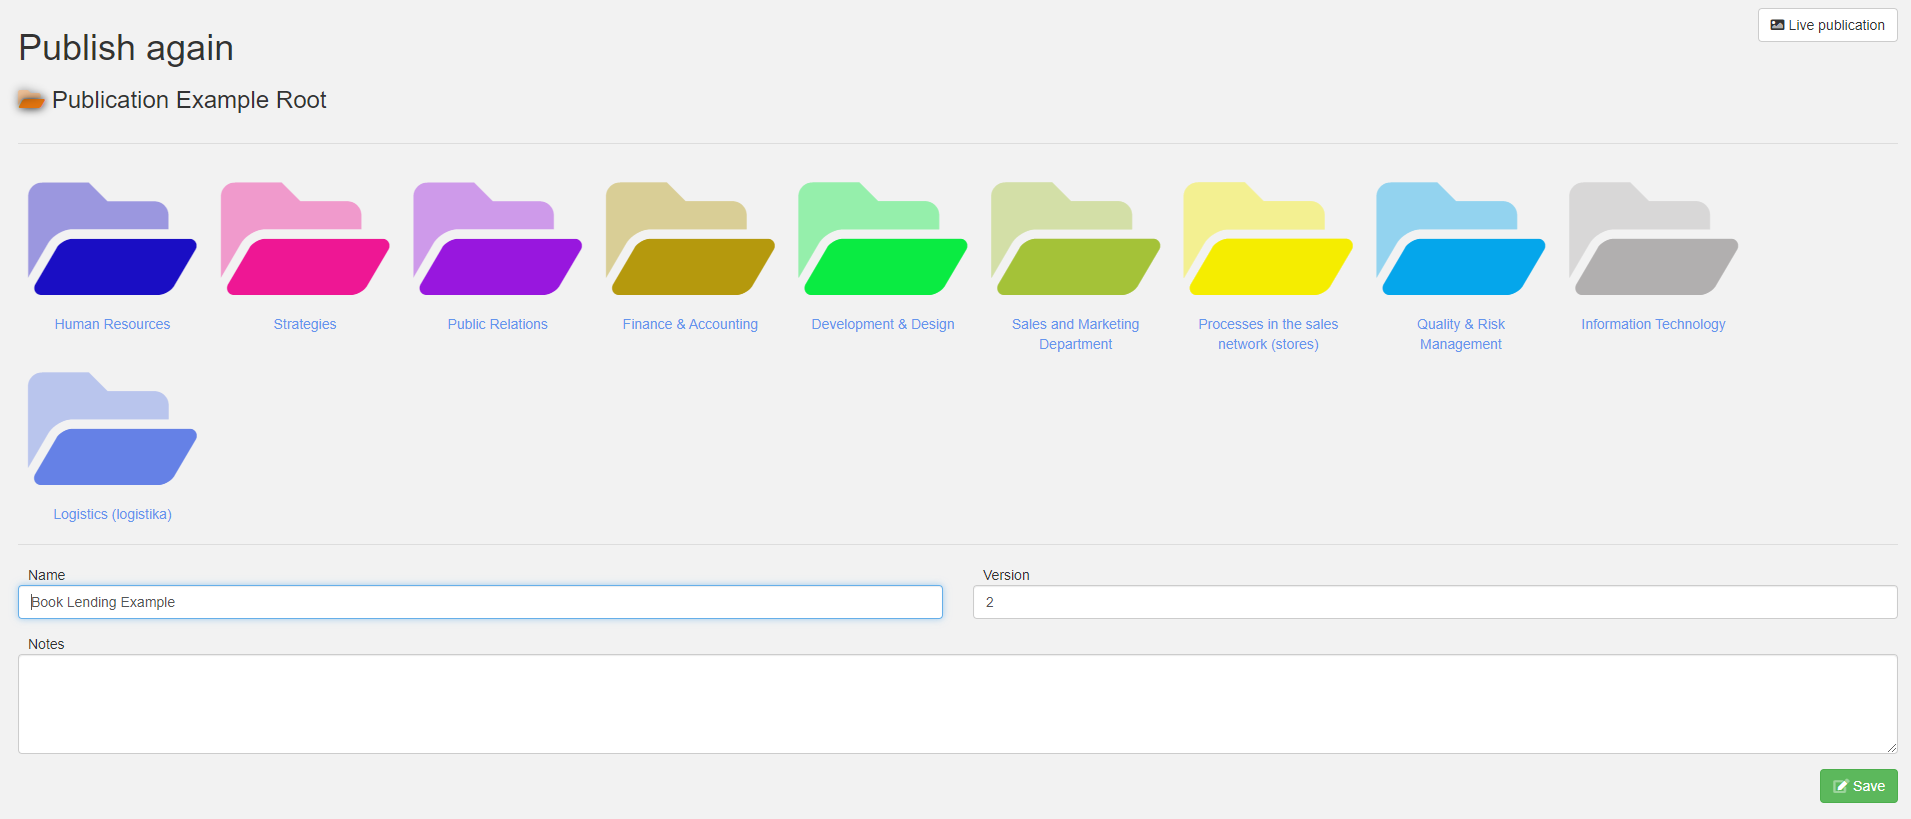
The user fills in mandatory and optional data:
- Section to which the diagram should be published - the user selects the section to which he wants to publish the diagram by clicking
- The name of the publication - is pre-filled from the title of the dialog, the user can change the title freely
- Version - is pre-populated, the user can change it freely
- Note - additional description of the publication (optional more detailed text)
Once the user has clicked the "Save" button to publish the diagram, it will be displayed in the appropriate section within moments. At the moment of publication, a copy of the diagram is created, including the elements and their details (up to a configurable level). The user can therefore edit or delete the original diagram without affecting the published or currently approved diagram. The copy is not created in the EA repository, but in the Infoport metadata, so the repository is not affected by this functionality.
A diagram can be published to multiple sections with multiple versions.
Approval of Publications
If approval of diagrams is required in a section, then the diagram will be displayed in the section only to owners and approvers – until it is approved or rejected.
The section owner or approver can view the relevant diagram, including metadata (who wants to publish the diagram and when), version, alternative name, etc.
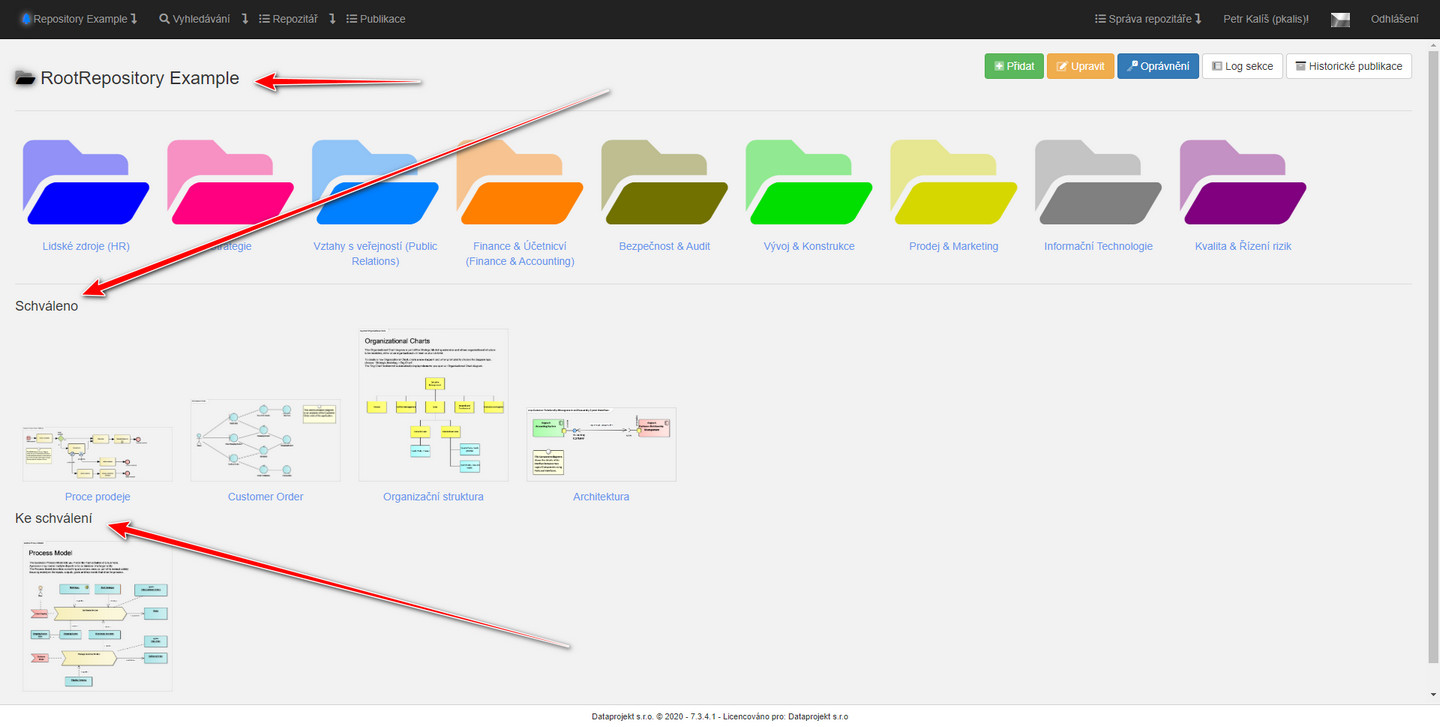
In the section, the user sees a list of publications designated "For Approval" and a list of "Approved" publications.
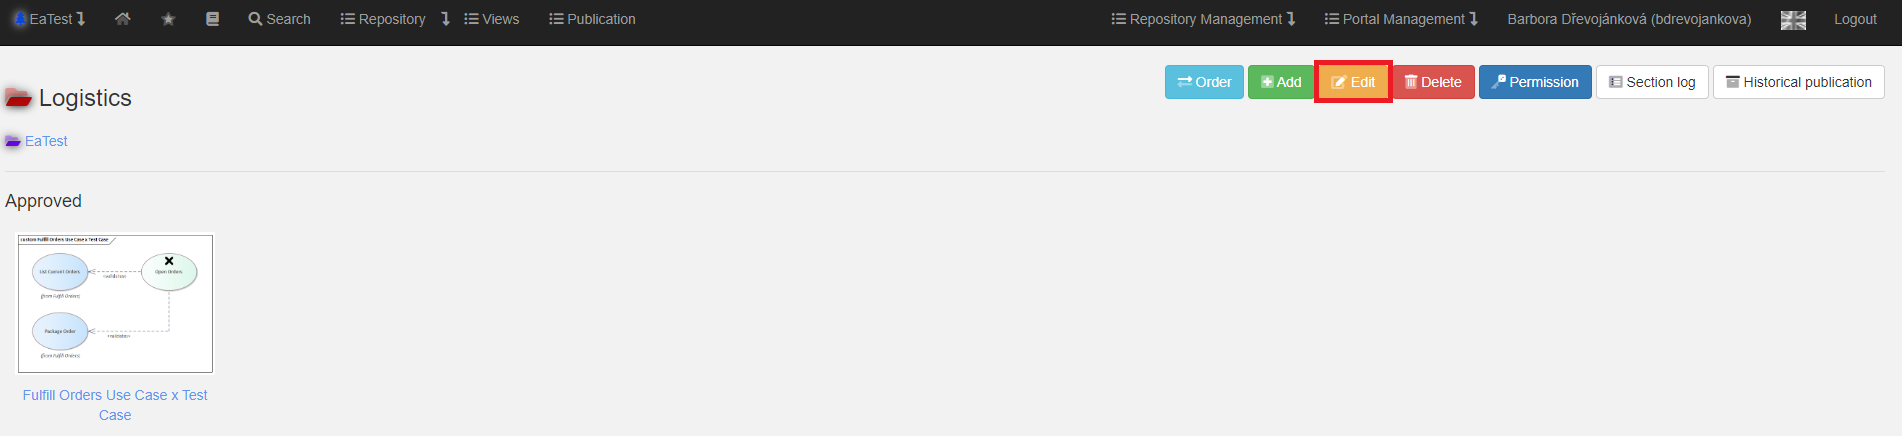
Rejected publications can be viewed using the "Historical Publications" button.
In the "To be approved" section, the user clicks on the preview of the diagram he wants to reject or approve.
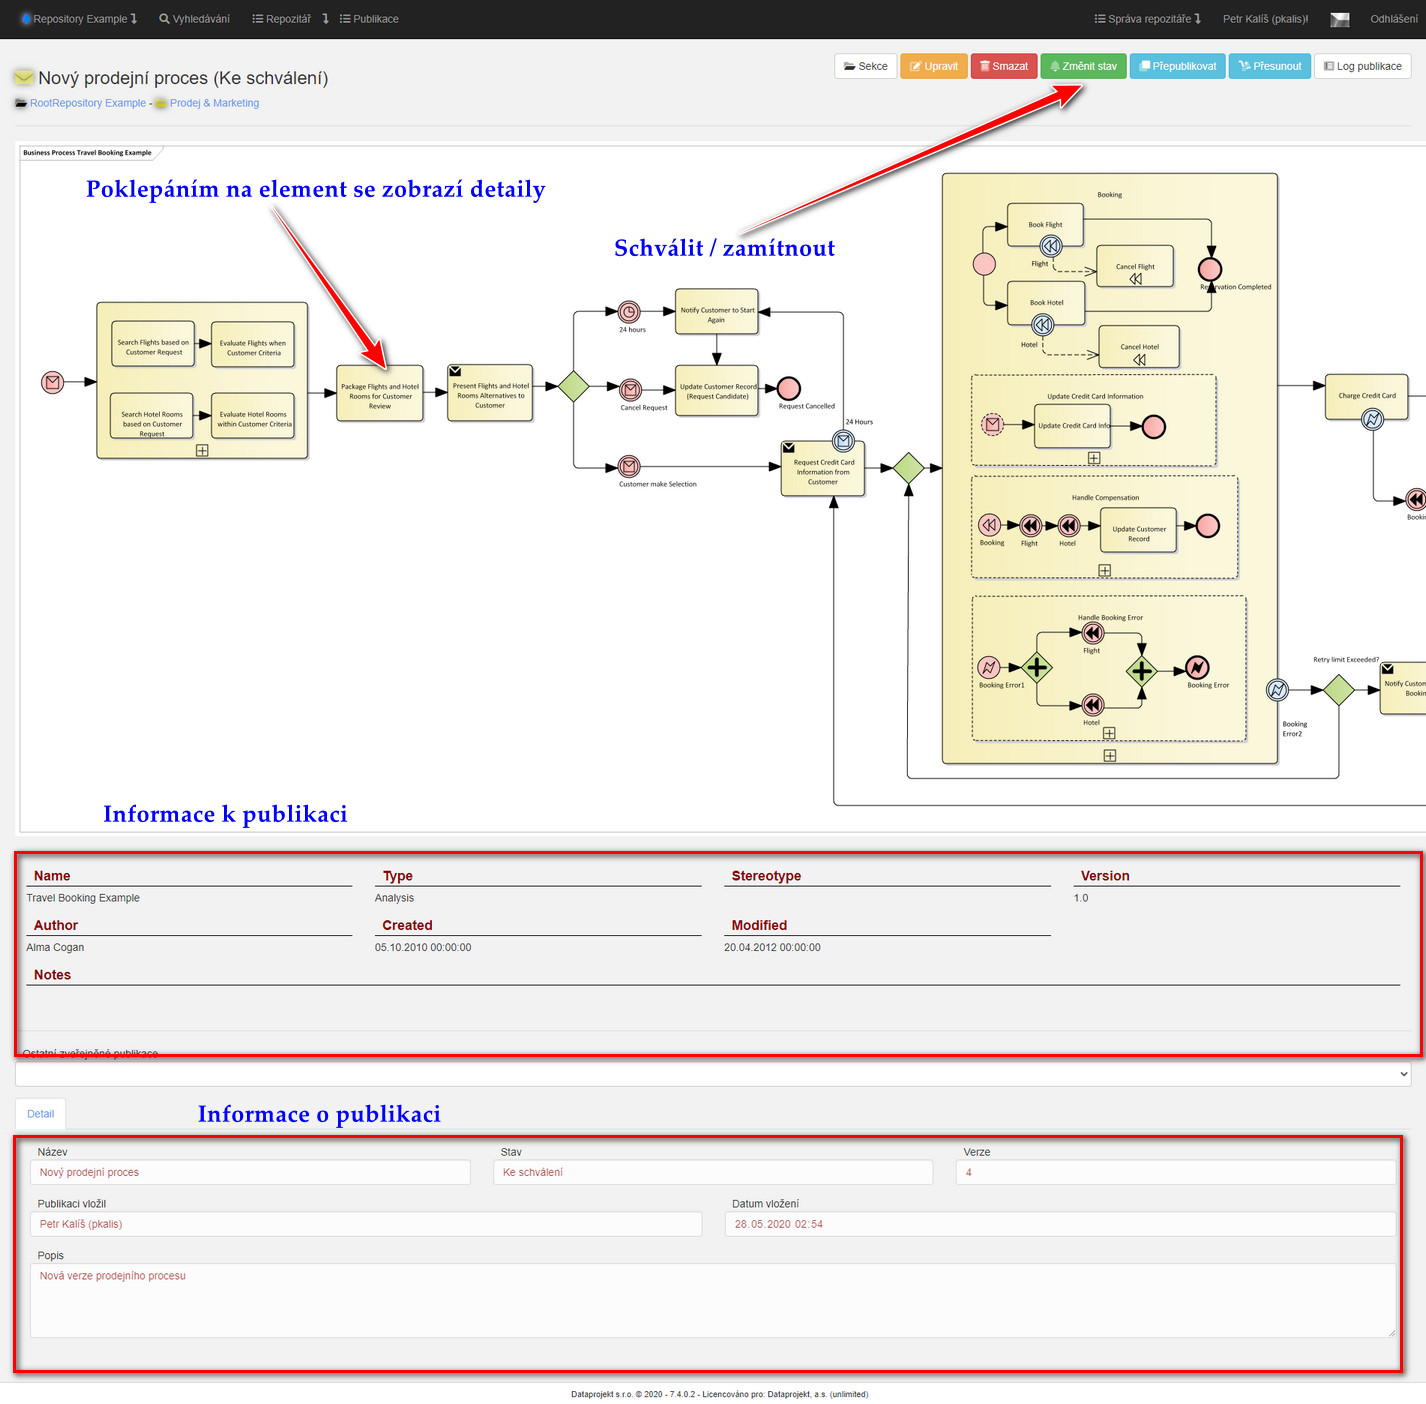
To approve or reject, the user clicks on the "Change Status" button.
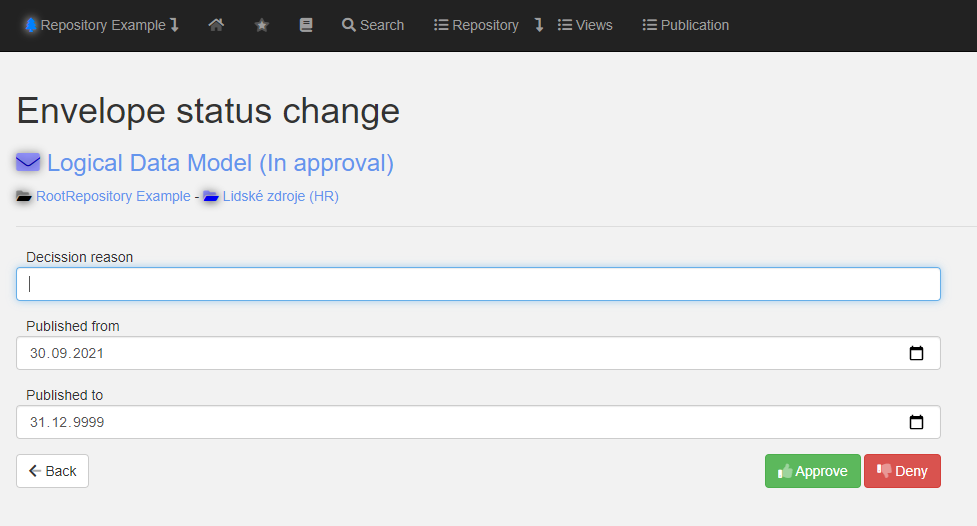
When approving or rejecting, the user must state the reason for the decision (e.g., found an error in the business process, etc.)
The validity of the publication is pre-populated by the system, published from is set to the current date and published to is set without date limitation.
Both of these values can be changed by the user. For example, he sets that version 1 of a particular business process is valid until 31.1.2018 and the new version of the same process (2) is valid from 1.1.2019.
After filling in these data, the user clicks on the "Approve" or "Deny" button.
If the "Approve" button has been used, the dialogue will move to the "Approved" section and if the "Deny" button has been used, users will not see it in the section and it is available in the "Historical Publications"
Historisation of Published Diagrams
Historical artifacts (these are artifacts that have expired publications) are used to preserve rejected and historicized diagrams.
Because it is still preserved in the Infoport metadata, they can be re-approved if necessary.
On the detail of an approved publication, the user has the option to expire the publication, i.e. historicize it.
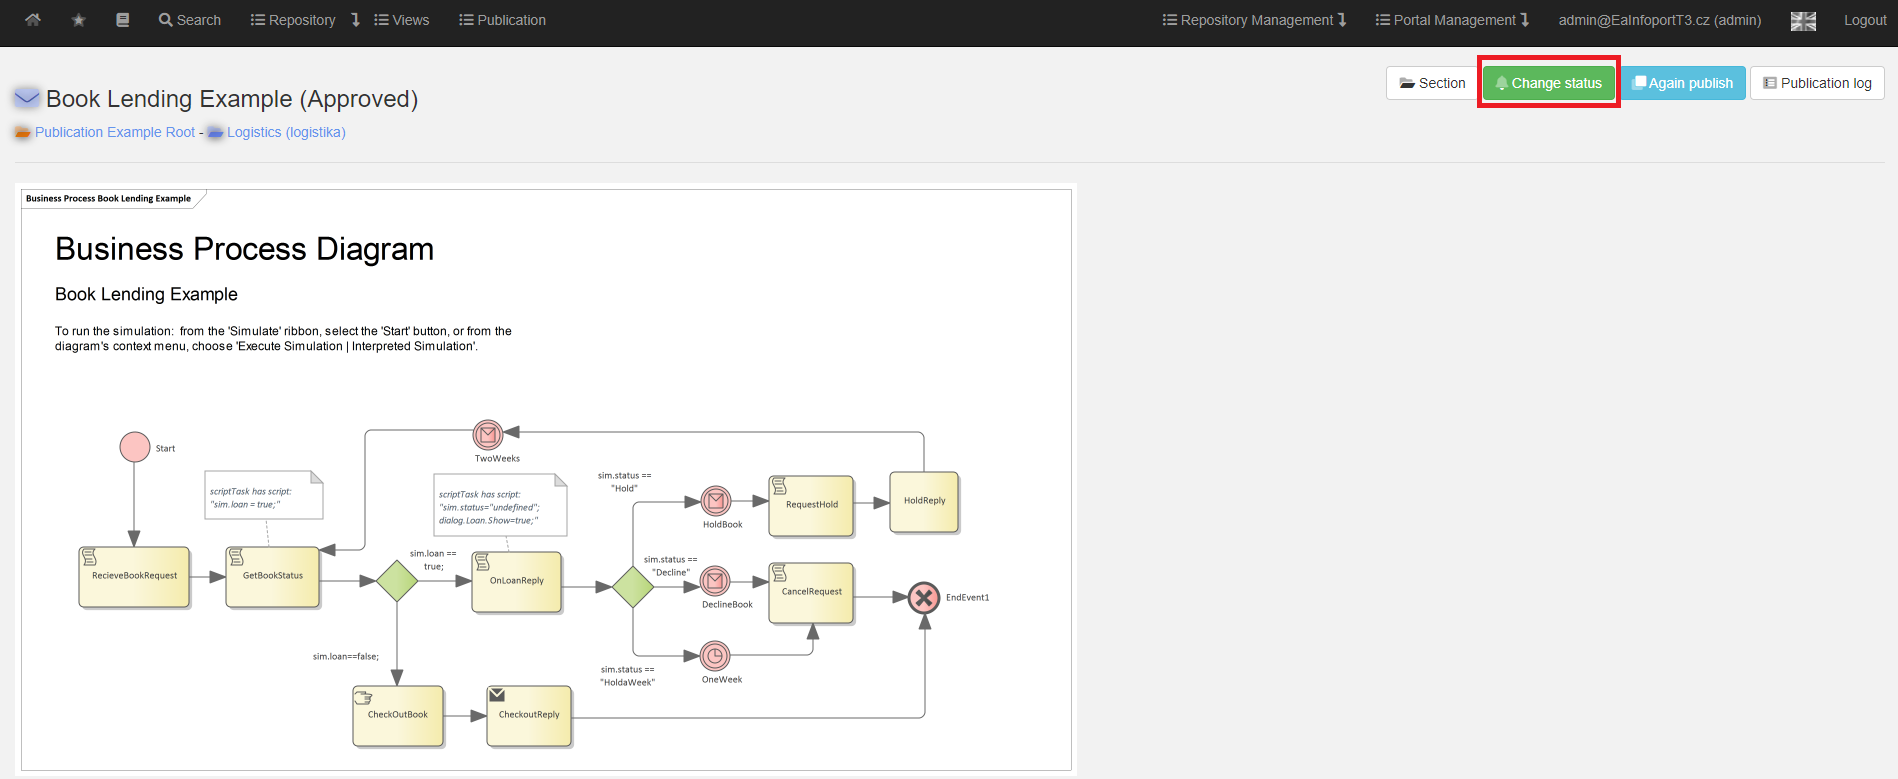
The user clicks on "Change Status" to see the "Change Publication Status" detail.
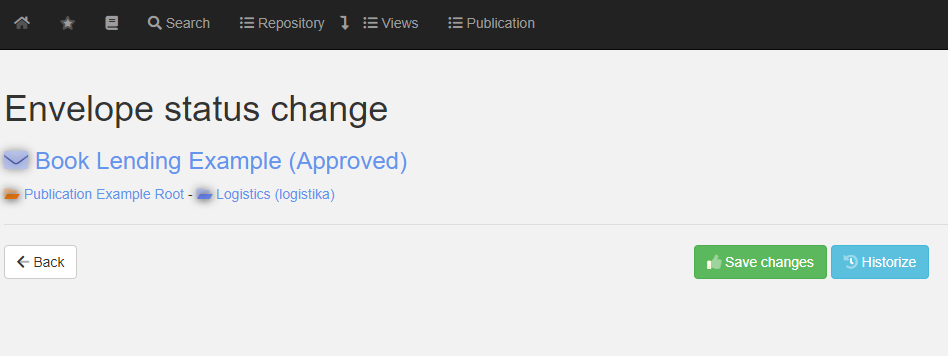
Once the user clicks on the "Historicize" button, the publication is moved to the "Historical publications".
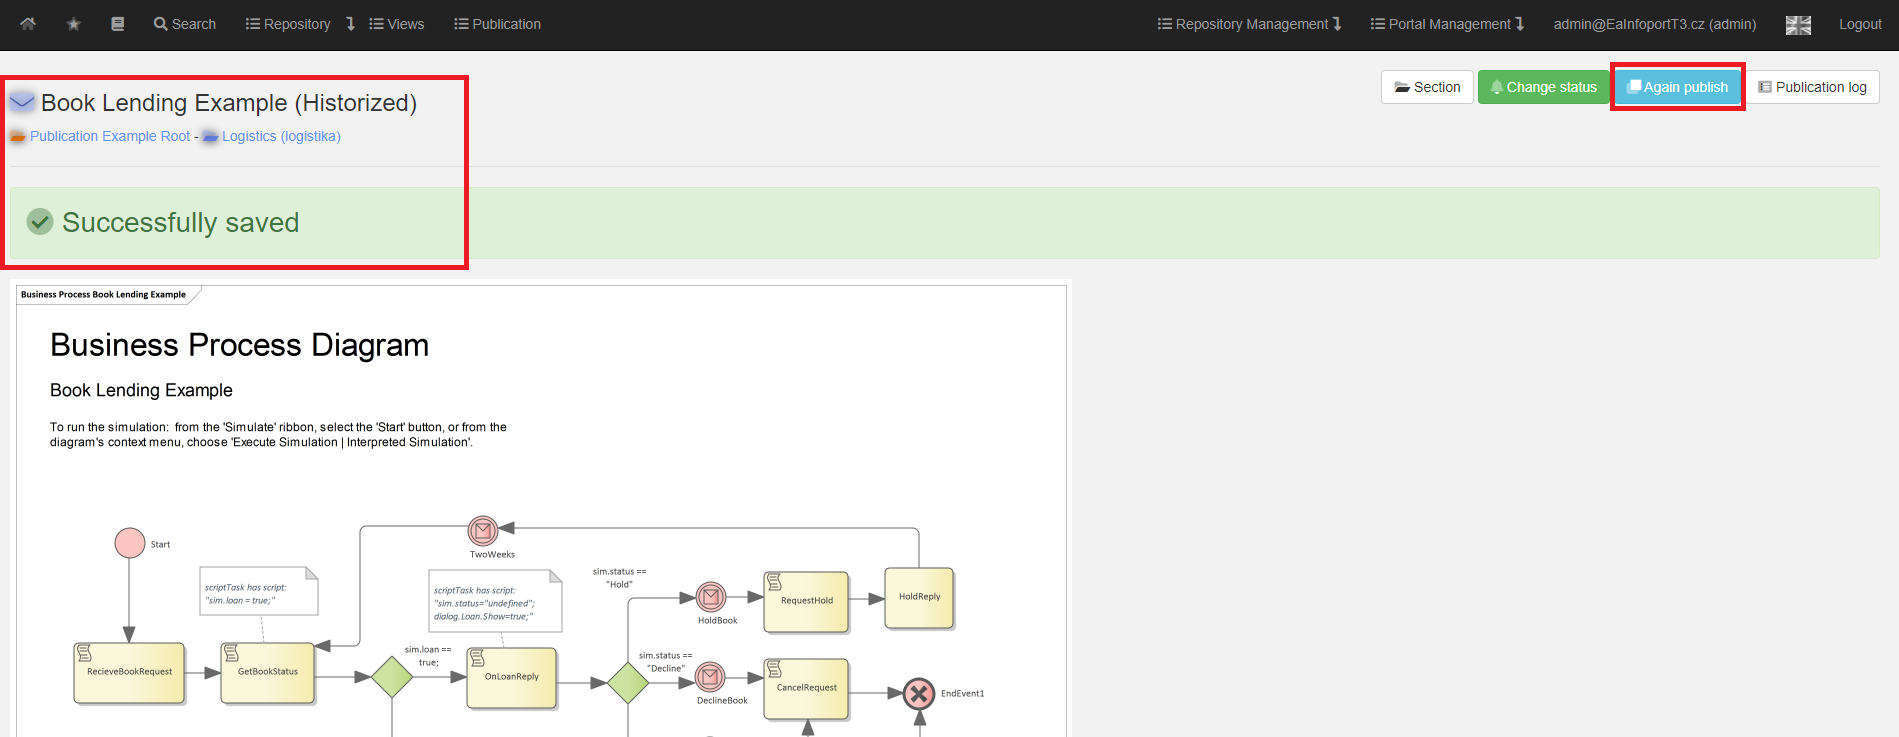
The user can click on the "Republish" button and select the section in which to save the publication.
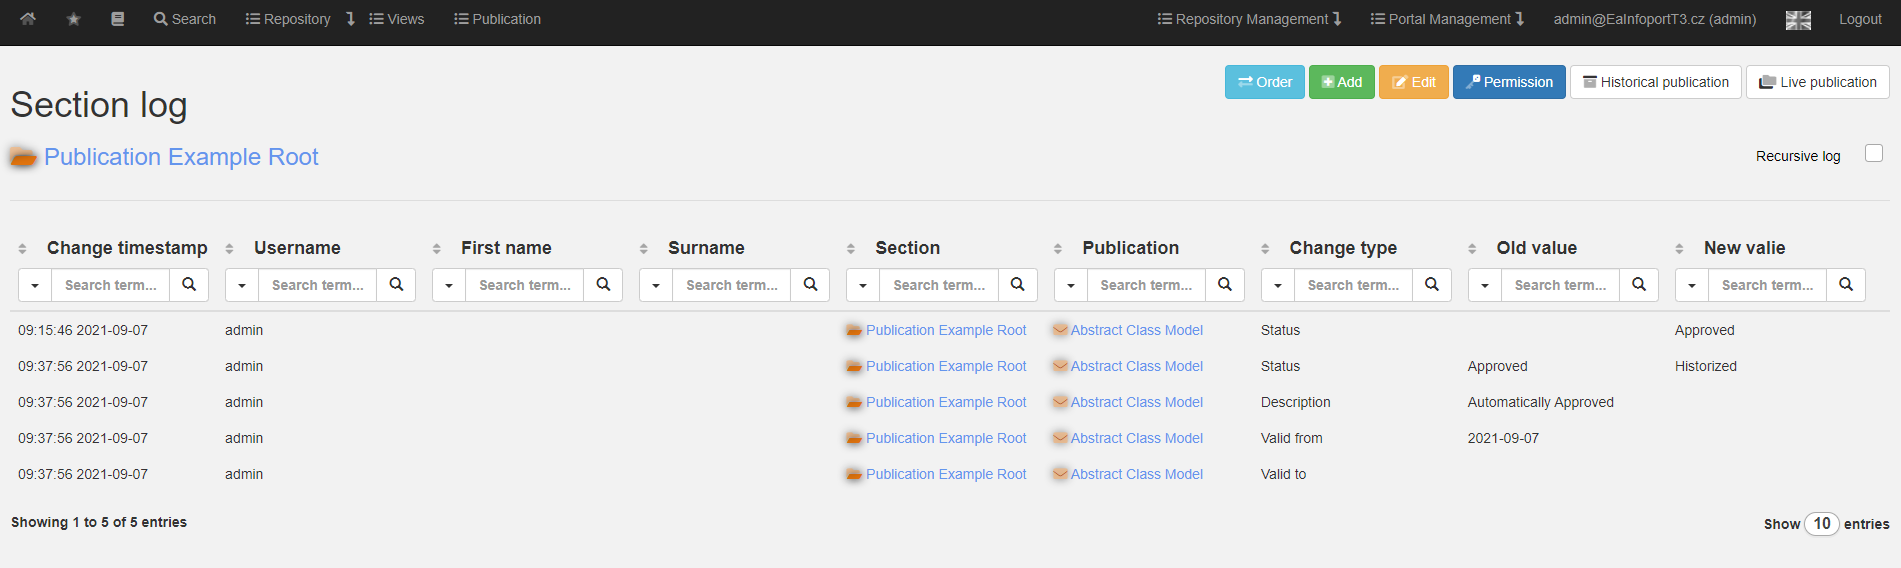
Logging Changes in a Publication
All changes to the published diagram (publication, approval, rejection, adding to another section and other activities in the publishing module) are logged. The log can be displayed in the UI.
The user can view the report below by clicking on the "Section Log" button located on the section tab.
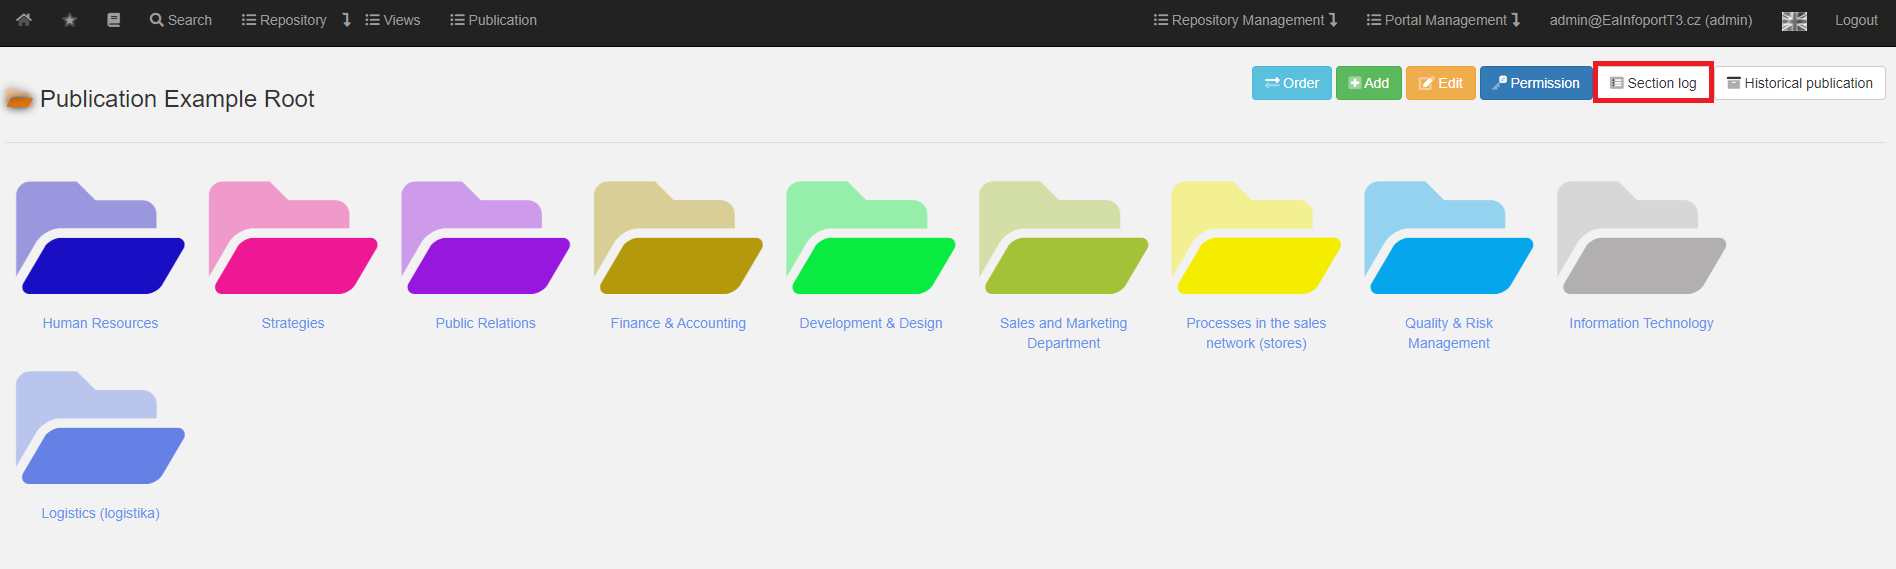
In this table, you can click through to sections or publications where a change has been made.
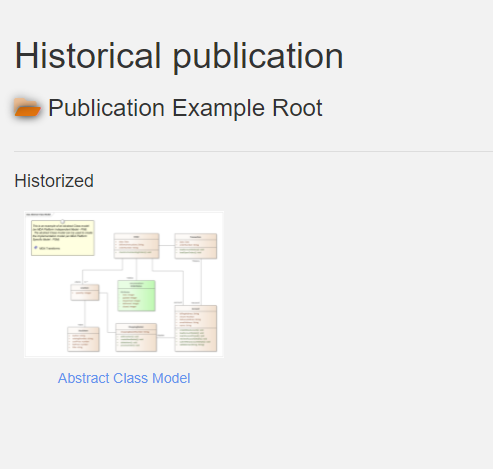
Historical Publication
Historical artifacts (these are artifacts that have expired publications) are used to preserve rejected and historicized diagrams.
From these states, they can be re-approved if necessary.
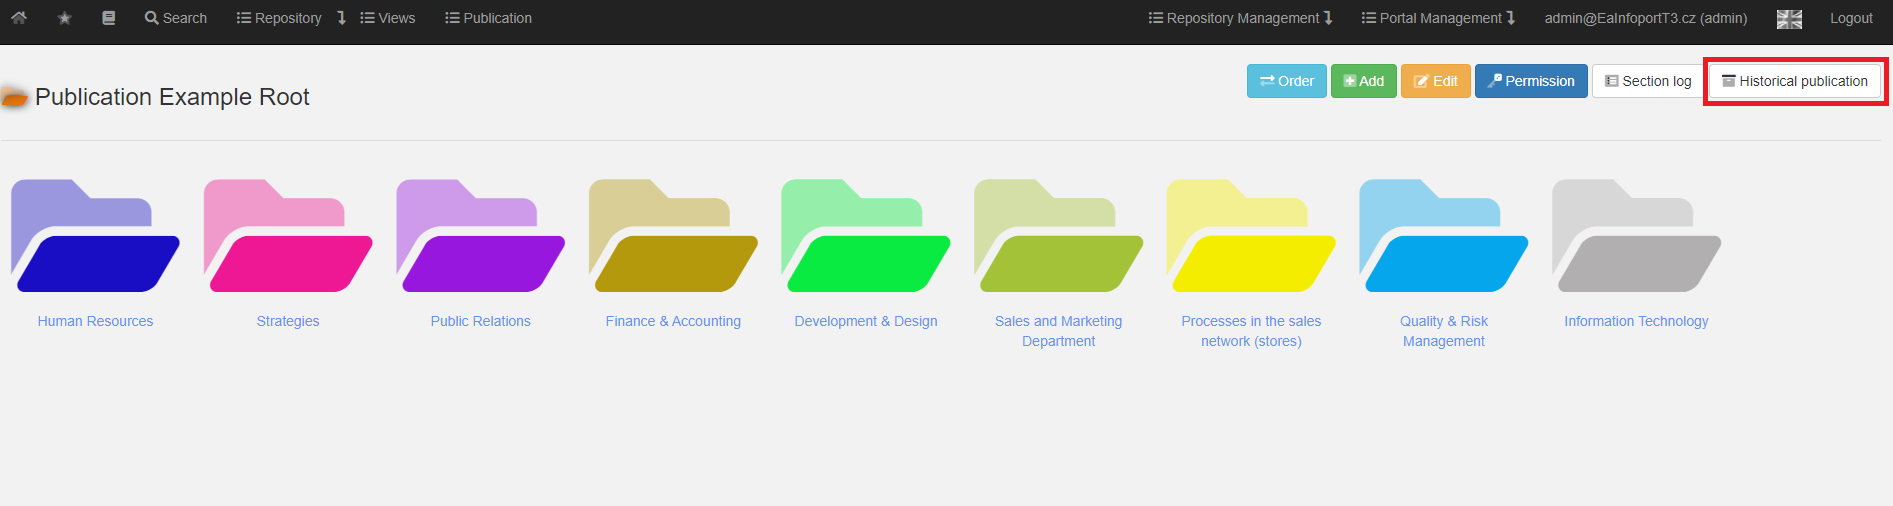
The user can view the list of historicized diagrams and also view the historicized diagrams (including element details).
It is therefore a very efficient way of versioning.
Setting default section rights
The default section rights settings can be found under the "Edit" icon.
The user will be presented with the following dialog where they can set/change the default rights "Reading is enabled" and "Approval is required".
- Reading is allowed:
- When checked, users/groups can default to read the package and any child packages that do not have the default read disabled.
- When checked with an "x", users/groups cannot default read a package and all its child packages that do not have default read enabled.
- With an "empty square", the user/group inherits default privileges from the parent packages.
- Approval required":
- When checked, diagrams are added to the publication in the "To be approved" state. When unchecked, the status is "Approved.
If everything is set, the user clicks the "Save" button.
Rights in the publishing module
For each section, you can set your own permissions.
If a section does not have a permission set, the permission from the parent section is taken over.
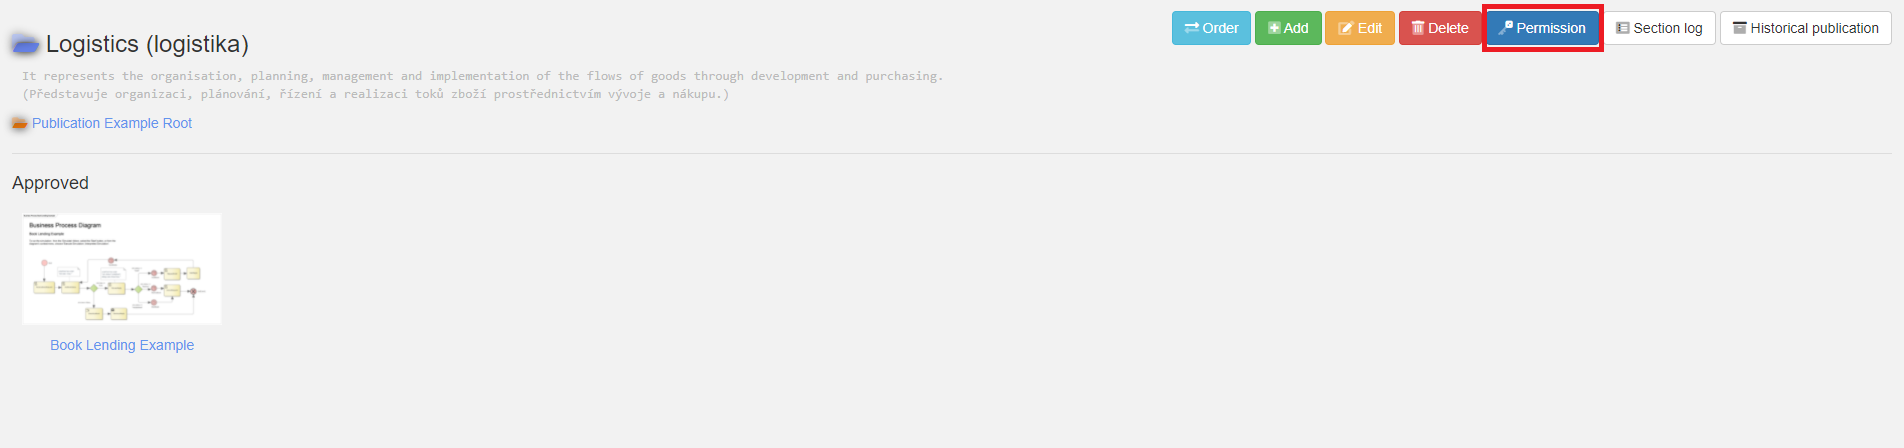
Setting one section:
Setting user and group permissions
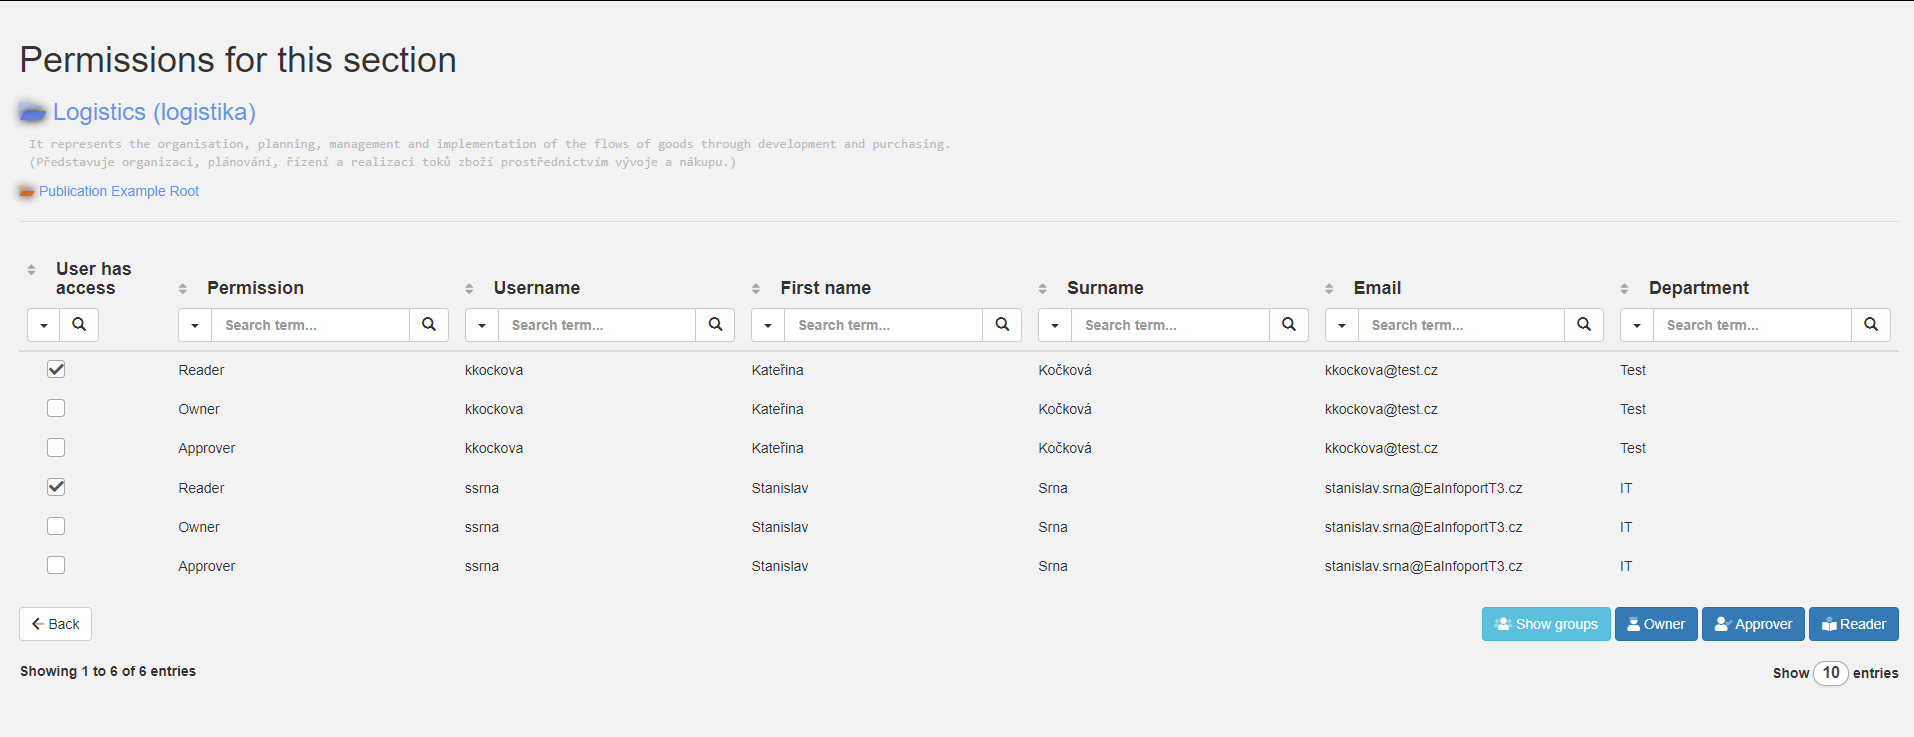
There are 3 levels of authorisation:
- The lowest permission is "Reader", who can see the published diagrams but cannot manipulate them. This means that he has no right to approve or reject the publication.
- The "Approver" can approve or reject the publication, or later historicize it.
- The "Owner" has the highest authority. He can approve, reject and historicize a publication. He can set the section name, comments and section color, and most importantly the section permissions.
- The user permission "Owner" has no restrictions in the section and its subsections.
- User permissions "Approver" and "Reader" are affected in subsections where they do not have exclusive personal permission and the default permission is set.
- User permissions take precedence over the default permission in that section. Subsections that do not have the default permission set inherit the user permission.
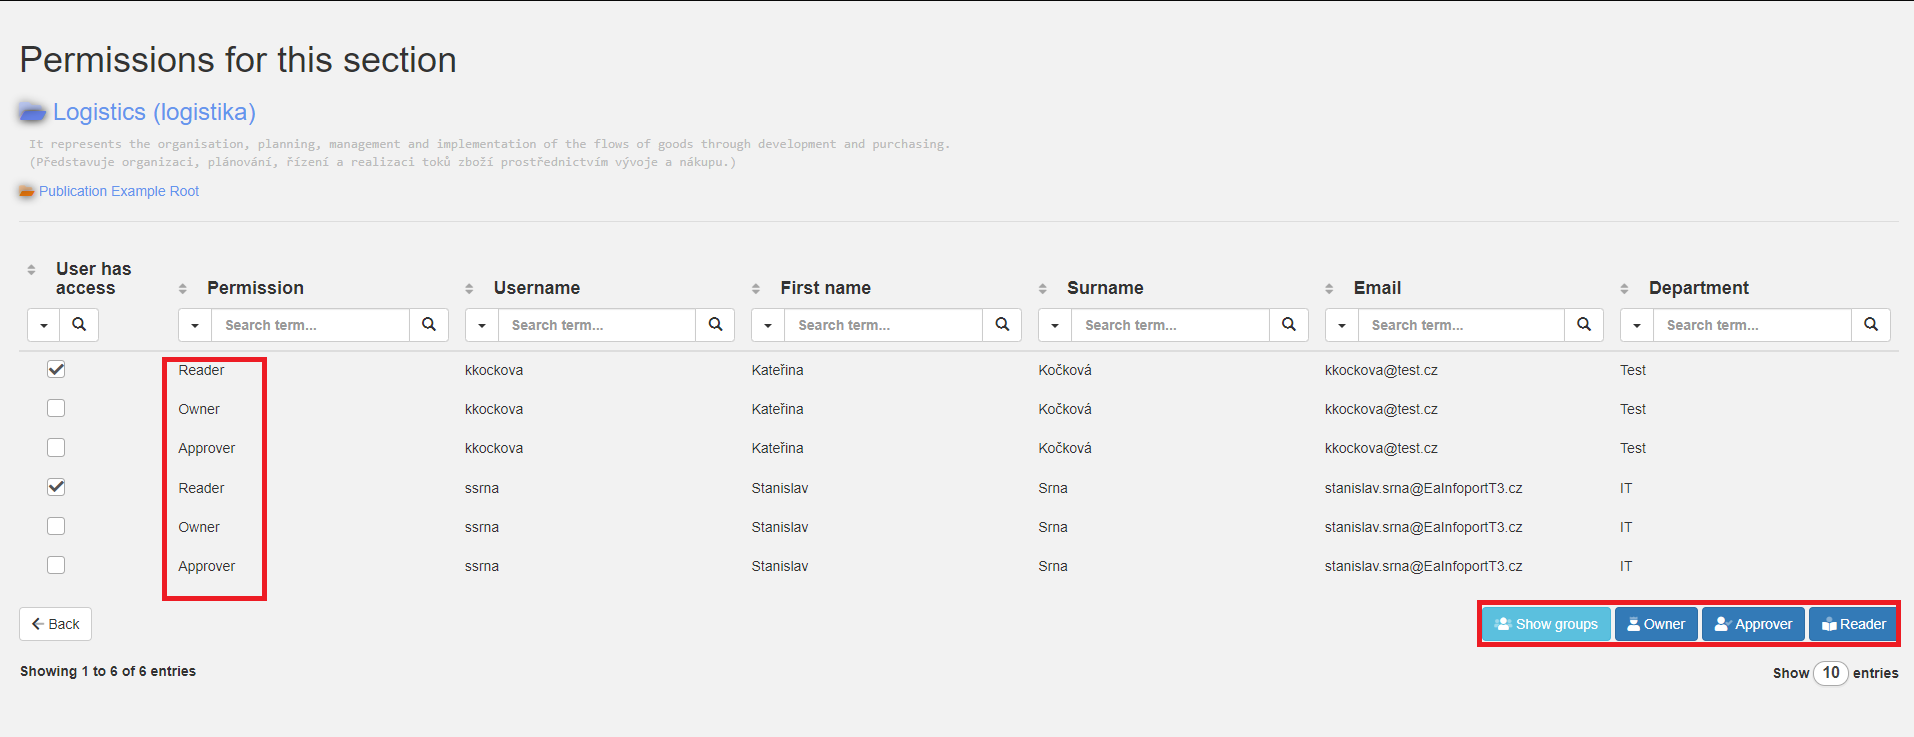
Using the "View users" or "View groups" button, you can view the rights of this section through users or groups.
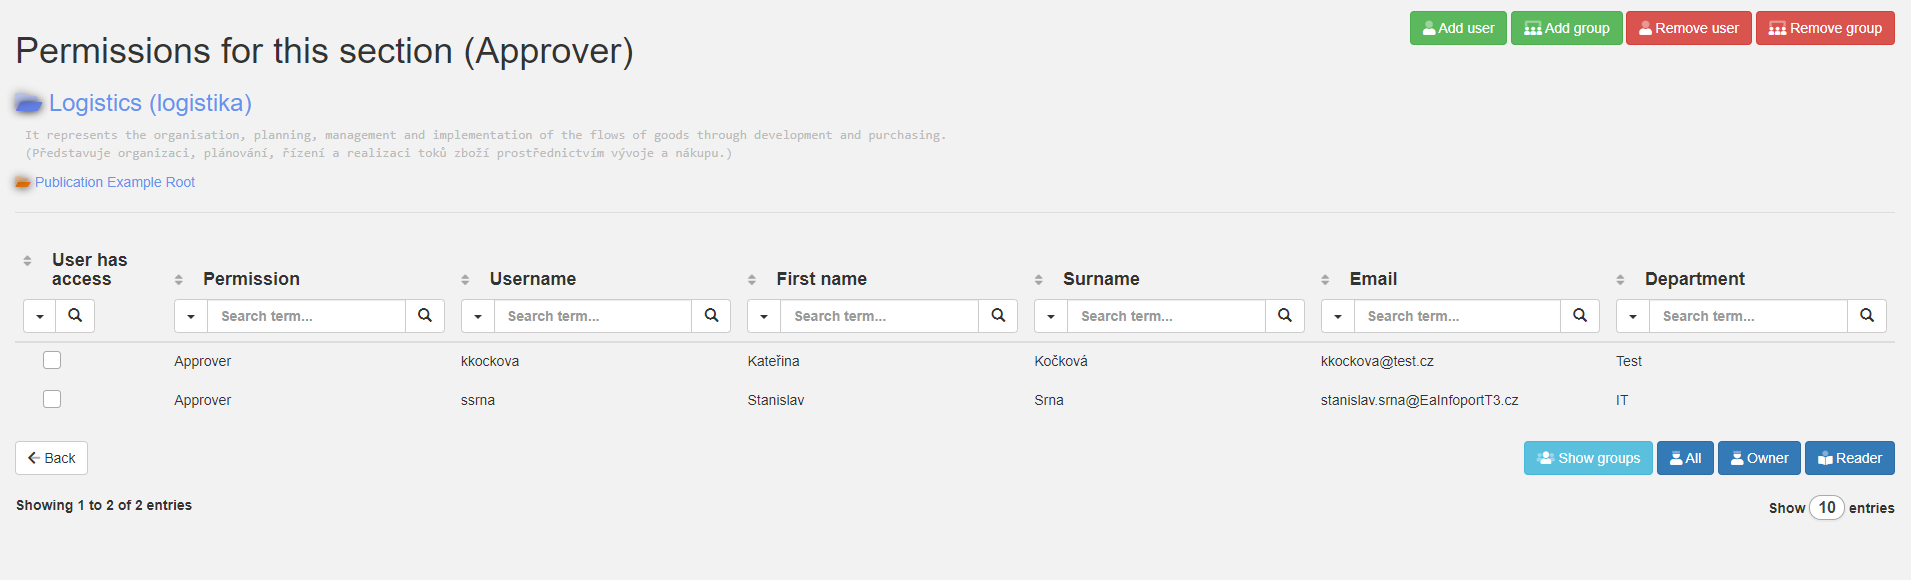
The "Owner, Approver, Reader" buttons are used to filter by role. For example, if you want to see a list of all approvers, click on the "Approver" button.
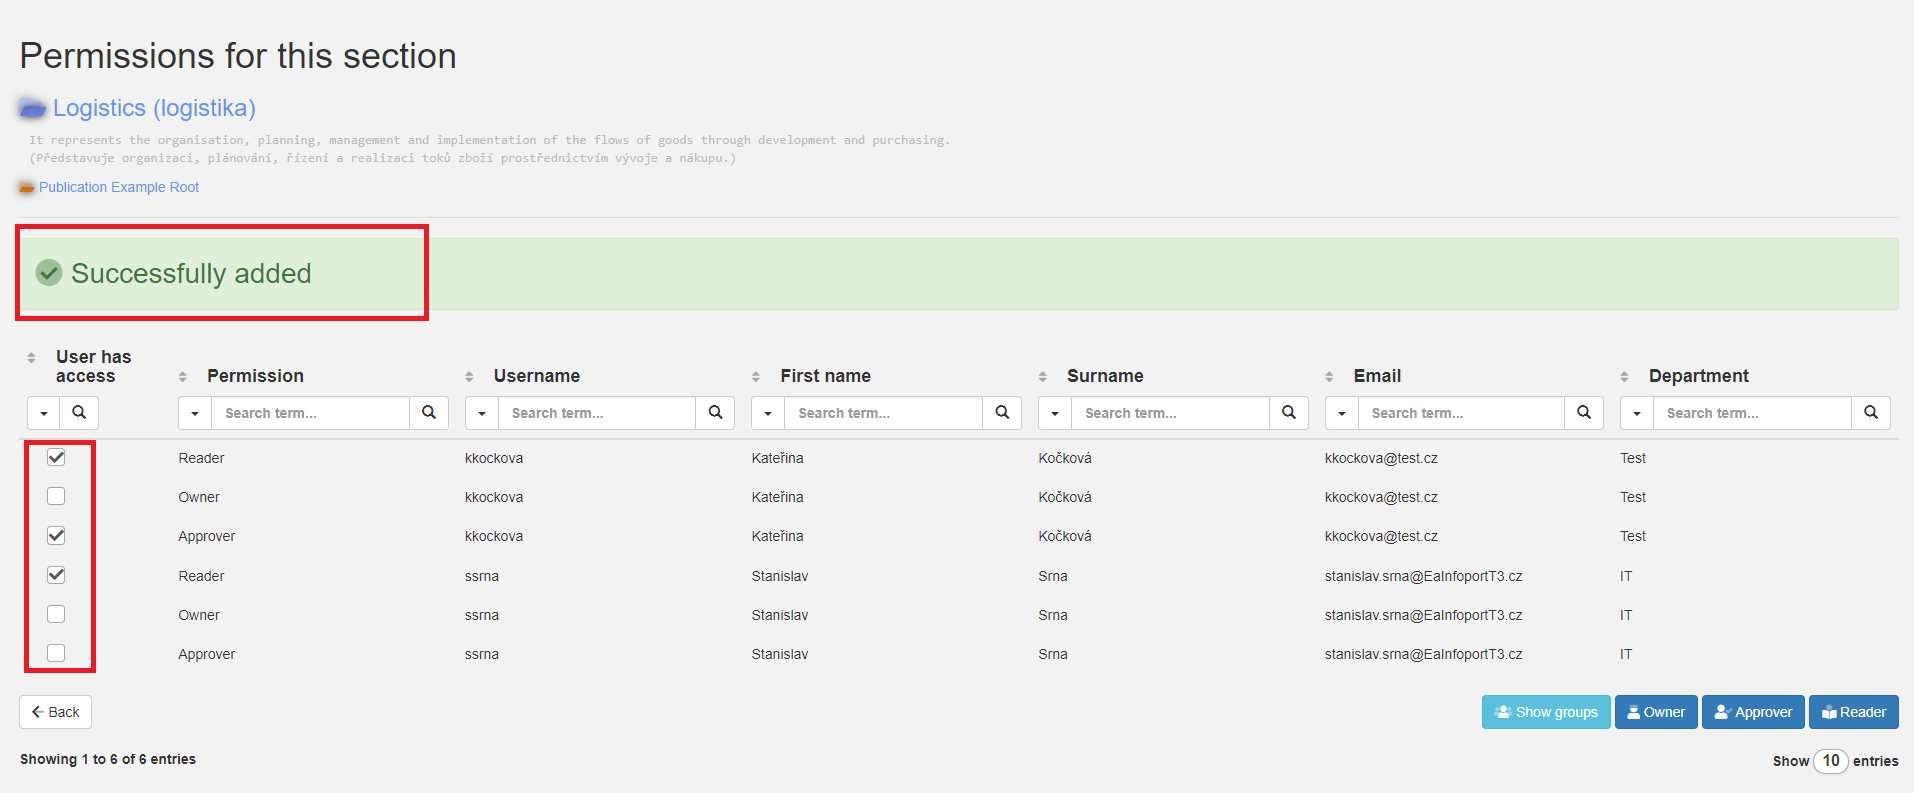
Adding or removing privileges is changed using a checkbox and after clicking/unclicking, the message successfully added or removed is displayed.
Repository Management
There are a basic permissions in each repository that can be assigned to a user or a group. Access to the repository tree Access to the publication Repository administrator Editor Glossary Access to views Access to publish public keys
Repository Management
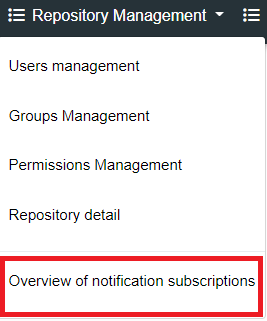
On the right side of the Infoport header we can see a Dropdown menu called Repository Management (Only logged in user with Repository Manager permission).
- Access to the repository tree
- If a user or group has this permission, they can access the tree and see the tree branches allowed by default
- Access to the publication
- If a user or group has this permission, they can access the publication and see the sections allowed by default
- Repository manager
- If a user or group has this permission, they can access repository management and manage repository users, repository groups, assign and remove repository permissions, and edit repository details
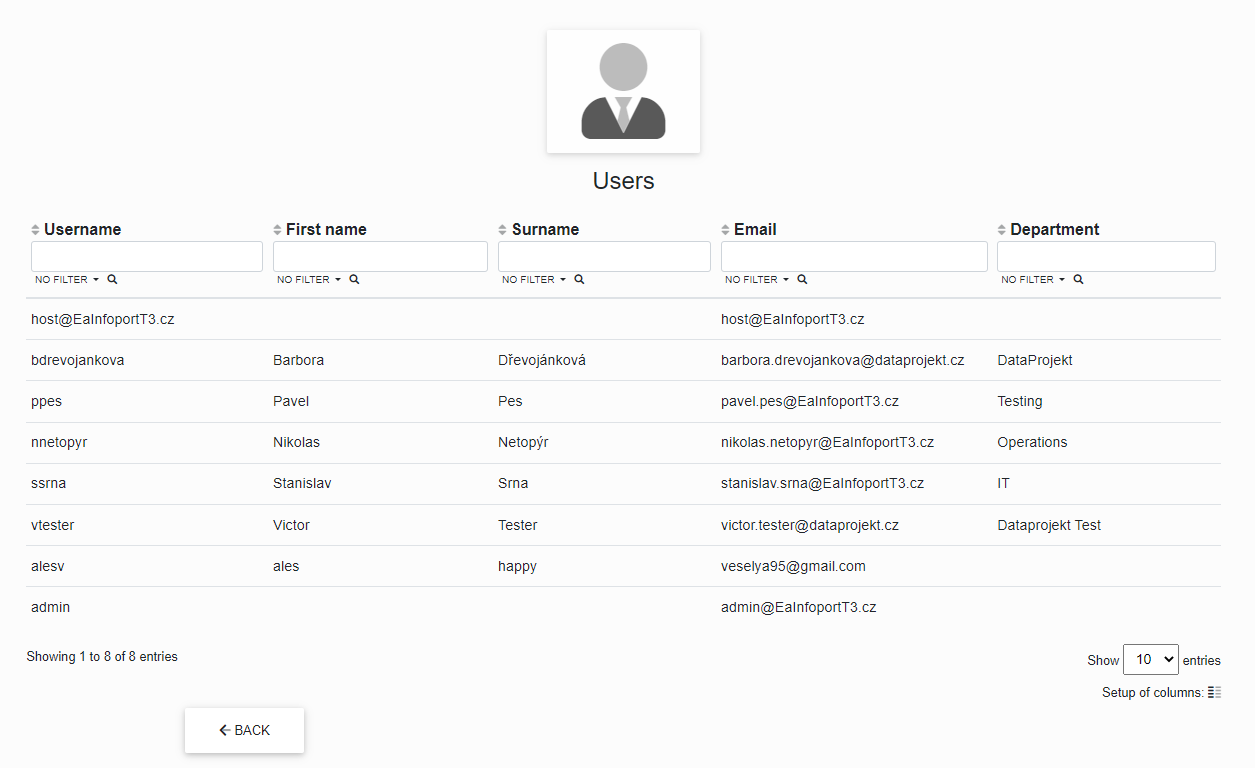
User Management
If we have chosen User Management, we will get to the “List of Users” in the repository.
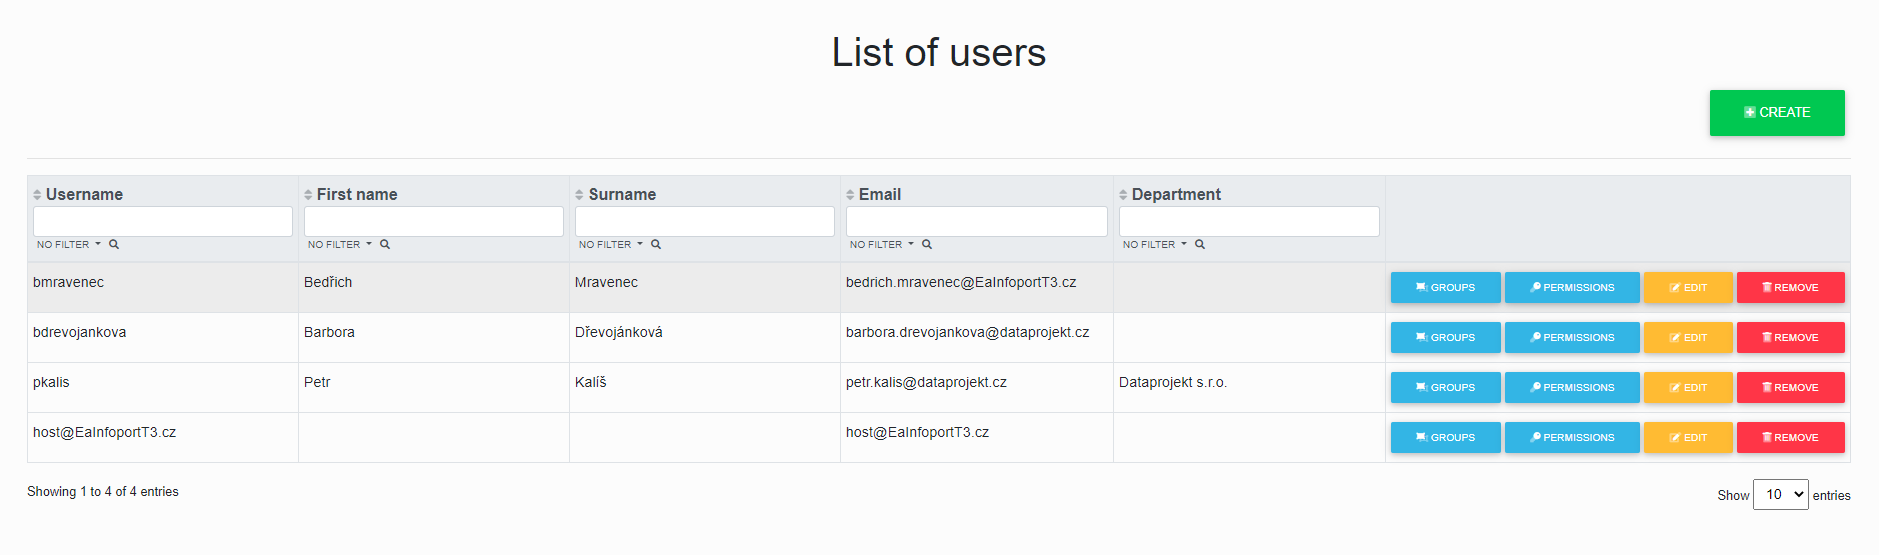
Here we can create new users, assign groups to existing users, assign permissions to existing users, edit existing users or remove existing users from the repository.
Creating a New User
We have chosen the green “Create” button in the List of Users.
The “Login name” and “Email” fields are required to create a user.
(Infoport in the background synchronises a user’s Infoport with the user’s EA according to the login name in Infoport and the login in EA.)
Password is required in order to sign in. Signing in without a password is permitted solely for users of Active Directory.
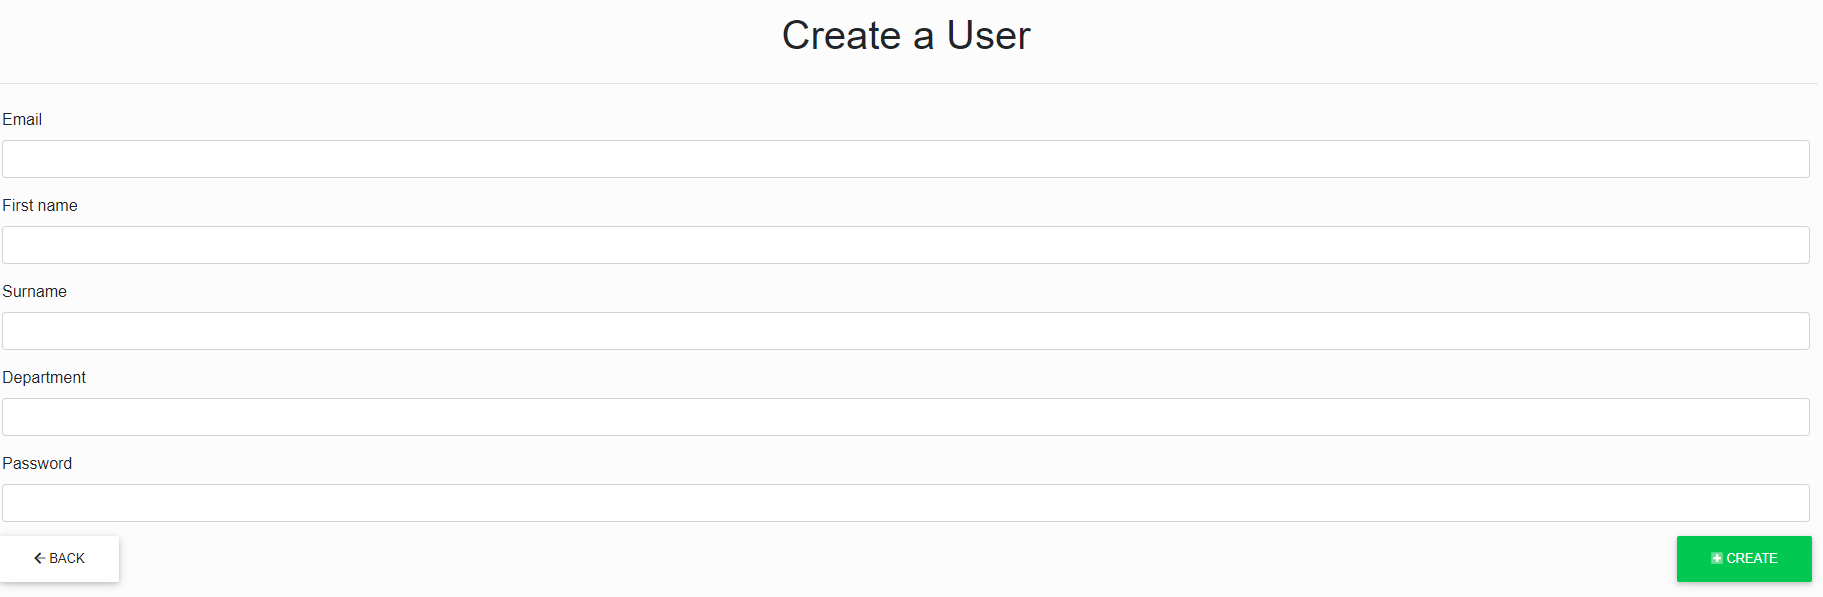
After correctly filling in and clicking on the “Create” button, we will get to the user “Edit”.
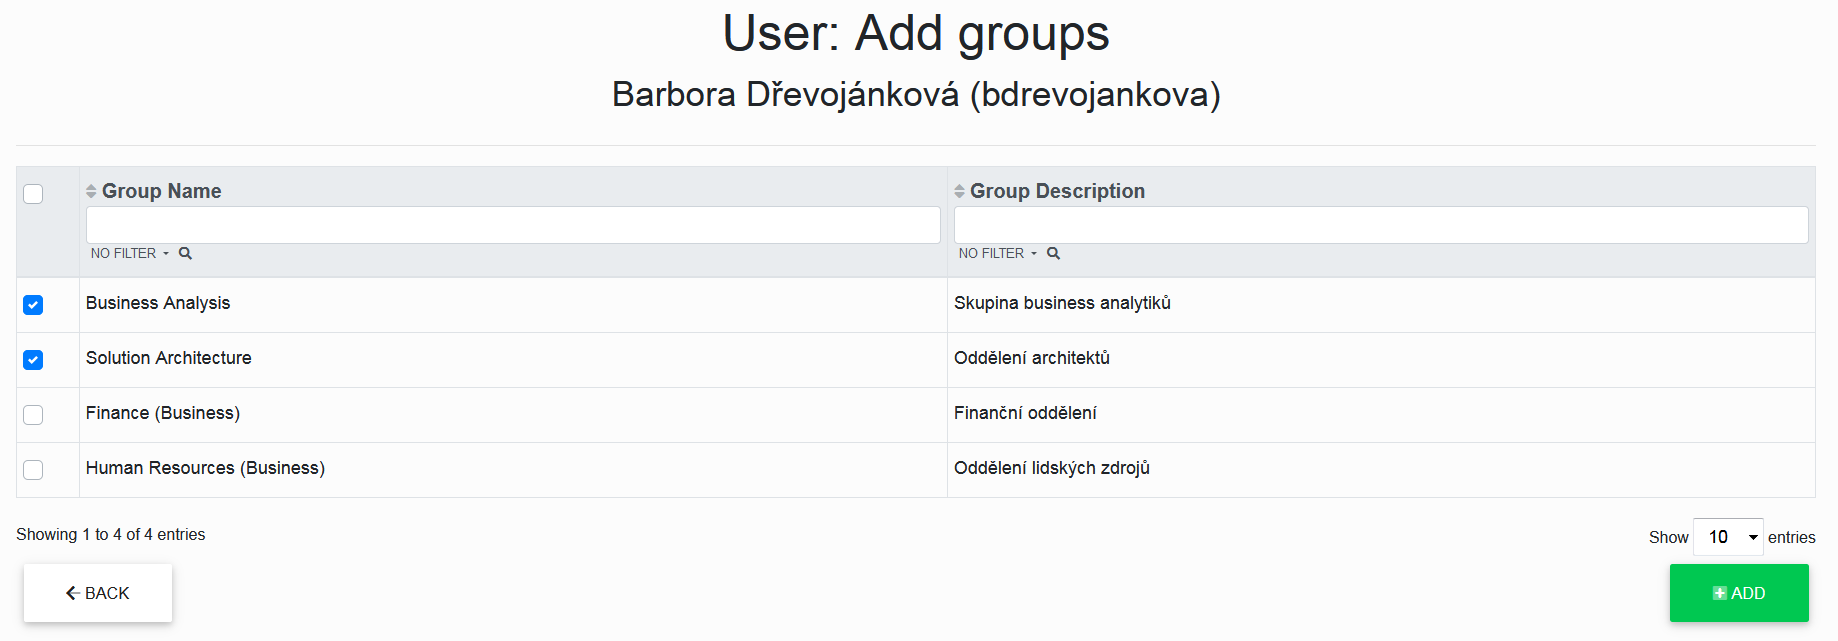
Assigning Groups to a User

We have chosen the blue "Groups" button.
We got to the List of Assigned Groups of a specific user for which the button was selected.
Here we can add users to different groups in the repository or remove users from different groups in the repository using the "Add" or "Remove" buttons and see an overview of which groups the selected user is in.
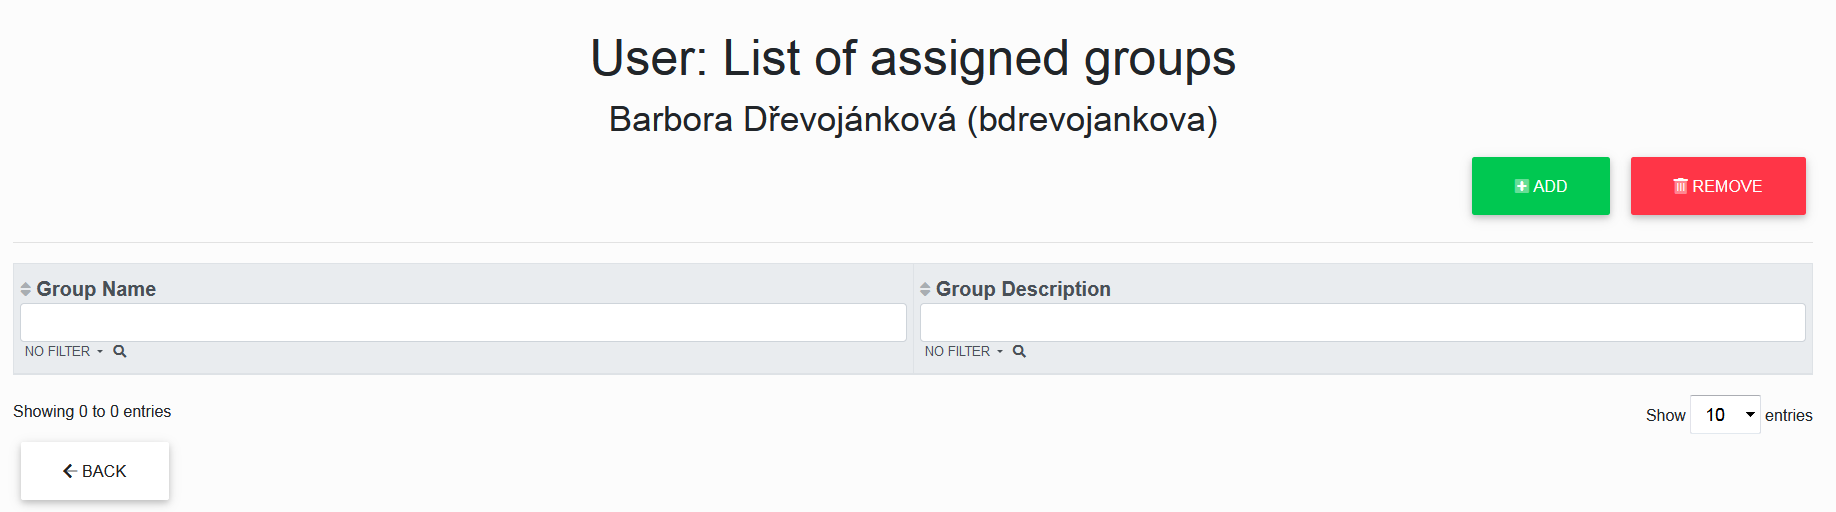
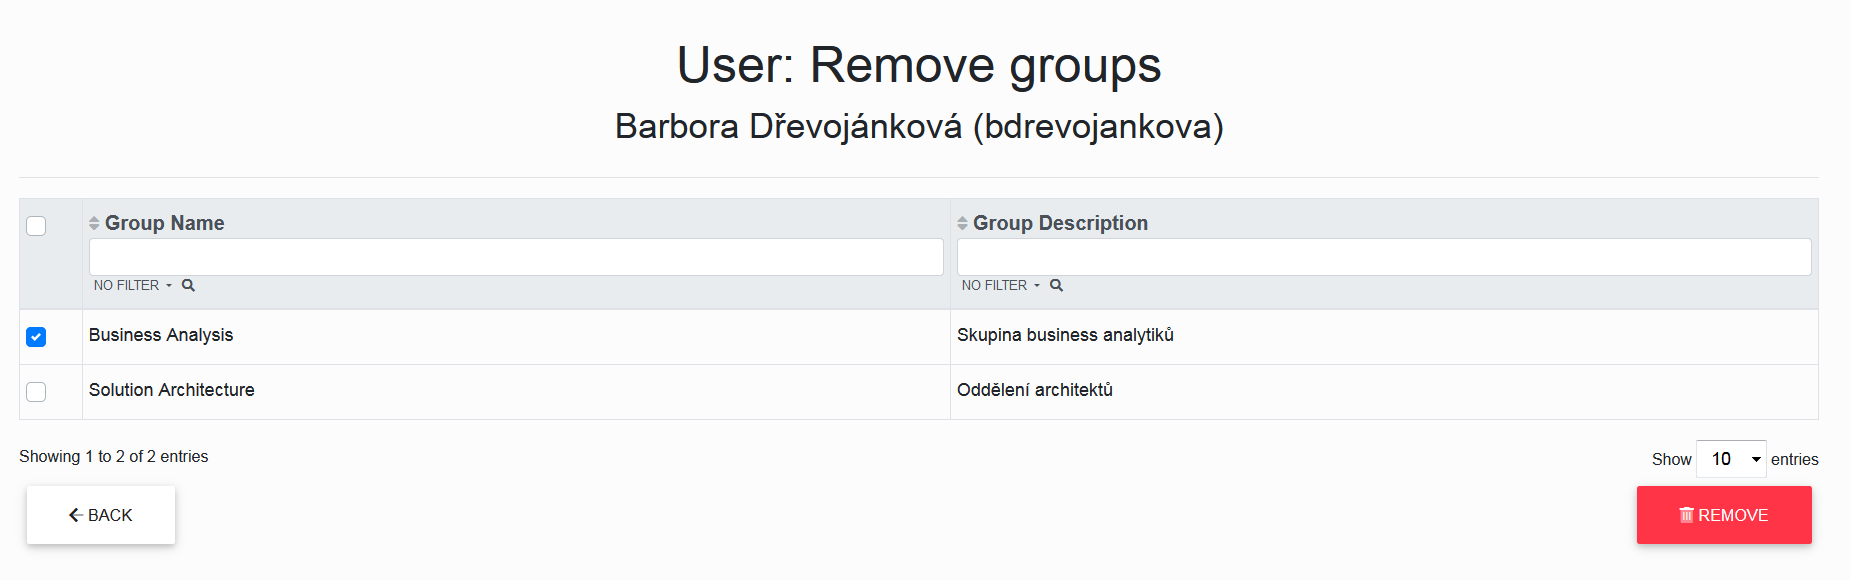
Remove
The “Remove” button opens a list of assigned groups where we can check the checkbox for each group we want to select, and after another click on the “Remove” button, the user will be sent to the checked groups.
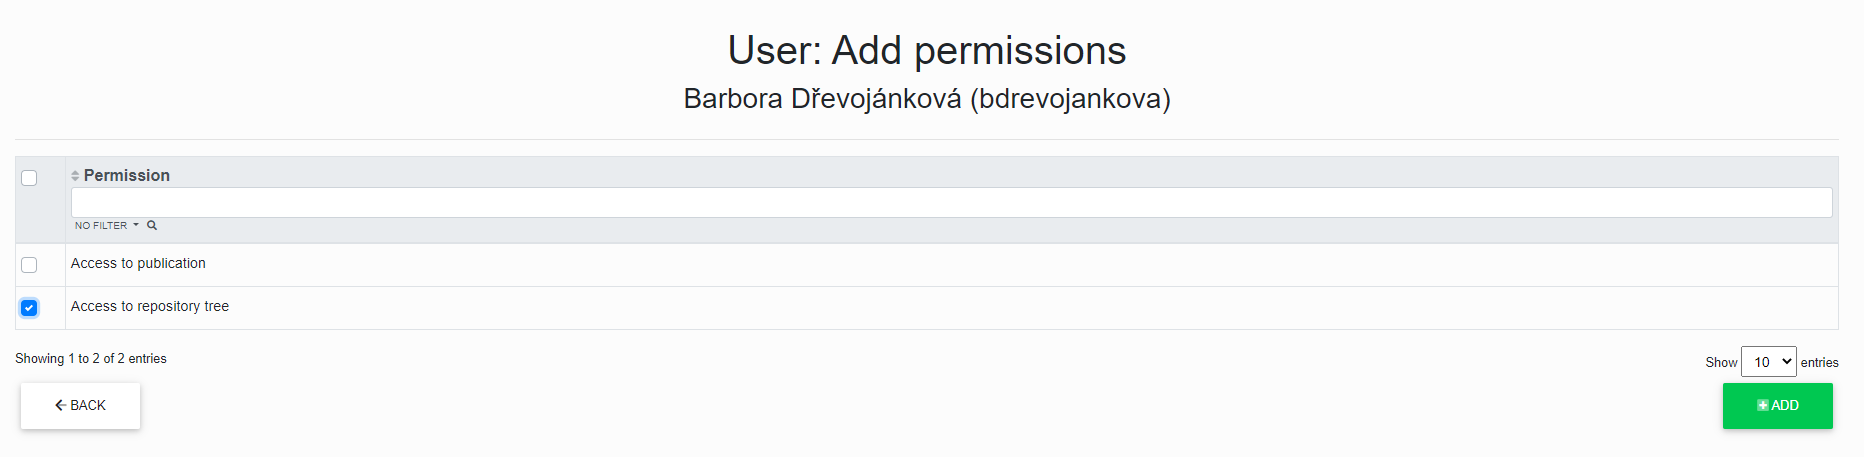
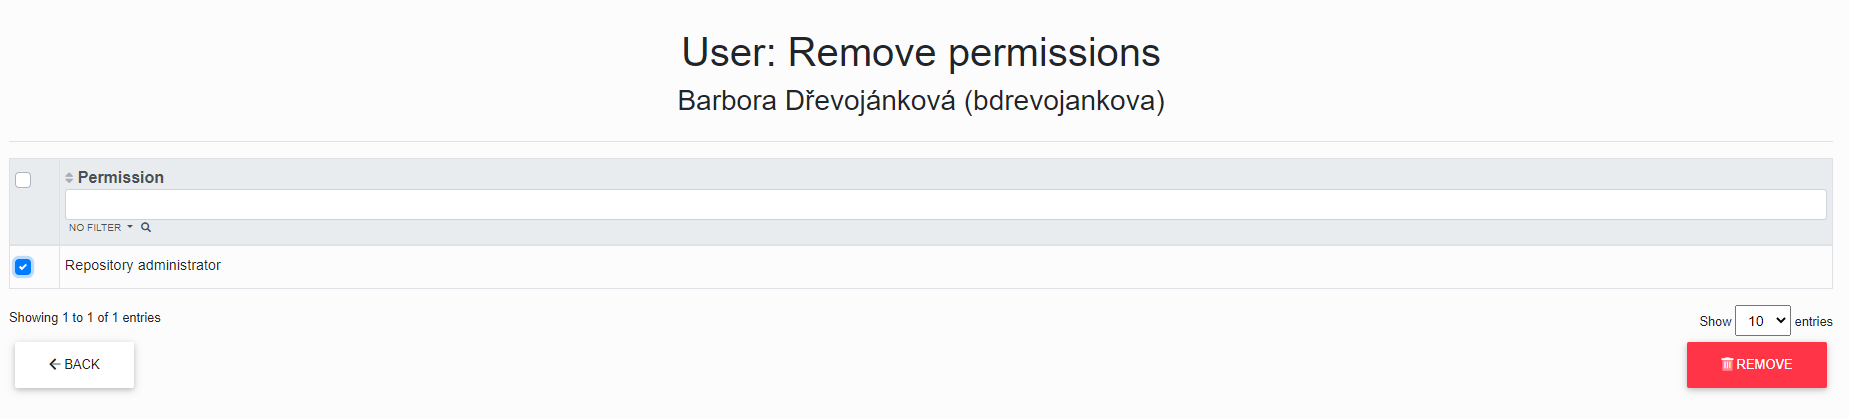
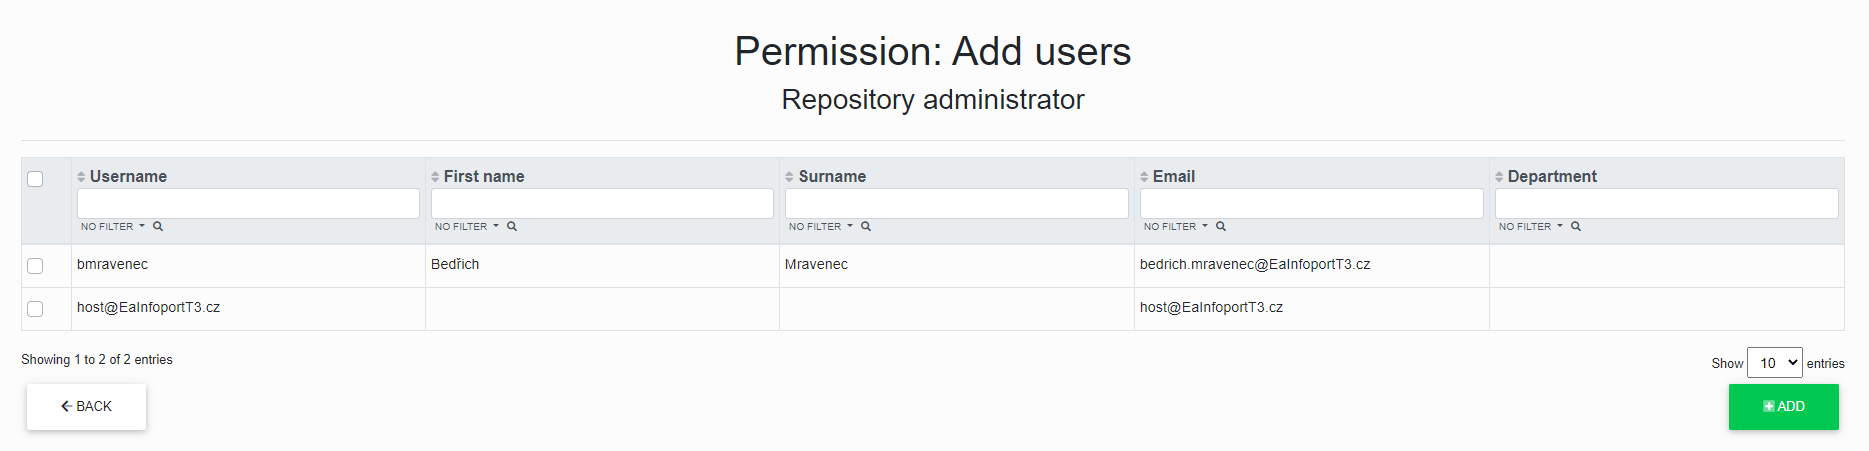
Assigning Permissions to a User

We have chosen the blue “Permissions” button.
Now we have the List of Assigned Permissions of a specific user for which the button was selected.
Here we can assign permissions to different users in the repository or remove permissions for different users in the repository using the “Add” or “Remove” buttons.
We can also see an overview of what permissions users own and whether they own it as their personal permission, or if they inherited it from the group in which they are assigned.
Remove
The “Remove” button has opened a list of assigned permissions where you can check the checkbox for each permission you want to select, and after another click on the “Remove” button, the permission for the selected user will be removed.

Edit a User

We have selected the yellow “Edit” button in the List of Users.
Now we can edit the selected user and also click through on “assign groups” to the user, “assign permissions” to the user and “remove a user” from the repository.
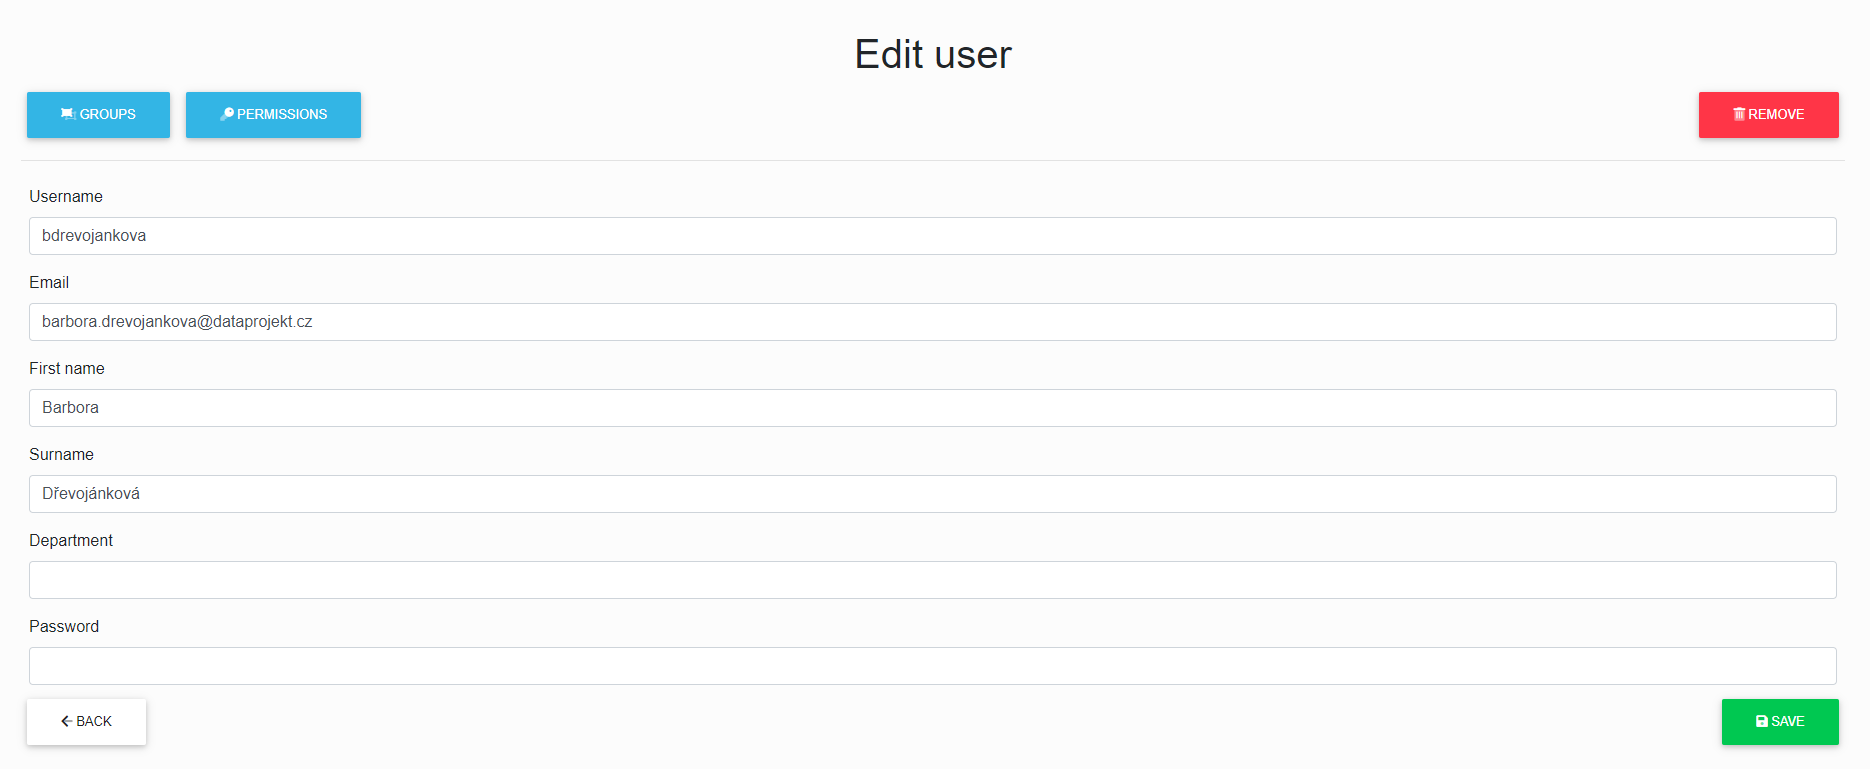
After correctly filling in and clicking on the “Save” button, the user data will be saved.
Remove a User
We have chosen the red “Remove” button, and now we can remove the selected user.
After another click on the “Remove” button, the user will be removed from the repository.

The user will still exist in Infoport. To renew it, just create a user with the same name and e-mail.
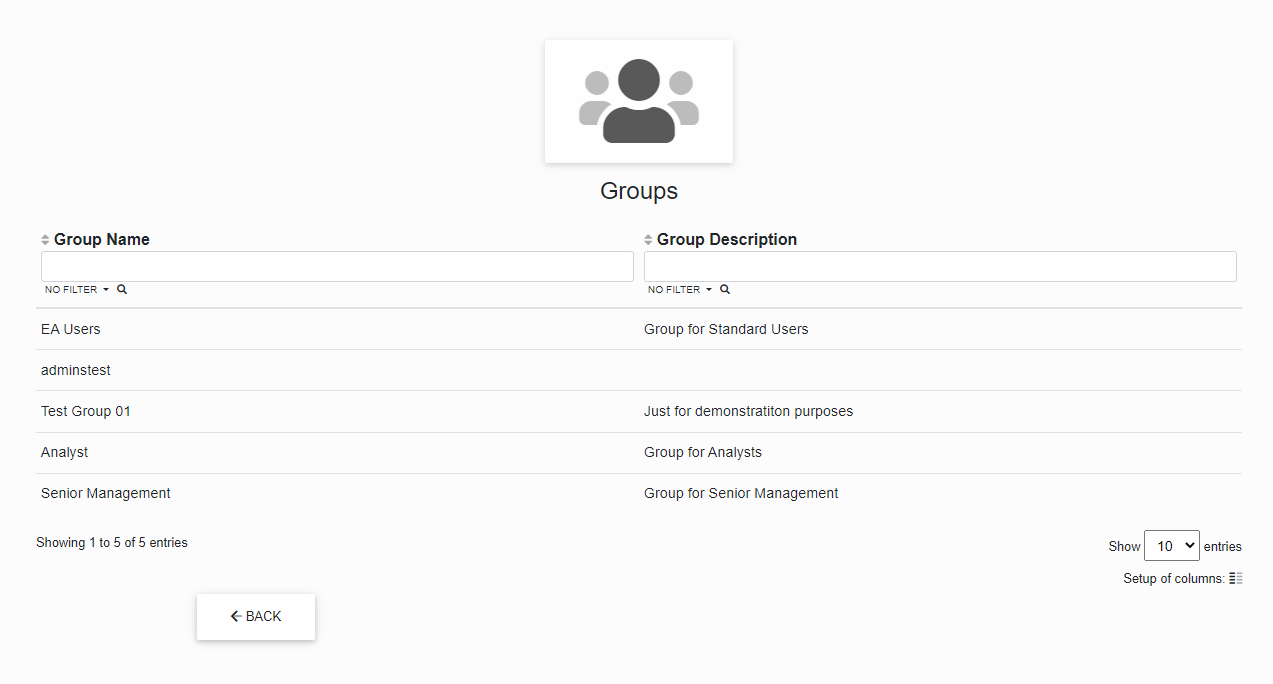
Group Management
If we have chosen the group management, we will get to the “List of Groups” in the repository.
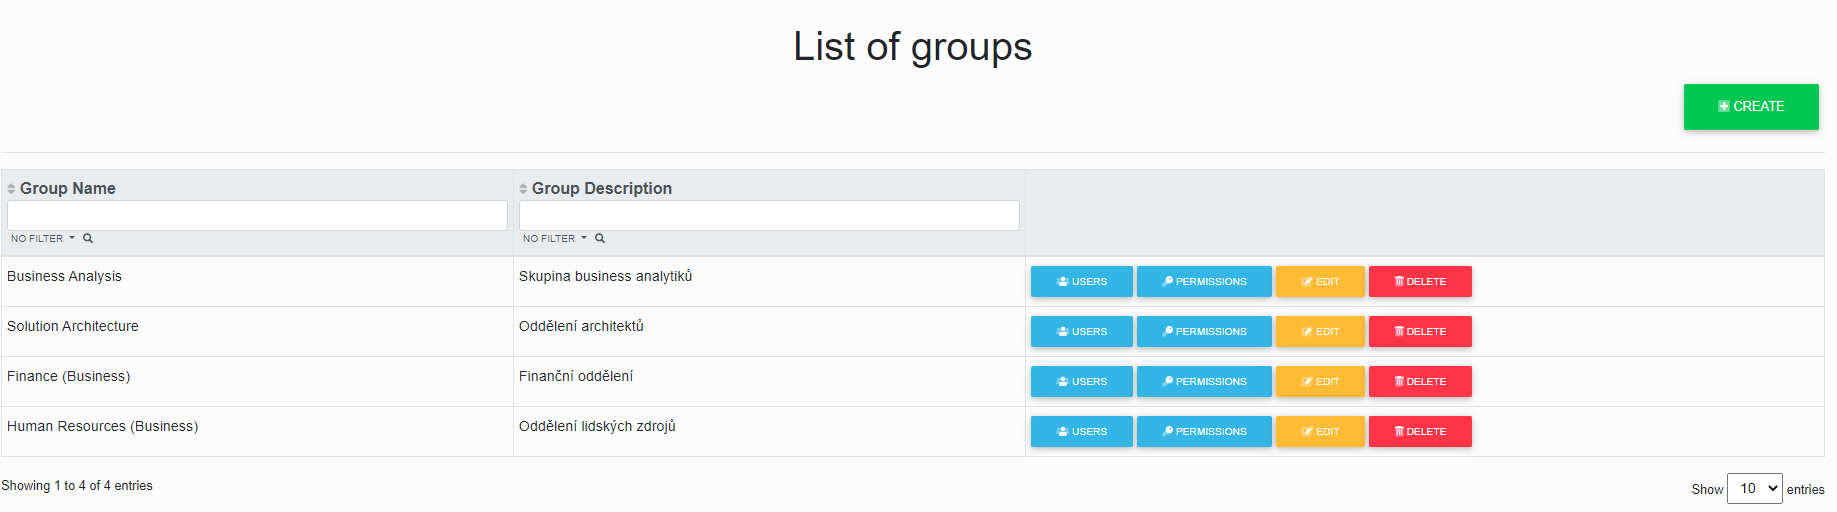
Here we can create new groups, assign users to existing groups, assign permissions to existing groups, edit existing groups or delete groups from the repository.
Creating a New Group
We have chosen the green “Create” button in the list of groups, and now we can create a new group.
The “Group Name” field is required during creation.

After correctly filling in and clicking on the “Create” button, we will get to the group editing.
Assigning Users to a Group

We have chosen the blue “Users” button.
Now we have the List of Assigned Users of a specific group for which the button was selected.
Here we can add users in the repository to the selected group in the repository or remove users in the repository from the selected group using the “Add” or “Remove” buttons and see an overview of users in the selected group.
Add
The “Add” button has opened a list of unassigned users where we can check the checkbox for each user we want to select, and after another click on the “Add” button, the checked users will be assigned to the group.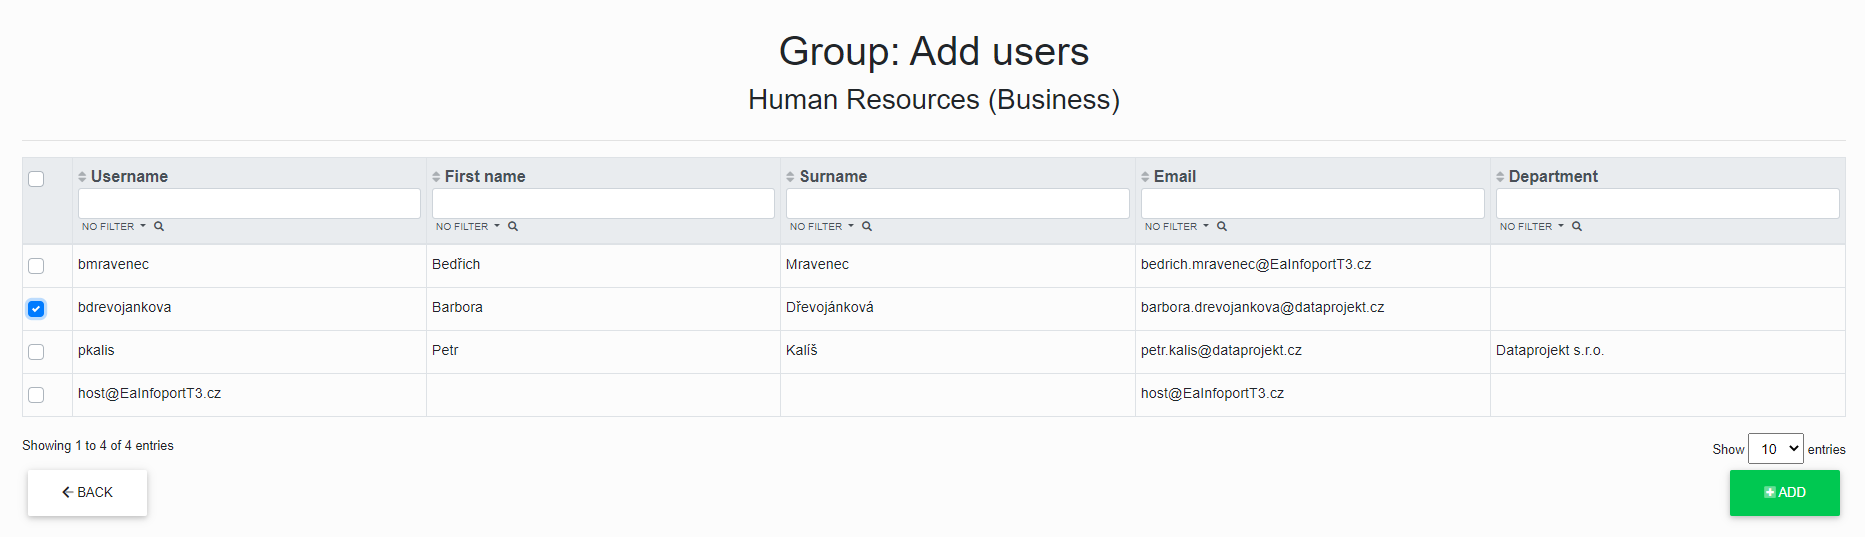
Remove
The “Remove” button has opened a list of assigned users where we can check the checkbox for each user we want to select, and after the next click on the “Remove” button, the checked users will be removed from the group.
Assigning Permissions to a Group
We have chosen the blue “Permissions” button.
Now we have the List of assigned permissions of a certain group for which the button was selected.
Here we can assign permissions to different groups in the repository or remove permissions to different groups in the repository using the “Add” or “Remove” buttons and see an overview of what permissions the group owns.

Remove
The “Remove” button has opened a list of assigned permissions where we can check the checkbox for each permission we want to select, and after another click on the “Remove” button, the permissions of the selected group will be removed.
Edit a Group
We have selected the yellow “Edit” button in the List of Users.
Now we can edit the selected group and also click through on “assign users” to the group, “assign permissions” to the group and “delete a group” from the repository.
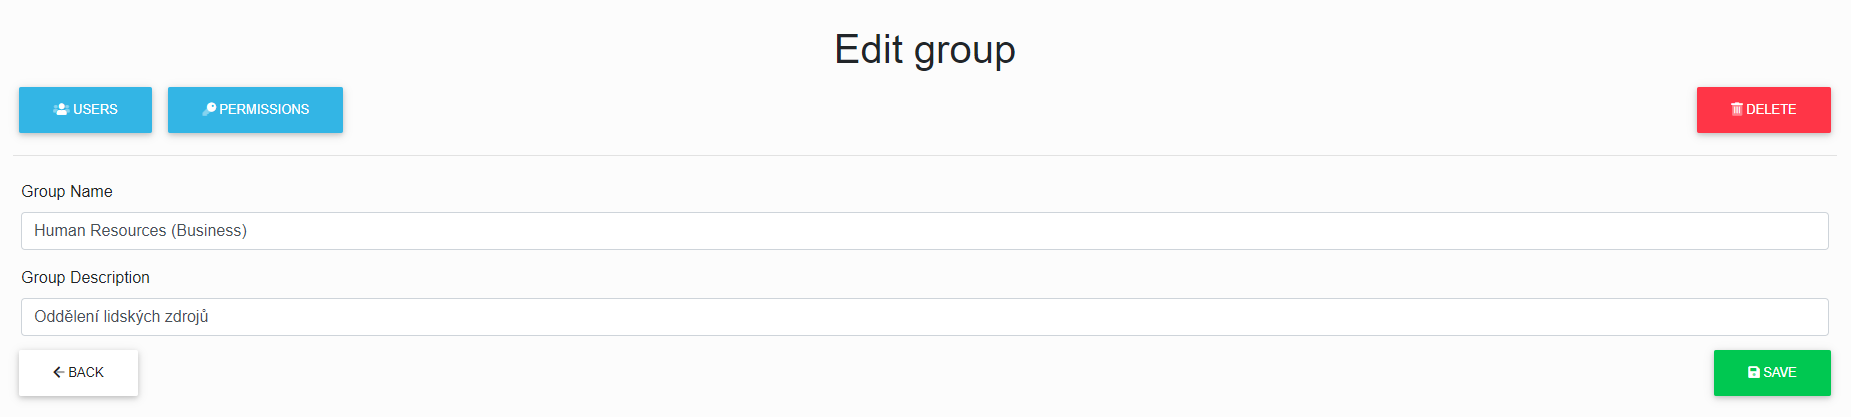
After correctly filling in and clicking on the save button, the group data will be saved.
Delete a Group

We have chosen the red “Delete” button, and now we can delete the selected group.
After another click on the “Delete” button, the group will be deleted from the repository.
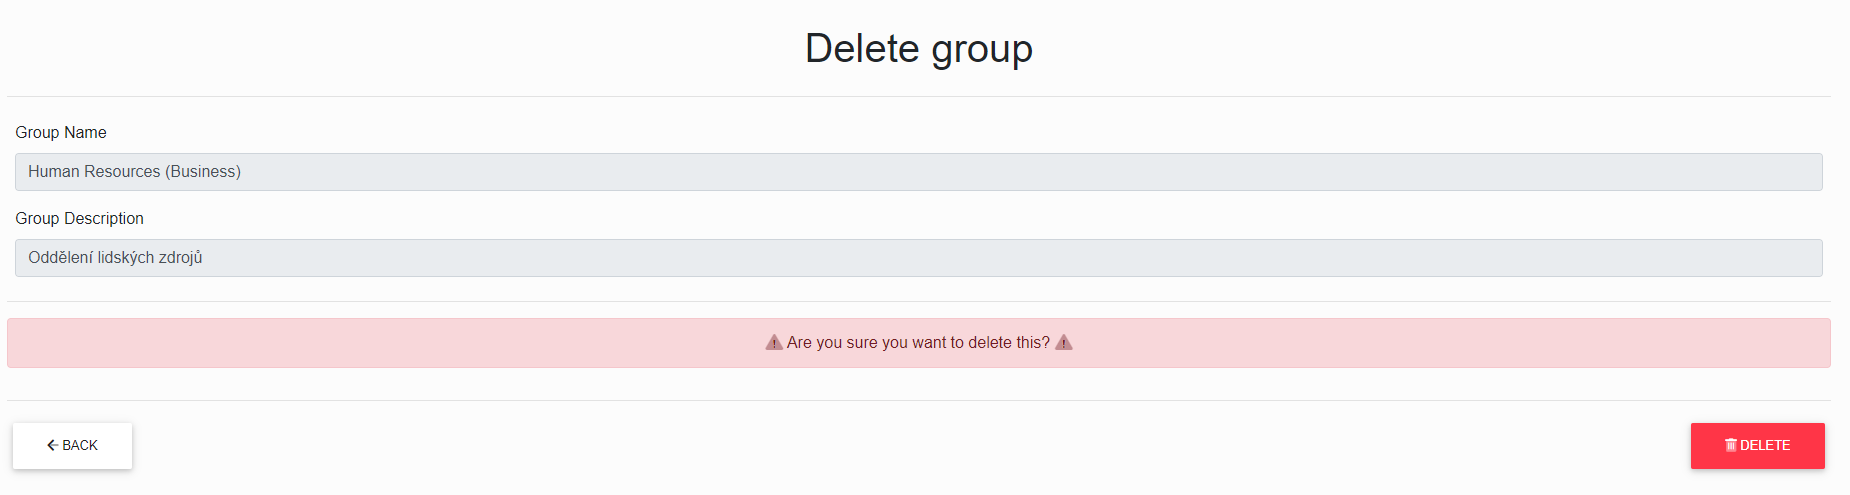
Deleting a group is irreversible. The users in the group remain in the repository, but all permissions they have gained from the group are removed.
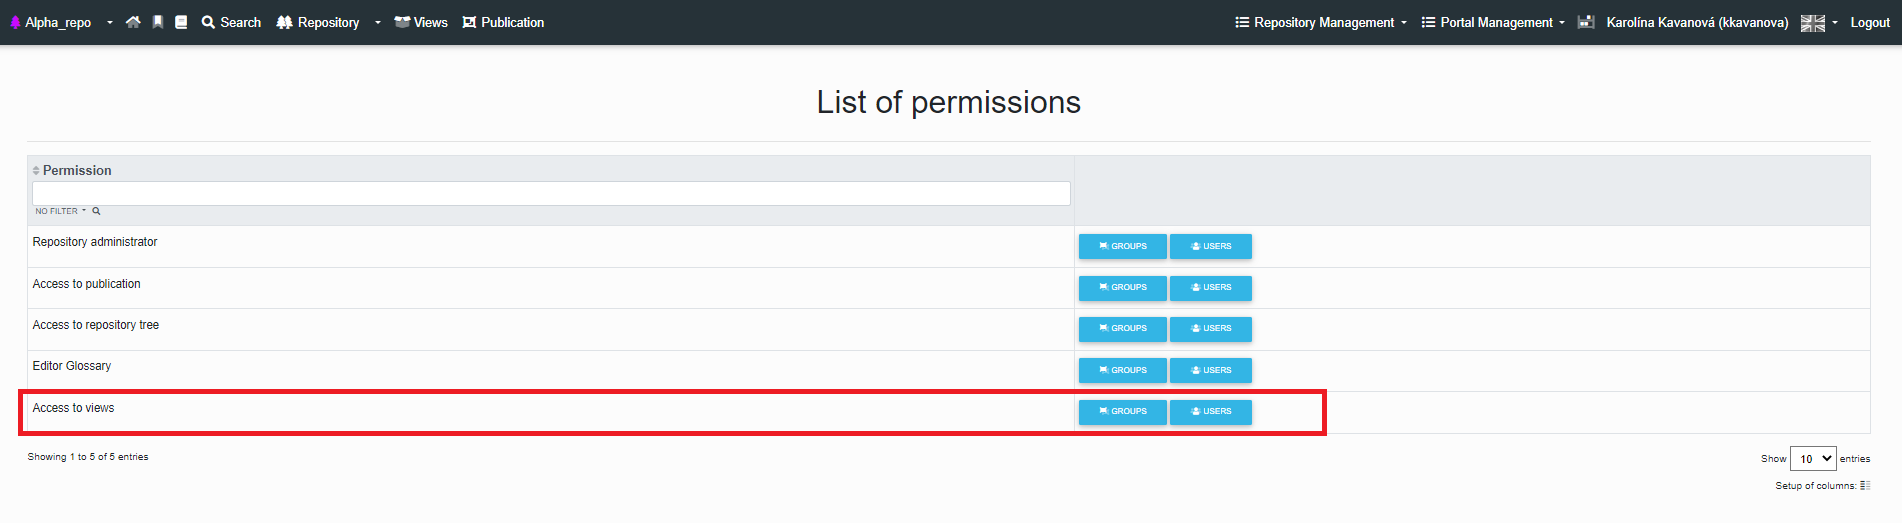
Permission Management
If “Permission Management” is selected, we will get to the List of permissions in the repository.
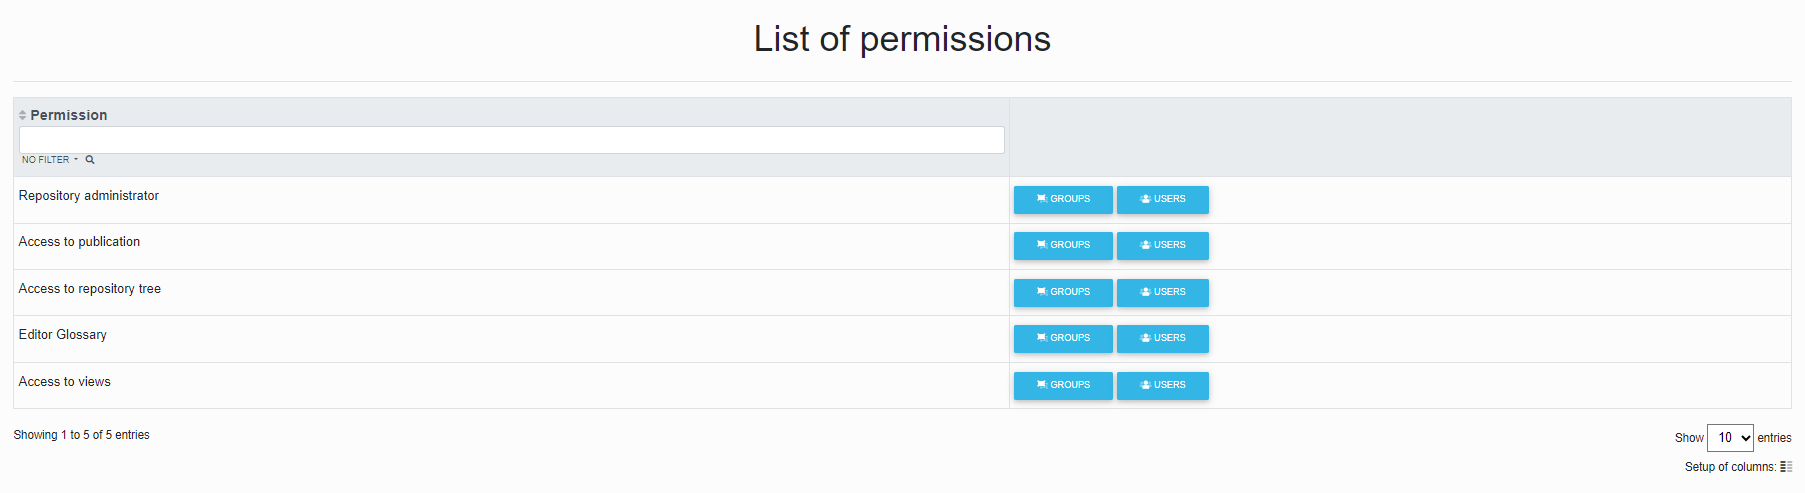
Here we can assign permissions to groups and users in the repository.
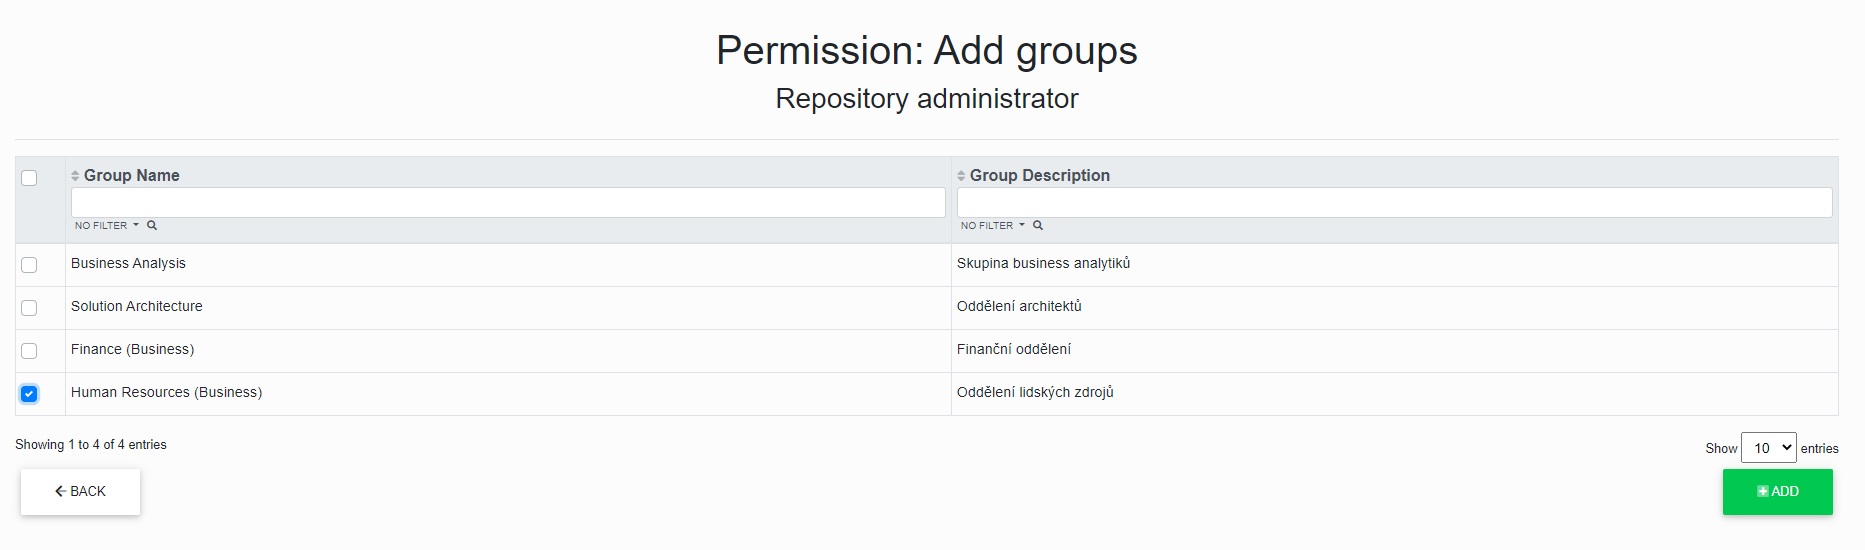
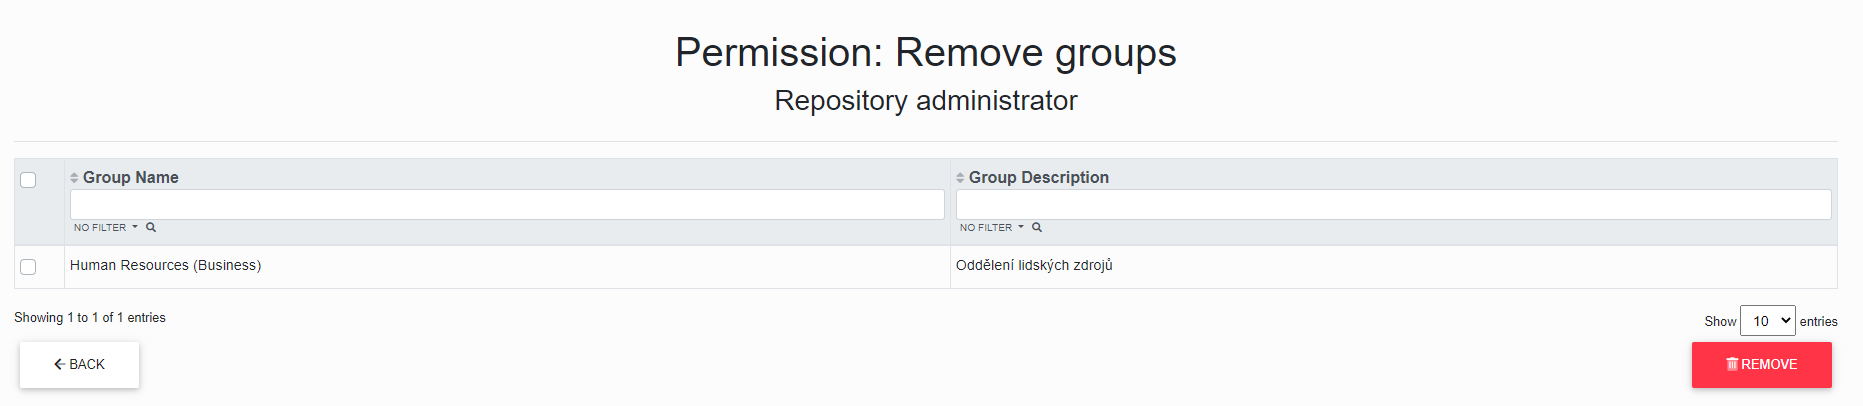
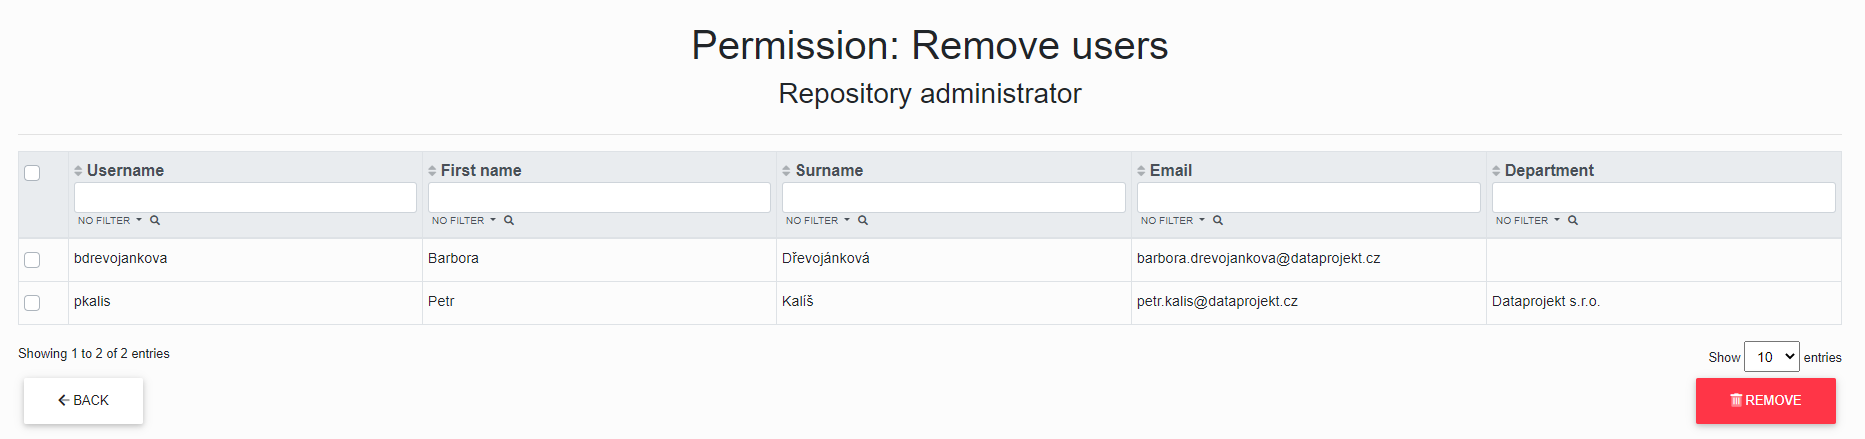
Assigning Permissions to Groups
We have chosen the blue “Groups” button.
Now we have the List of groups to which a certain permission is assigned and for which the button was selected.
Here we can assign permissions to different groups in the repository or remove permissions to different groups in the repository using the “Add” or “Remove” buttons and see an overview of the groups that own the selected permission.
Remove
The “Remove” button has opened a list of assigned groups where we can check the checkbox for each group we want to select, and after another click on the “Remove” button, the user will be removed to the checked groups.
Assigning Permissions to Users
We have chosen the blue “Users” button.
Now we have the List of users to whom a certain permission is assigned and for which the button was selected.
Here we can assigned permissions to different users in the repository or remove permissions for different users in the repository using the “Add” or “Remove” buttons and see an overview of users who own the selected permission.
Add
The “Add” button has opened a list of unassigned users where we can check the checkbox for each user we want to select, and after another click on the “Add” button, permission will be assigned to the selected users.
Remove
The “Remove” button has opened a list of assigned users where we can check the checkbox for each user we want to select, and after another click on the “Remove” button, the permission will be removed from the selected users.
Repository Detail
If we have selected “repository detail”, we can edit the repository.
We can change its name, description and colour.
These changes are mostly important if you use the “Multiple Repositories” function or as an Infoport manager.
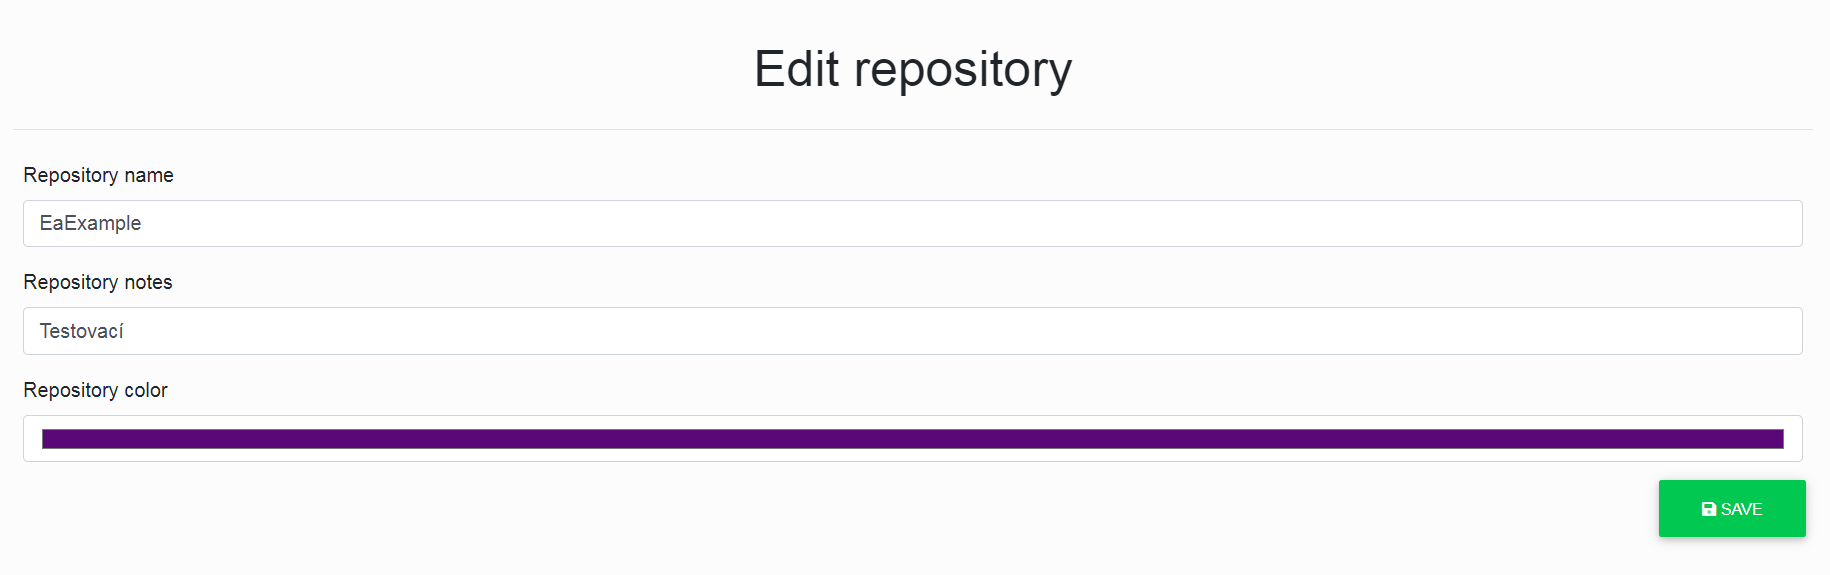
After clicking the "Save" button, the changes will be saved.
Overview of notification subscriptions
The administrator must set up an e-mail server in Configuration Manager to send notification e-mails to users.
If the notification system is set up, the repository administrator can see all the notifications set up in the repository.
The repository administrator can click on the "Tree" icon or the "ChangeNotificationType" button.
After clicking on the "ChangeNotificationType" button, the repository administrator is redirected to the "Setting the notification interval for diagram subscribers" page where he can check the Name, Type, Login and Email to which the notification is sent.
There are three notification services that notify users of changes to the diagram.
By hovering the cursor over the icons, the user can read what type of notification it is.
You can easily change the notification type either on this page, where you just click the blue icon, or go to the diagram on the repository.
The green colour of the icon informs which notification type is on.
If the user wants to cancel the notification, just click the red icon.
When the user clicks on the "Tree" icon, he is redirected to the repository of the diagram.
Archive repository
Archive repository (without background jobs for regeneration and chache)
In the repository editor, it is possible to set the "Archive repository (without background jobs for regeneration and chache)" mark. The functionality will ensure that the system does not unnecessarily run background jobs and chache regeneration.
You can edit a repository > Portal Management > Repositories Management > Edit a specific repository.
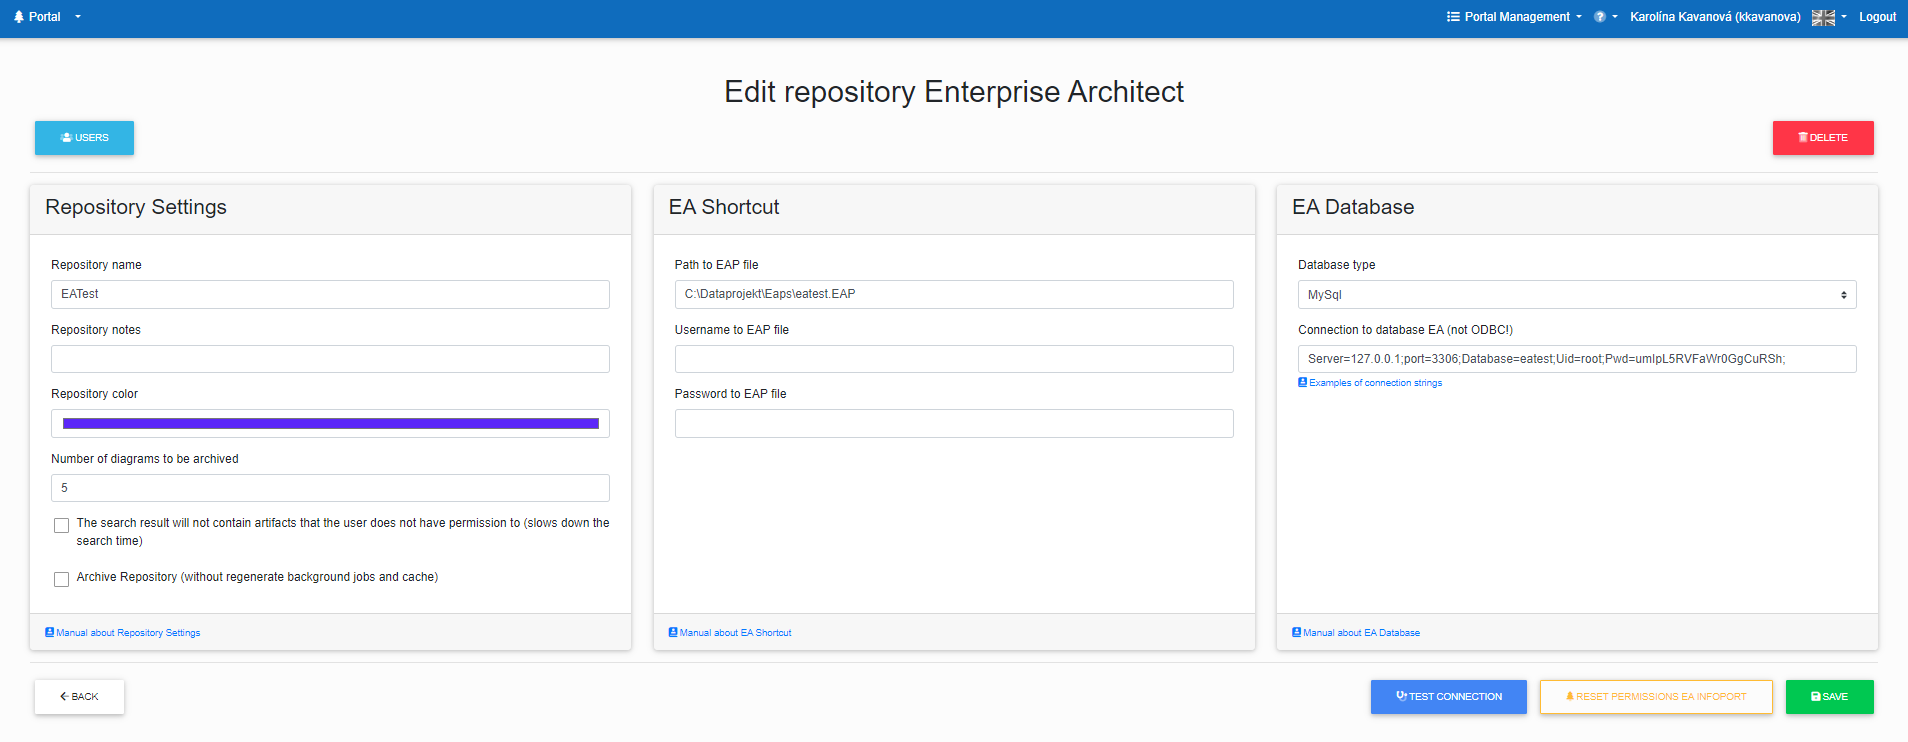
Repository password encryption
EA Infoport now offers the ability to encrypt passwords in the repository.
Settings:
1) Configuration Manager >Encryption Key > generate Encryption Key > save setup > restart EA Infoport
Attention!!! Deleting the key will result in data loss.

2) Portal Management >Management Repositories > select edit a specific repository > check the checkbox > Encrypt EAP and Connection String credentials.
3) After saving the settings, a restart of EA Infoport is required.
Portal Management
Portal administration can only be viewed by a logged-in user with Portal Administrator privileges.
Portal Management
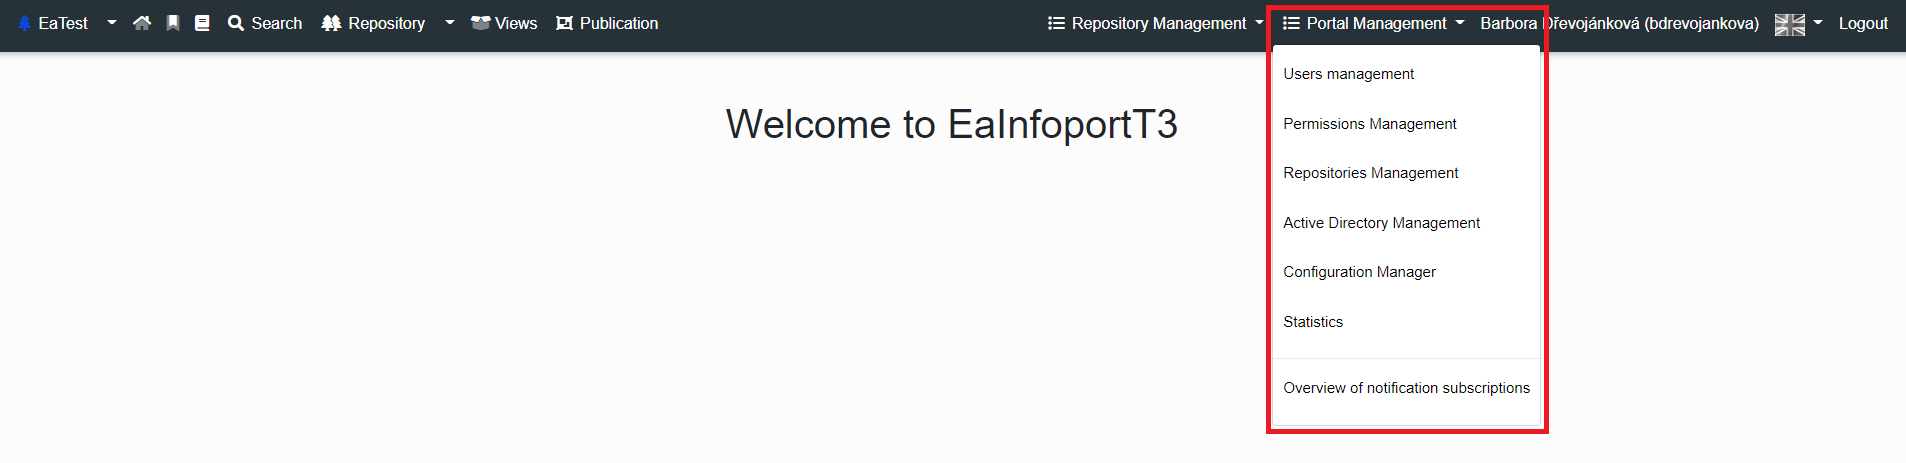
On the right side of the Infoport header we can see a Dropdown menu called Portal Administration (Only logged in user with Portal Administrator permission).
User Management
A user with portal administrator rights can view the list of users of the entire portal, where he can change the user's password, set basic permissions to the portal (to the repository, the publishing module or set him as an administrator).
Infoport has its own user repository that is independent of the Enterprise Architect repository. In practice, this means that portal users (unlike in previous versions) do not need to have an account in the EA repository at the same time. However, the account can be linked in the portal and in EA for proper display of edit locks and so on. The user list is filterable, searchable and optimized for a large number (thousands) of users.
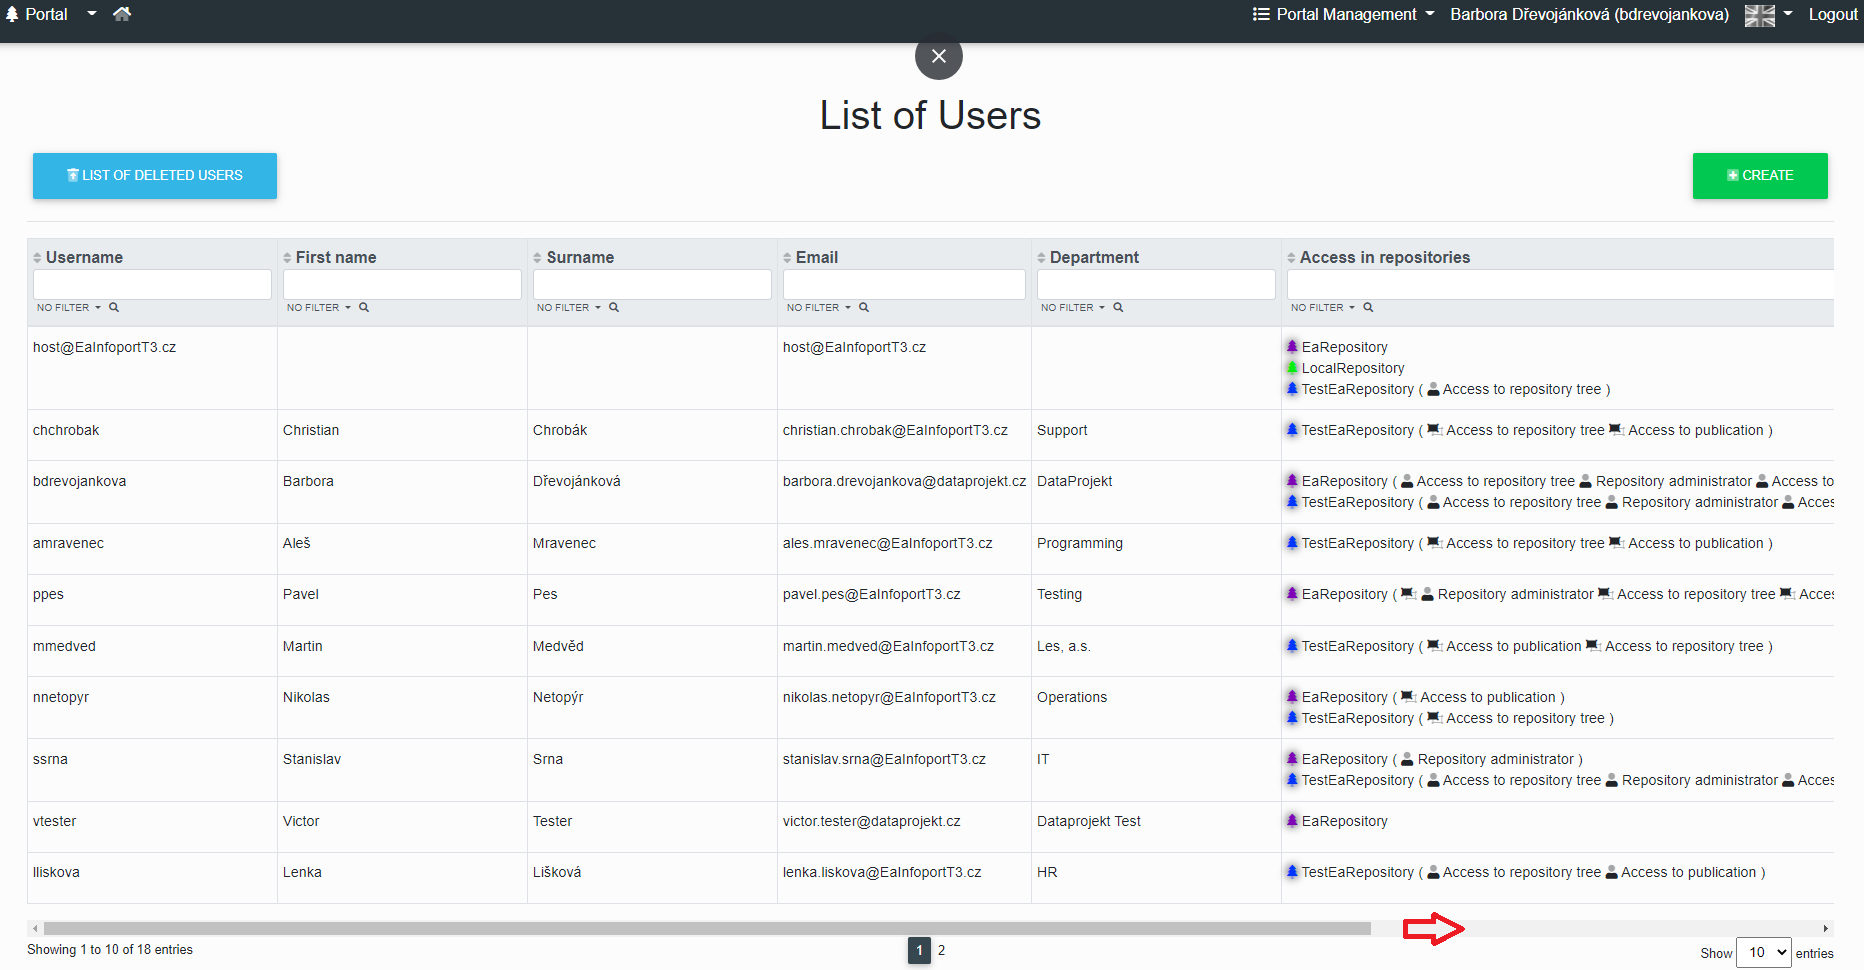
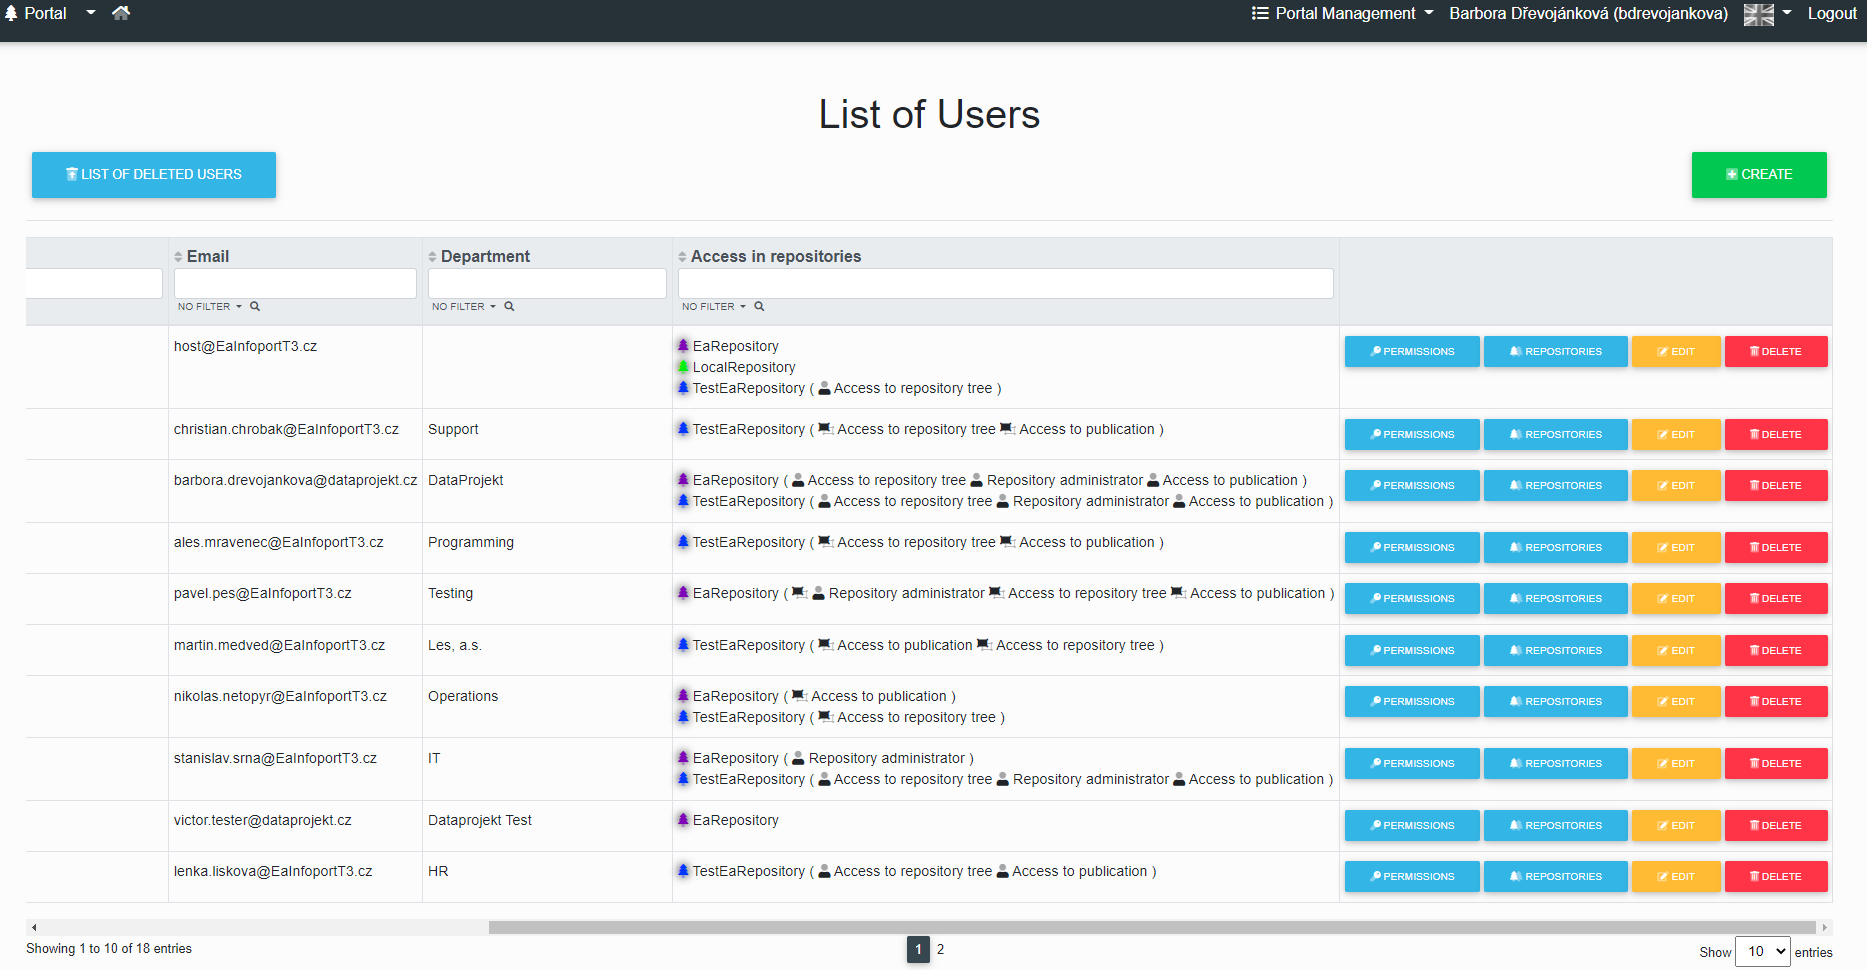
Users are recorded at the level of the entire portal, not at the level of individual repositories. This is so that if a user has access to multiple repositories, they can quickly switch between them.
Users are then assigned access to individual repositories. It also ensures that the administrators of each repository do not see a list of all users - so that, for example, the repository administrator of one vendor does not see the users of another vendor.
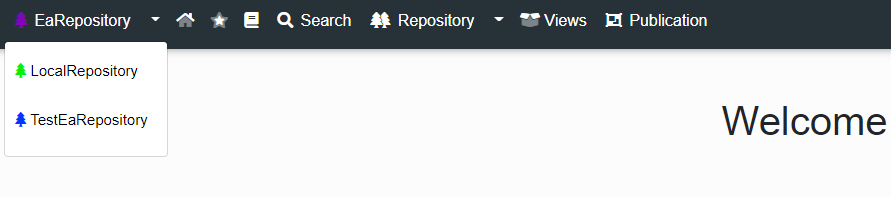
- Creating a new user in the portal
- Edit a user in the portal
- Remove a user in the portal
- Permissions to a user in the portal
- List of repositories and repository permissions
- List of deleted users
Creating a new user in the portal
To create a new user, the portal administrator clicks the "Create" button in the User List.

The following dialog is displayed to the portal administrator.
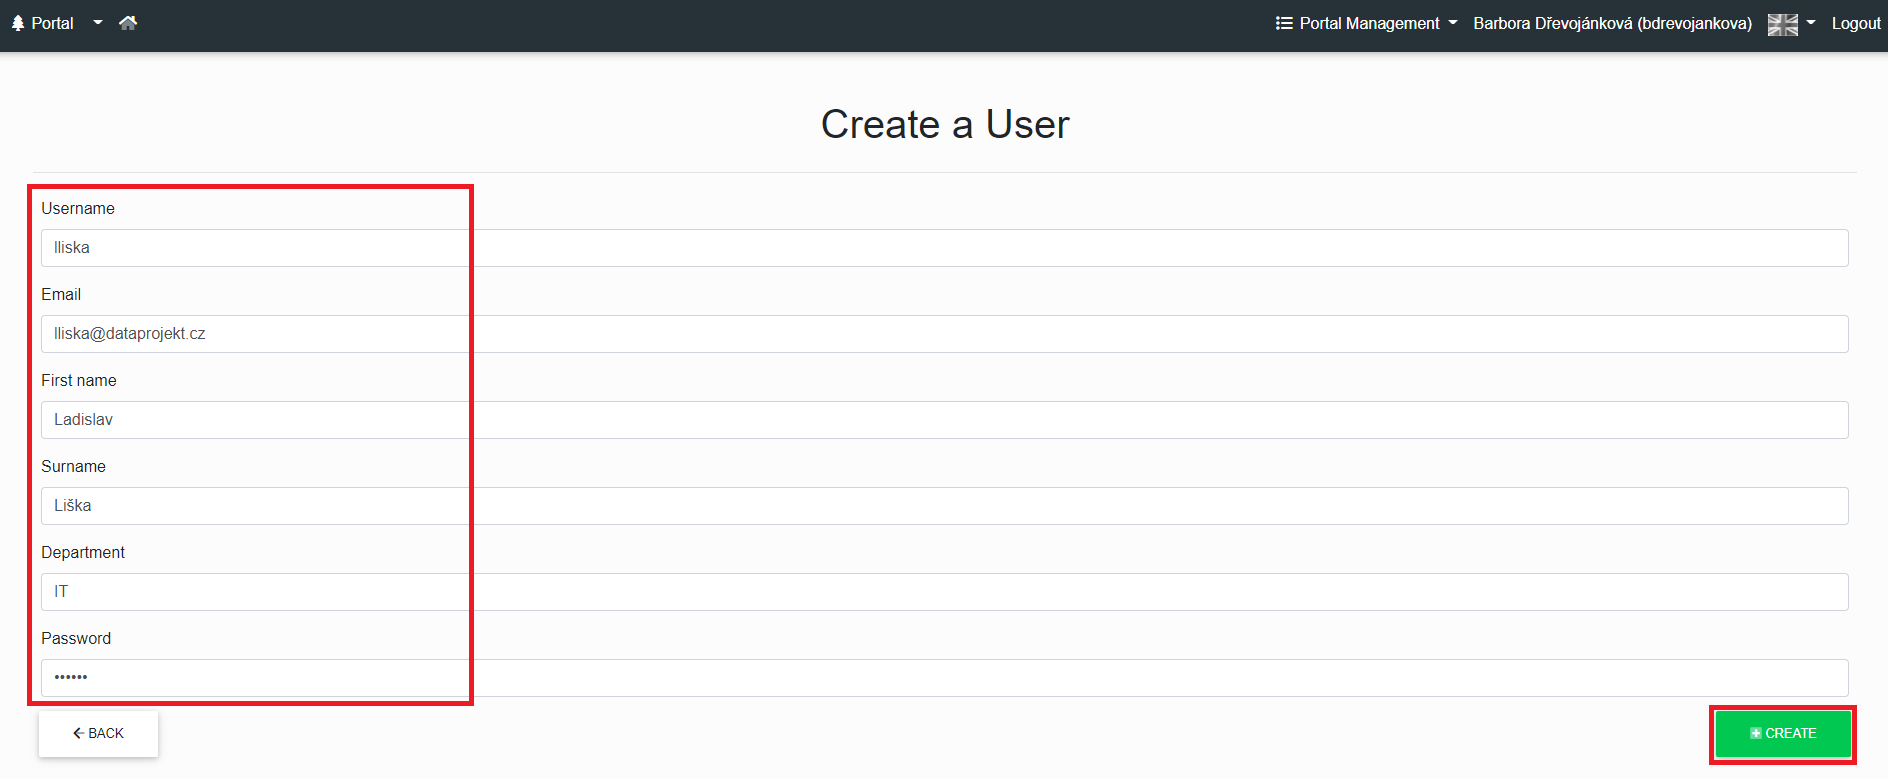
After filling in the details, the portal administrator clicks on the "Create" button , then the administrator will see the message "Successfully created".
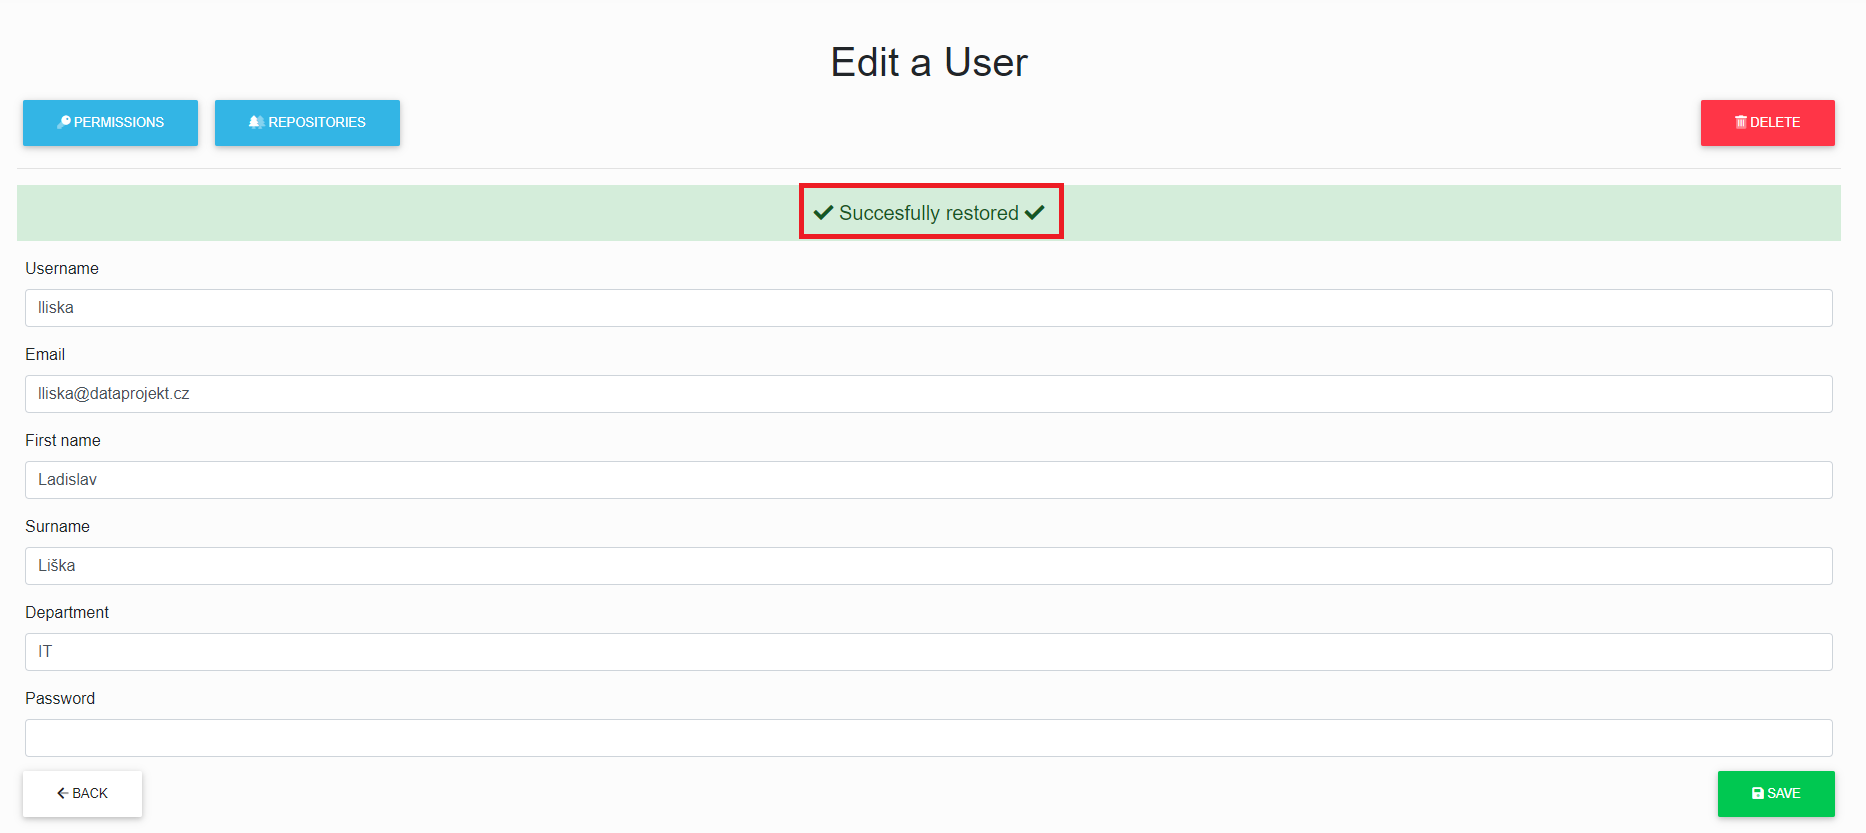
After clicking on the "Back" button, the administrator is redirected to the table with users, where he can use the filter to find the currently created user.
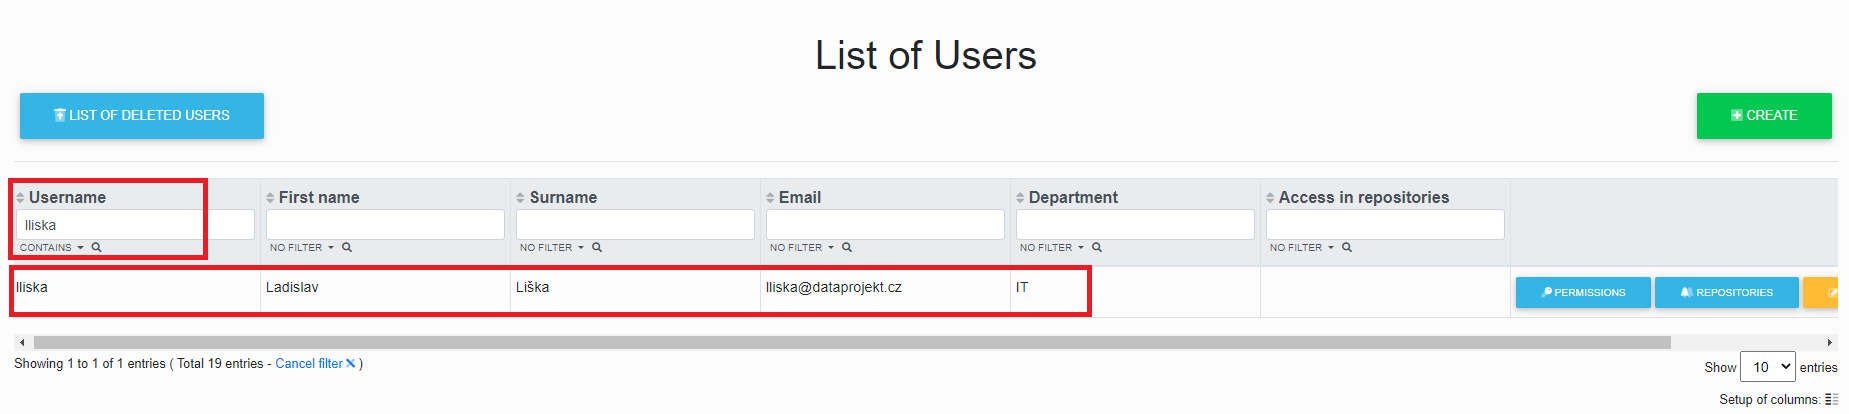
Edit users in the portal
To edit a user in the portal, the administrator clicks the "Edit" button.
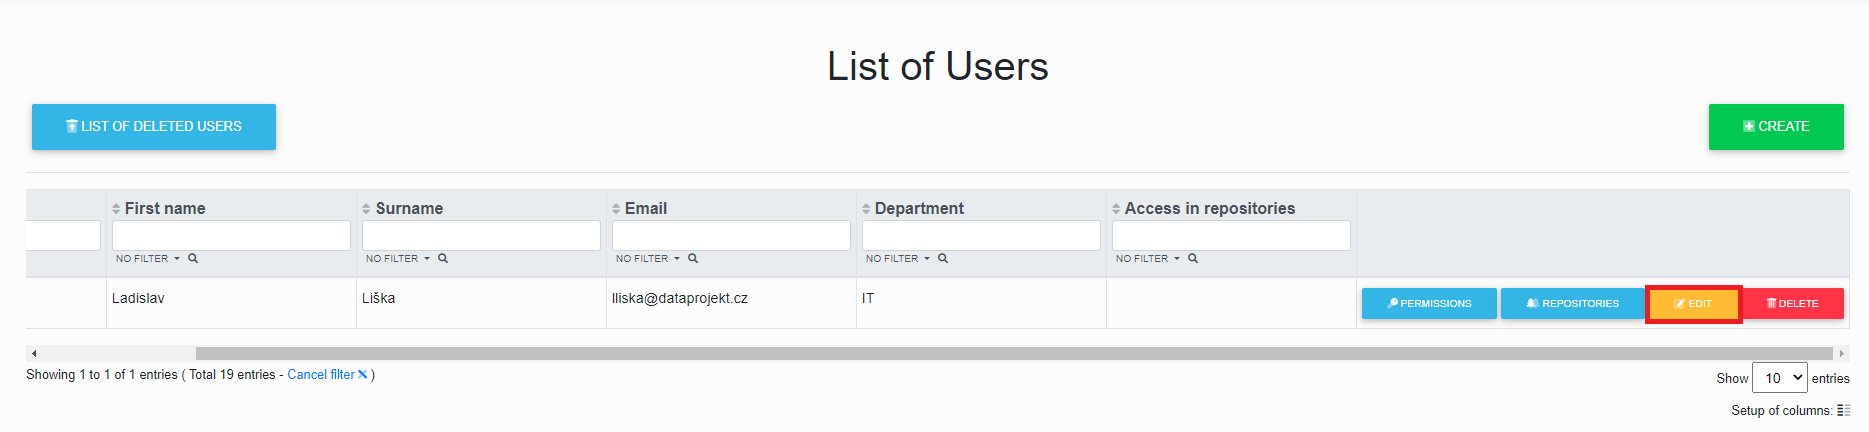
The administrator will see the following dialog, where he can edit the "login, email, first name, last name, department and password" of the user, he can delete the user and he can also assign and change permissions and repositories to the user.
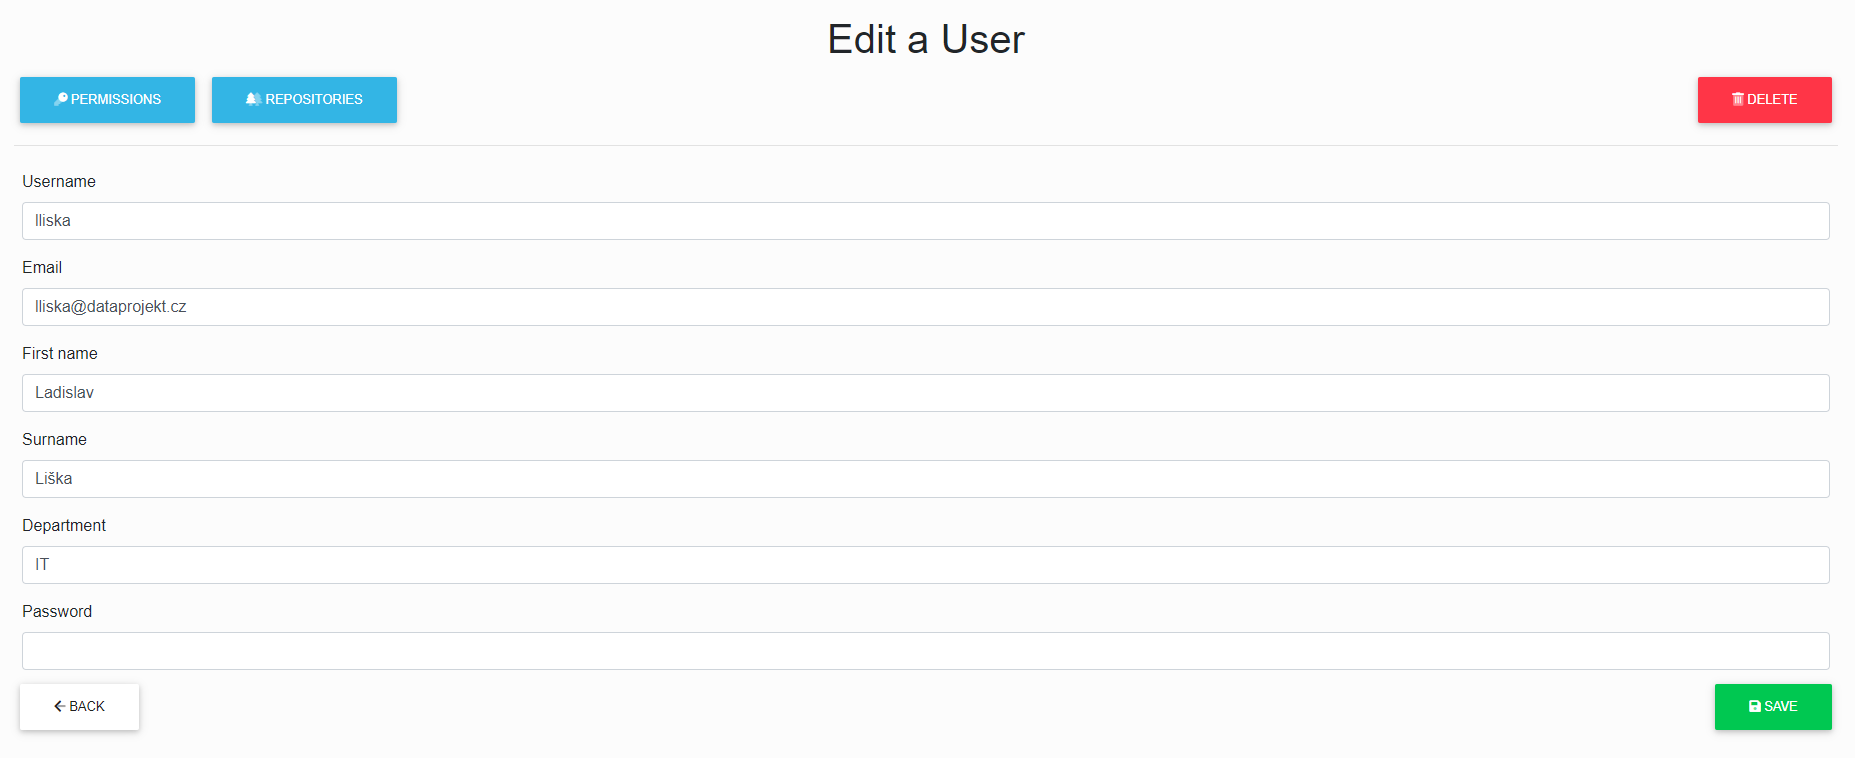
Removing a user from the portal
To remove/delete a user, the portal administrator clicks on the "Delete" button in the User List.

After deletion, the administrator will see the message "Successfully deleted".
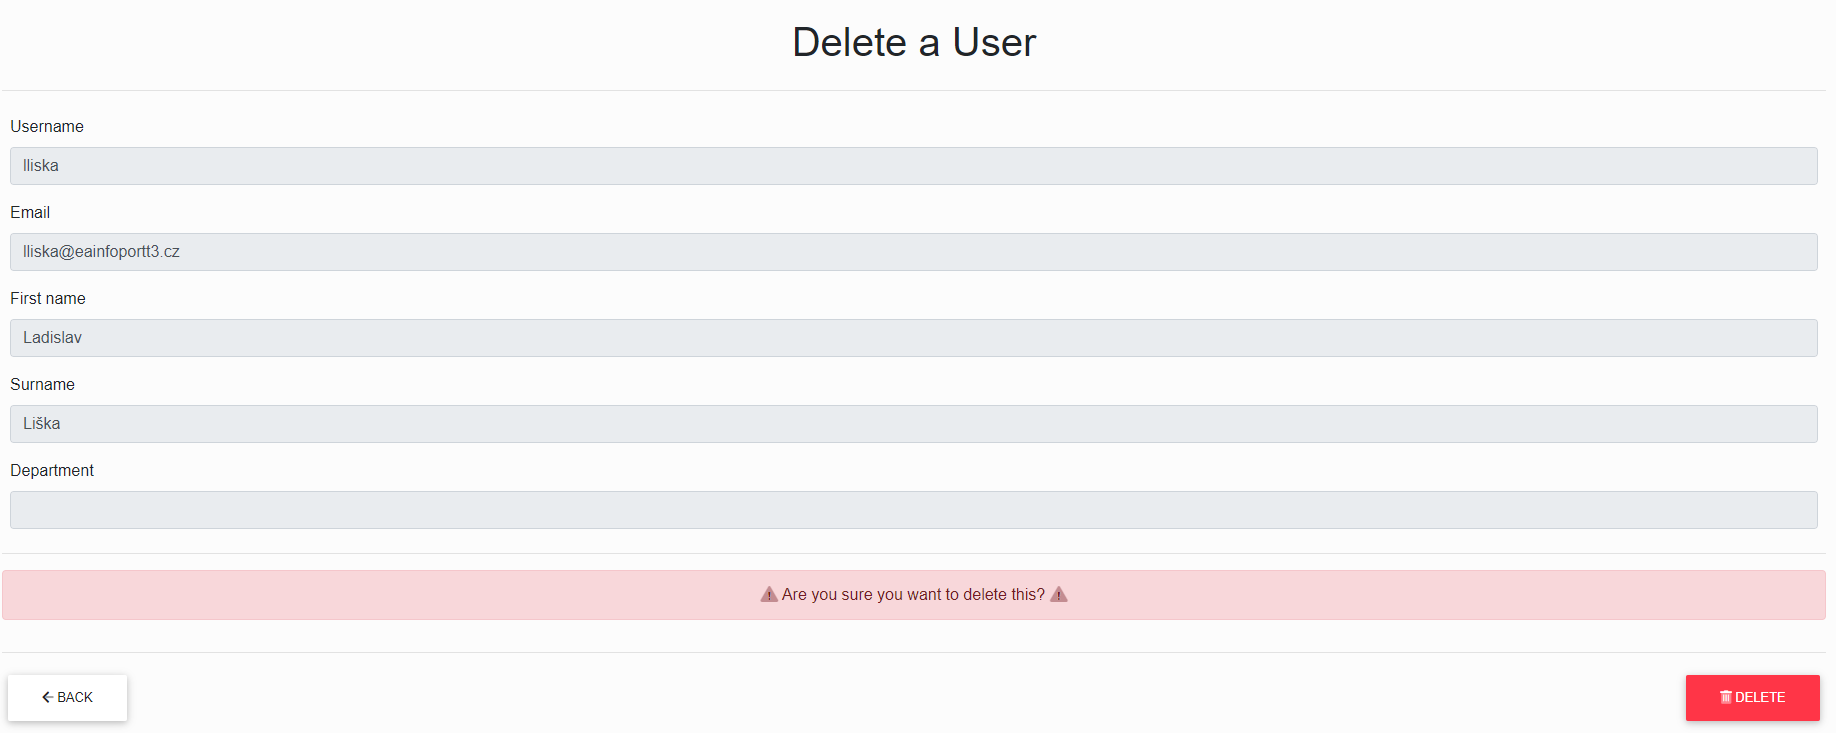
The user will still exist in Infoport and to restore the user, just create a user with the same name and email or go to the list of deleted users.

Permissions to a user in the portal
The portal administrator can assign the user "Portal Administrator"; to assign this permission, the administrator clicks the "Permissions" button.

The portal administrator will see the following dialog with "Add" buttons to add permissions and "Remove" buttons to remove permissions.
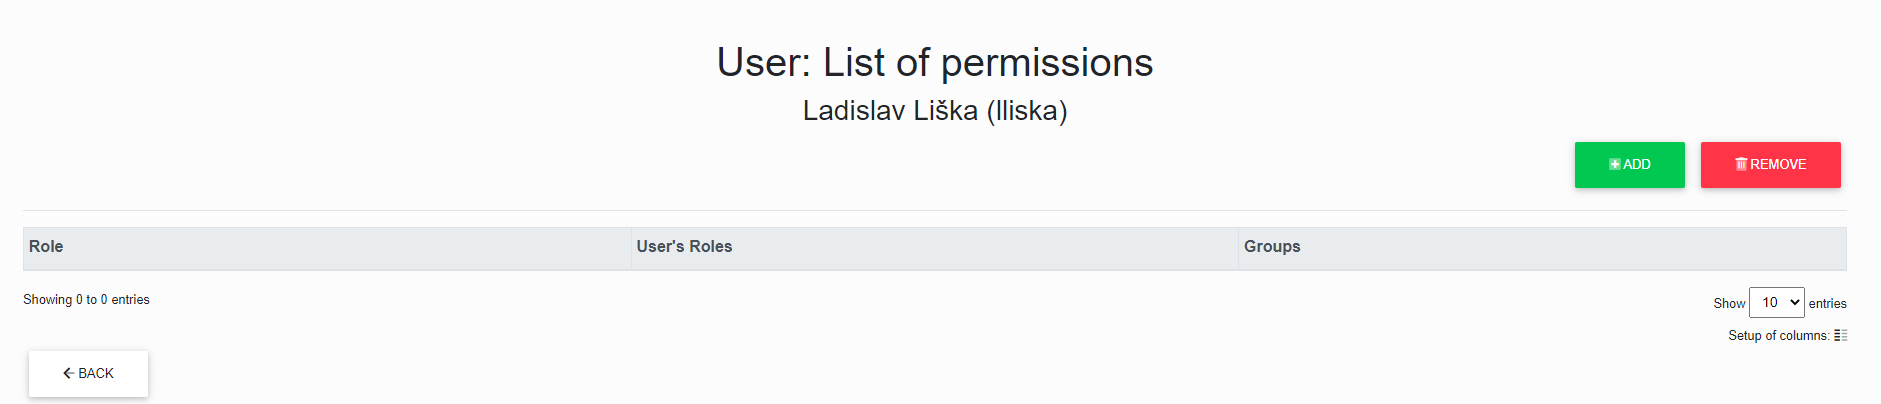
Assigning permissions to a user in the portal
The portal administrator can assign a "Portal Administrator" to a user.
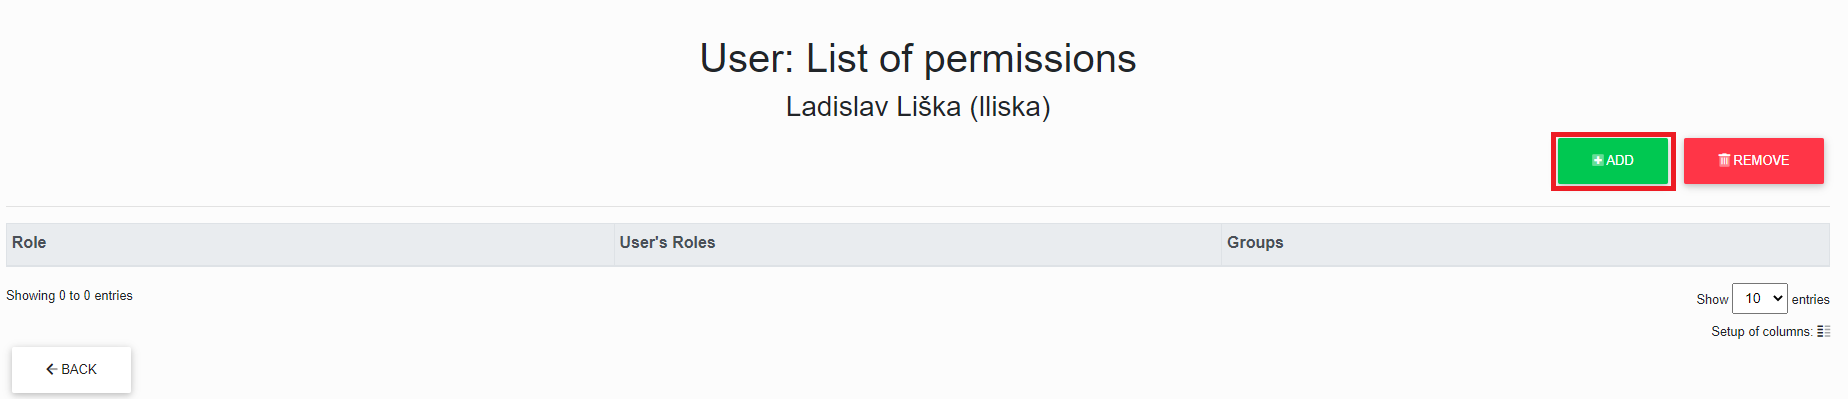
After clicking the "Add" button, the administrator is redirected to the table of the user to whom he wants to add the "Portal Administrator" right.

After checking the checkbox, the administrator clicks the "Add" button, then the administrator will see the message "Successfully added".
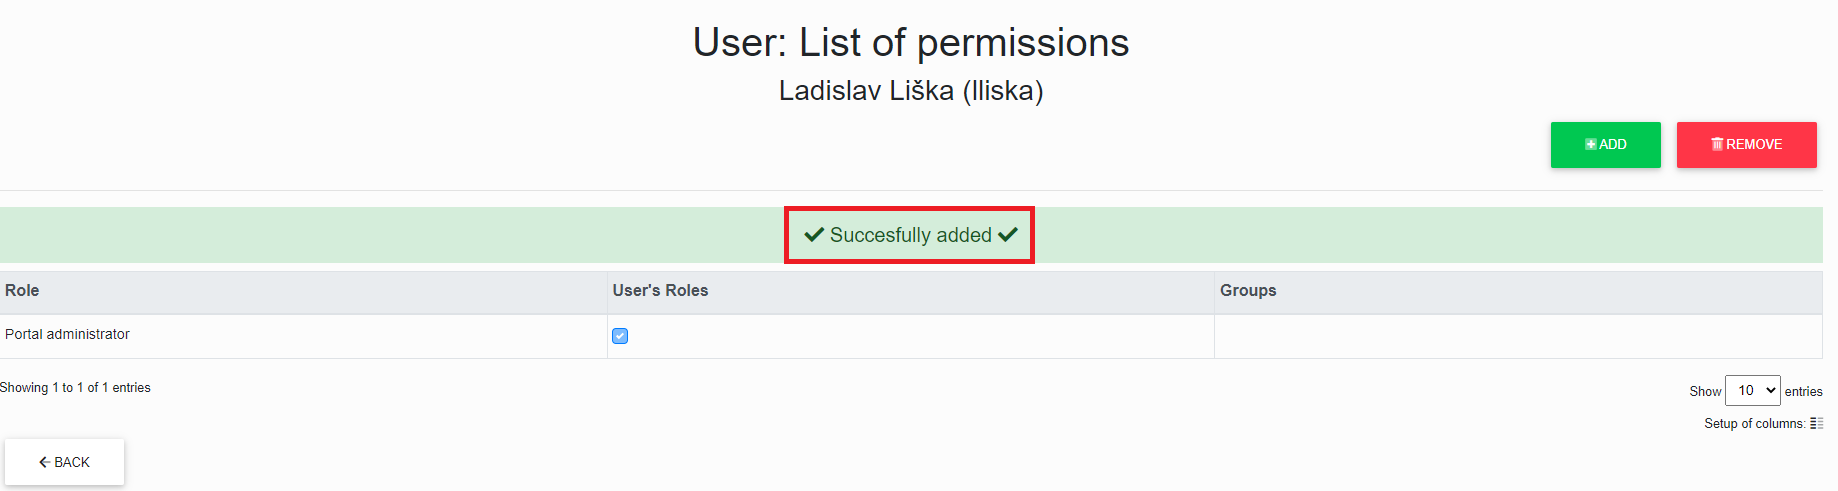
Removing permissions from a user in the portal
The portal administrator can remove a "Portal Administrator" to a user.
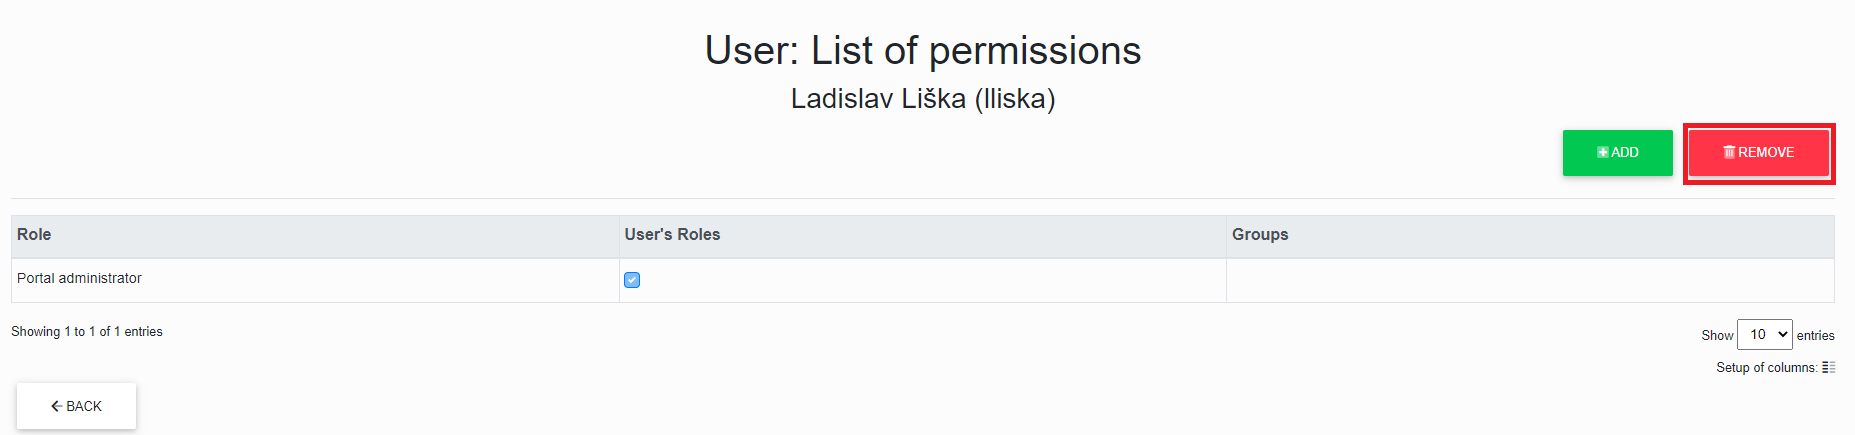
After clicking the "Remove" button, the administrator is redirected to the table of the user to whom he wants to remove the "Portal Administrator" right.
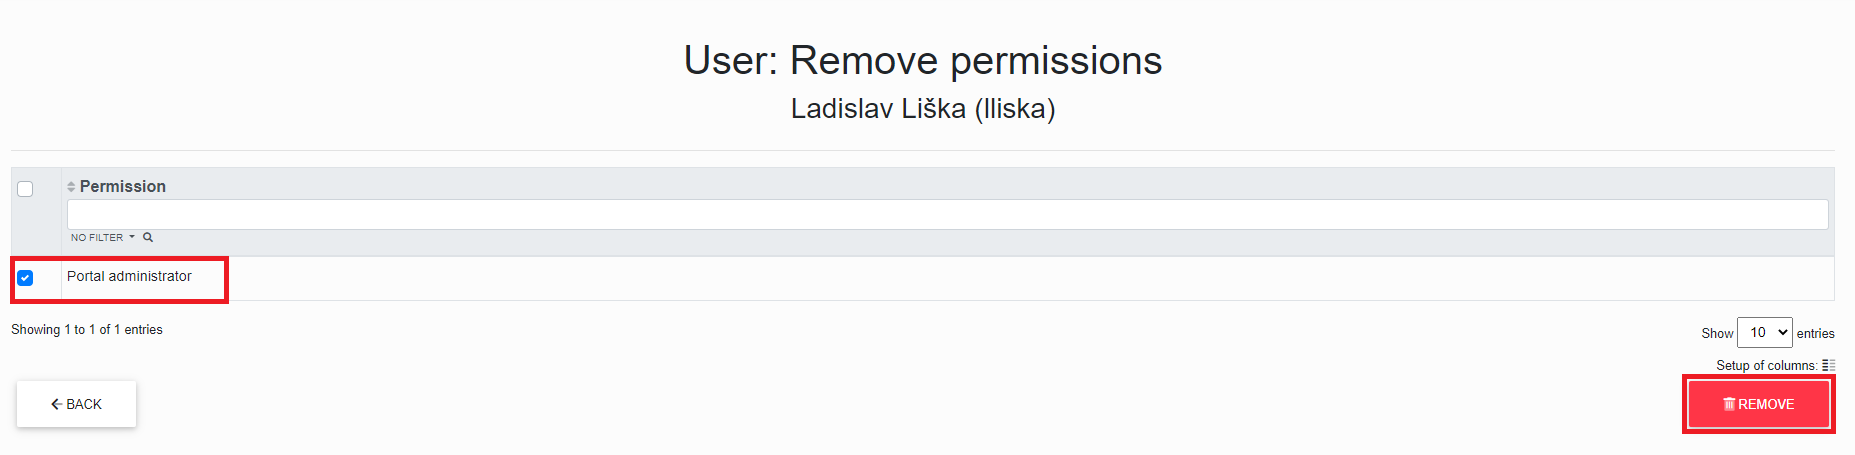
After checking the checkbox, the administrator clicks the "Remove" button, then the administrator will see the message "Successfully removed".
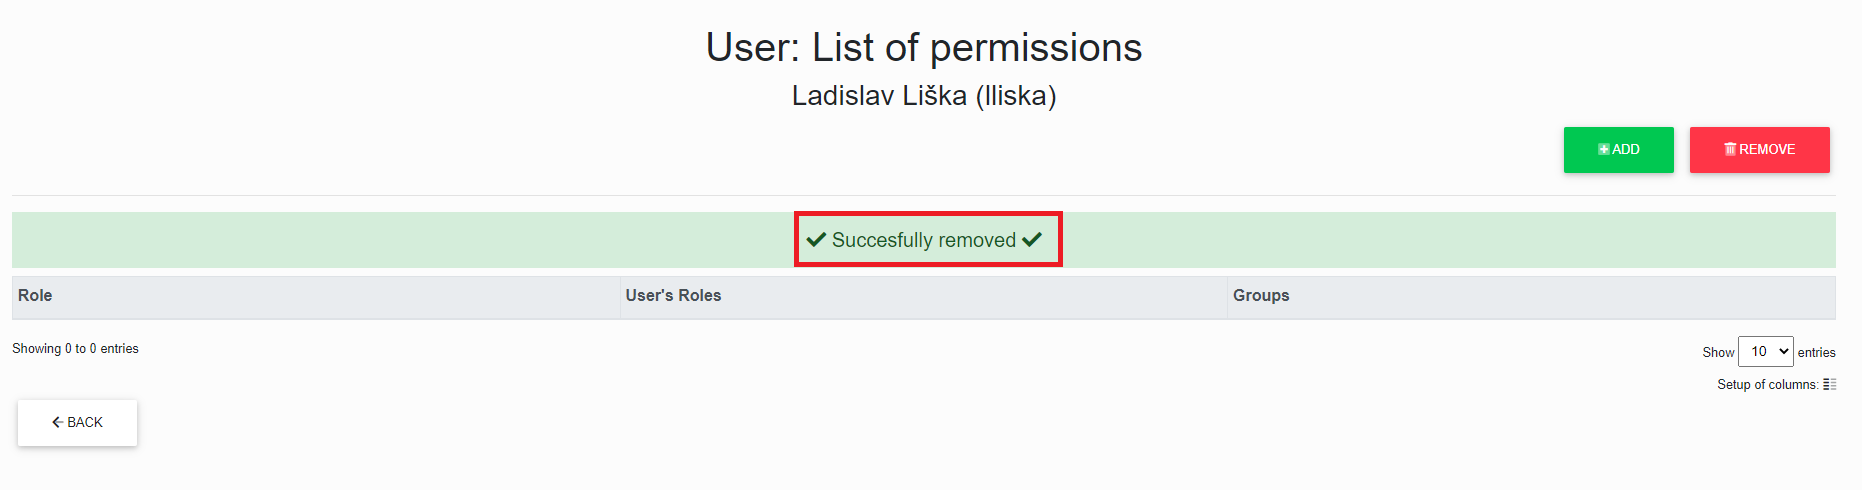
List of Repositories and Repository permissions
By clicking the "Repositories" button in the User List, the portal administrator can assign and/or remove a user's repository and repository permissions.
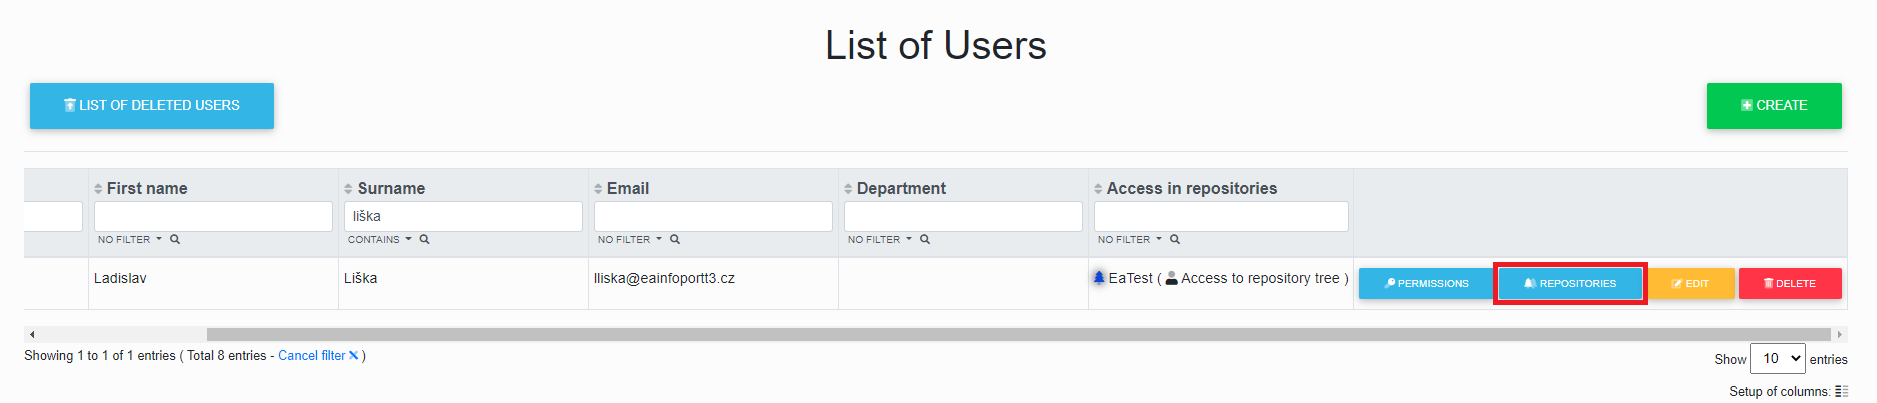
The administrator will be presented with the following dialog where he can add and/or remove a user's repository and repository permissions.
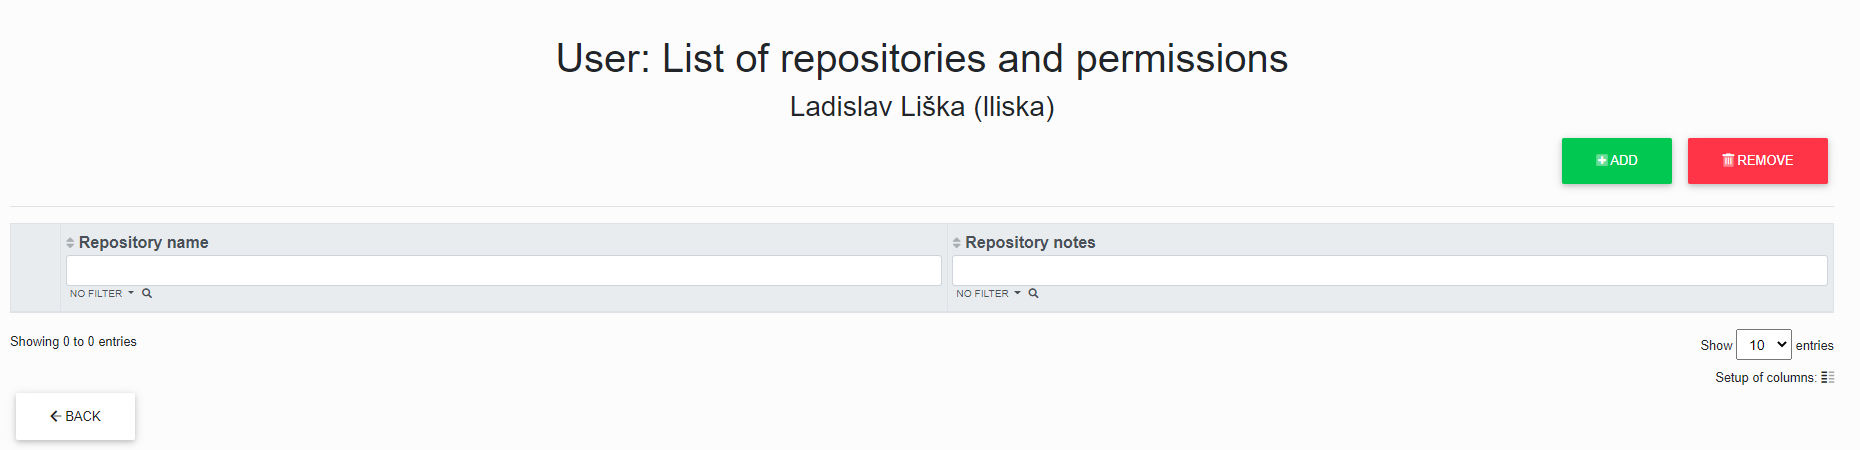
- Assignment Repository and Repository permissions to a user in the portal
- Removing Repositories and Repository permissions from a user in the portal
Assignment Repository and Repository permissions to a user in the portal
The portal administrator can assign repository and repository permissions to a user.
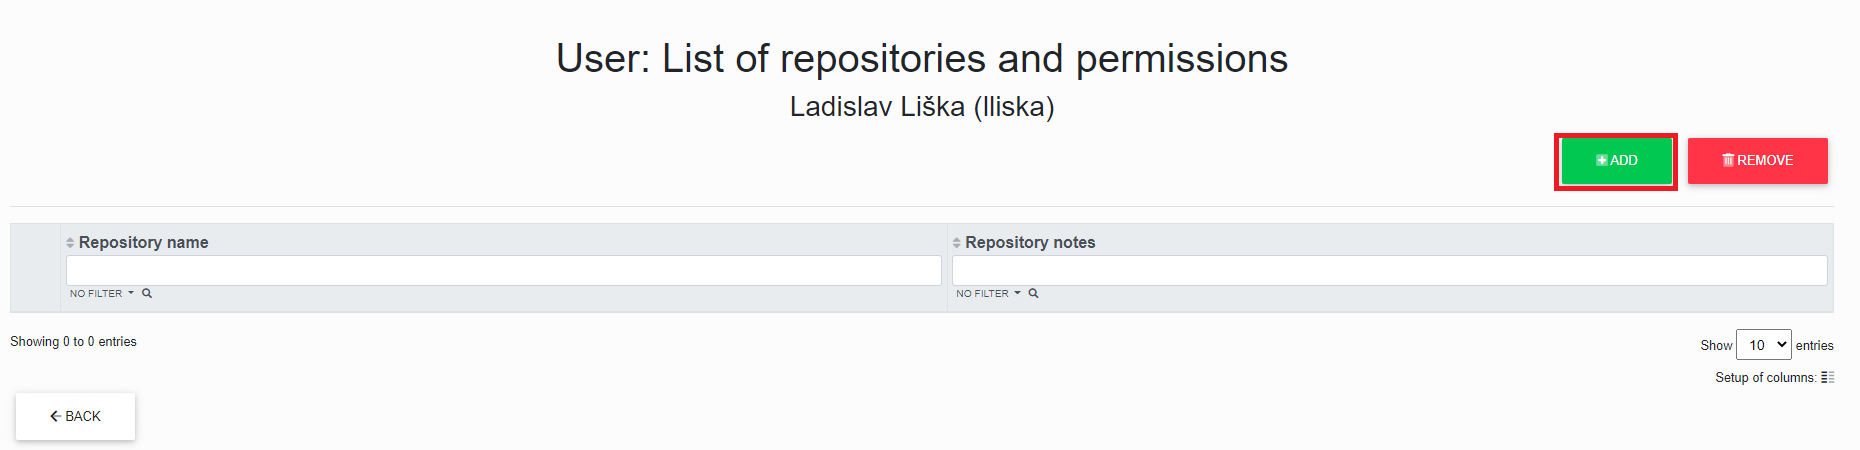
After clicking the "Add" button, the administrator is redirected to the table of the user to whom he wants to add the repository and repository permissions.

After checking the checkbox, the administrator clicks the "Add" button, then the administrator will see the message "Successfully added".
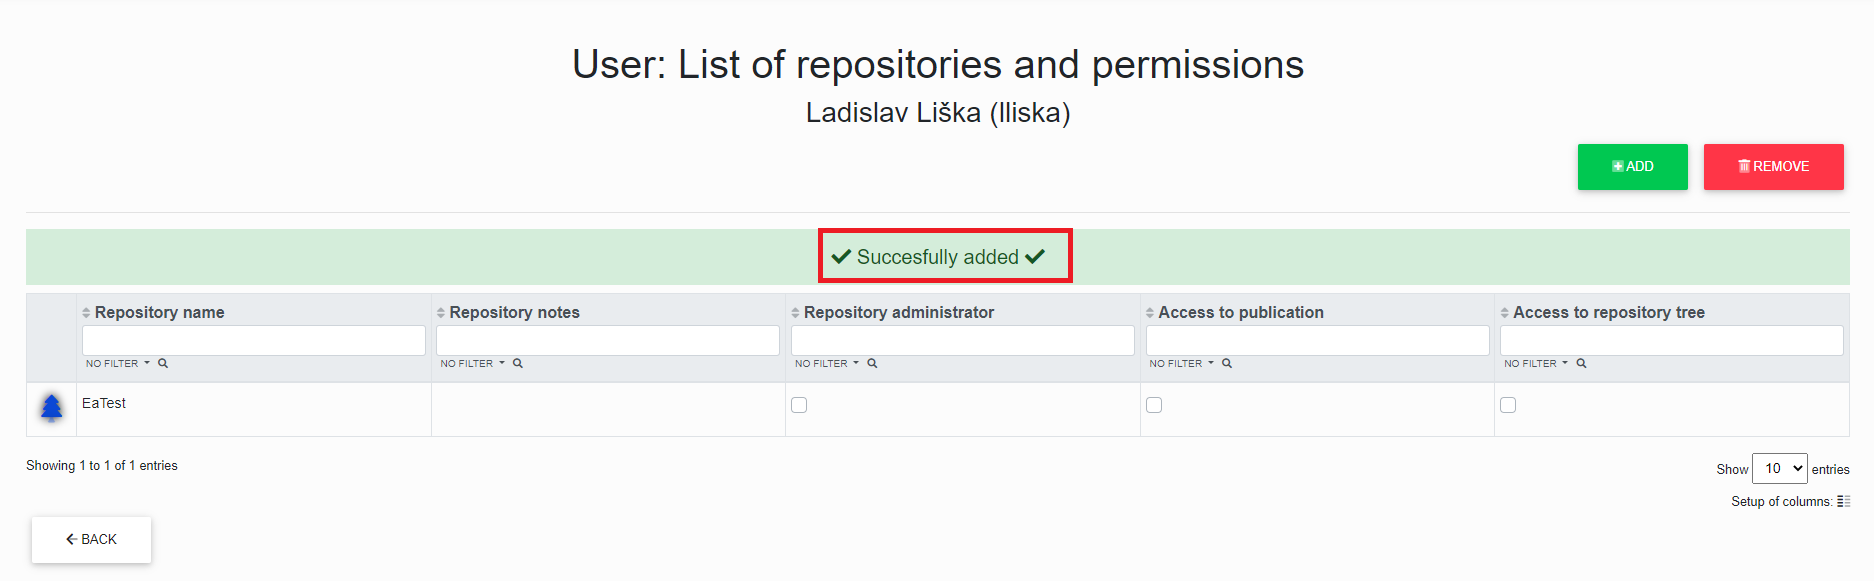
Once a repository is added, the portal administrator can assign the repository permissions "Repository Administrator, Publication Access and Repository Tree Access".
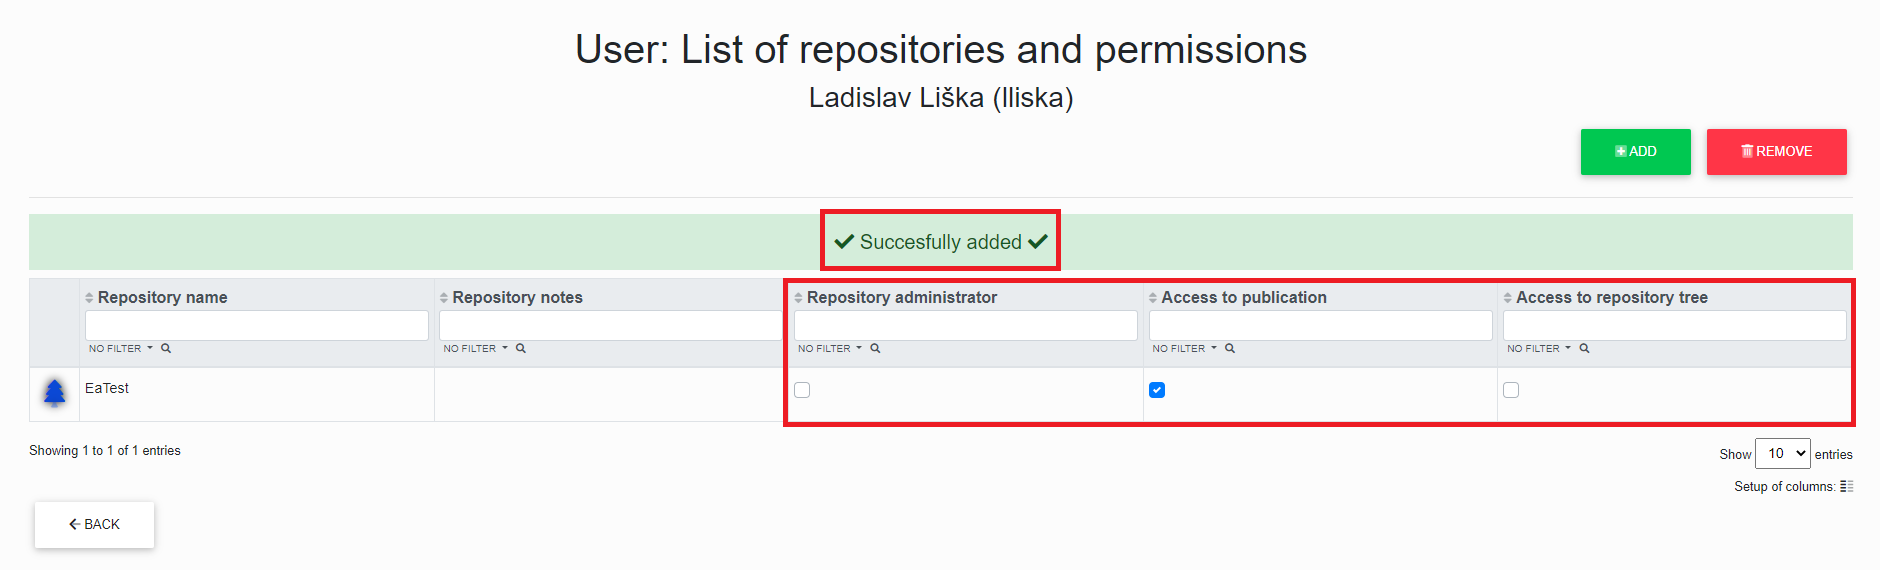
After clicking on the checkbox, the message "Successfully added" is displayed.
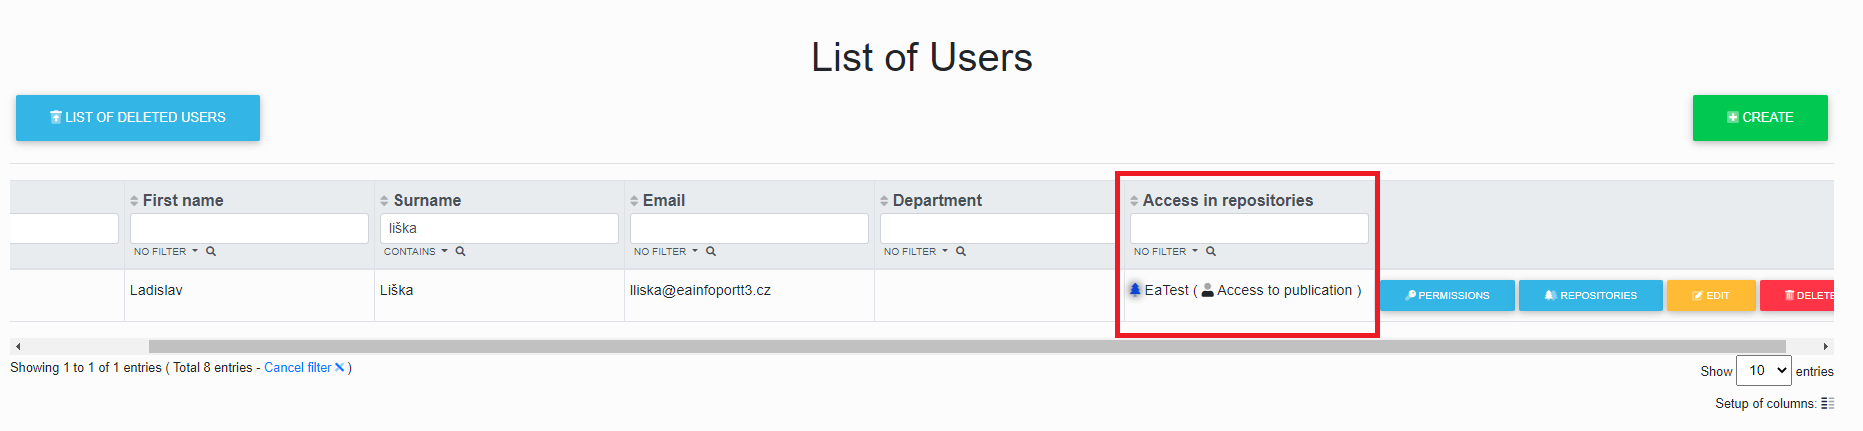
Clicking the "Back" button will display the "User List" with the added repository and the permissions in the repository.
Removing Repositories and Repository permissions from a user in the portal
The portal administrator can removed repository and repository permissions to a user.
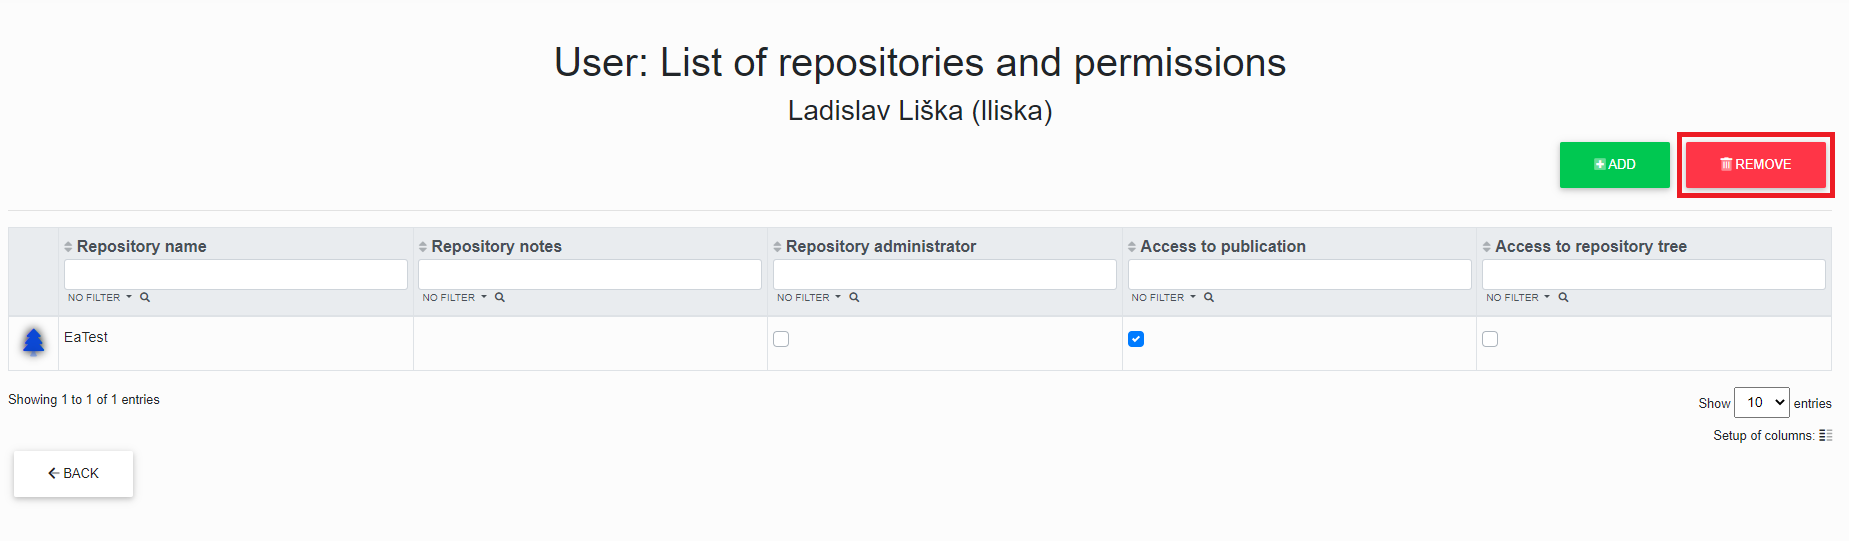
After clicking the "Add" button, the administrator is redirected to the table of the user to whom he wants to add the repository and repository permissions.

After checking the checkbox, the administrator clicks on the "delete" button, after which the administrator receives the message "Successfully removed".
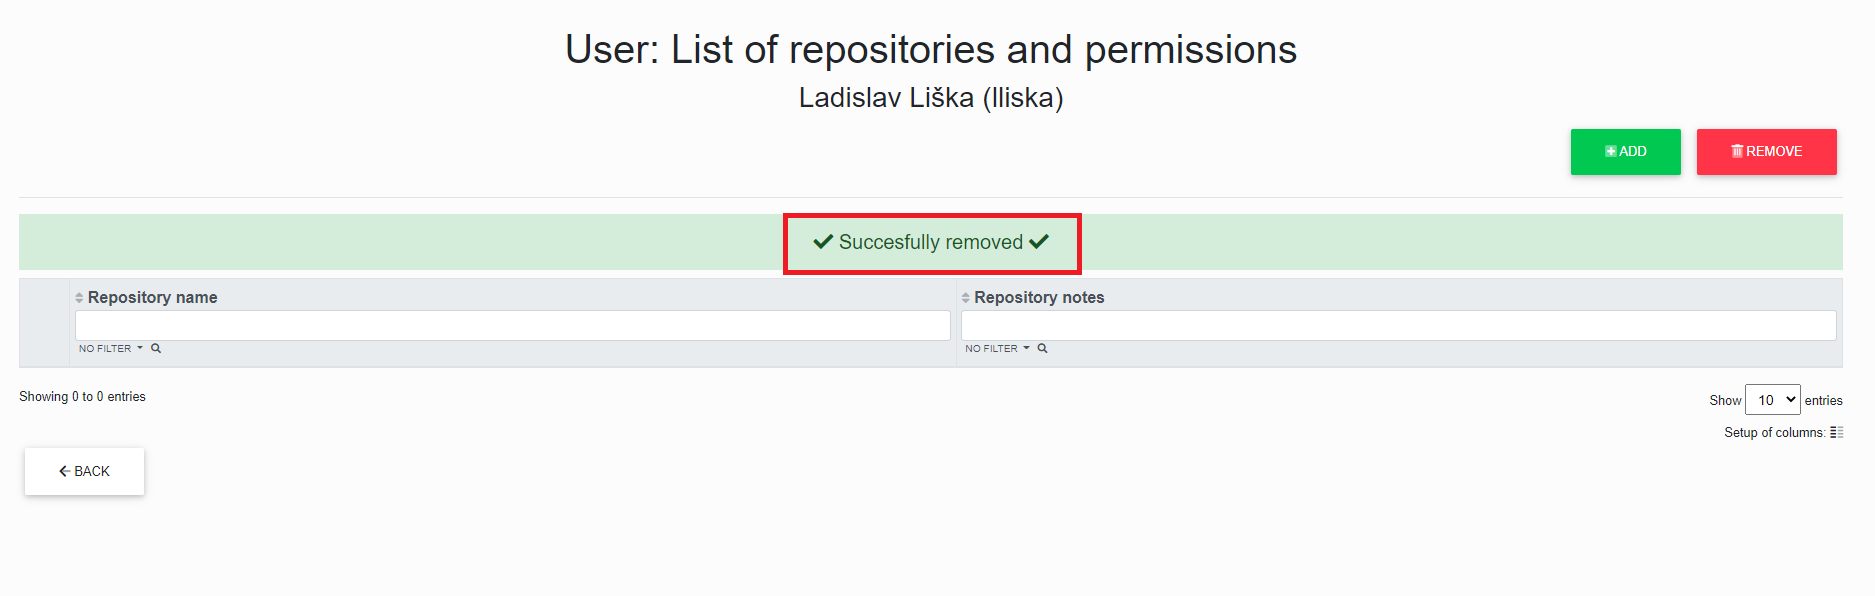
After clicking the checkbox, the portal administrator can remove the repository permissions "Repository Manager, Publication Access and Repository Tree Access".
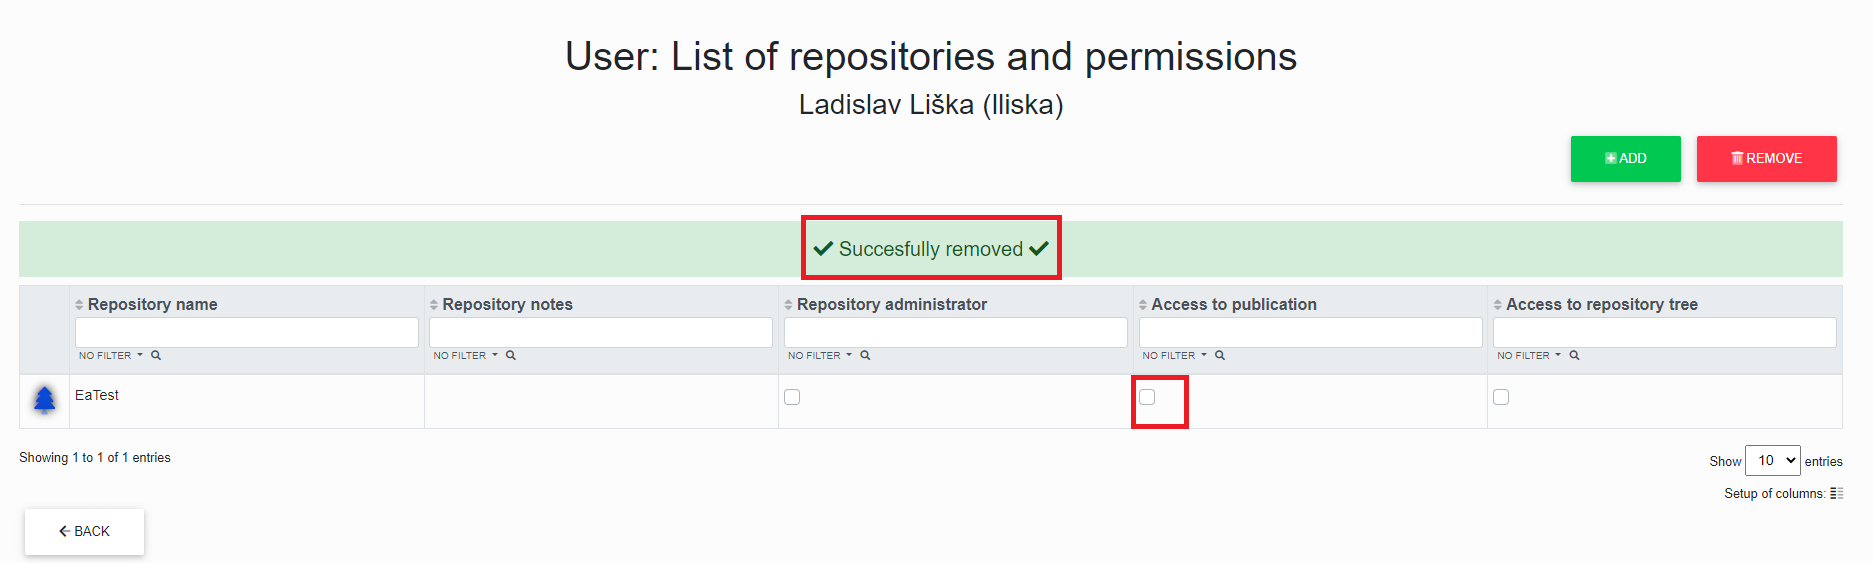
Clicking the "Back" button will display the "User List" with the repository permissions removed.
List of Deleted Users
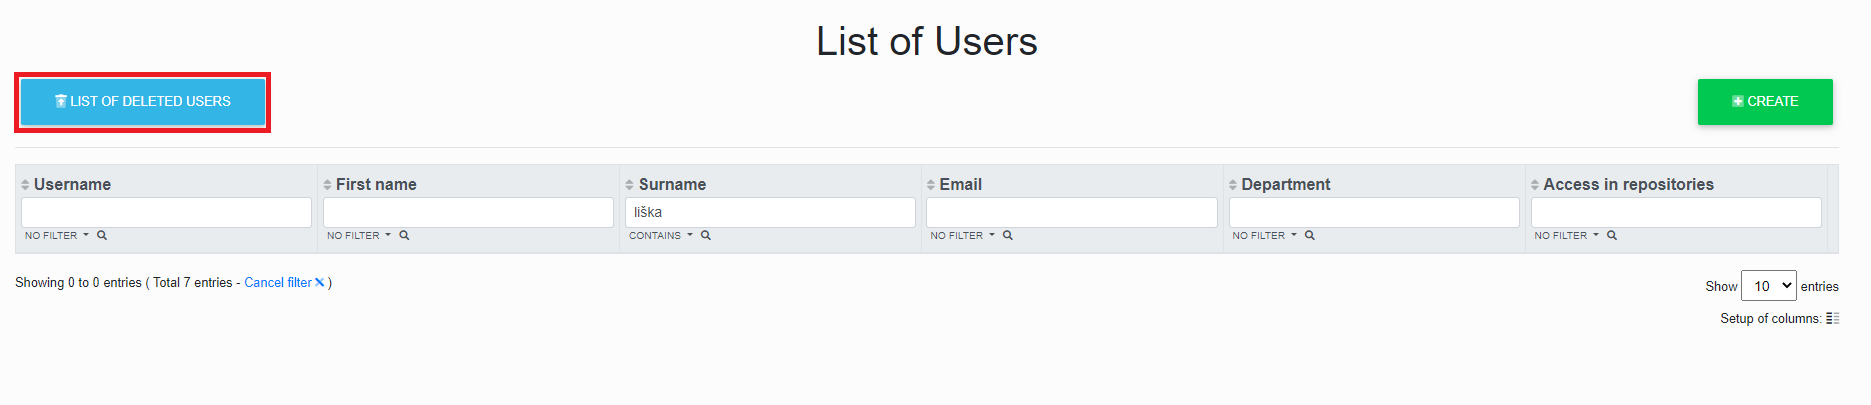
Here is a list of all deleted users.
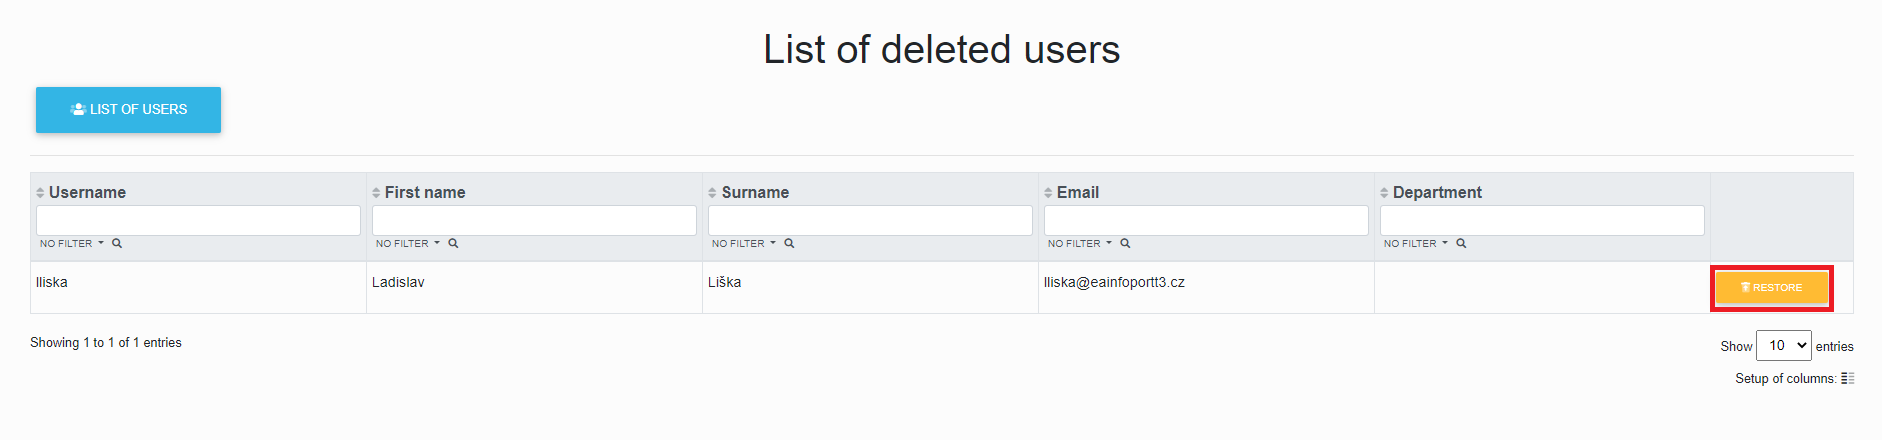
To restore a deleted user, click on the "Restore" button.
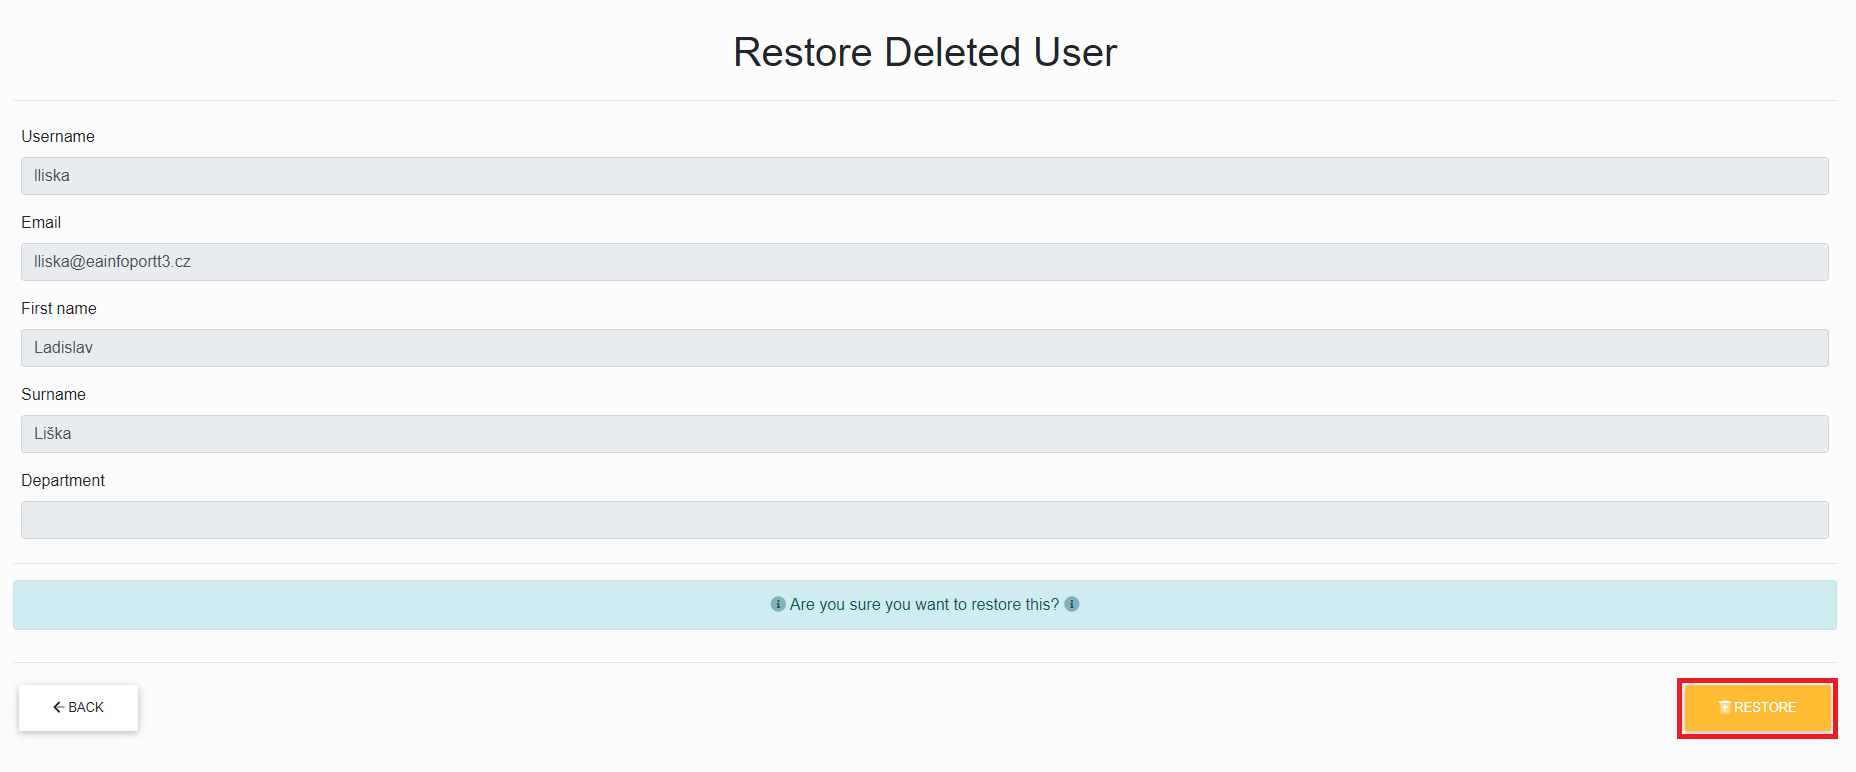
Once you have checked that you are the correct user, just click on the "Refresh" button.
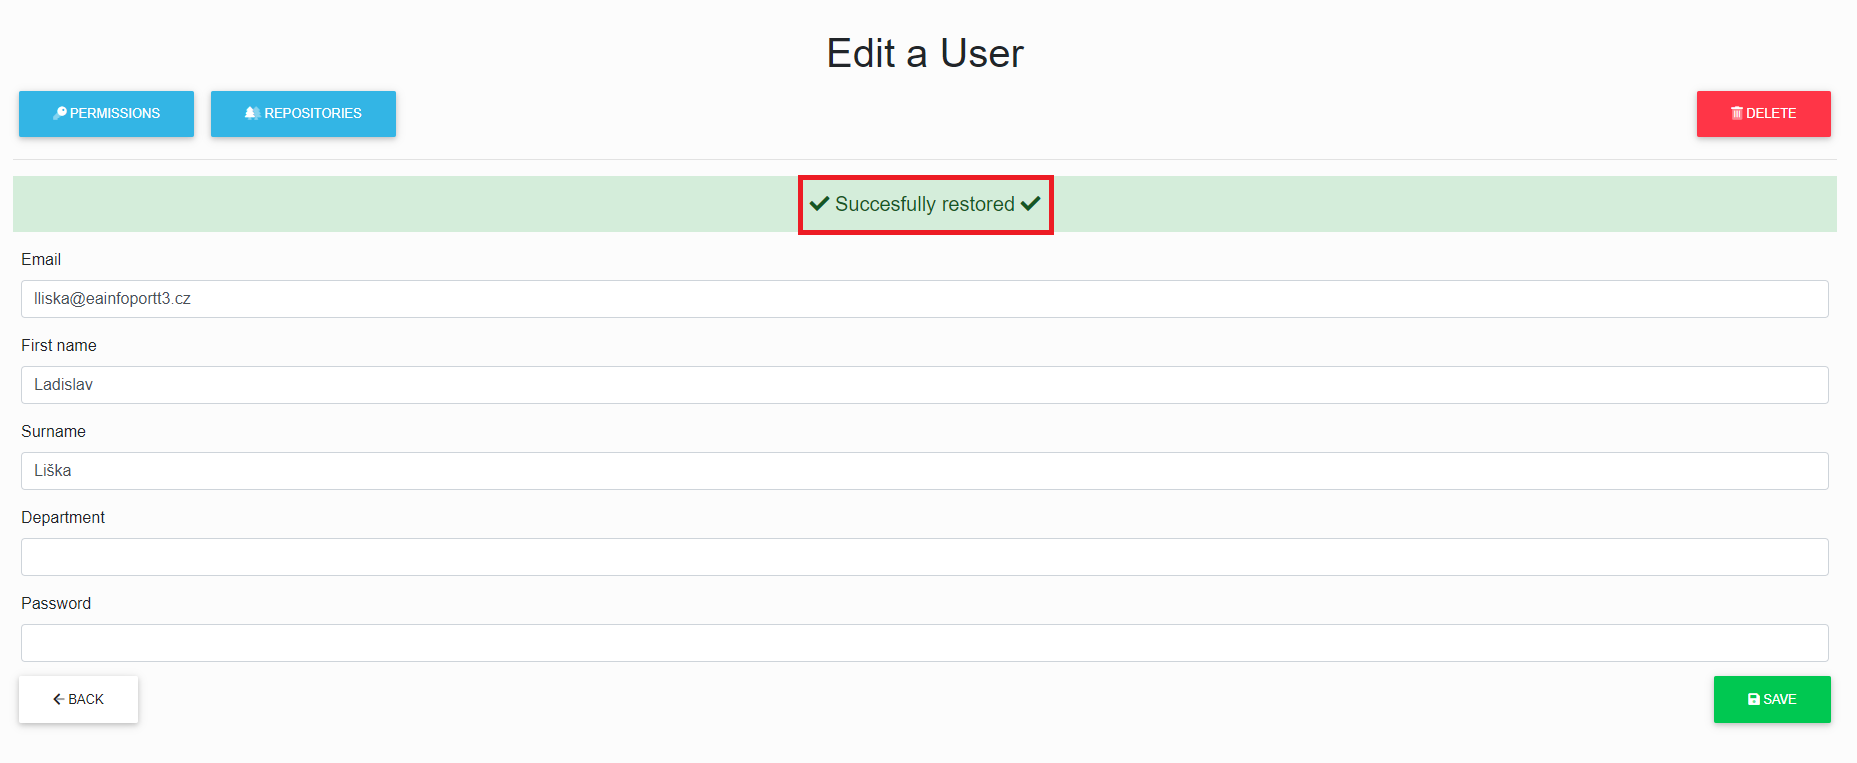
After a successful restore, you can edit the user, assign permissions, and assign repositories.
Permissions Management
If we have selected "Permissions Management", we will be taken to the Permissions list in the portal.
The portal administrator can assigned a portal administrator to a user.
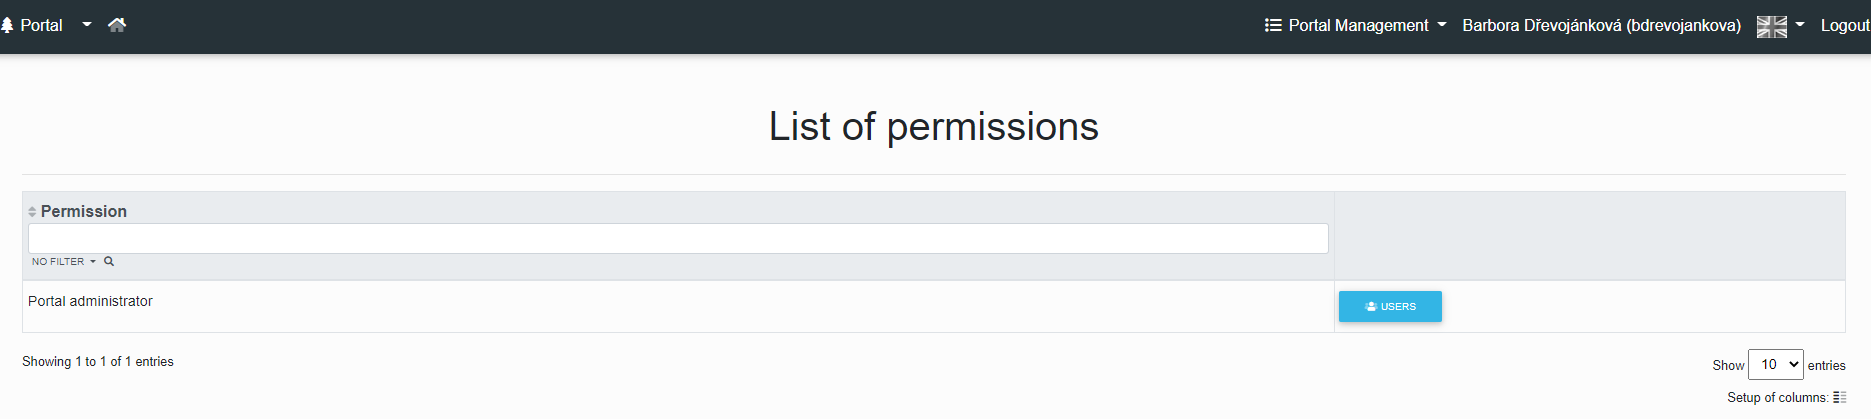
We have reached the User List.
Here we can assigned or remove portal administrator permissions to different users using the "Add" or "Remove" buttons and see a list of users that have the selected permission.

Assigning Portal Permissions to a user
The portal administrator can assigned the Portal Management permission to a user.
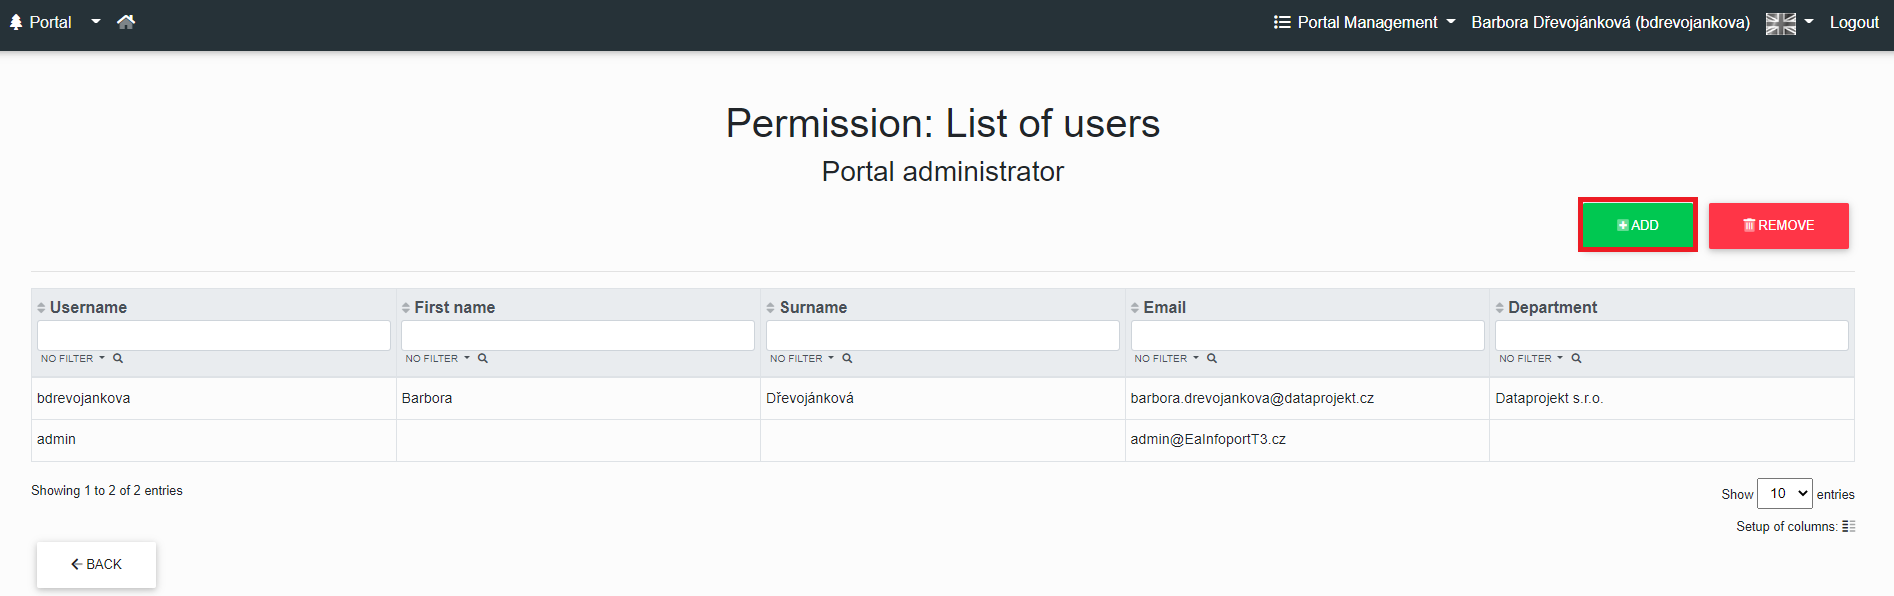
After clicking the "Add" button, the administrator is redirected to the user table.
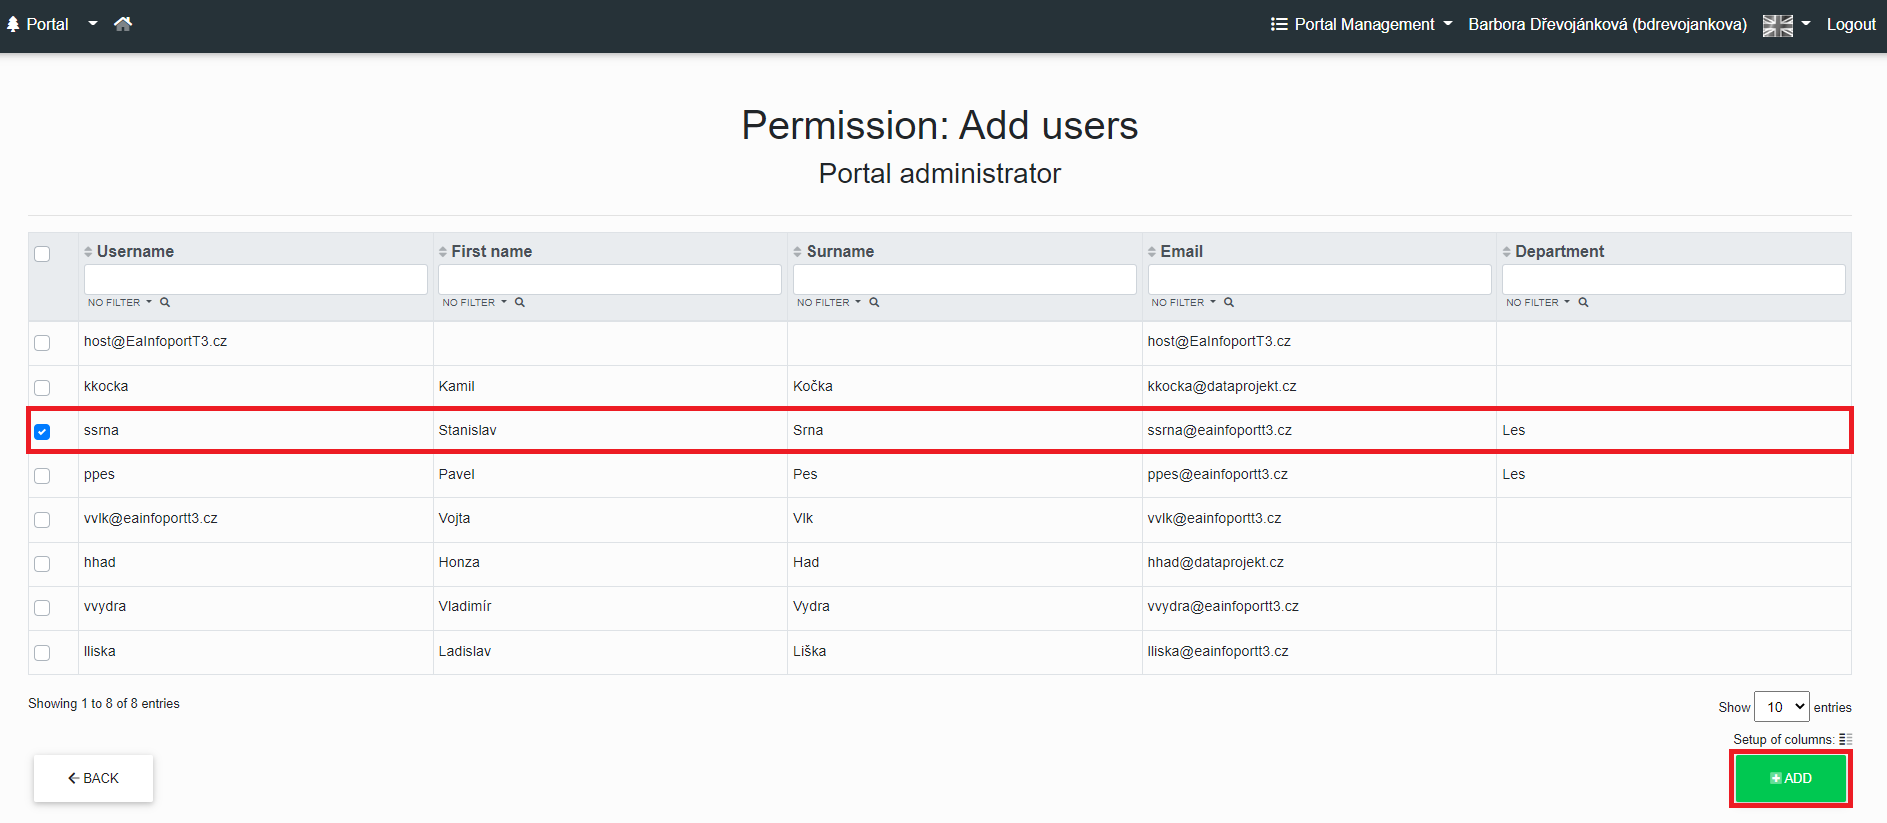
After checking the checkbox for the user, the Portal Administrator clicks on the "Add" button, then the administrator will see the message "Successfully added".
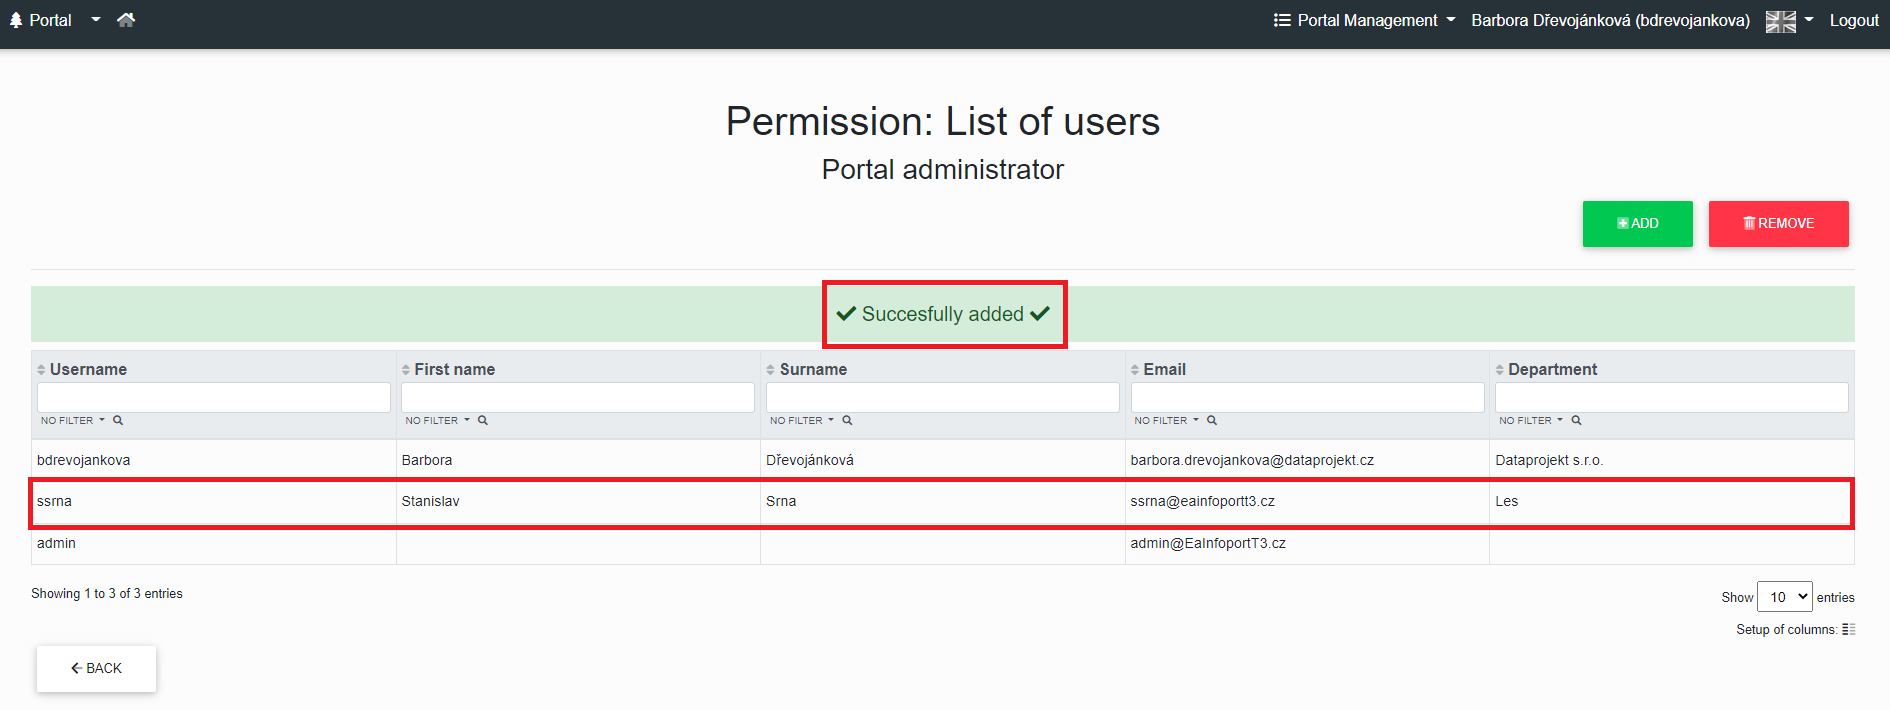
The user is now a Portal Administrator.
Remove Portal Permissions from a user
The portal administrator can remove the Portal Management permission to a user.
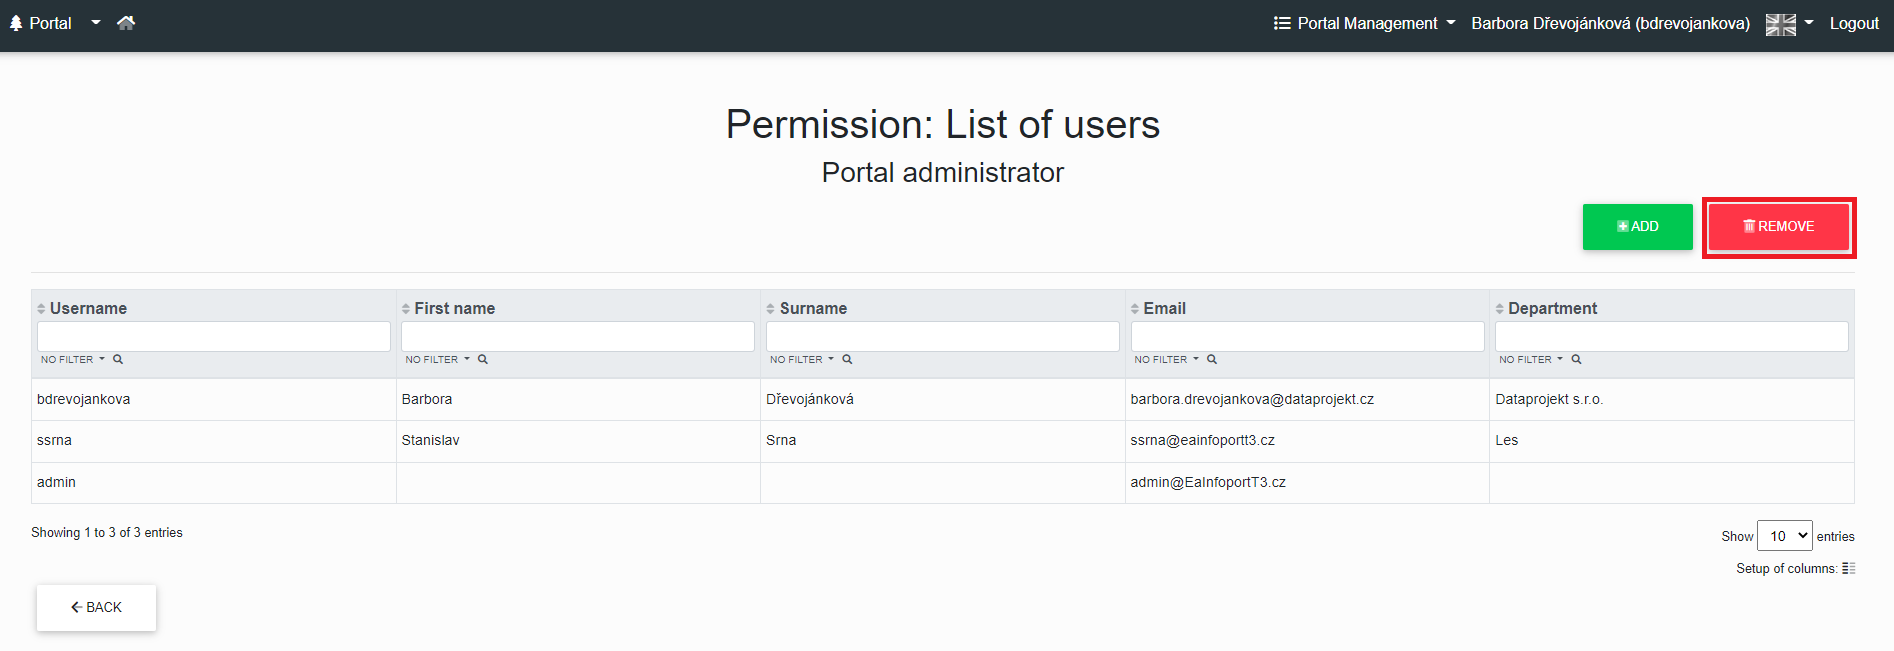
After clicking the "Remove" button, the administrator is redirected to the user table.
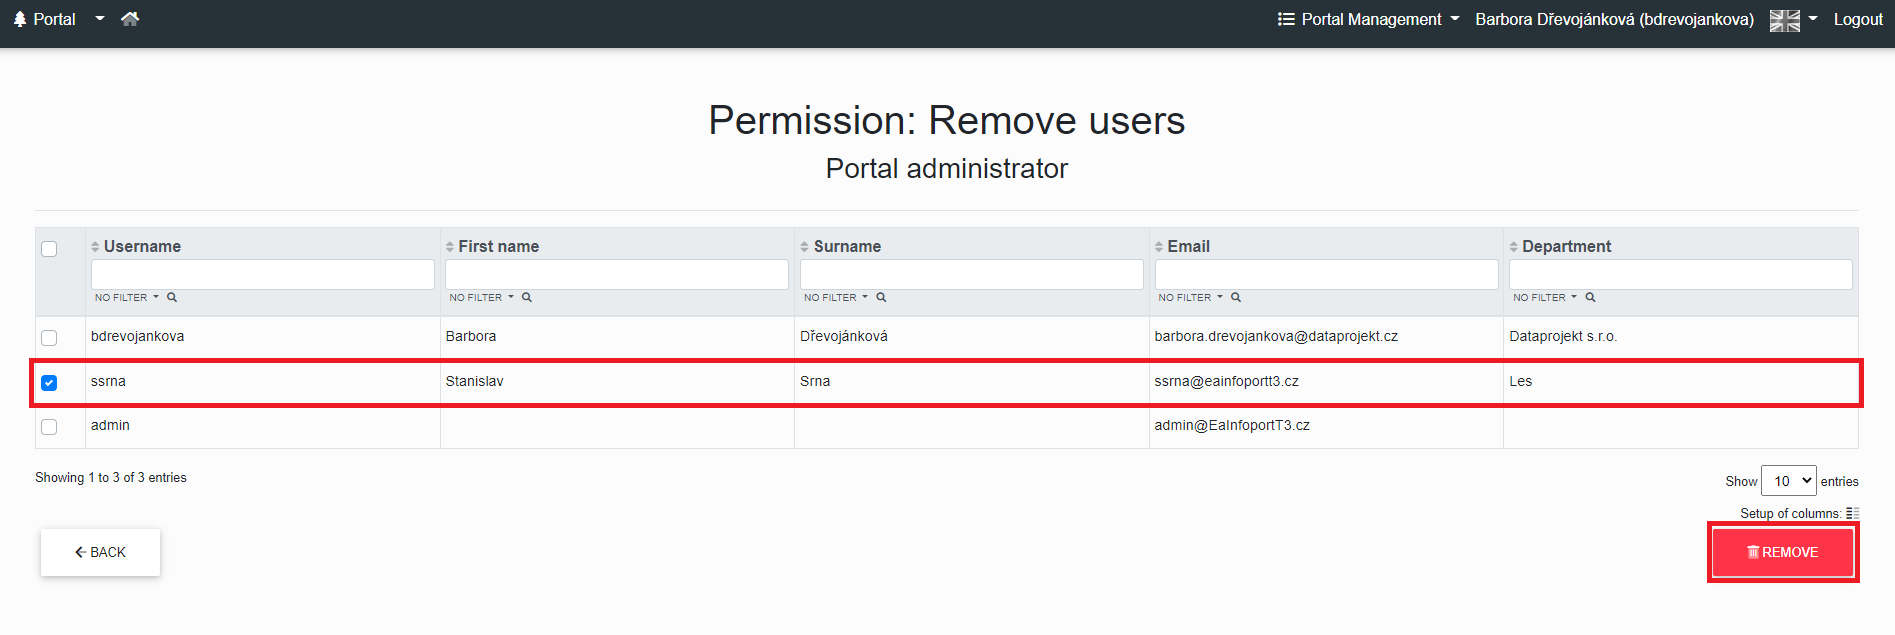
After checking the checkbox for the user, the Portal Administrator clicks on the "Remove" button, then the administrator will see the message "Successfully removed".
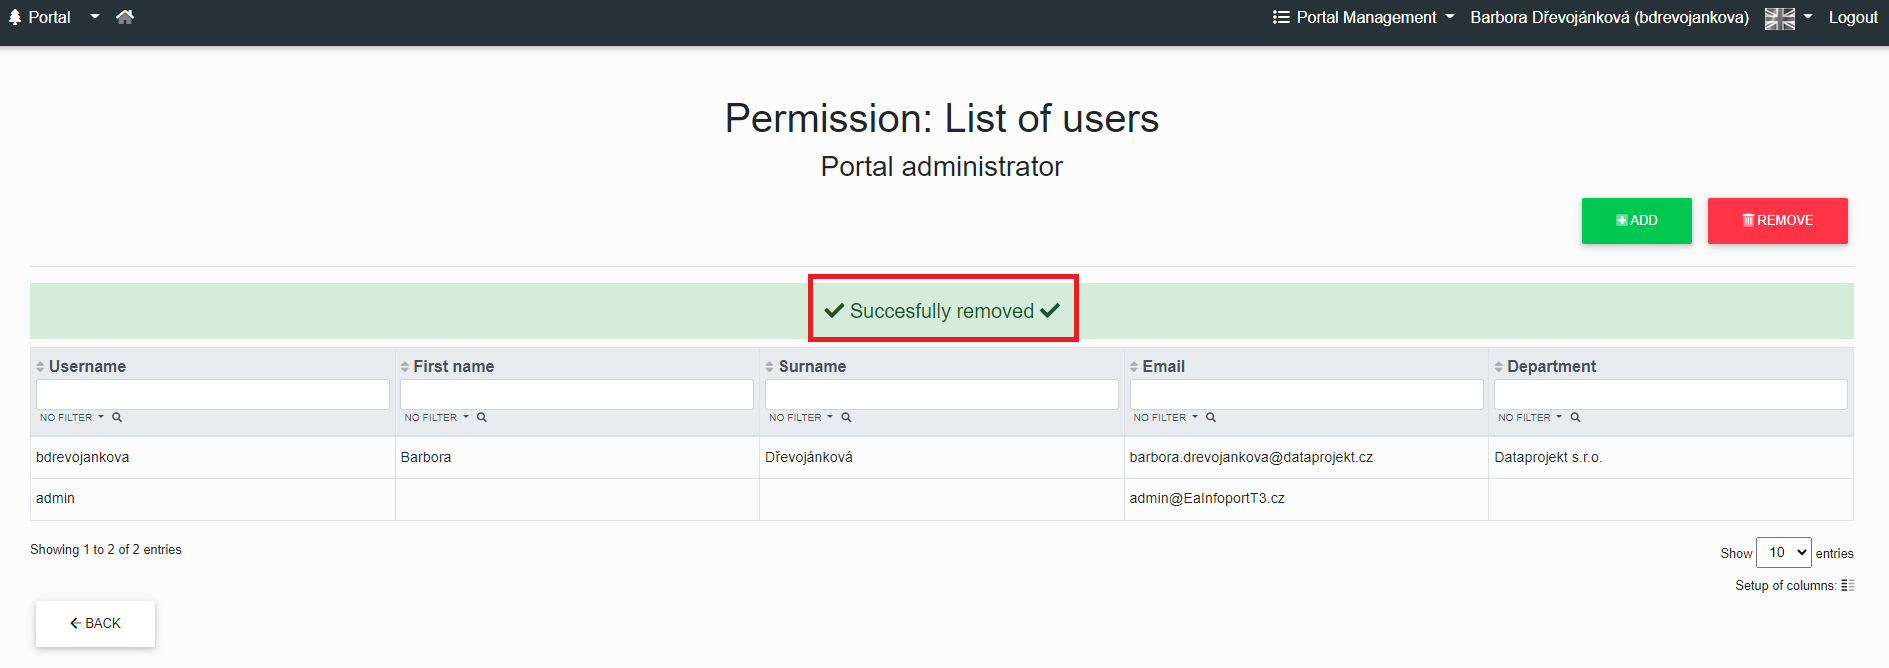
The user is no longer the portal administrator.
Repositories Management
Multiple repositories (databases) can be connected to one instance of the information portal. Therefore, the management of the portal and the management of the individual connected EA repositories is separate. One user can have access to multiple repositories and different rights in each of them. It is easy to switch between repositories.
Each connected EA repository has its own administrators.
Users are registered at the portal level, and rights to repositories are assigned by the portal administrator. EA Repositories are strictly data segregated, and if a user does not have rights to a particular EA Repository, he or she cannot see it (cannot see that it exists).
This functionality is useful, for example, if a company has multiple customers. Who have data in separate EA repositories and need to present it using a single portal instance.
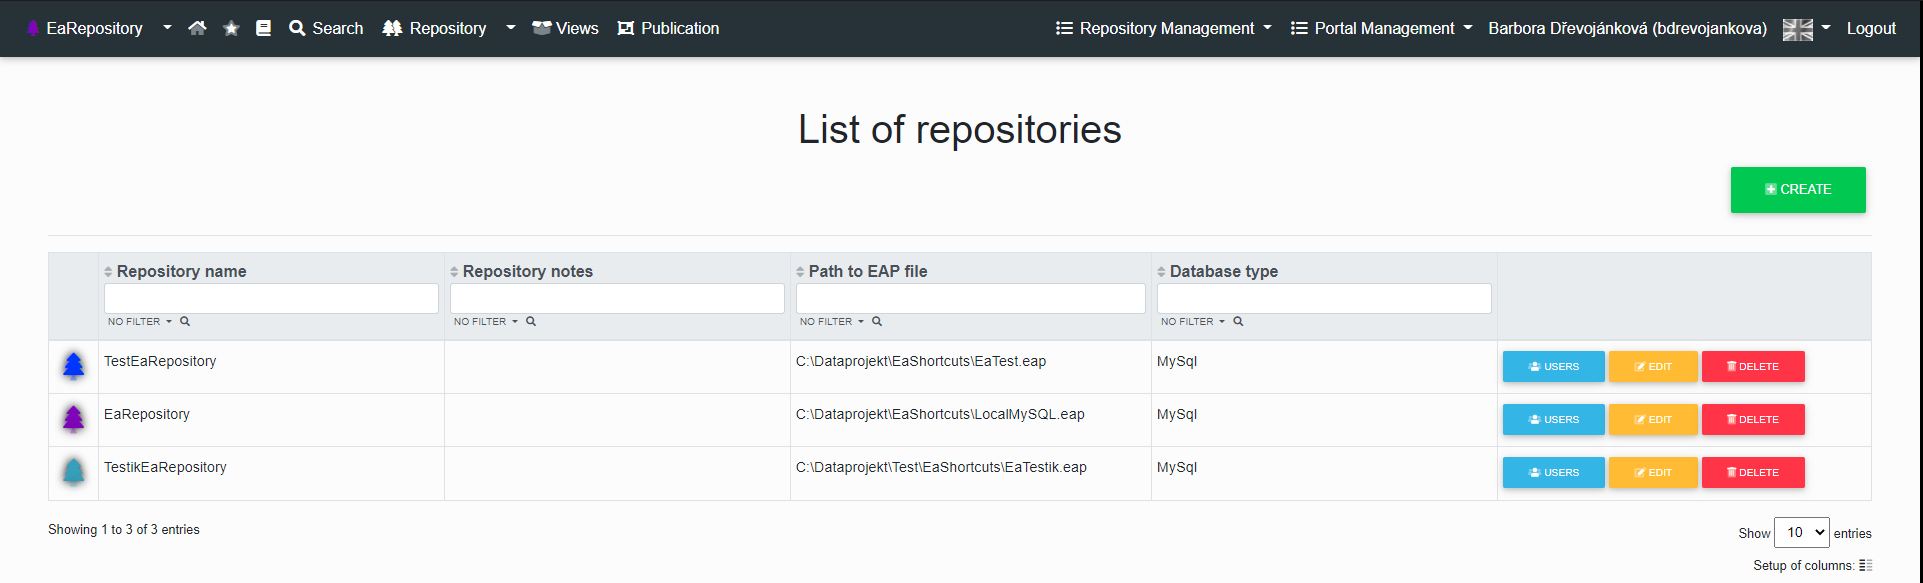
After clicking on "edit" the following page will be displayed Edit repository
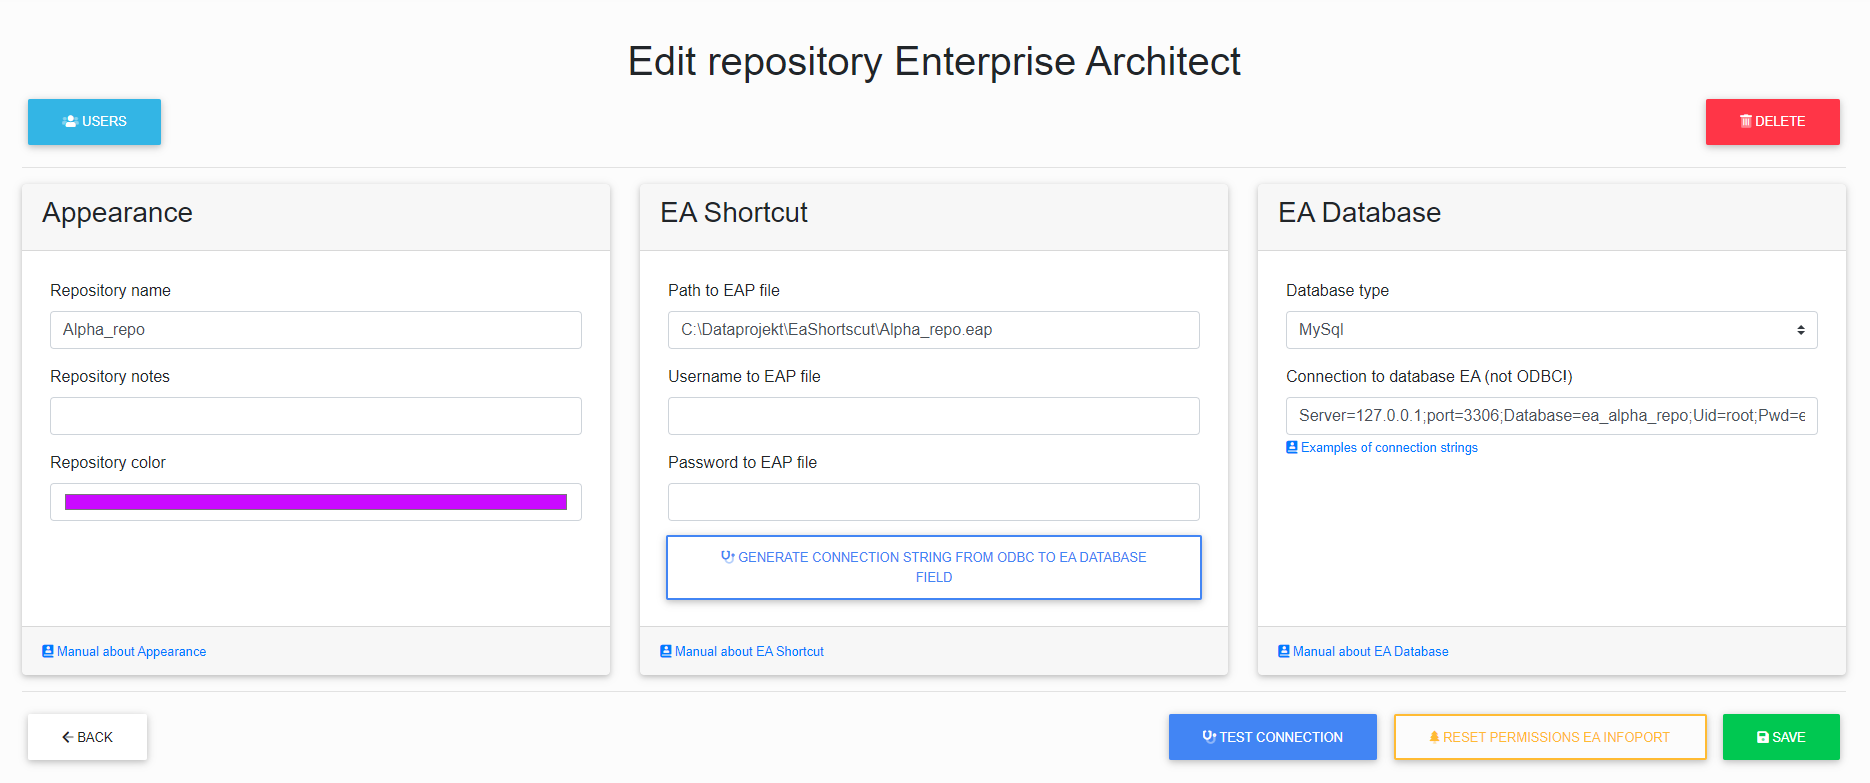
Active Directory Management
Enterprise Architect can be connected to one or more Active Directory servers.
AD automatically imports groups from AD into the Infoportal. The import is done by AD group, where the administrator must define which AD group he wants to import into which Infoport group.
NTLM authentication - if the user is registered in Active Directory and Active Directory is configured, the user does not have to log in to Infoport manually - he is logged in automatically with his windows account. However, he can still log in manually (useful, for example, if another user needs to log in to the InfoPortal on the computer with the logged-in user.
If the user is not found in Active Directory and Infoport has multiple Active Directory servers configured, they are all searched in turn. If the user is not found anywhere, a login dialog is displayed where the user can log in manually (or just as a guest).
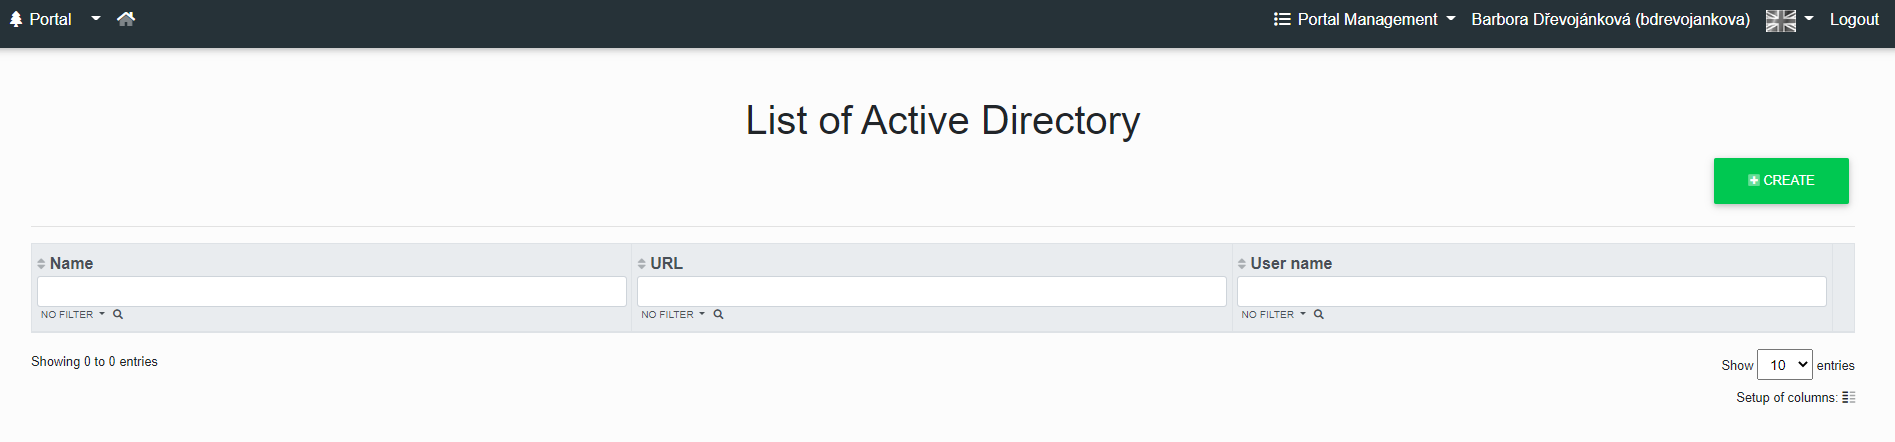
After clicking the "Create" button, the page to create the AD will be displayed. Where you need to fill in the "Name, URL, Username and Password".
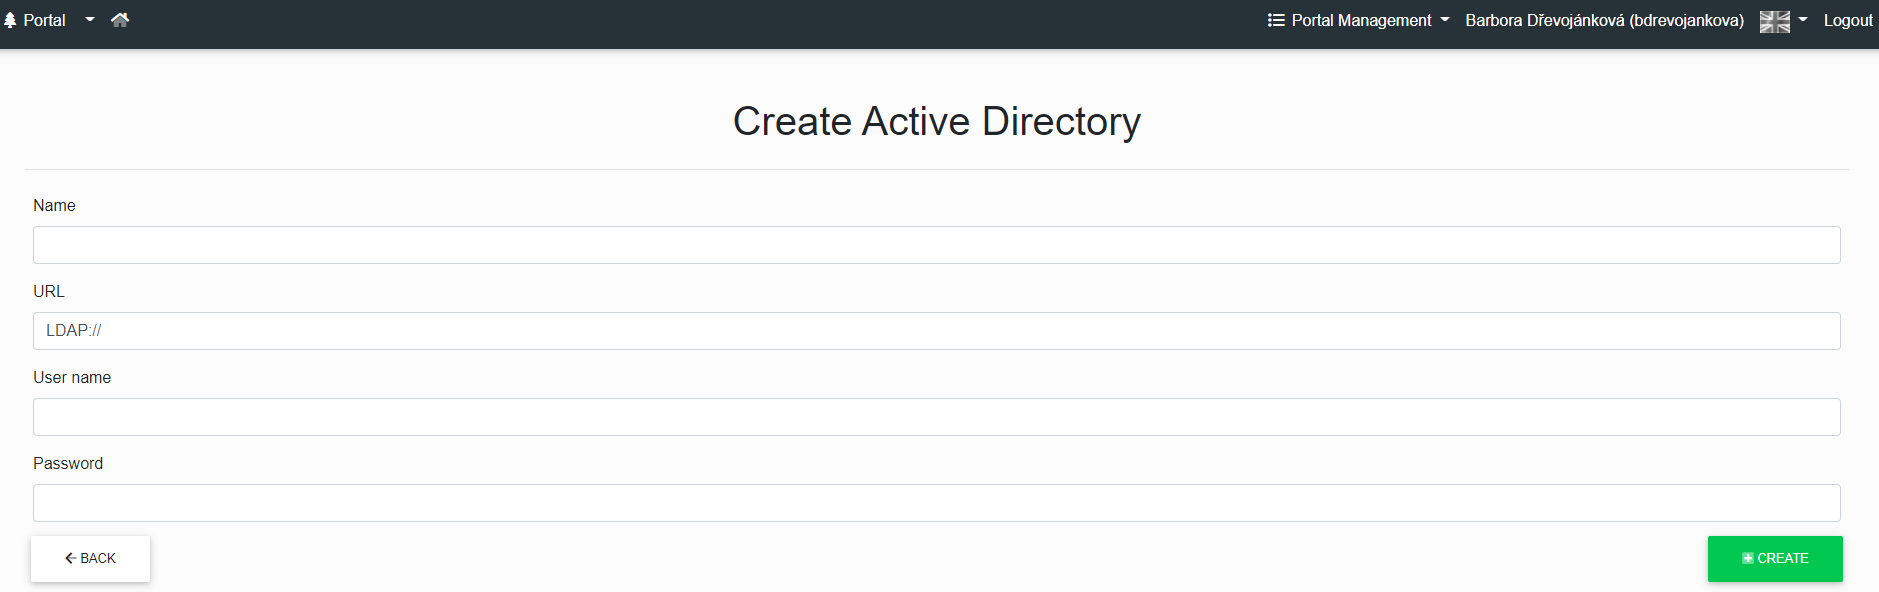
Configuration Manager
See the Configuration Manager section in the Installation Manual
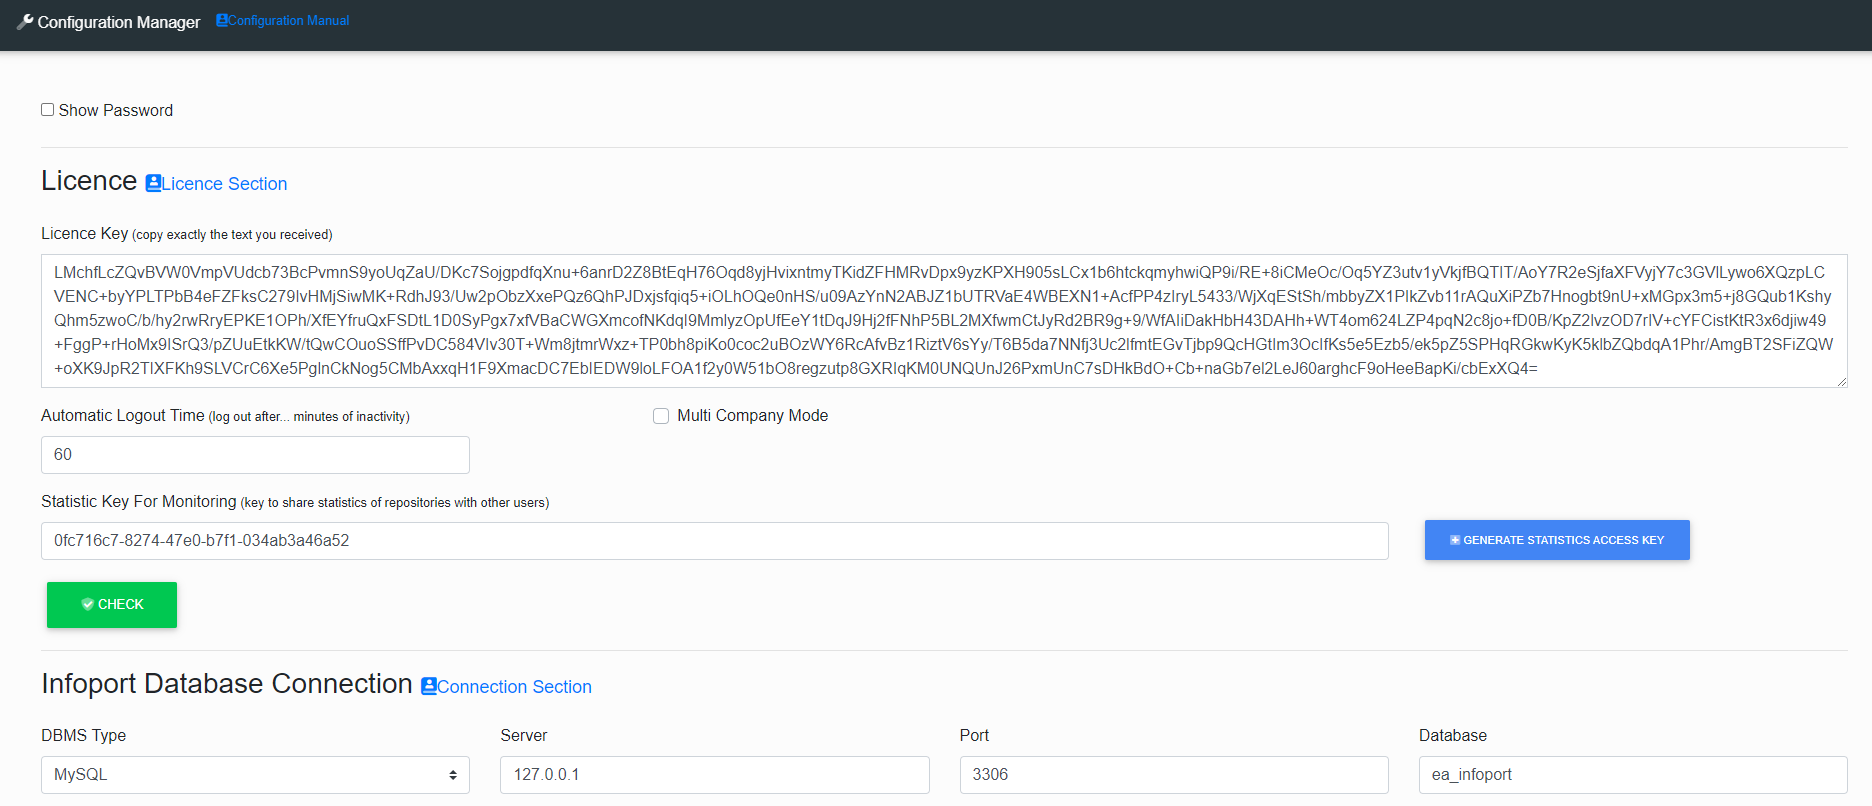
Statistics
If the user has a key, he can start Statistics without being logged in.
Stats shows information about connected repositories and dcoms.
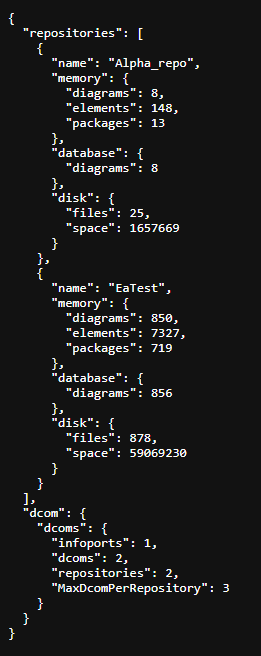
Overview of notification subscriptions
The administrator must set up an e-mail server in Configuration Manager to send notification e-mails to users.
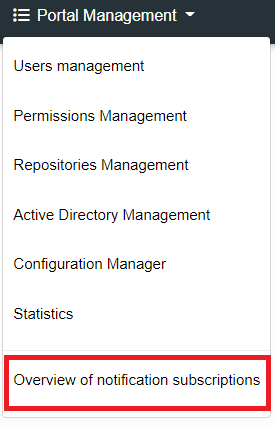
If the notification system is set up, the portal administrator can see all the notifications set up in the repository.
The portal administrator can click on the "Tree" icon or the "ChangeNotificationType" button.
After clicking on the "ChangeNotificationType" button, the portal administrator is redirected to the "Setting the notification interval for diagram subscribers" page where he can check the Name, Type, Login and Email to which the notification is sent.
There are three notification services that notify users of changes to the diagram.
By hovering the cursor over the icons, the user can read what type of notification it is.
You can easily change the notification type either on this page, where you just click the blue icon, or go to the diagram on the repository.
The green colour of the icon informs which notification type is on.
If the user wants to cancel the notification, just click the red icon.
When the user clicks on the "Tree" icon, he is redirected to the repository of the diagram.
Login of a user who does not have an OpenID group assigned
In Infoport, it is possible to set a ban on the login of a user who does not have an OpenID group assigned.
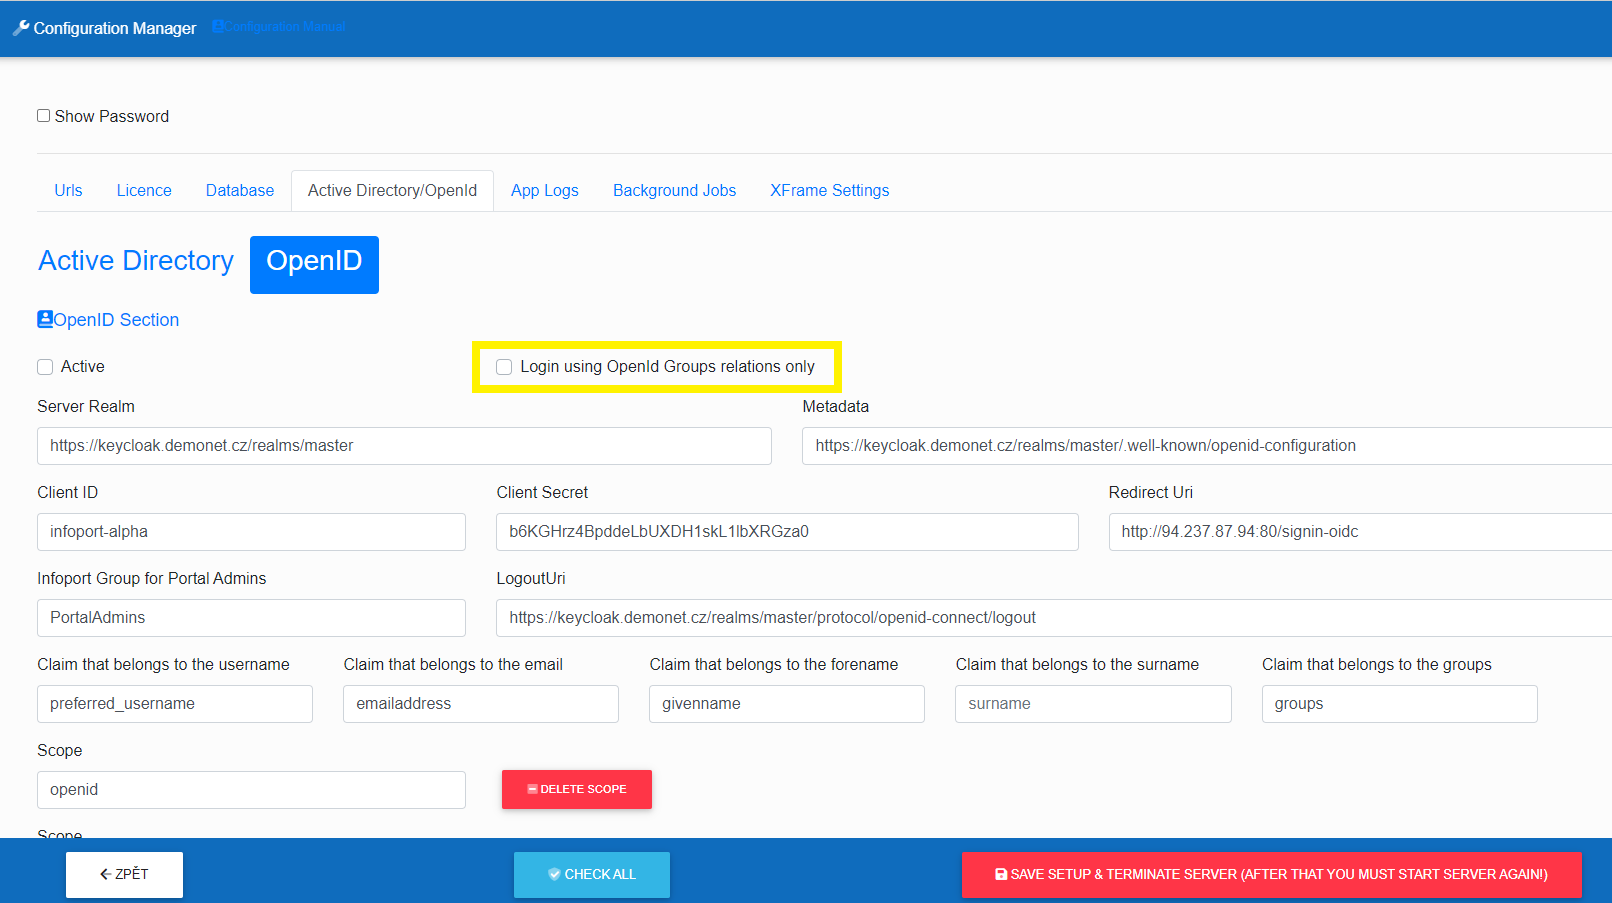
Login of a user who does not have an Active Directory group assigned
In Infoport, it is possible to set a ban on the login of a user who does not have an Active Directory group assigned.
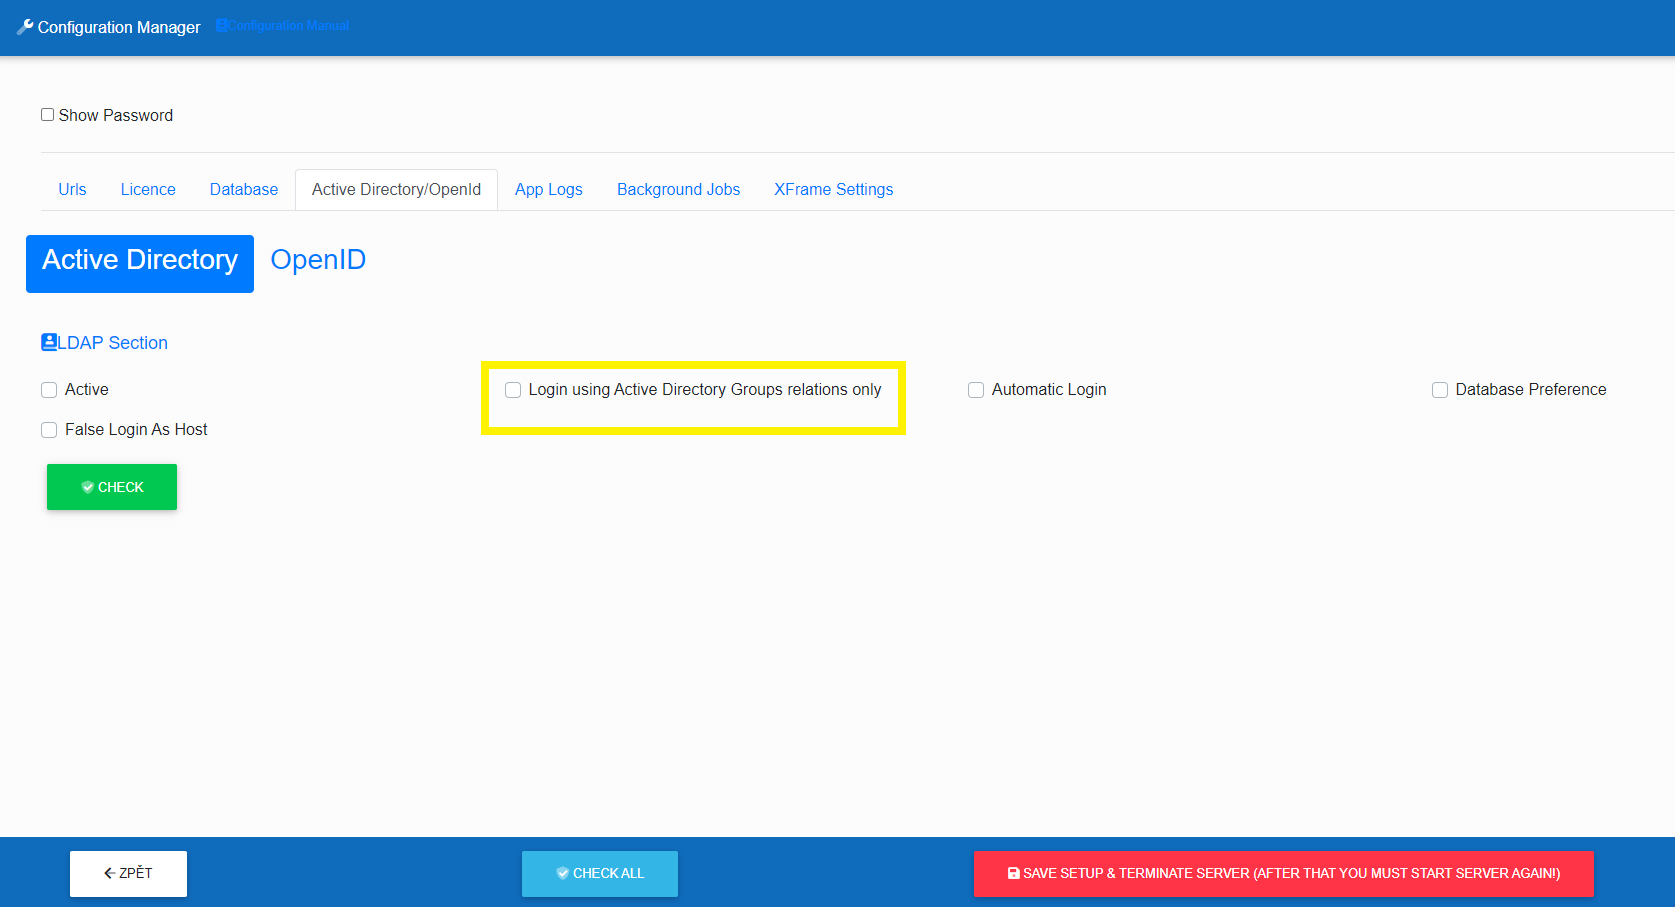
Audit Logs
Infoport allows you to log changes in the Enterprise Architect database: • changes in Infoport permissions • user logins/ logouts • HTTP status codes from the server We call these Logs Audit and we save it in .csv files.
Audit Logs - activation
The portal administrator must go to the Configuration Manager and set up the box for the logs he wants to activate. Save the settings and restart Infoport.
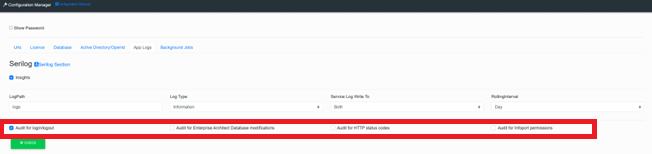
Saving a record from Audit Logs
We save the record from Audit Logs in .csv files.
You can find these new logs on disk in the Infoport folder "\EaInfoportT3\audit\".

The second option is new button that is added next the button Portal Management. It is possible to download a certain log directly from the browser.

The Audit Log is created every hour if one of the listed actions occurs. The name of the audit log always consists of the year, month, day and hour.
Access Tokens
List of Access Keys
Whenever a user uses the “Direct Access URL” option, the key for that URL is saved in the access key list.
If a user no longer wants to be able to access the relevant address without a password through this key, he/she has the option to delete it here.
The list of active access keys is available by clicking on the arrow next to the “Repository” tab and in the subsequently expanded submenu on the “Access Key List” tab.
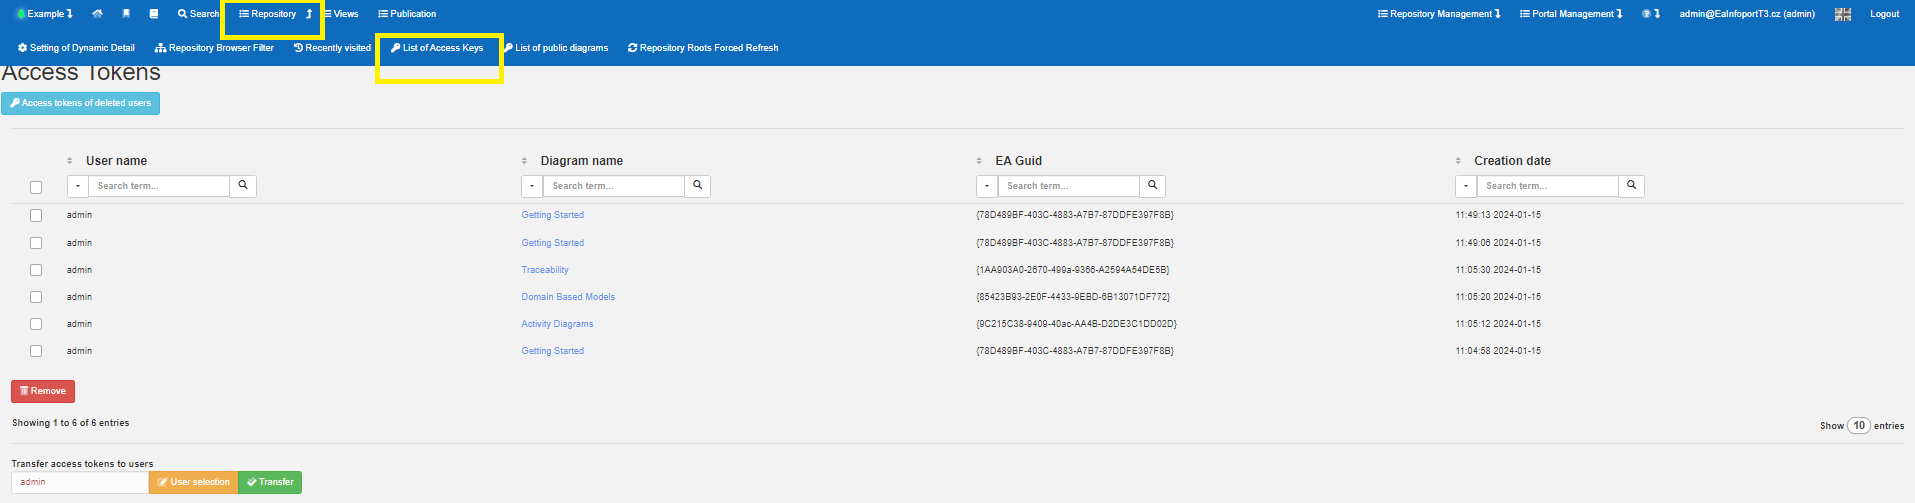
Creating an access key
To add an access key, a user finds an artefact in the repository and runs the detail – then he/she clicks on the arrow to the right to expand the menu and selects the “Direct Access URL” – then he/she clicks on copy and at this point the key is added to the access key list.
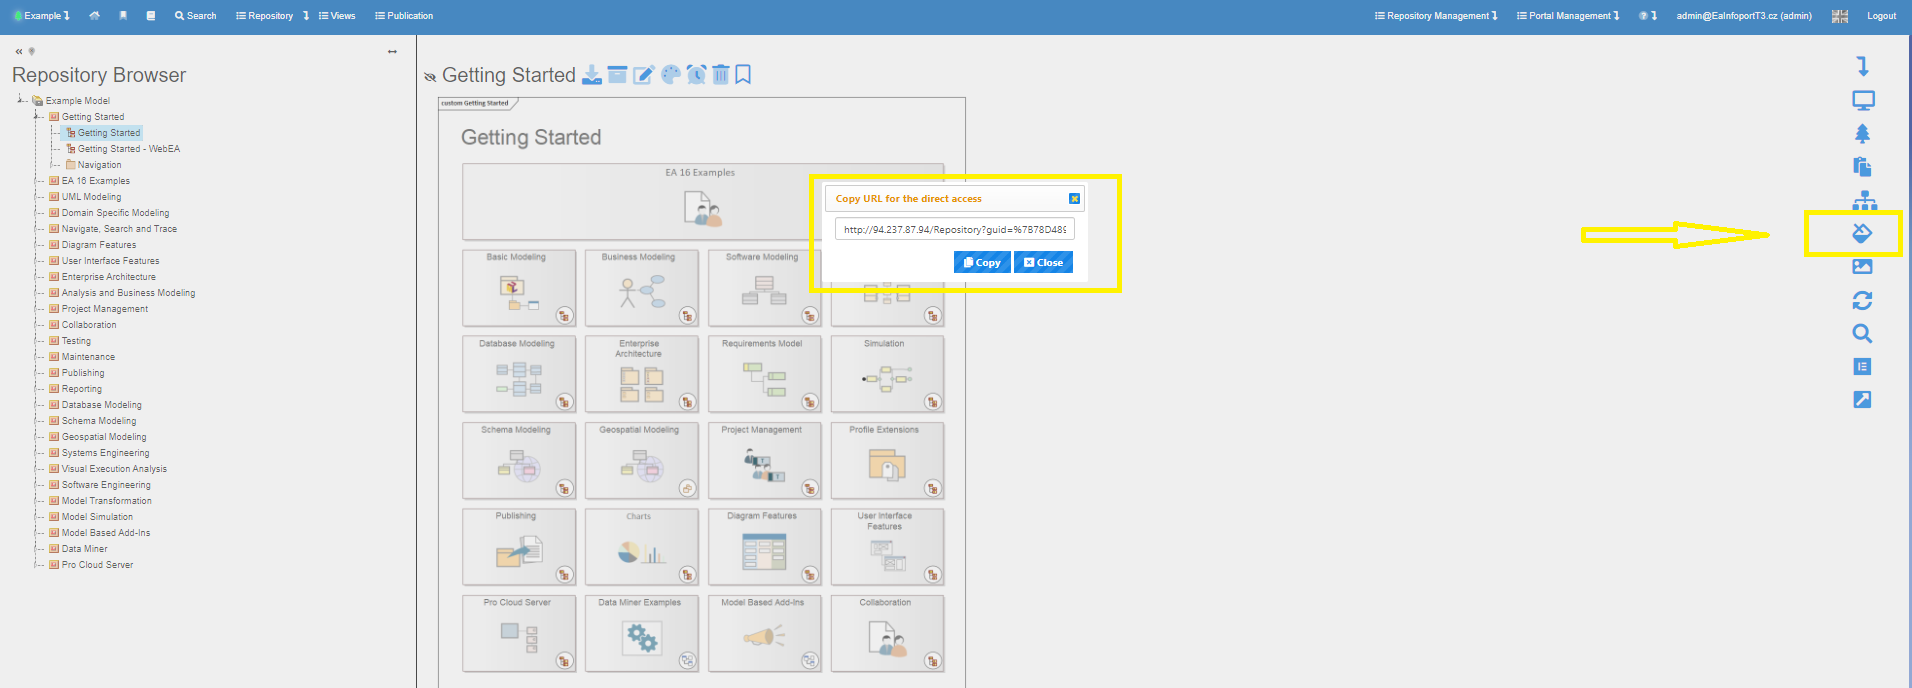
Transfer of access keys
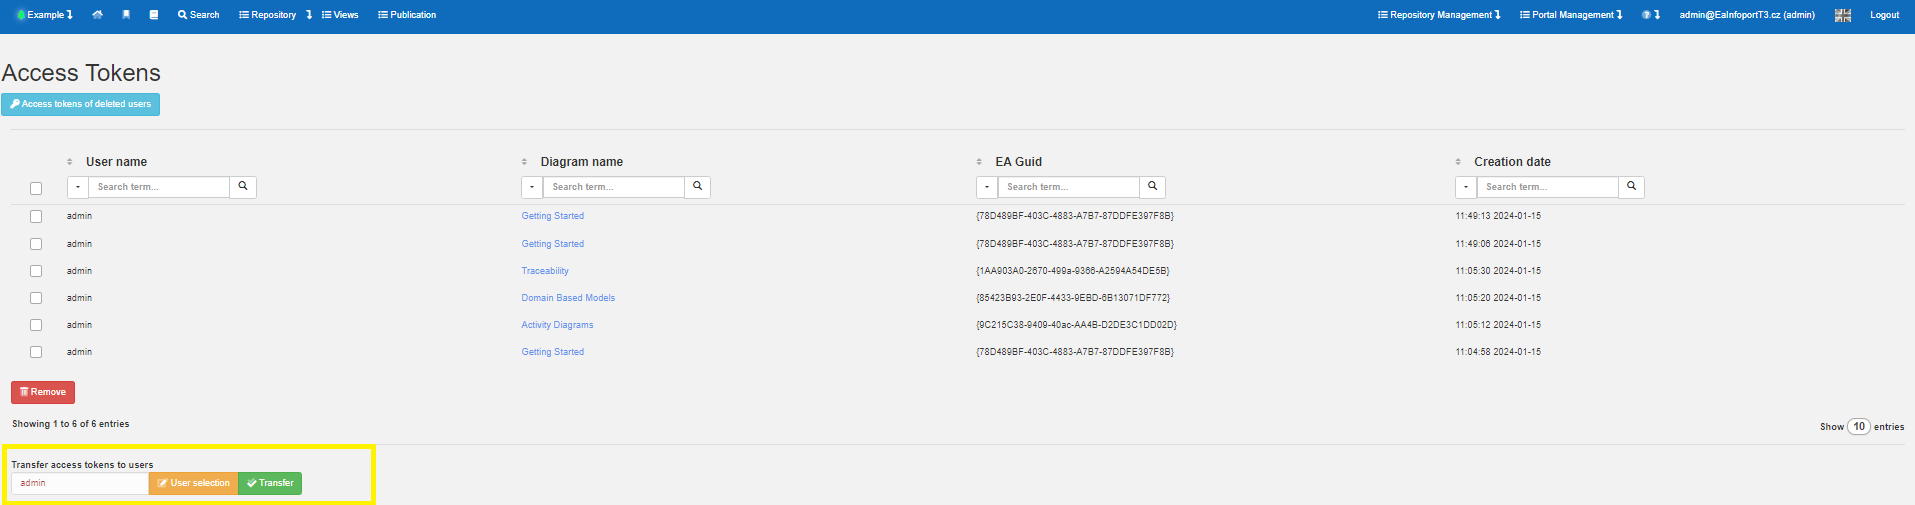 At the bottom of the screen, click on "User Selection". After selecting the user, specify which access keys to transfer (using the checkbox). Confirm the selection with the green "Transfer" button.
To transfer access keys, it is necessary that the user to whom we are transferring the key has at least the same permissions on the package.
To remove an access key
In the access key list, the user sees the active keys.
He can use the filter to find the key and if he wants to remove it, he can select it with the left mouse button and then click on the "Remove" button.
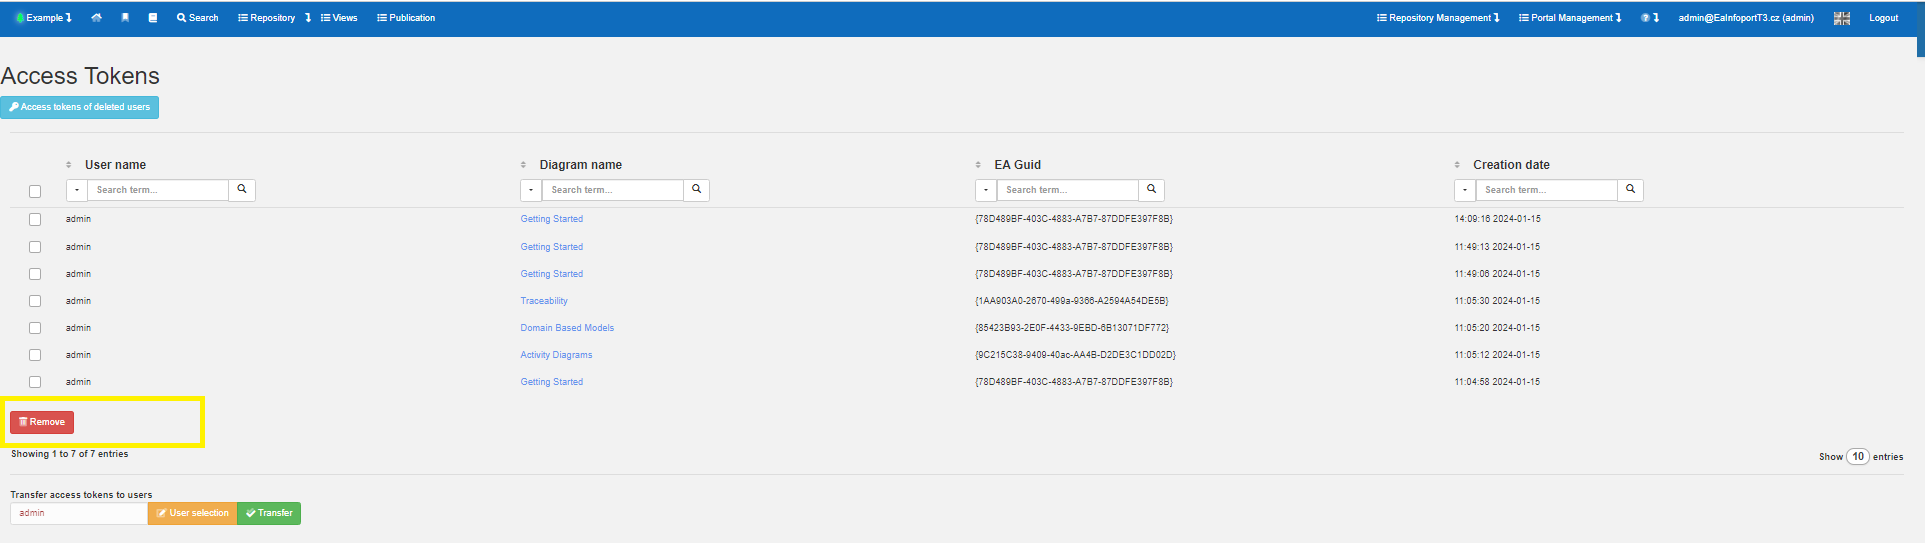
Access tokens of deleted users

The Access tokens of a user who has been deleted are transferred from the "Access tokens" section to " The Access toknes of deleted users" section.
Access toknes of deleted users can be filtered, transferred and removed in the same way as "Access tokens".
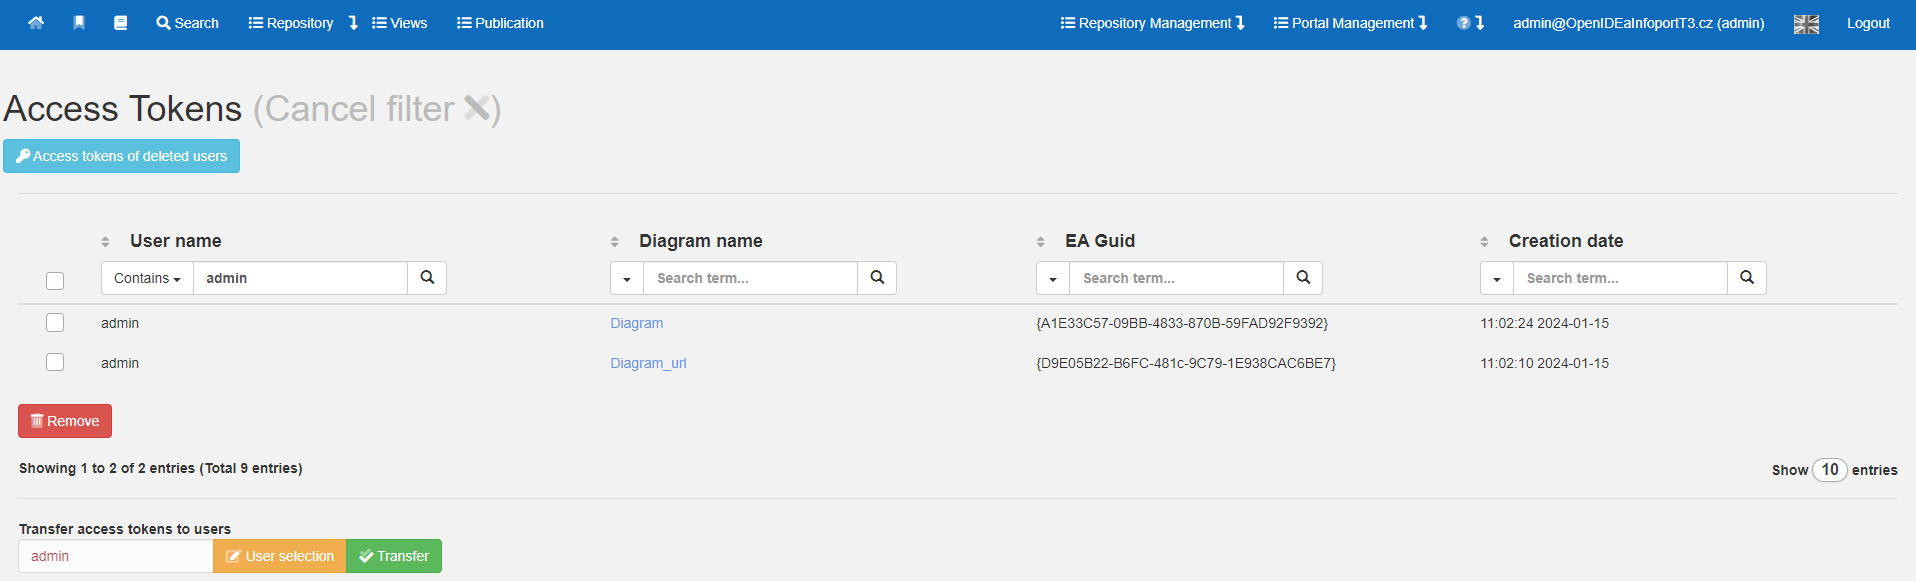
Transferring Access Tokens of Deleted Users
List of public diagrams
Access diagrams are available by clicking on the arrow next to the "Repository" tab and in the subsequently expanded "List of public diagrams" submenu.
Whenever the user uses the "URL for public diagram" option, the key of this URL is saved in the "List of public diagrams".
If the user no longer wants to be able to access the corresponding URL without a password, he has the option to remove the key here.

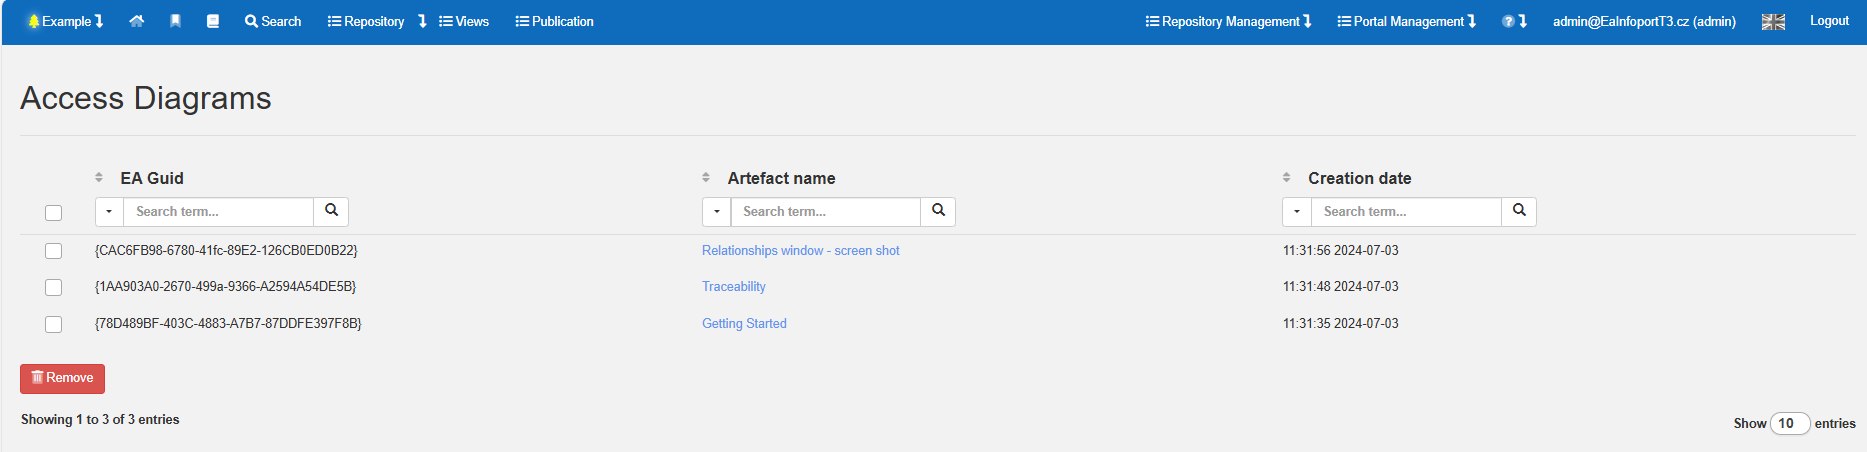
Permissions - Access to publish public keys (permalinks)
There is a new option in EaIfoport to set "Access to publish public keys" for users.
After installing version 8.7.0, users who create permalinks must set the permissions otherwise they will lose this option.
Setting option:
1) Portal Management > Users management > Repositories > select the required permissions
2) Click on Repository Model > Repository Management > Users Management > Permissions
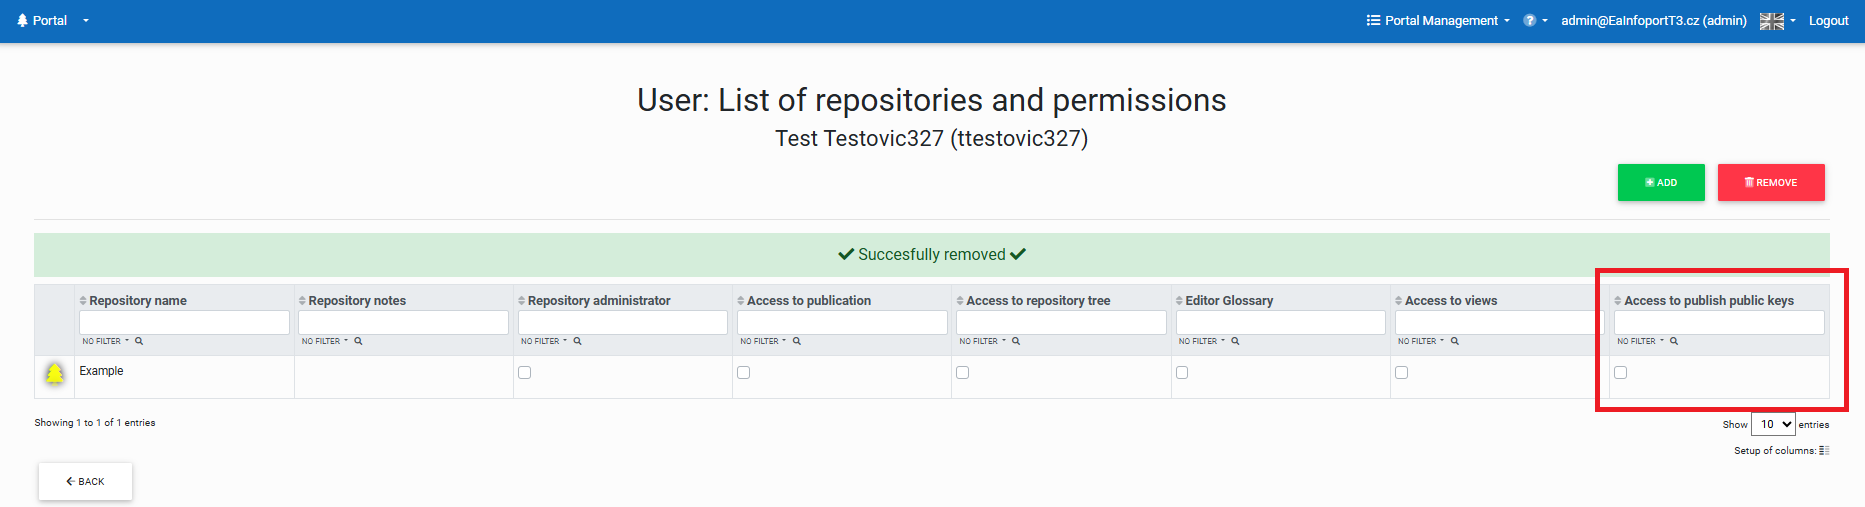
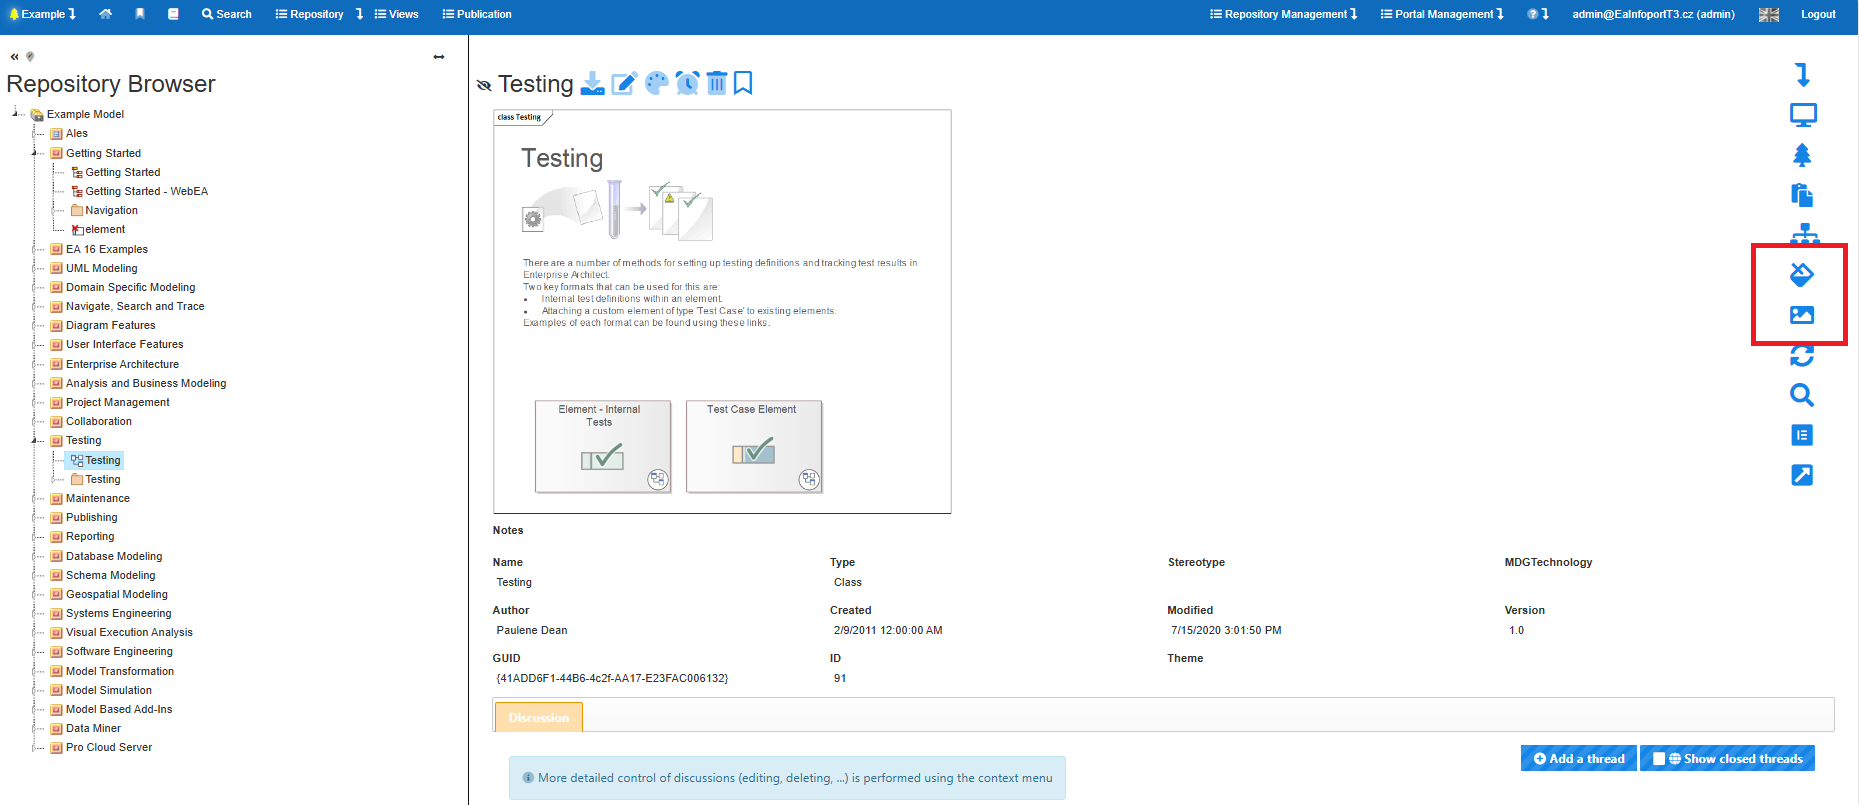
Learn more about access keys https://doc.eainfoport.cz/books/user-manual/chapter/access-tokens
Permissions on the package
Permissions to parts of the repository
EA Information Portal supports a permission system at the package level (repository browser tree branches), both for reading and (since version 7.5) for writing.
It is therefore possible to restrict the reading of parts of the model to specific groups or users. This functionality is not available in Enterprise Architect itself.
It is therefore possible to restrict access of certain users to (for example) specific projects, sensitive processes, risk analyses, strategic business models, etc.
This feature fundamentally supports the effort to have all models in one repository.
Permissions can be set for groups and users.
Permissions are applied hierarchically from the package they are set on down.
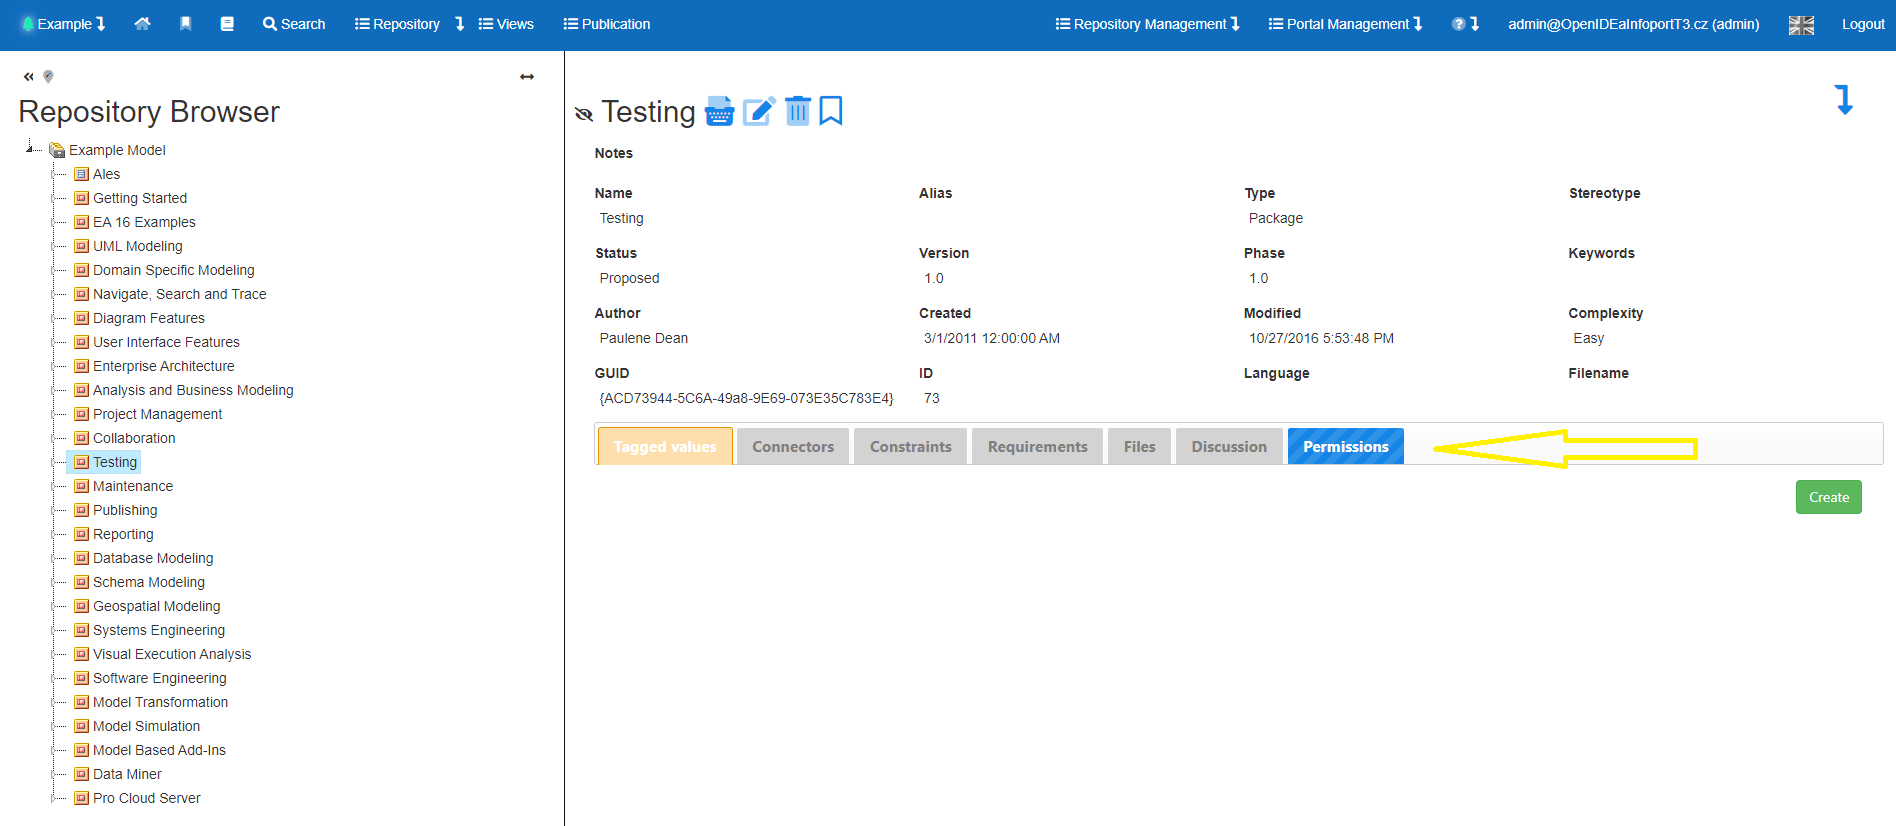
Default settings
EA Infoport supports a permission system at the package level (repository browser tree branches), both for reading and (since version 7.5) for writing.
Thus, it is possible to restrict the reading of parts of the model to certain groups or users.
It is thus possible to restrict access of certain users to (for example) specific projects, sensitive processes, risk analyses, strategic business models, etc.
If there is no default setting, i.e. the setting is taken from the parent root package, then the repository is not visible by default, or reading is not allowed.
Permissions can be set for groups and users, via the "Permissions" button.
The rights are applied hierarchically from the package on which they are set downwards.
EA Infoport allows you to disable/allow users or groups from accessing different packages by default using the following button:
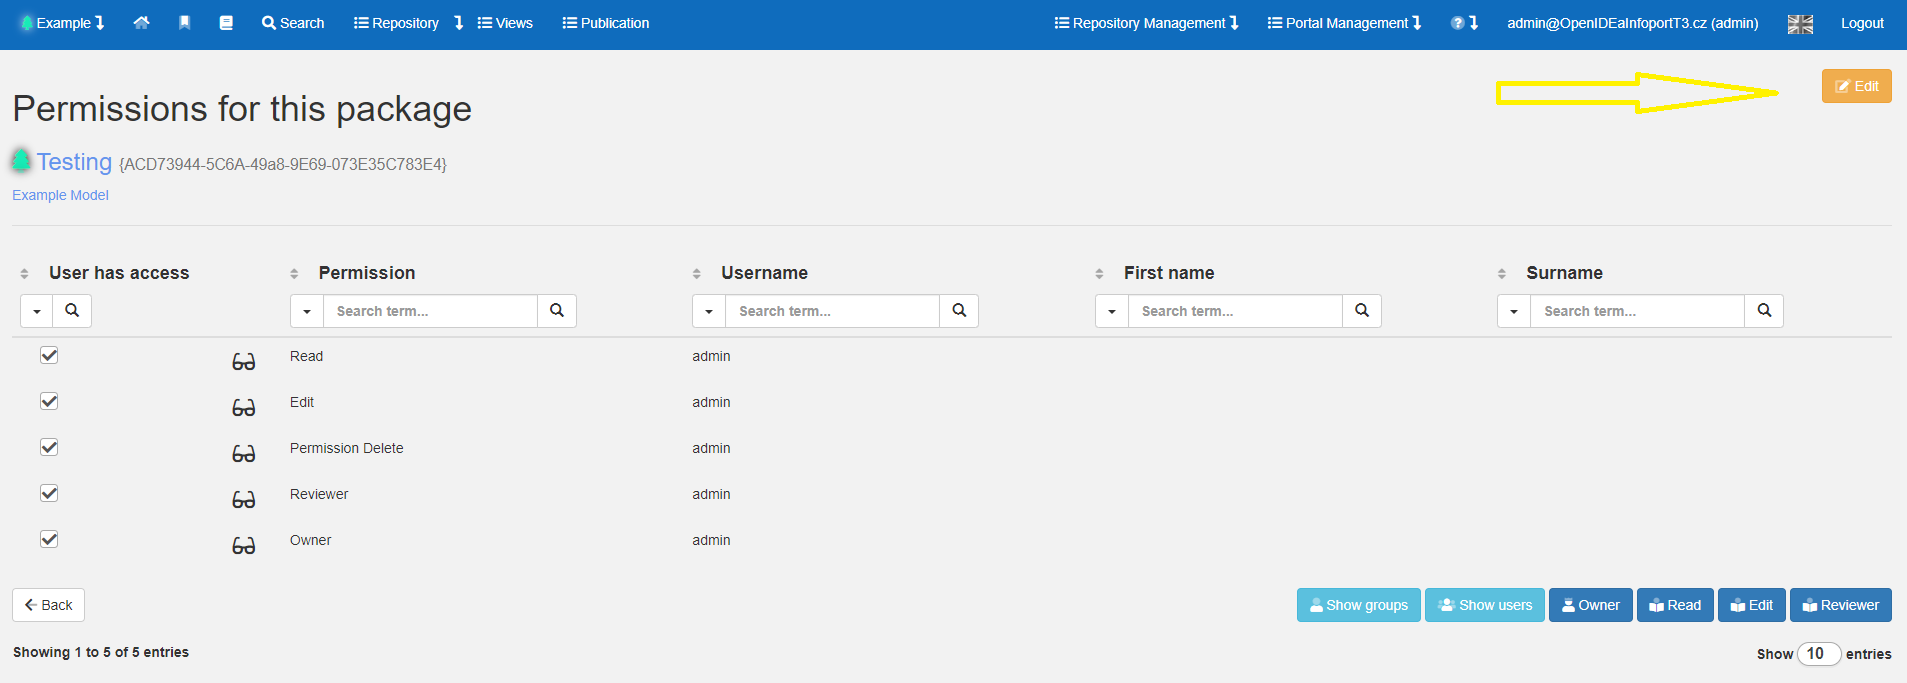
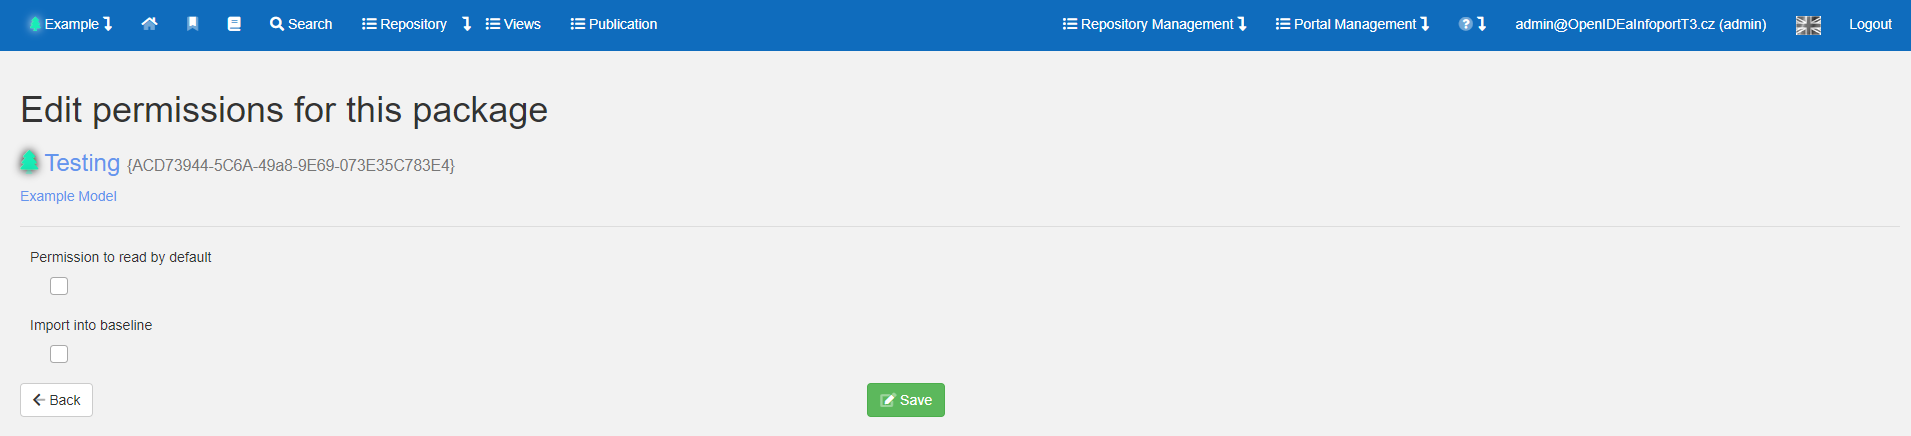
Without default settings
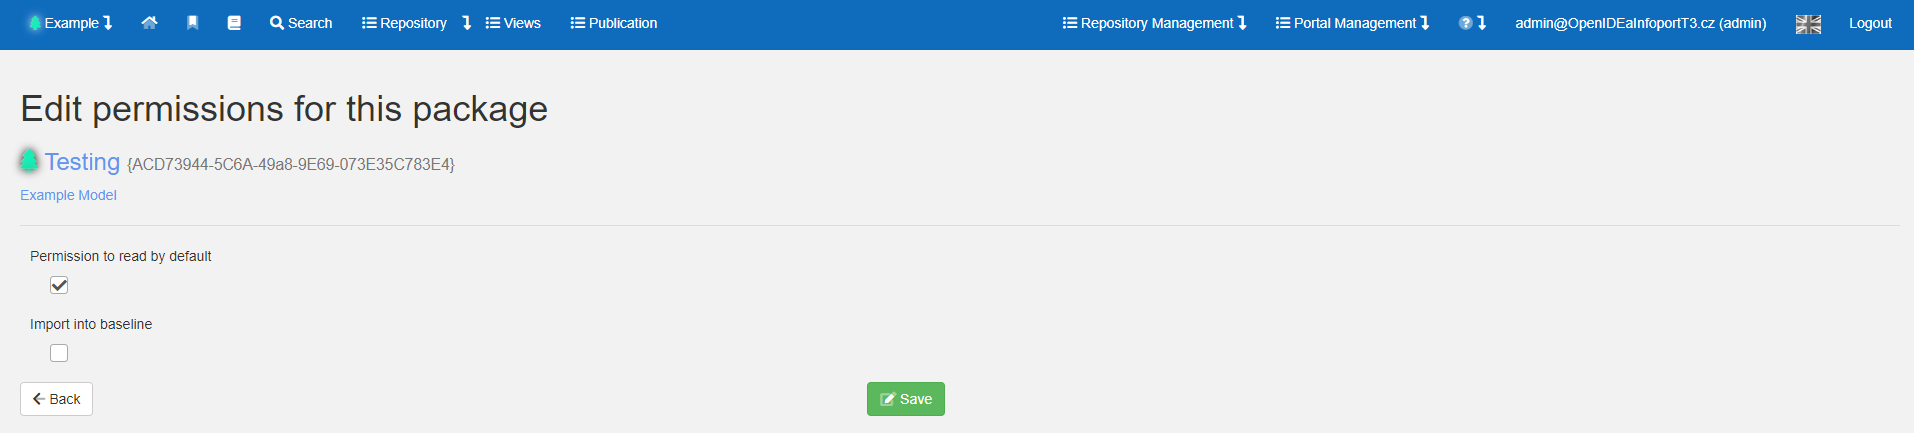
Reading is enabled by default
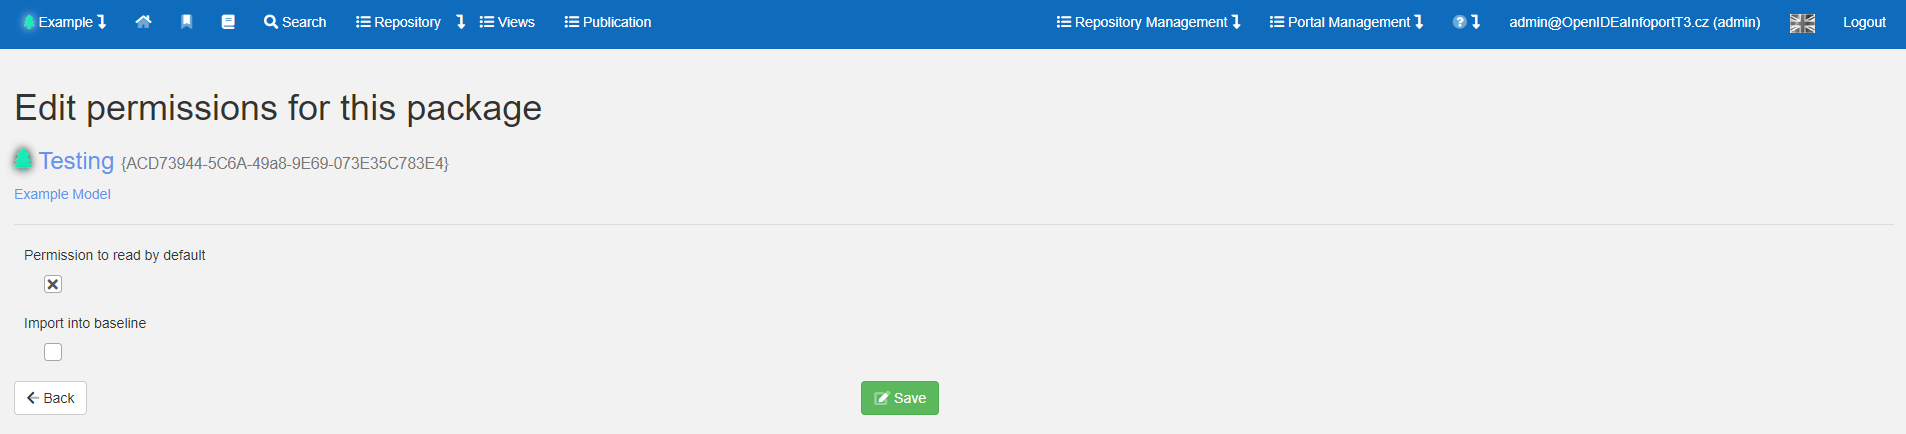
Reading is disabled by default
User/group role specifications
If the default settings are not enough and we need to specify a range of other users, it is possible to specify roles and access directly on the user or group.
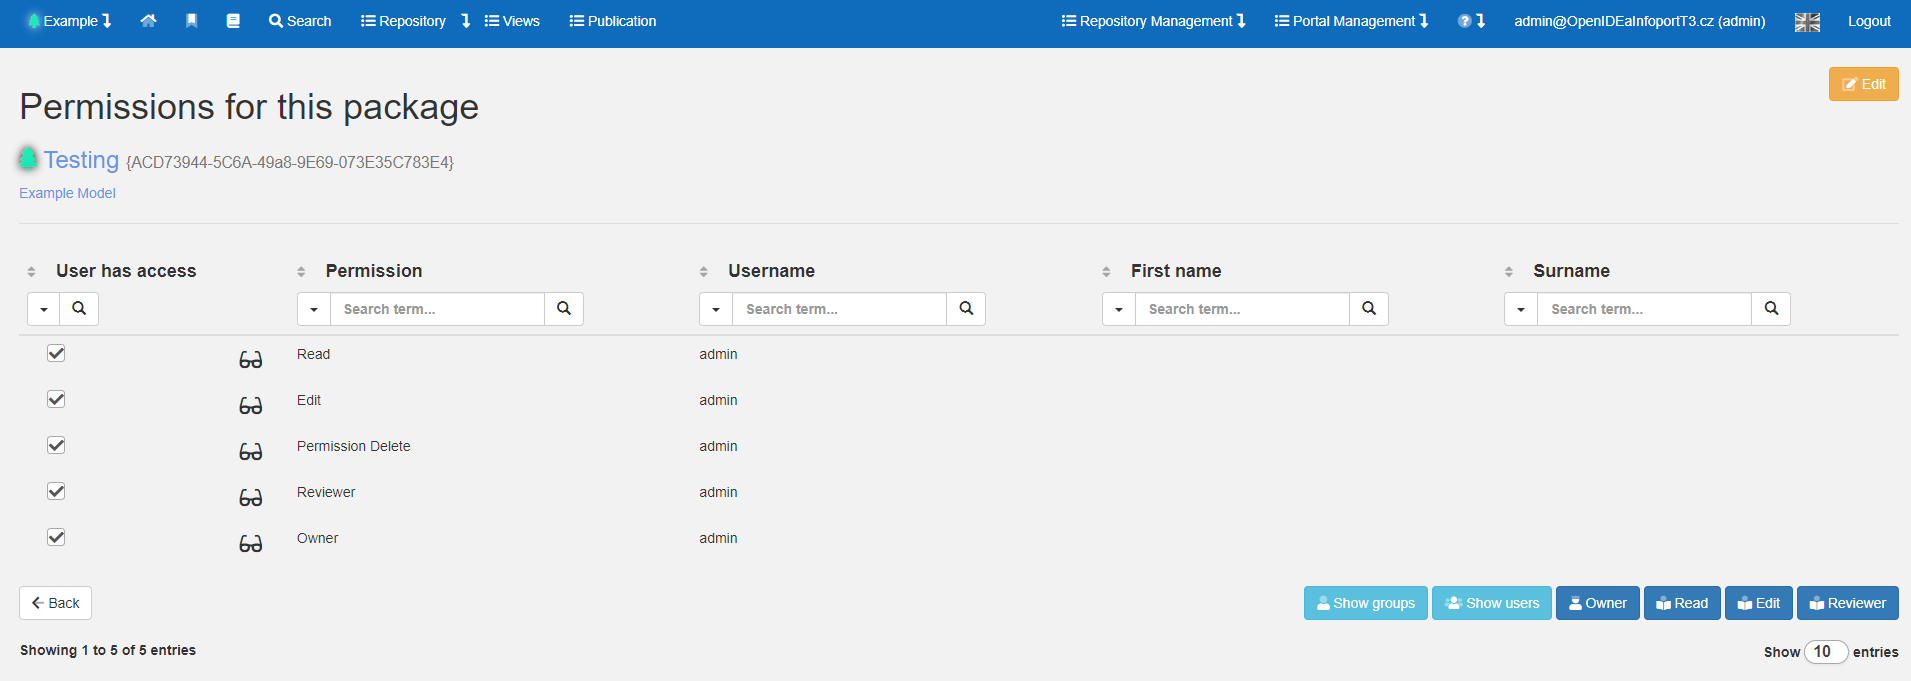
The table below shows the legality of the powers:
|
Role |
read |
edit |
delete |
reviewed |
|
Reader |
✔ |
x |
x |
x |
|
Editor |
✔ |
✔ |
x |
✔ |
|
Permission Delete |
✔ |
x |
✔ |
x |
|
Reviewer |
✔ |
x |
x |
✔ |
|
Owner |
✔ |
✔ |
✔ |
✔ |
Owner
The EA Information Portal supports a package-level permission system (repository browser tree branches), both read and (as of version 7.5) write.
It is therefore possible to restrict the reading of parts of the model to specific groups or users. This functionality is not available in Enterprise Architect itself.
It is therefore possible to restrict access of certain users to (for example) specific projects, sensitive processes, risk analyses, strategic business models, etc.
The rights are applied hierarchically from the package on which they are set downwards.
In this context, a new role is introduced in EA Infoport - the owner of a process part. This role will be able to assign read, write (and other) rights to the parts of the model it owns (tree branches). The owner can be users or groups. This role is introduced so that the repository administrator (admin) does not have to set all read and write permissions.
Example of use
- Restricting access of external contractors working on a common project. Everyone can only see what they are allowed to see.
- In case of termination of cooperation with a contractor, it is sufficient to terminate access through the EA Information Portal.
Permissions on the package
Setting permissions on package
The permission settings on package are shown in the table below:
| Parent | Default | Group | Personal | Result |
| no | - | - | - | no |
| no | no | - | - | no |
| no | yes | - | - | yes |
| no | x | - | no | no |
| no | x | - | yes | yes |
| no | x | no | - | no |
| no | x | yes | - | yes |
| no | x | no | no | no |
| no | x | no | yes | yes |
| no | x | yes | no (not possible)** | yes |
| no | x | yes | yes | yes |
| yes | - | - | - | yes |
| yes | no | - | - | no |
| yes | yes | - | - | yes |
| yes | x | - | no | no |
| yes | x | - | yes | yes |
| yes | x | no | - | no |
| yes | x | yes | - | yes |
| yes | x | no | no | no |
| yes | x | no | ano (not possible)** | no |
| yes | x | yes | no | no |
| yes | x | yes | yes | yes |
* If you set permissions on a group, the settings are automatically checked on the user who is a member of the group.
- not specified
x value does not matter
If there is no default setting i.e. the setting is taken from the parent root package, the repository is not visible by default, or reading is not allowed.
Authorization if the user is a member of two groups with different permissions
| Package default | Group A - Manager | Group B - basic | Result |
| Without settings* | Without settings* | Without settings* | Disabled |
| Enabled | Without settings* | Without settings* | Enabled |
| Disabled | Without settings* | Without settings* | Disabled |
| Enabled | Enabled | Enabled | Enabled |
| Disabled | Disabled | Disabled | Disabled |
| Enabled | Enabled | Disabled | Disabled |
| Disabled | Enabled | Disabled | Disabled |
*only for new "root" in other cases the settings are inherited from a higher package
Correction if the user is a member of two groups with different permissions and also has individual settings
| Package default | Group A - Manager | Group B - basic | Result | Individual settings | Result |
| Without settings* | Without settings* | Without settings* | Disabled | Enabled | Enabled |
| Enabled | Without settings* | Without settings* | Enabled | Disabled | Disabled |
| Disabled | Without settings* | Without settings* | Disabled | Enabled | Enabled |
| Enabled | Enabled | Enabled | Enabled | Disabled | Disabled |
| Disabled | Disabled | Disabled | Disabled | Enabled | Enabled |
| Enabled | Enabled | Disabled | Disabled | cannot be allowed** | Disabled |
| Disabled | Enabled | Disabled | Disabled | cannot be allowed** | Enabled |
** the message successfully removed/added but settings are not saved, group settings cannot be overridden
Pool/Lanes

Since version 8.7.6.9118, the names of roles/actors connected to the pool/lanes via classifiers are displayed.
Detail in the element