Repository (Repository Browser)
The repository shows the physical structure of the repository, i.e. the hierarchy (tree) of packages, elements, diagrams and other elements. Its functionality is similar to a browser (or repository browser) in the Enterprise Architect tool and it displays data in the same structure with the possibility of additional filtering – see later in this document. Each repository element can be present in the tree only once.
- Permissions to parts of the repository
- Repository View
- Basic Description of the Repository User Interface
- Tree Repository
- Hiding the Repository Tree
- Turning repository tree editing on/off
- Manipulating the tree repository
- Internal artifacts
- Clone
- Create a view
- Export/Import XMI
- Slider between the Repository Tree and the Detail
- Description of commands in the context menu
- Full Screen
- Find in the Repository Browser
- Copy URL
- Copy EA Address
- URL for Direct Access
- Forced Refresh
- Zoom
- Zoom in
- Zoom out
- Reset Diagram Zoom
- Reset Diagram Position
- Elements in the Diagram
- Hiding Text Information in Element Detail
- Information about the repository
- Icons on Artefacts
- Detail elementu / package / diagramu
- Discussion (comments) in packages, diagrams, elements
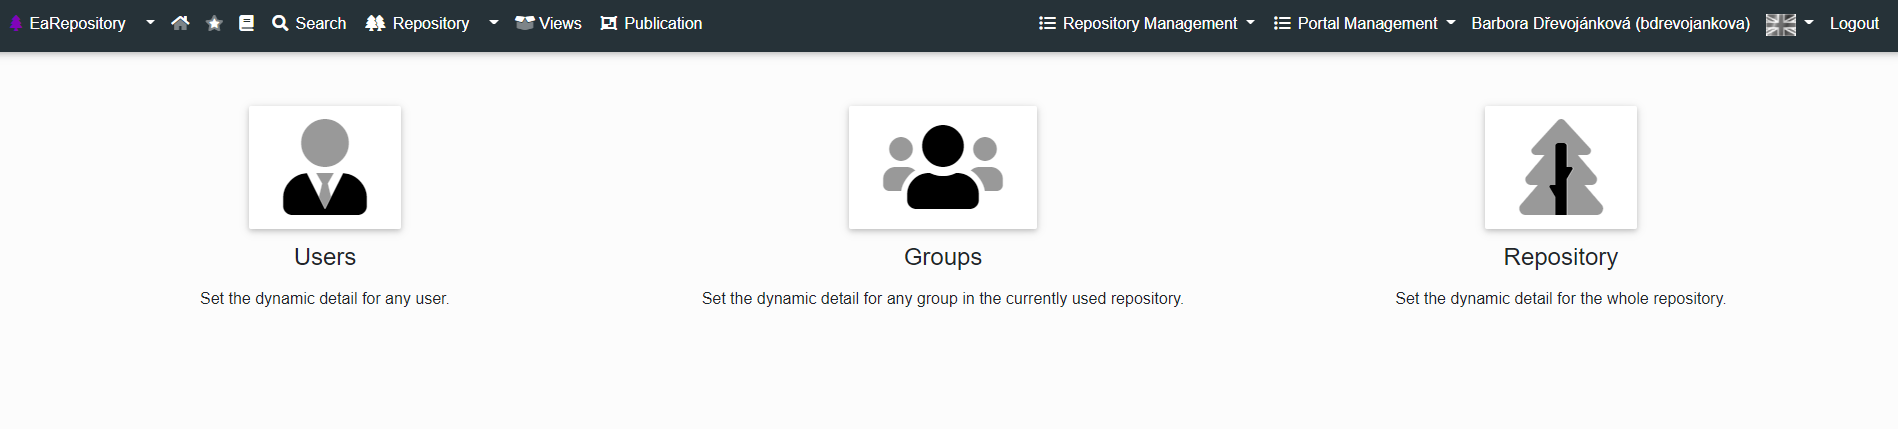
- Setting of Dynamic Detail
- Setting of Dynamic Detail for Users
- Setting of Dynamic Detail for Groups
- Setting of Dynamic Detail for Repository
- Repository Tree Filter
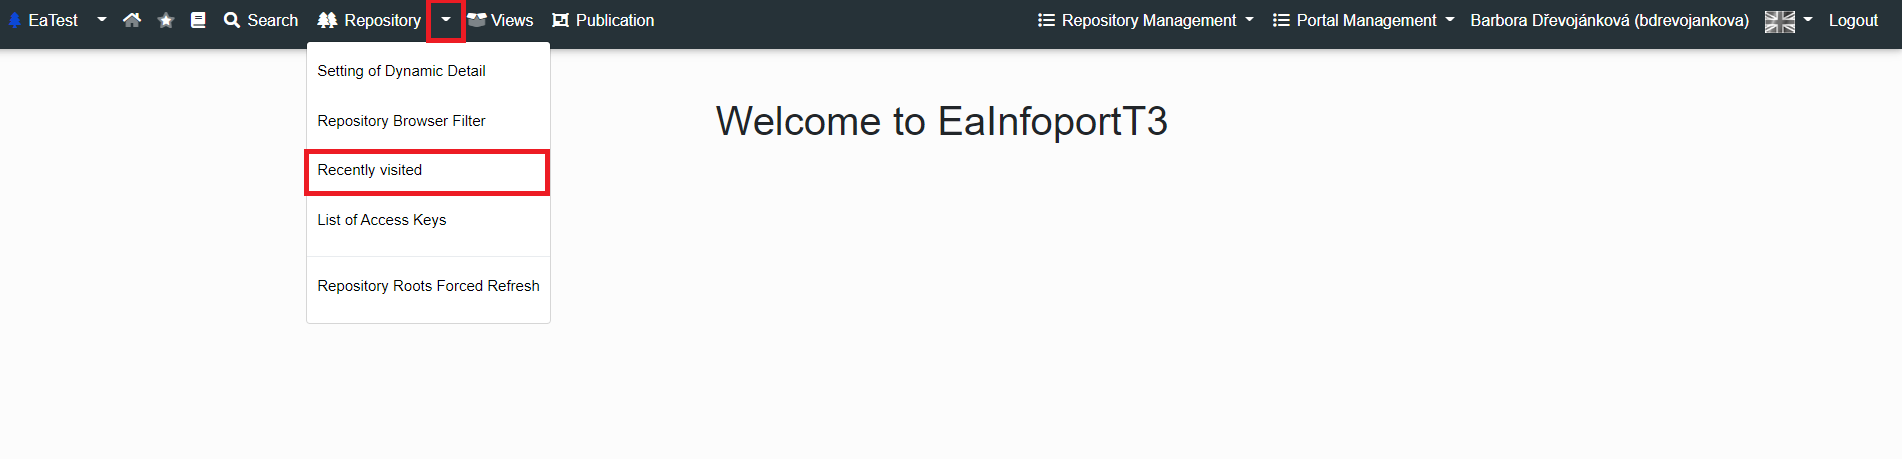
- Recently visited
- List of Access Keys
- Repository Roots Forced Refresh
- Setting the notification interval for diagram subscribers
- Permissions to parts of the repository - default settings
- Dynamic detail - tagged values
- Archiving of diagrams
- Sharing images
- Tagged values - Enum
- Recently visited
Permissions to parts of the repository
The EA Information Portal supports a package-level permission system (repository browser tree branches) for both read and (as of version 7.5) write permissions.
It is therefore possible to restrict the reading of parts of the model to certain groups or users. This functionality is not available in Enterprise Architect itself.
It is therefore possible to restrict access of certain users to (for example) specific projects, sensitive processes, risk analyses, strategic business models, etc.
This feature fundamentally supports the effort to have all models in one repository.
Permissions can be set for groups and users.
Permissions are applied hierarchically from the package they are set on downwards.
In this context, a new role is introduced in EA Infoport - the owner of a process part. This role will be able to assign read, write (and other) rights to the parts of the model that it owns (tree branches). The owner can be users or groups. This role is introduced so that the repository administrator (admin) doesn't have to set all read or write rights.
Example of use
- Restricting access to external contractors working on a joint project. Everyone sees only what they are allowed to see.
- In case of termination of cooperation with a supplier, it is sufficient to terminate access via the EA Information Portal.

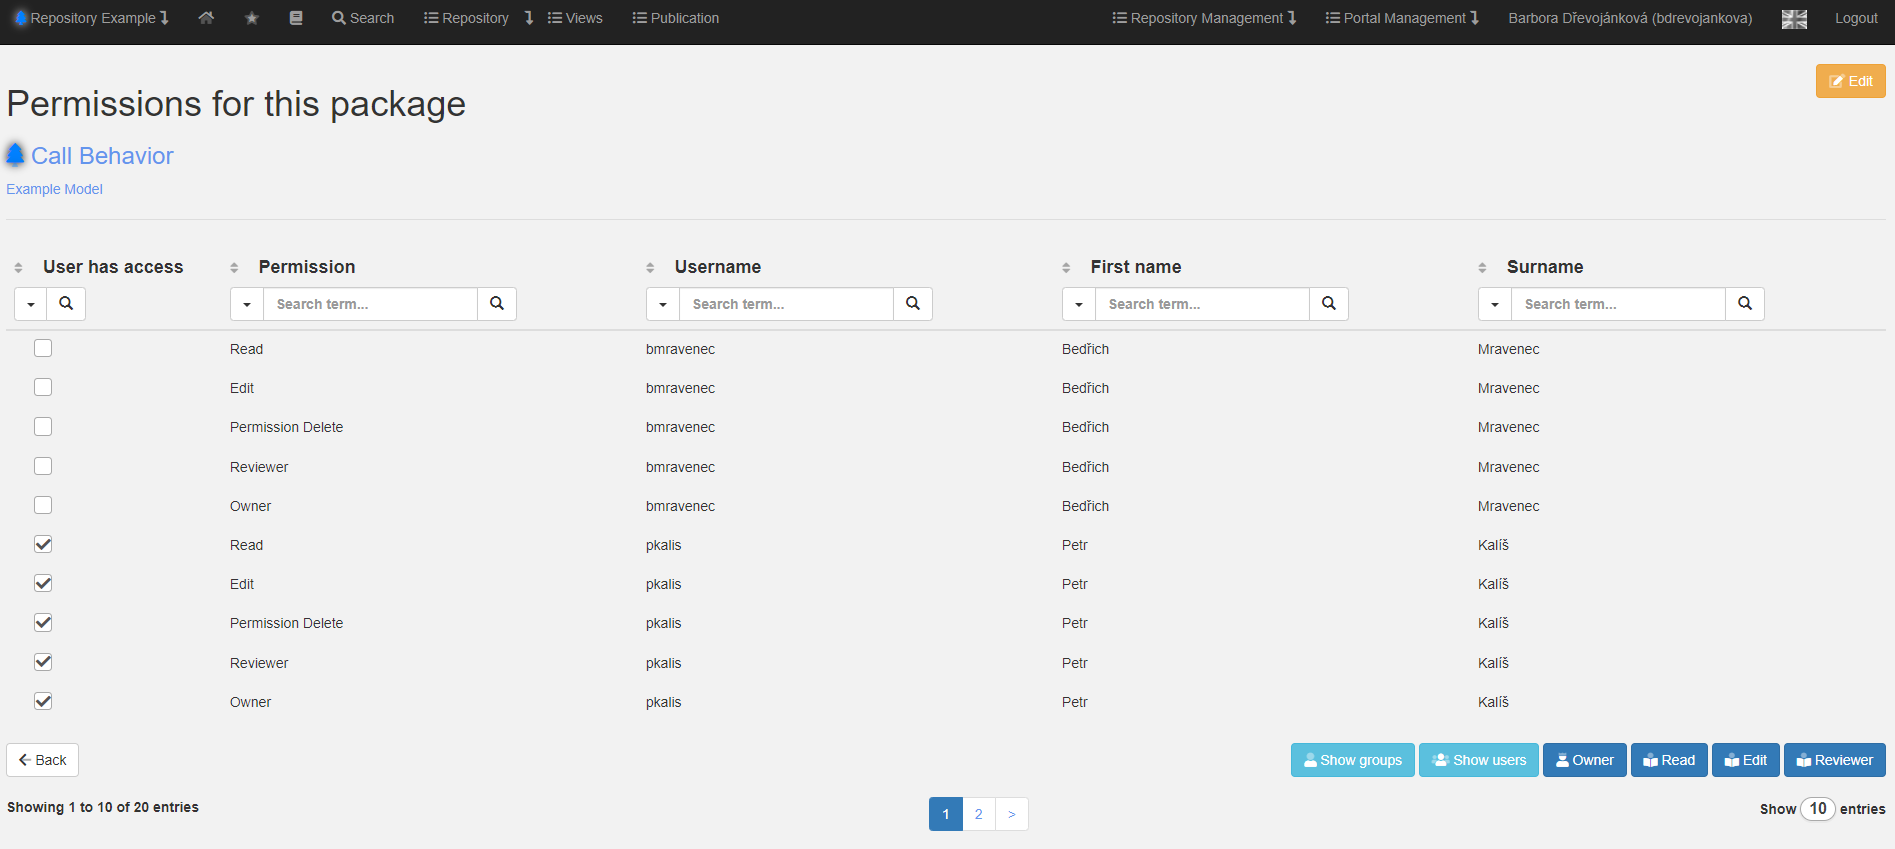
Permissions for this package
Repository View
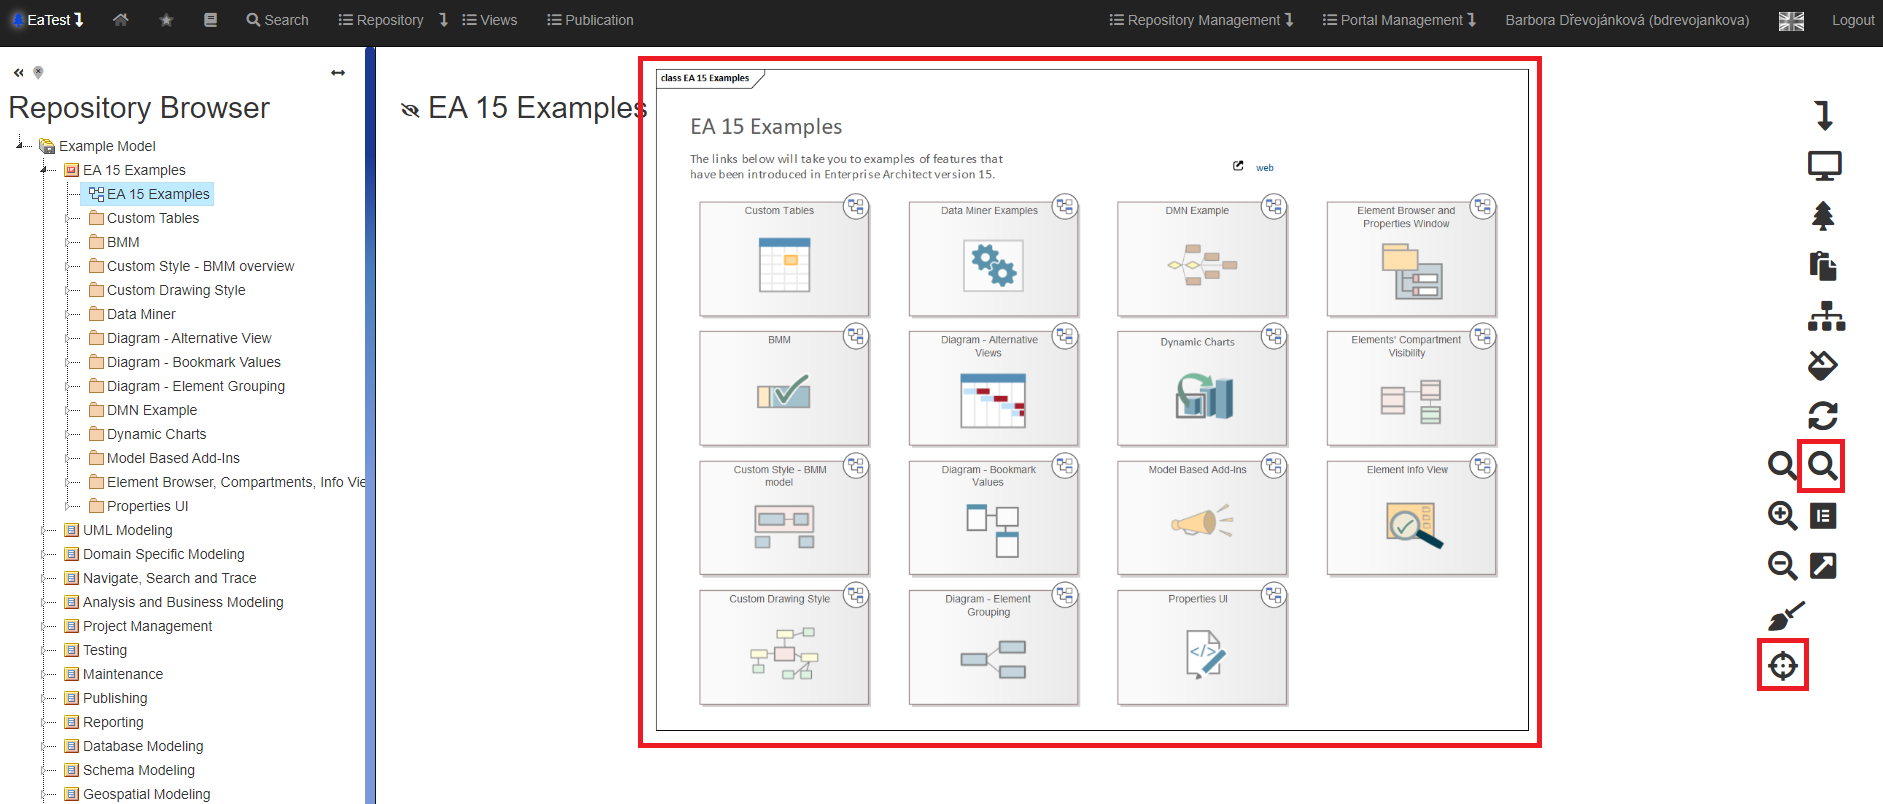
A user can view the contents of the currently selected repository by clicking on the “Repository” command.

After clicking on the “Repository” command, the corresponding form will be displayed with the repository tree shown in the left half and the contents arranged as it is displayed by Enterprise Architect itself.
Basic Description of the Repository User Interface
The repository form (screen) contains several basic elements, which are described in detail in later chapters of this document.
Here is an overview and a brief description.
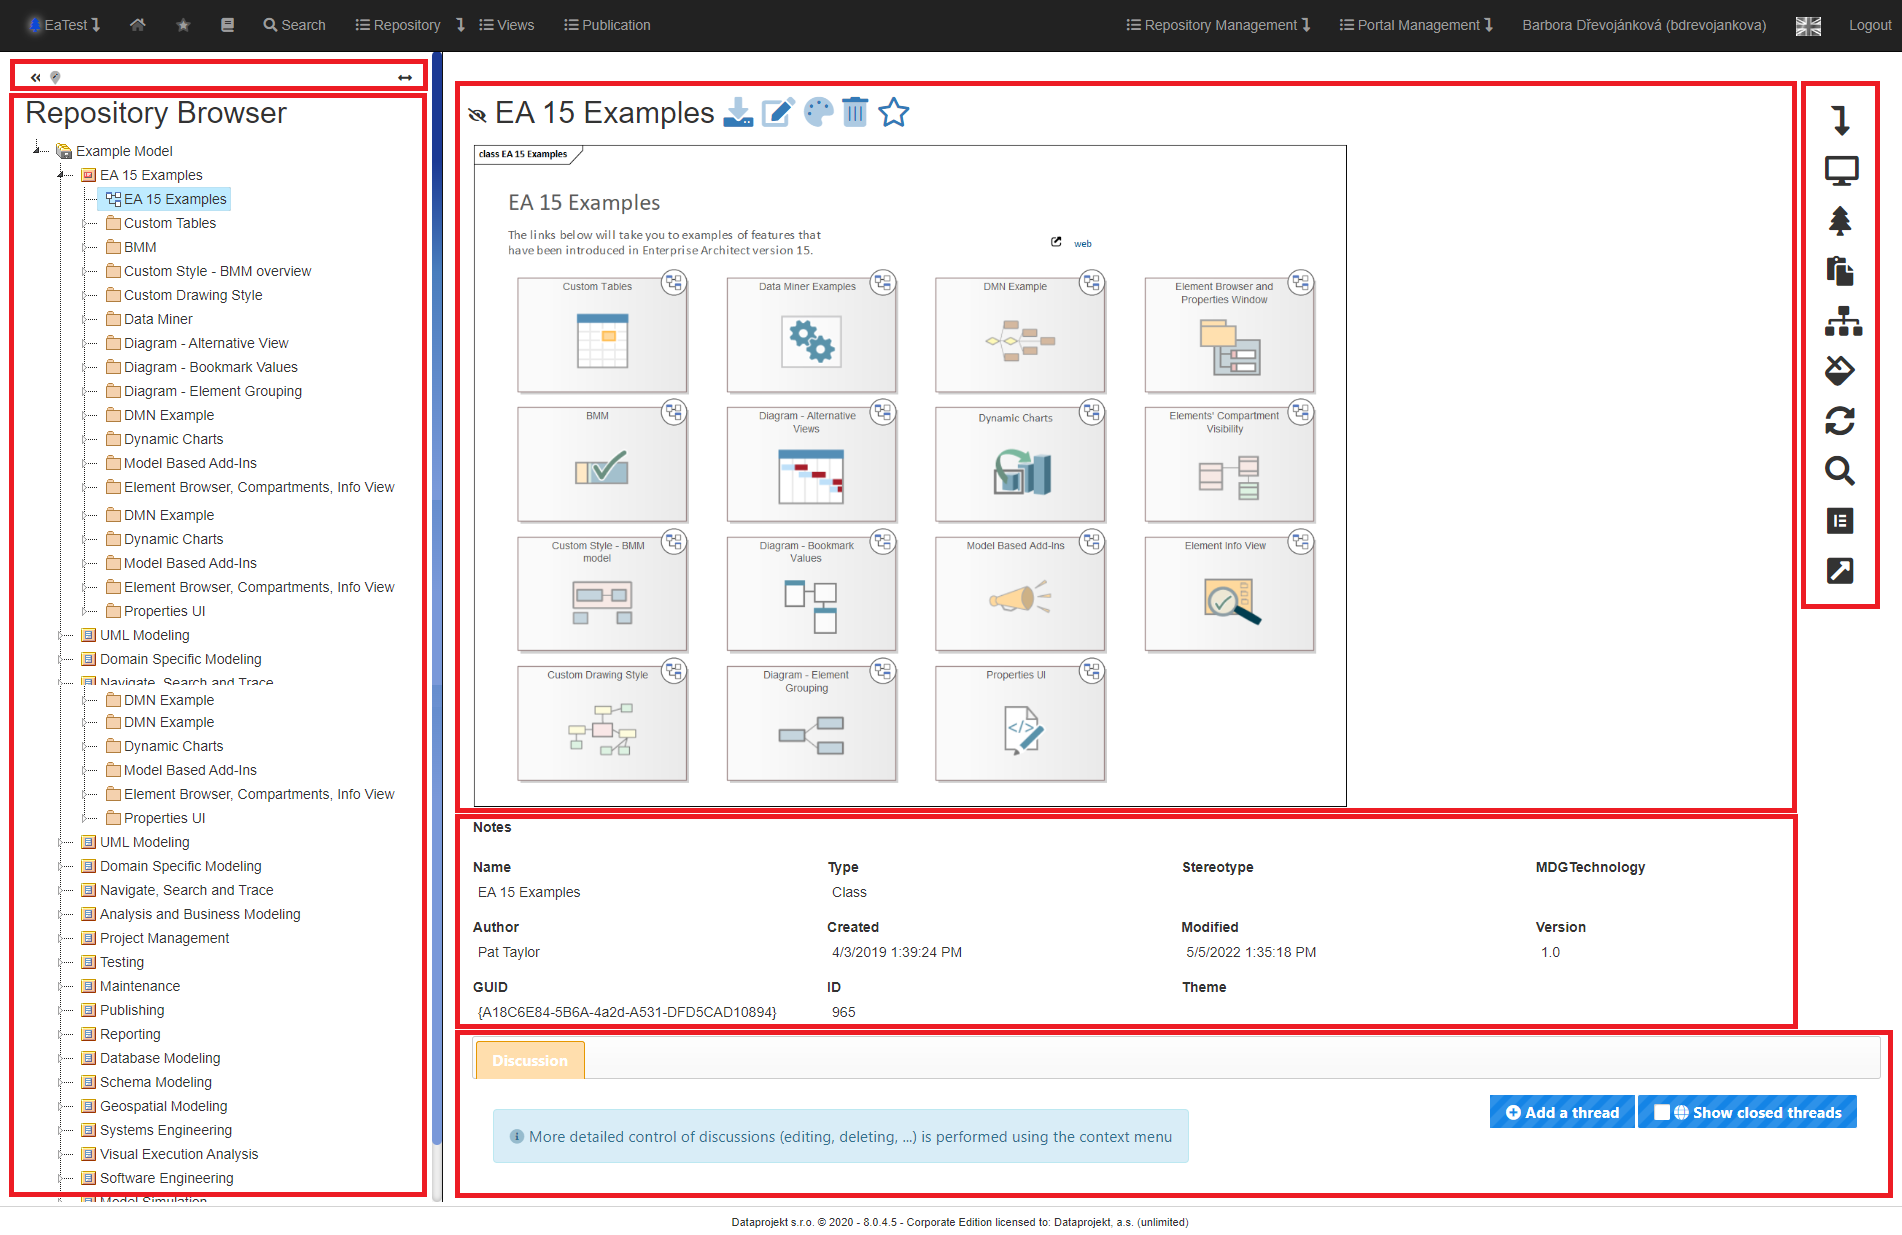
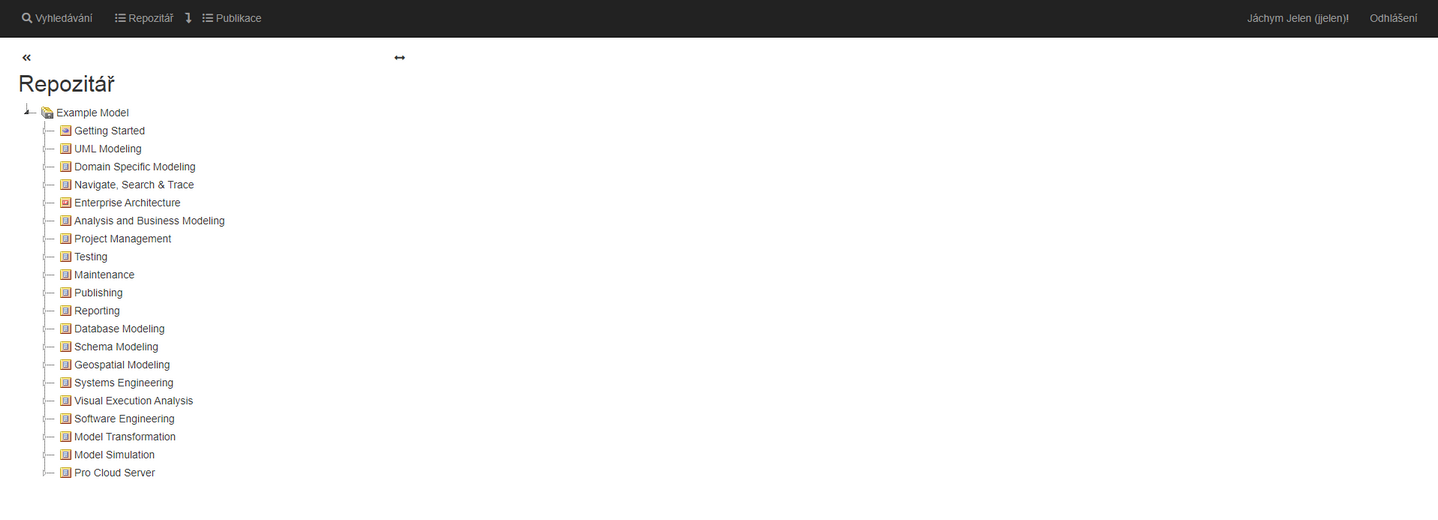
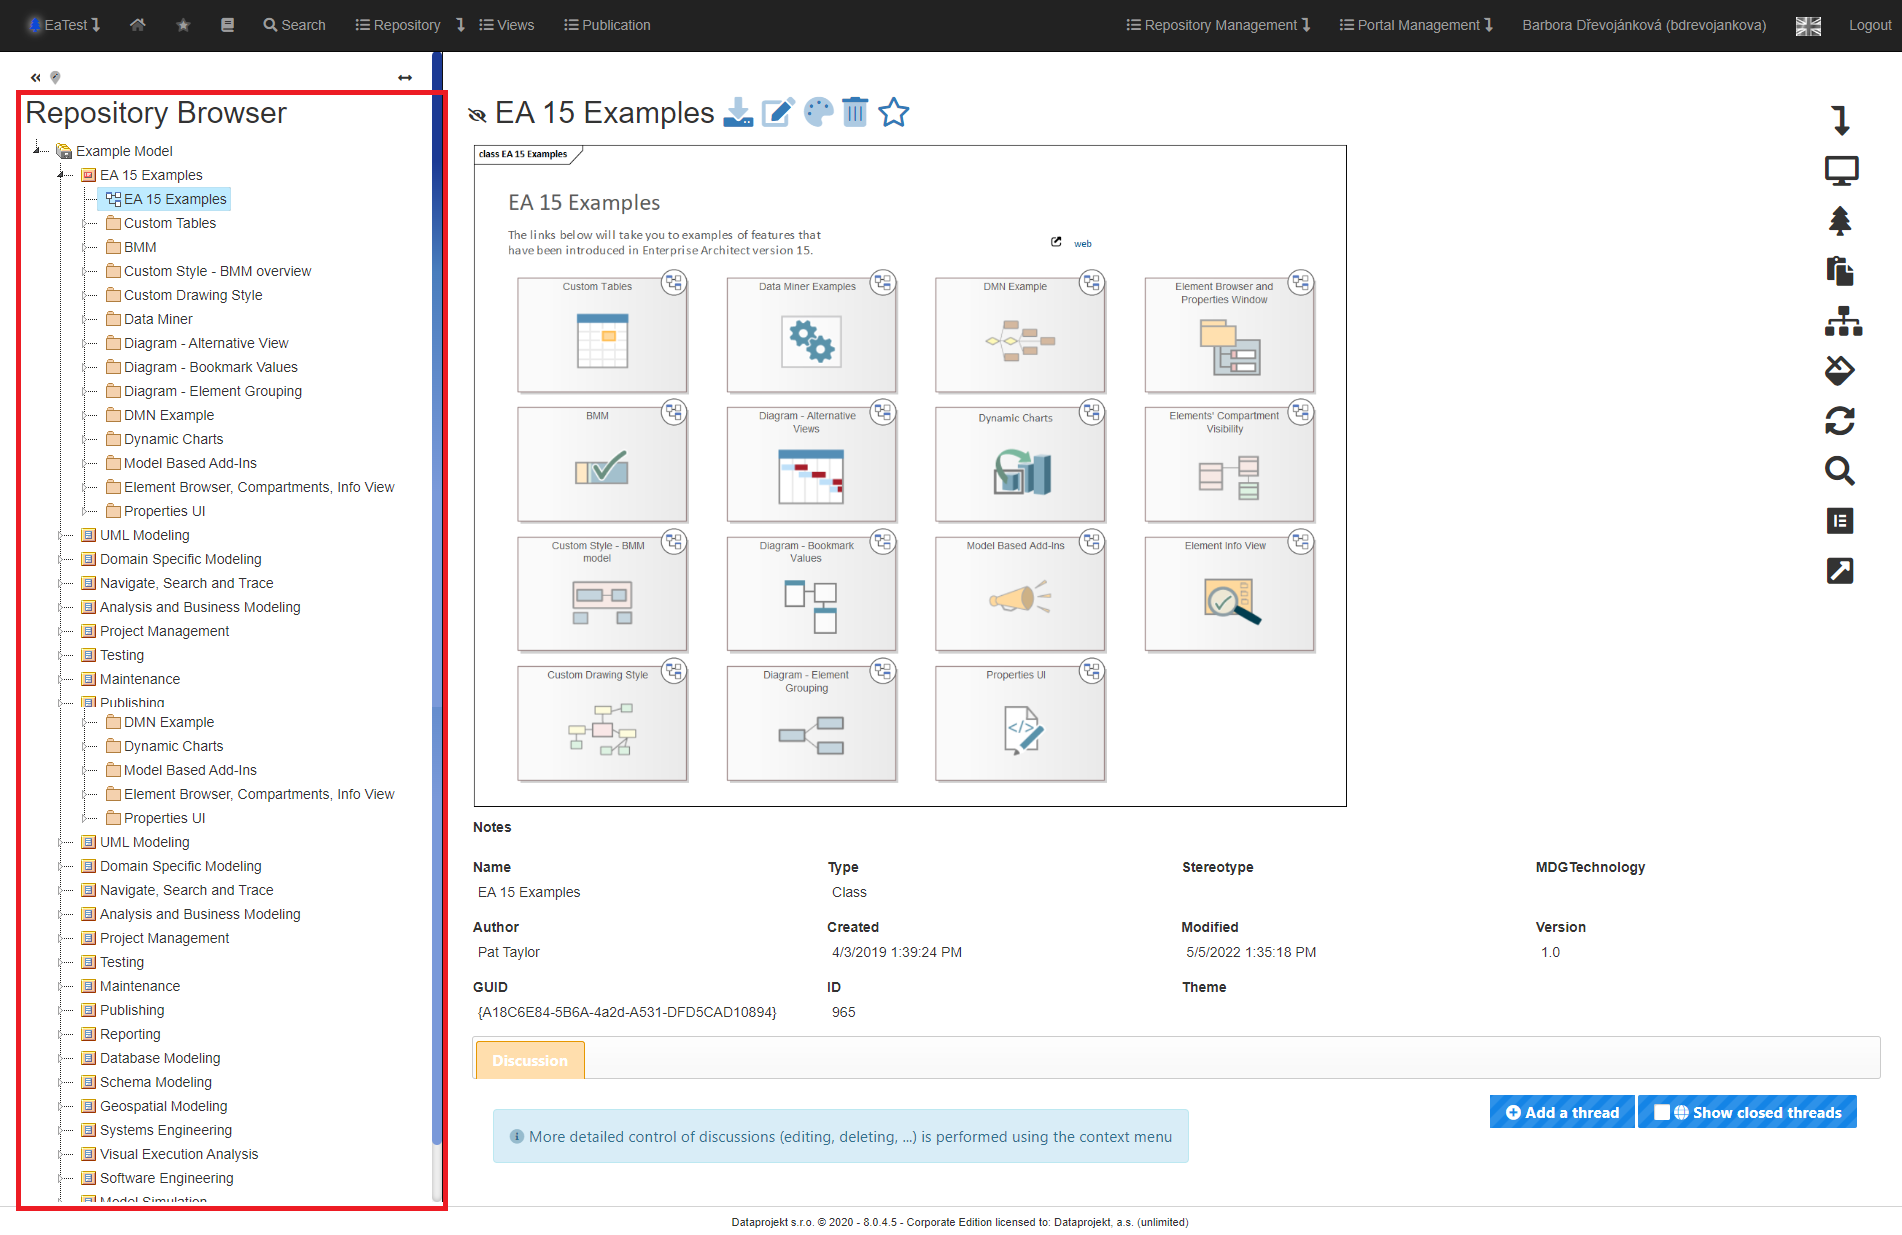
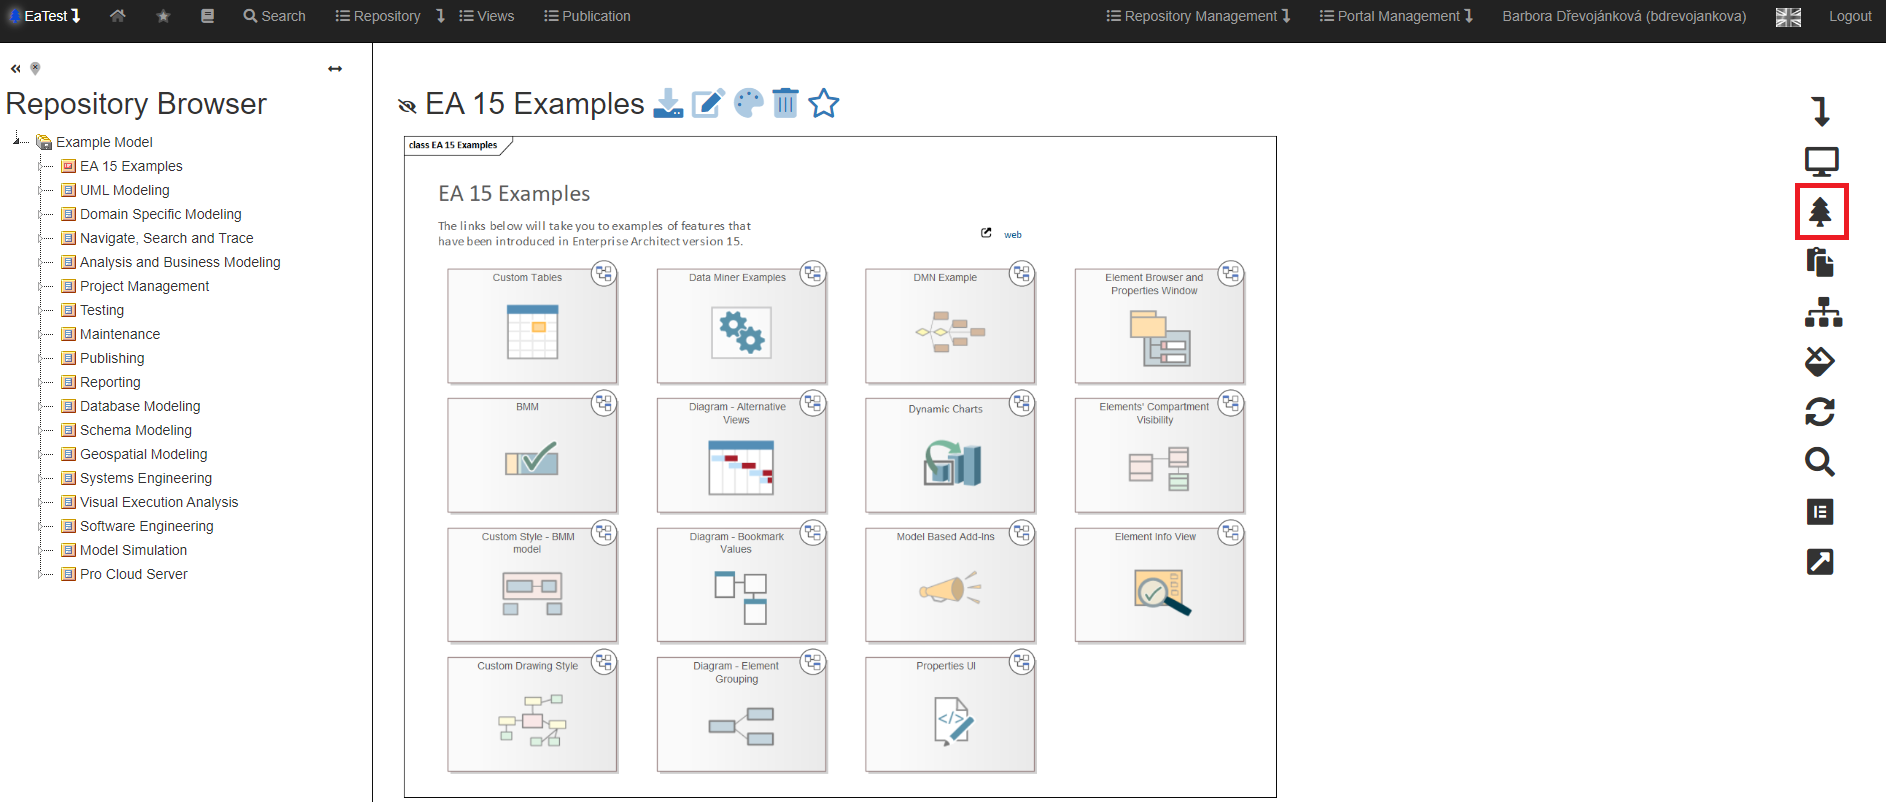
Tree Repository
The repository tree has similar functionality to the browser (repository browser) of the Enterprise Architect tool.
It contains the physical structure of the repository in the form of a clickable tree.
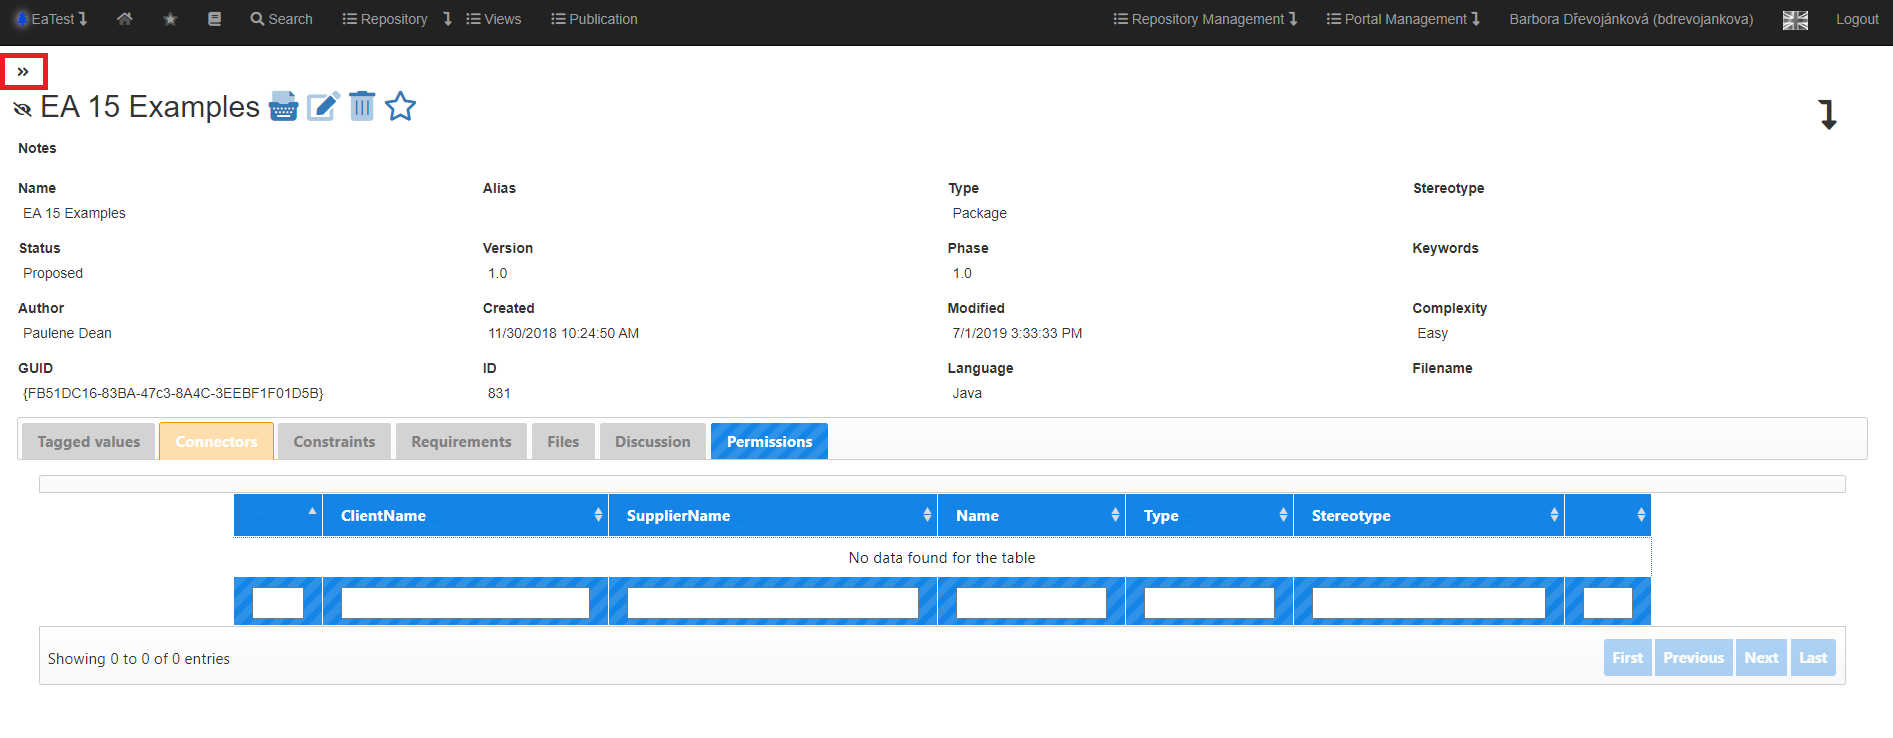
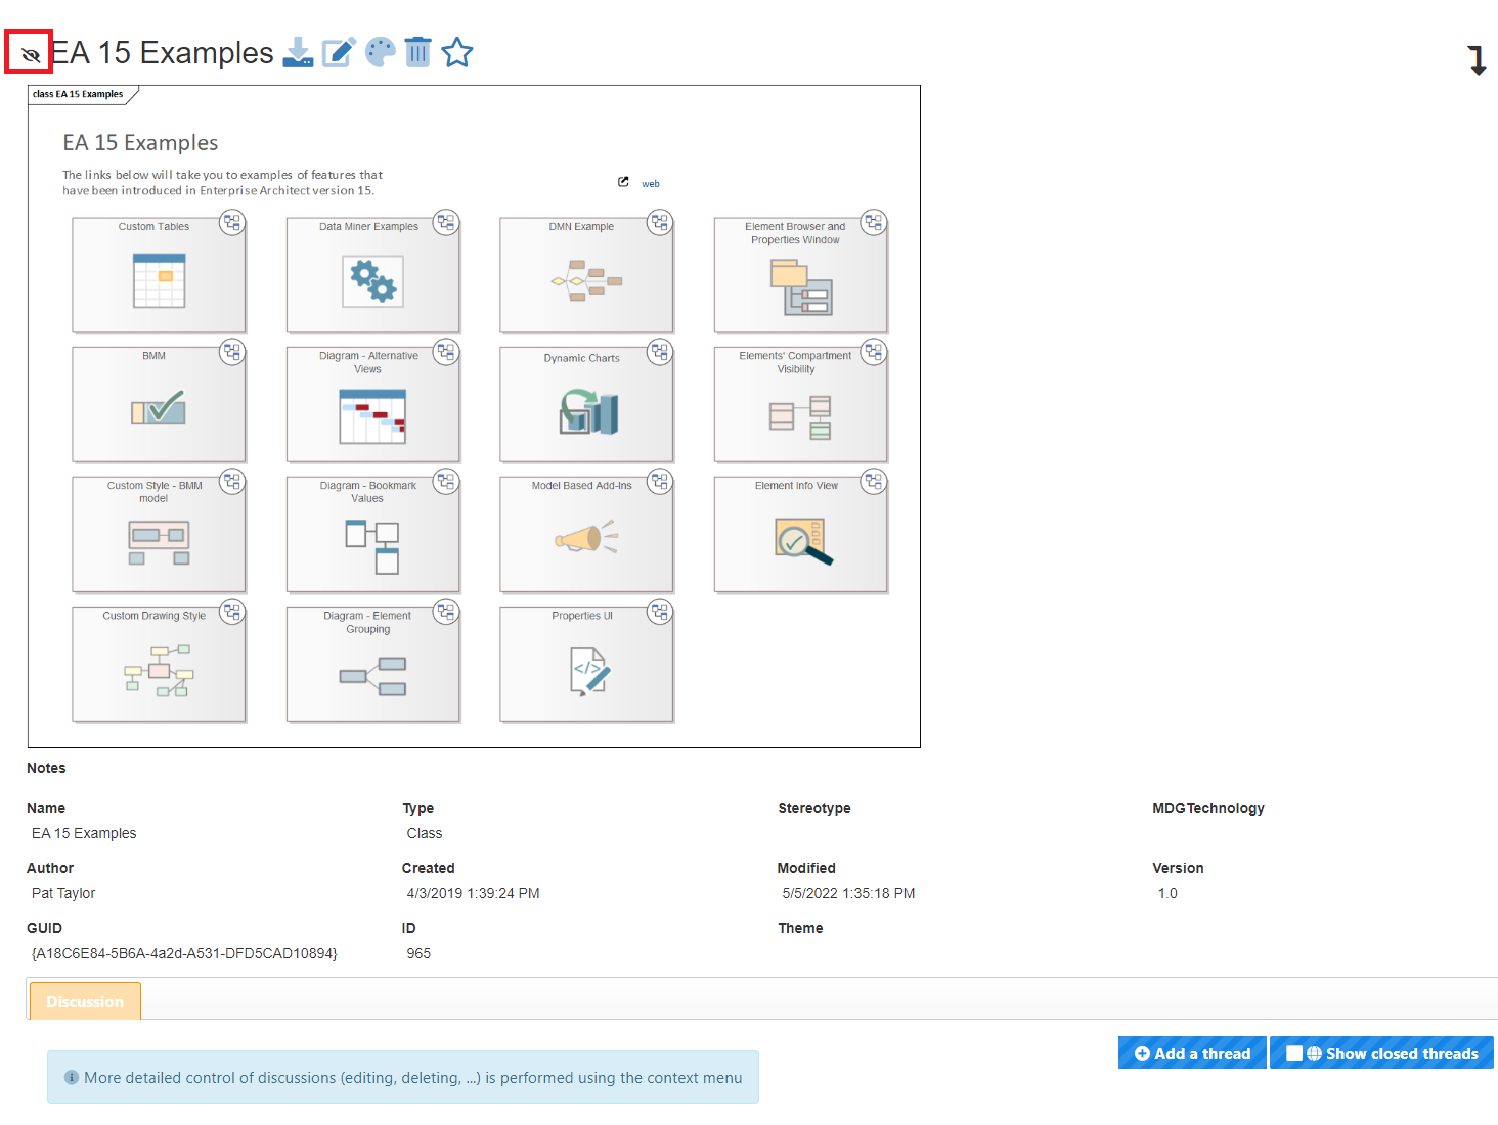
Hiding the Repository Tree
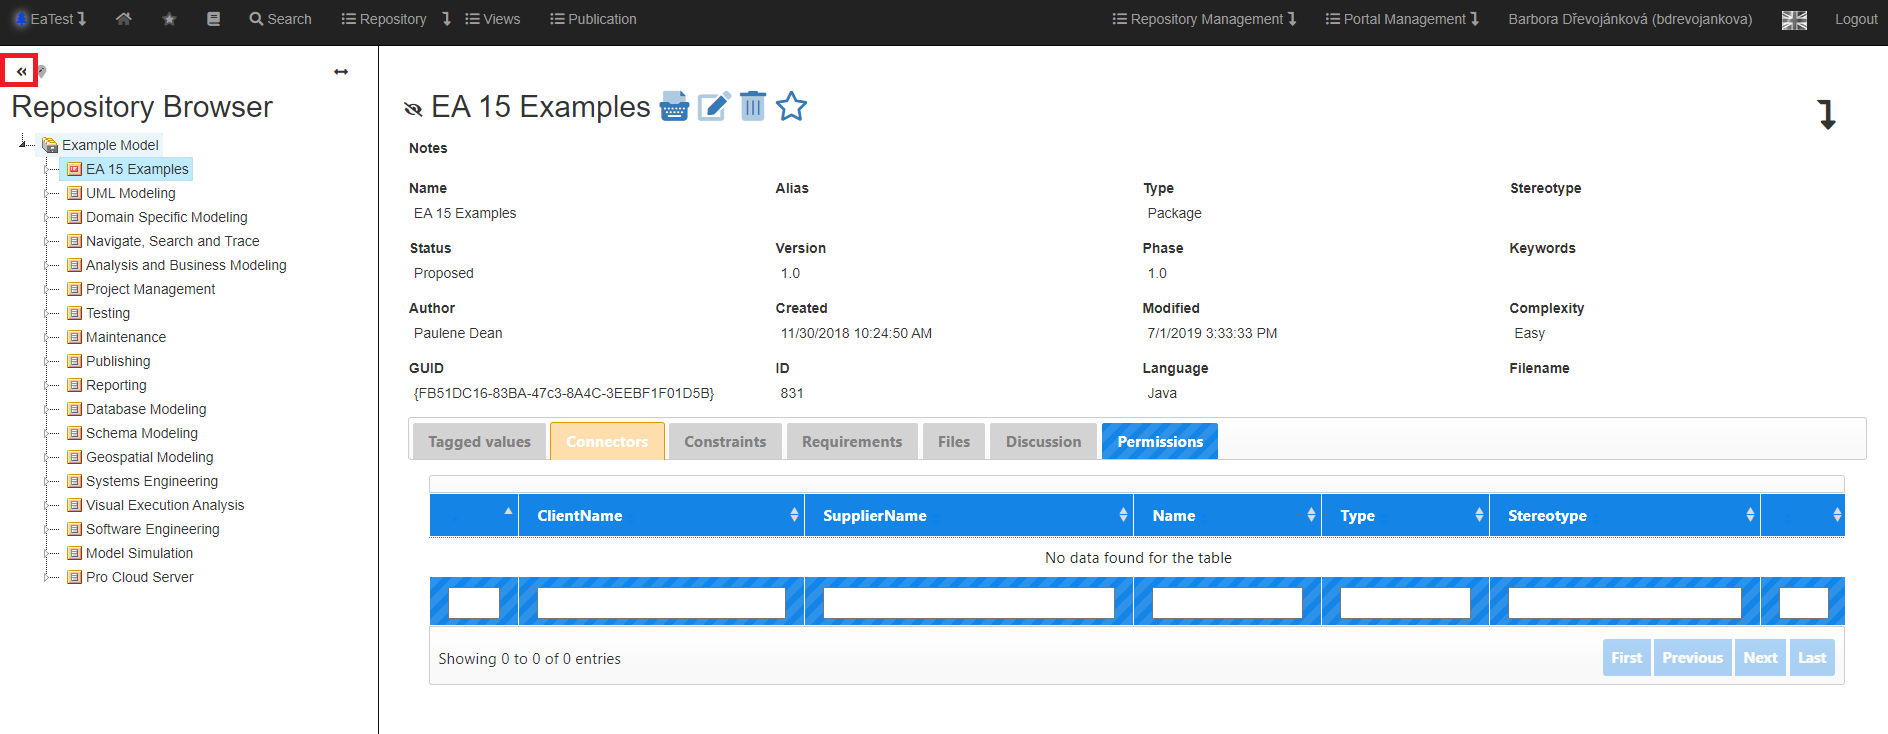
View of the diagram after hiding the repository tree.
Turning repository tree editing on/off
If the user checks the small icon in the upper left part of the tree, the tree will switch to active mode and offer, in the context menu, additional commands.
The available commands also depend on the permissions the user has for that part of the tree (editing, etc.).
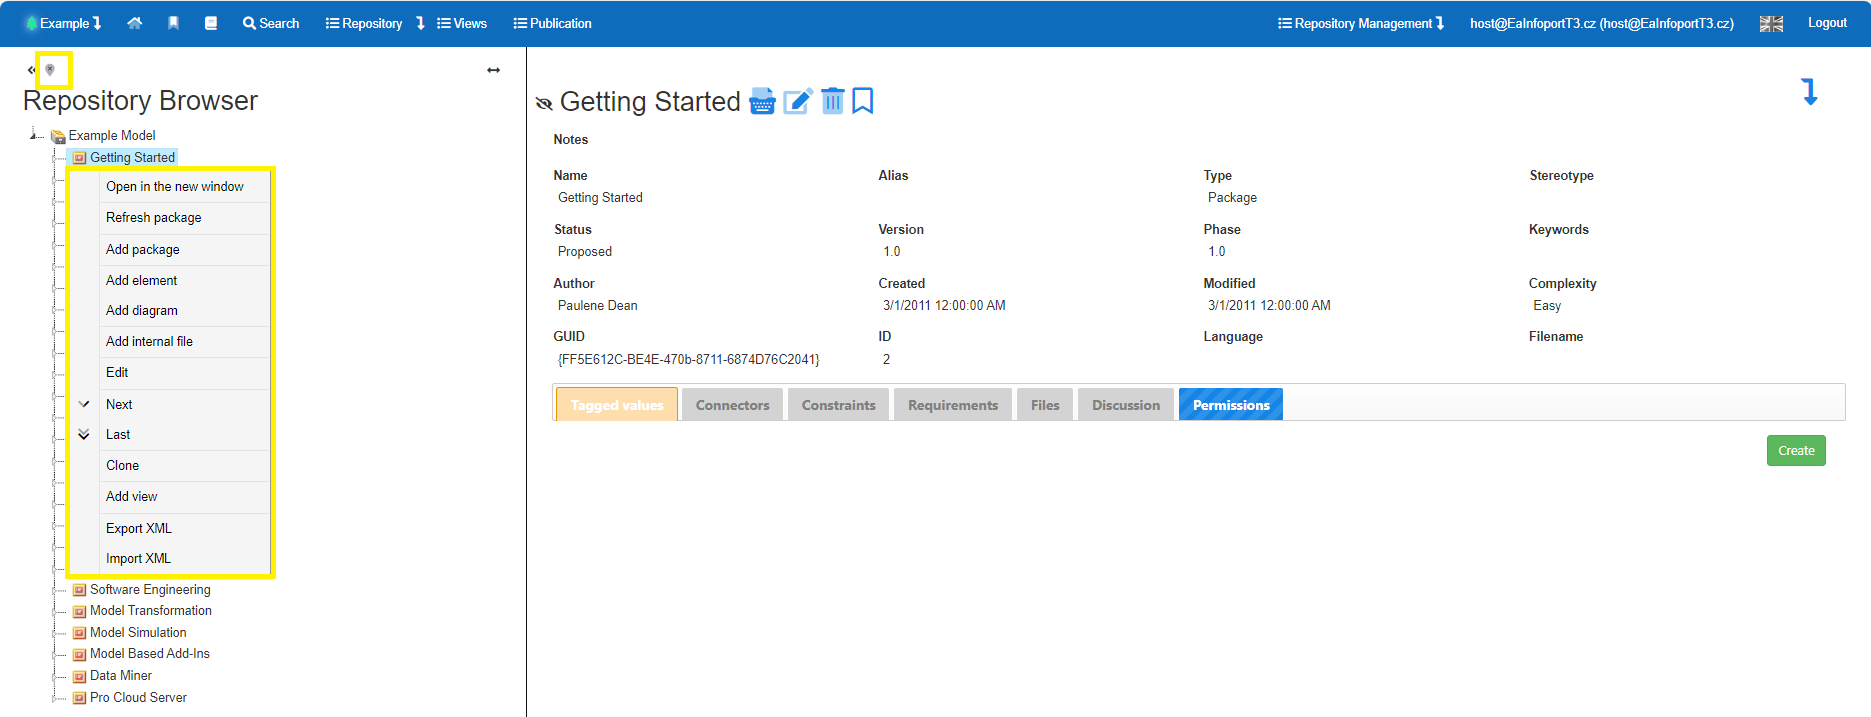
Manipulating the tree repository
The user, if he has the appropriate permissions, can move items in the tree (diagrams, packages, elements but also other artifacts - attributes, operations). The portal respects EA rules when moving (anything can be moved under package, diagrams and other elements can be moved under elements, nothing else can be moved under elements). It also respects locks (blue/red exclamation marks), permissions, etc.
It is also possible, from the context menu, to add artifacts - diagrams, packages, elements, but also attributes, operations and more - depending on which artifact the user clicks on. The user can also delete or edit the selected element. It is also possible to change the order of the elements in the package (move elements up and down).
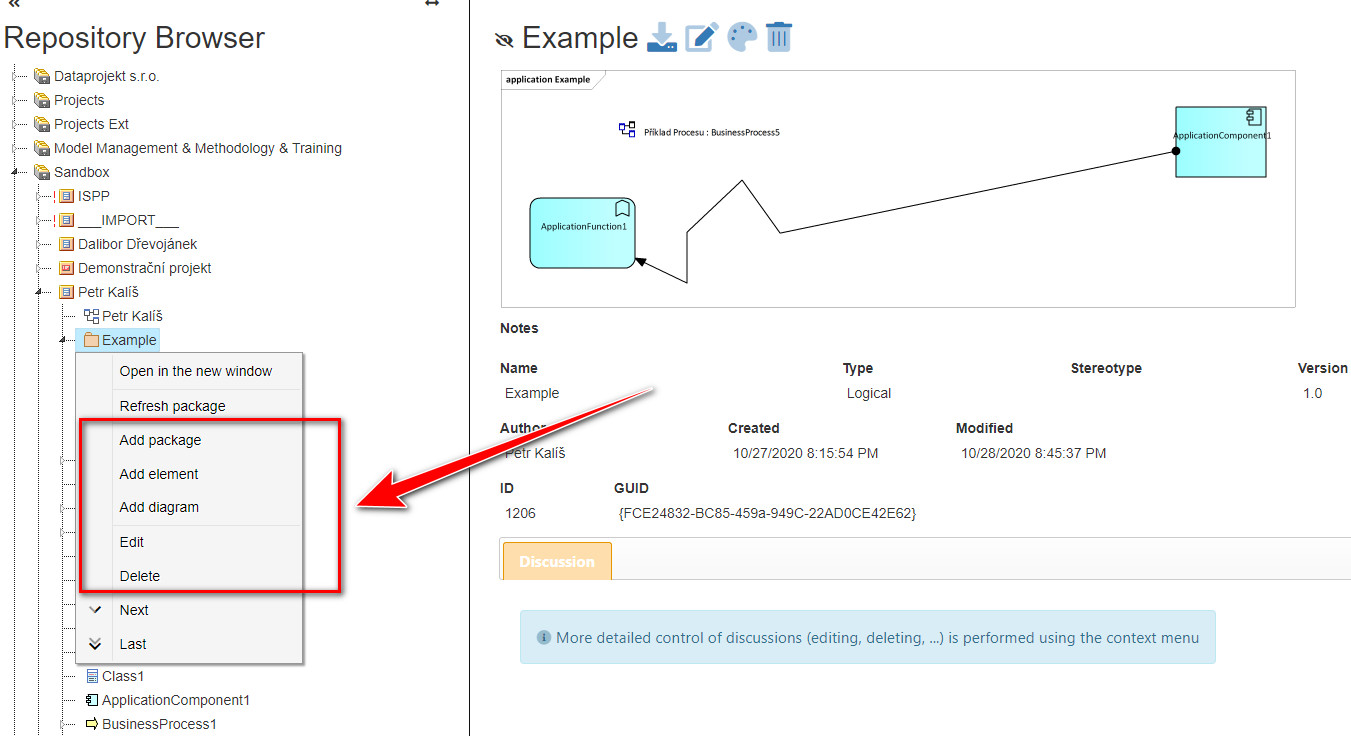
The user can also pull an element from the tree onto the diagram.
 After pulling the element on the diagram, the change is immediately written to the EA Repository.

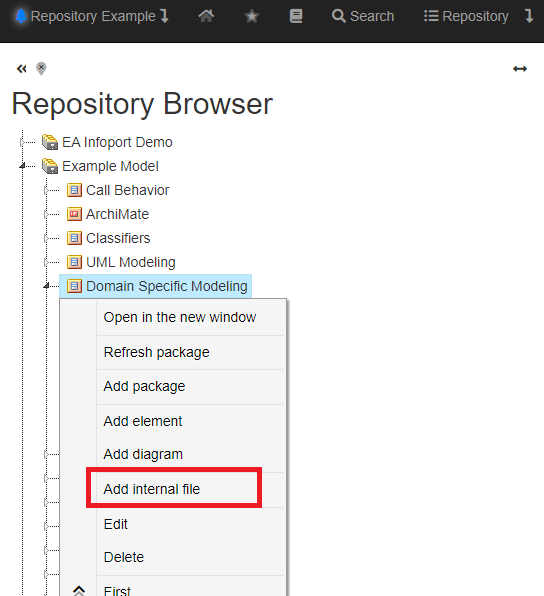
Internal artifacts
The user can create and edit (update) so-called internal artifacts, i.e. objects (documents, tables and any other files) that Enterprise Architect stores in its internal repository and works with them as elements.
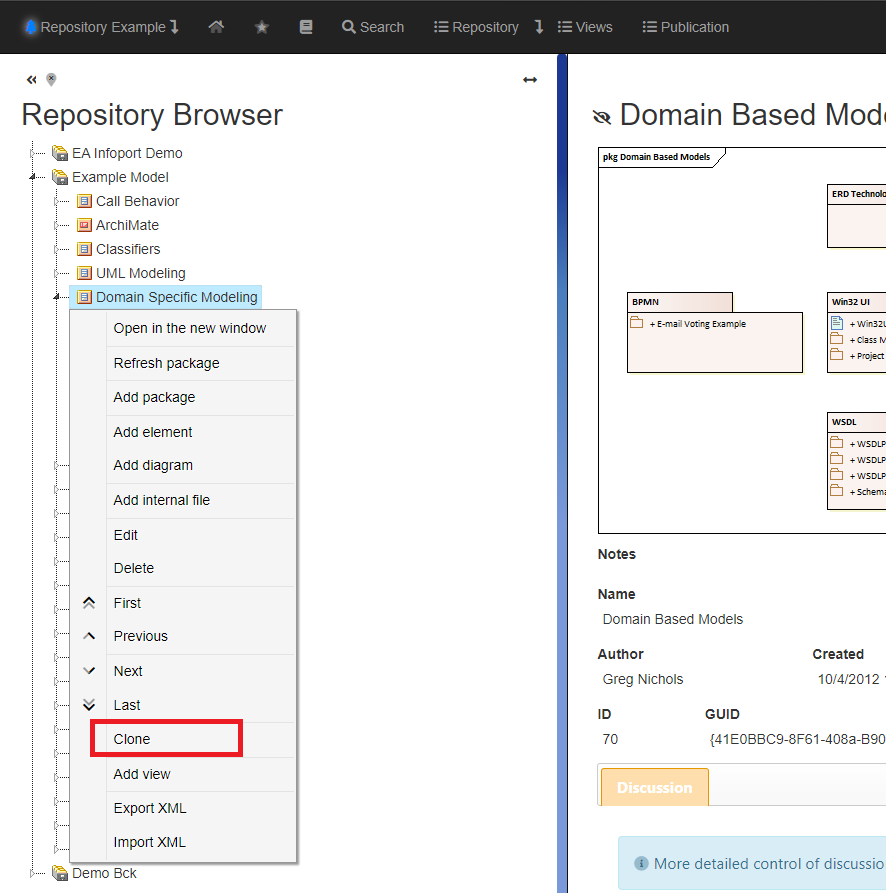
Clone
The user can create a copy of an element, a diagram, a package, or an entire structure. If there is a diagram or other elements under the copied element, they will be copied as well. The package is also copied, including the complete contents.
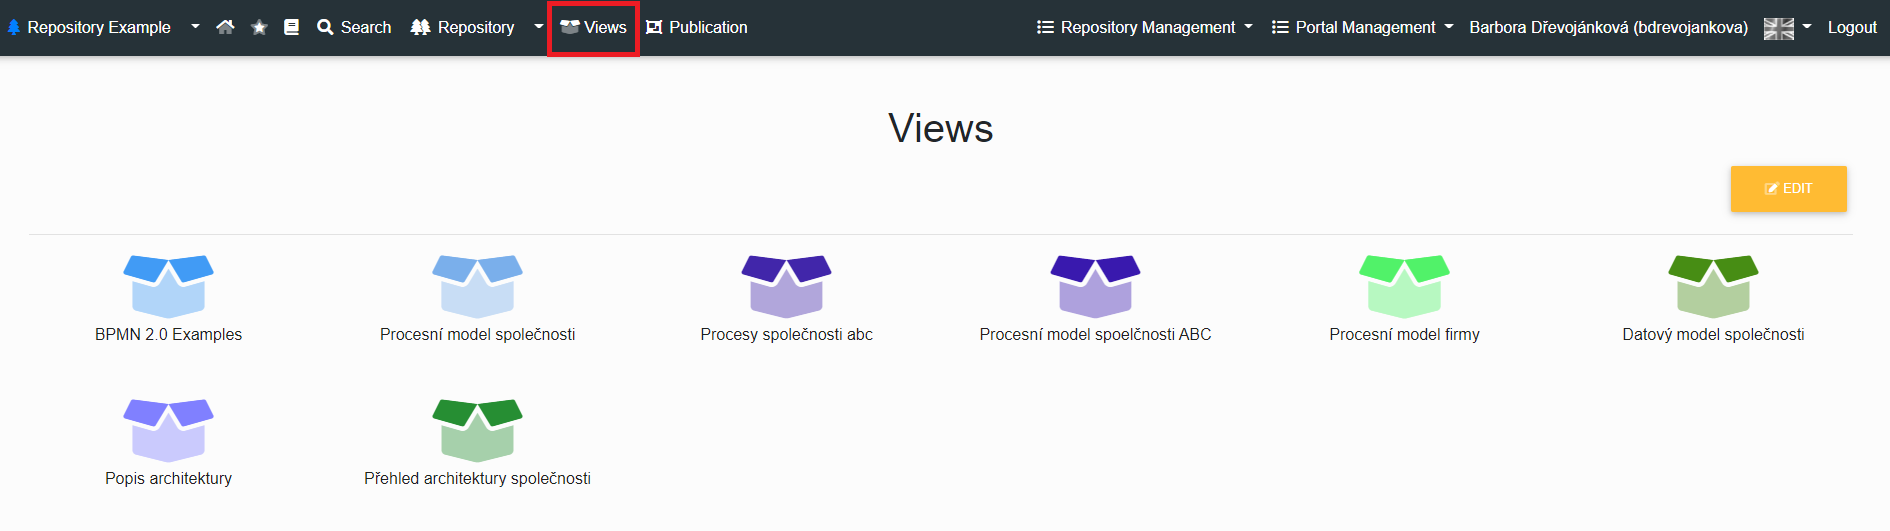
Create a view
Create a view allows you to take a specific part of the tree and display it in a separate section. Thus, if, for example, a company's process model, organizational structure, architecture design, etc. is deeply embedded in the repository structure, this functionality allows you to make it available to readers without having to search for it in a complicated way. Thus, these are views of specific repository packages (trees) and their contents, including the embedded packages.

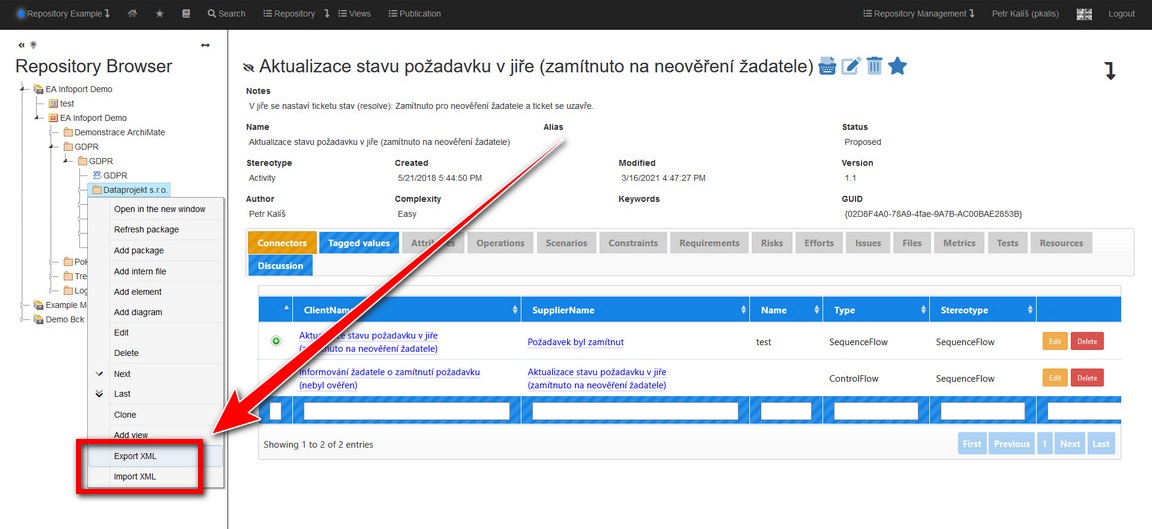
Export/Import XMI
EA Infoport supports exporting the XMI of the selected package (and children) to XMI format, which can be imported into Enterprise Architect, edited, and imported back.
The user must have access to the exported package (read + export and, in case of reimport, import).
During the export and reimport, all bindings between elements will be preserved, even if the elements at one end of the binding are not located in the exported package.
This functionality is especially useful if there are several users/groups that are not allowed to see each other's model parts (located in the same repository) and need to be able to edit them in Enterprise Architect. This problem cannot be solved with Enterprise Architect alone, because if a user accesses the repository, he can see everything (editing can be prevented, viewing cannot, even with the help of the RLS functionality that is accessible, for some DBs, in the Ultimate Edition EA).
Procedure: the user marks the package he/she has access to in the portal tree and clicks on the "Download XMI" command. He imports this XMI into his repository and modifies it as needed (in the EA tool). After this modification, it re-exports the XMI from EA and this, via EA Infoport, to its original location.
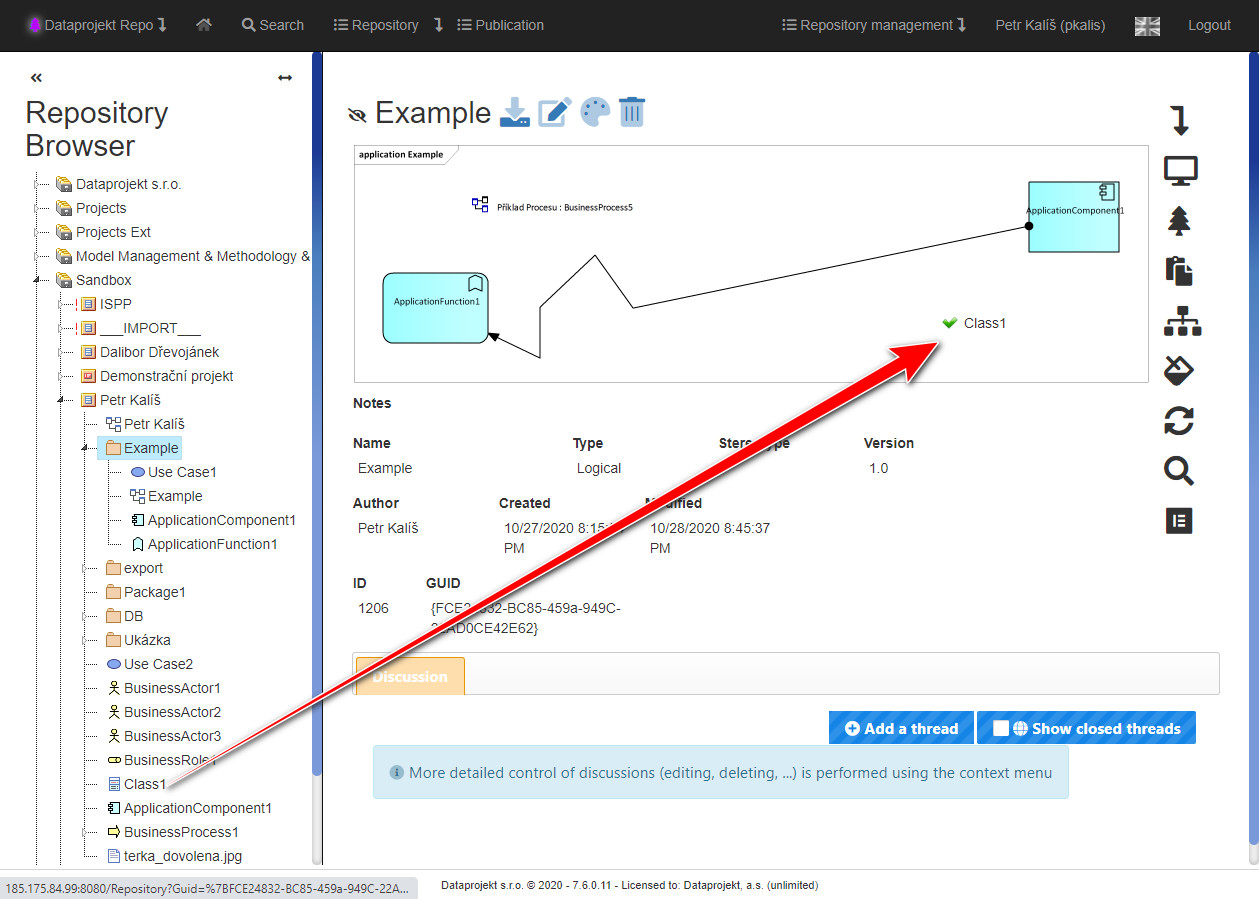
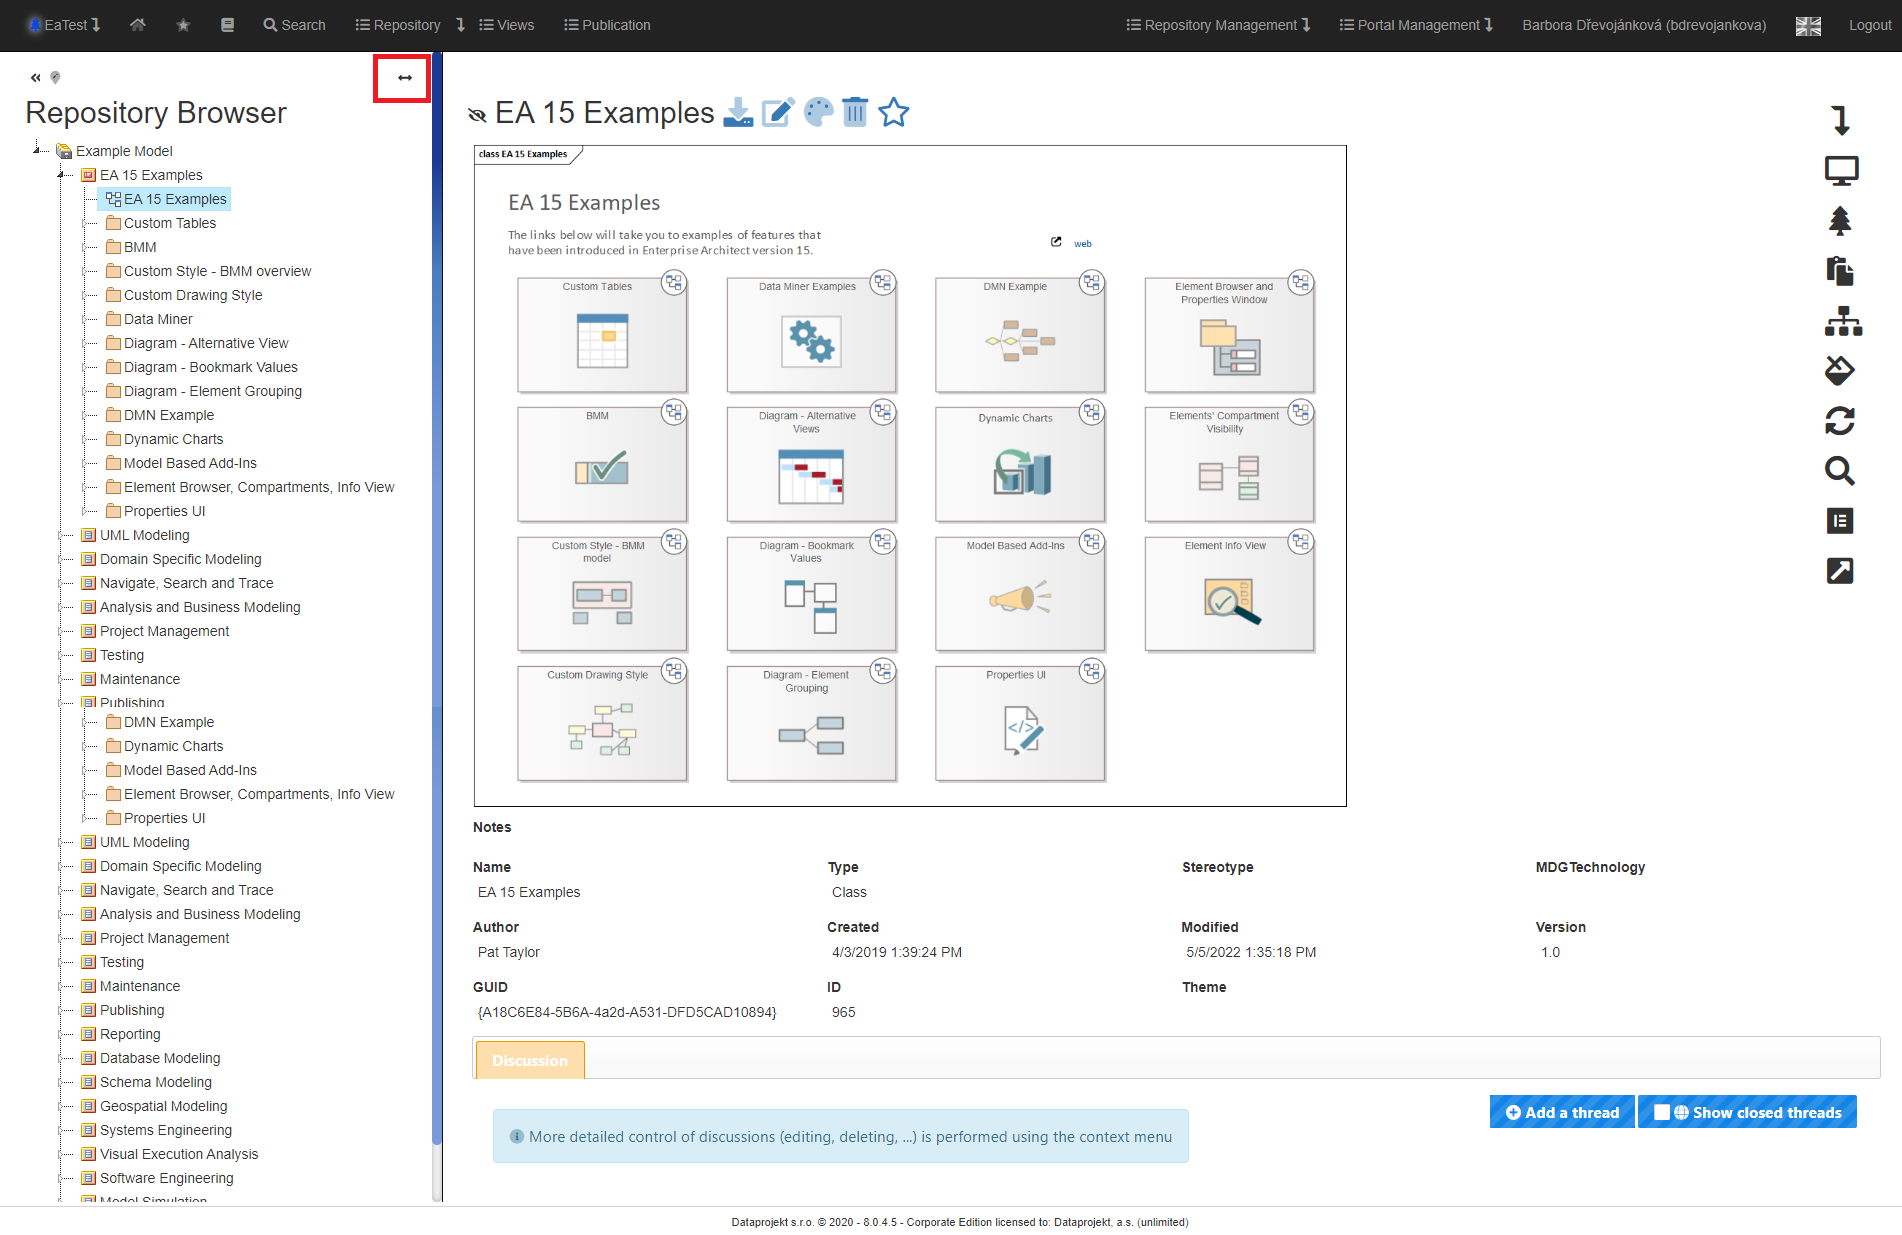
Slider between the Repository Tree and the Detail
The slider allows you to expand the width of the repository tree.
Description of commands in the context menu
Use  to display the context menu.
To open a drop-down menu of options related to an artifact, the user left-clicks on the arrow icon in the upper right corner of the artifact detail.
The menu is unpacked.
List of context menu commands:
Full Screen
The functionality is available in the context menu under the symbol 
The full screen allows us to see a detail of an artefact without disruptive elements.
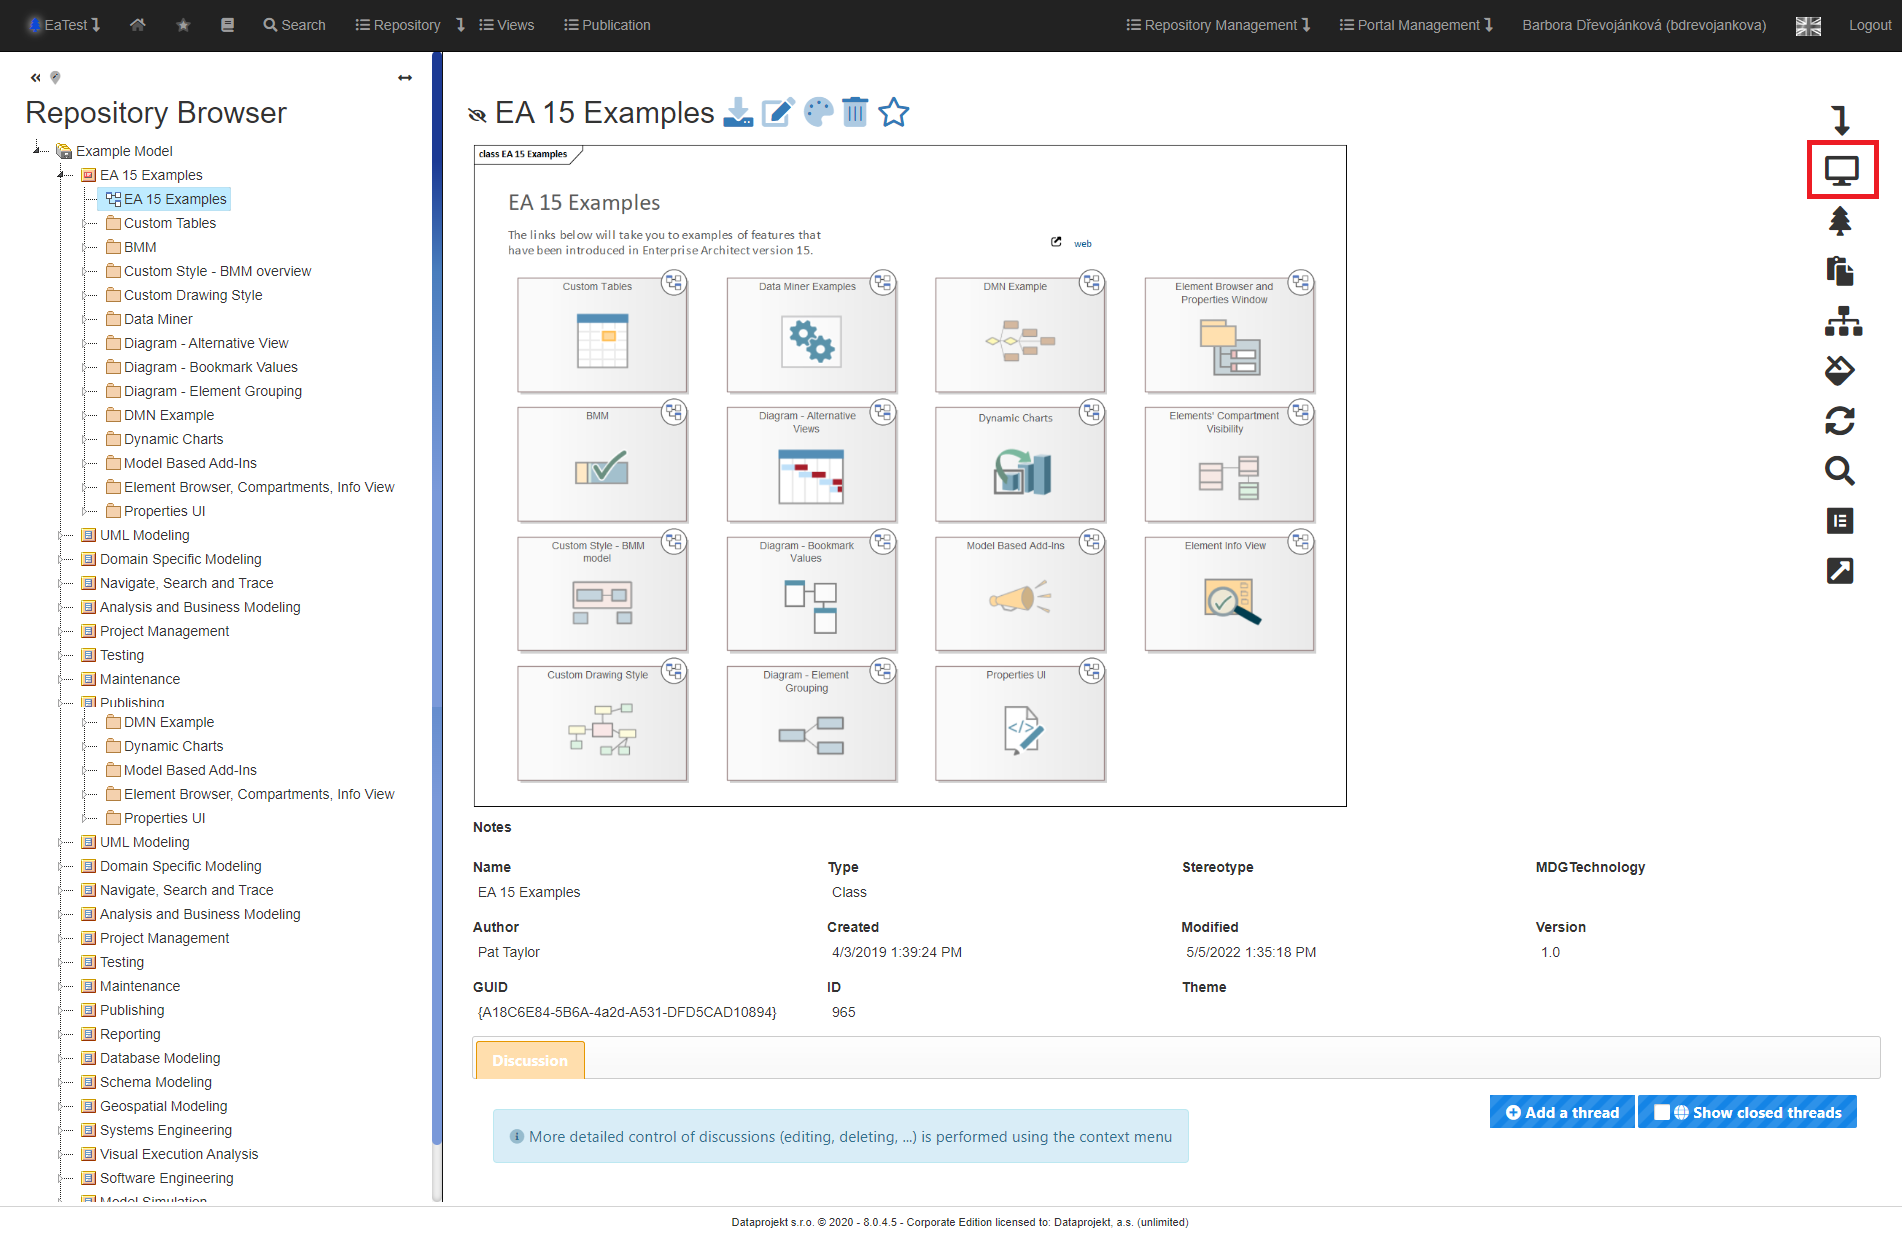
After clicking on the “Full Screen” icon, the disruptive elements will be switched off.
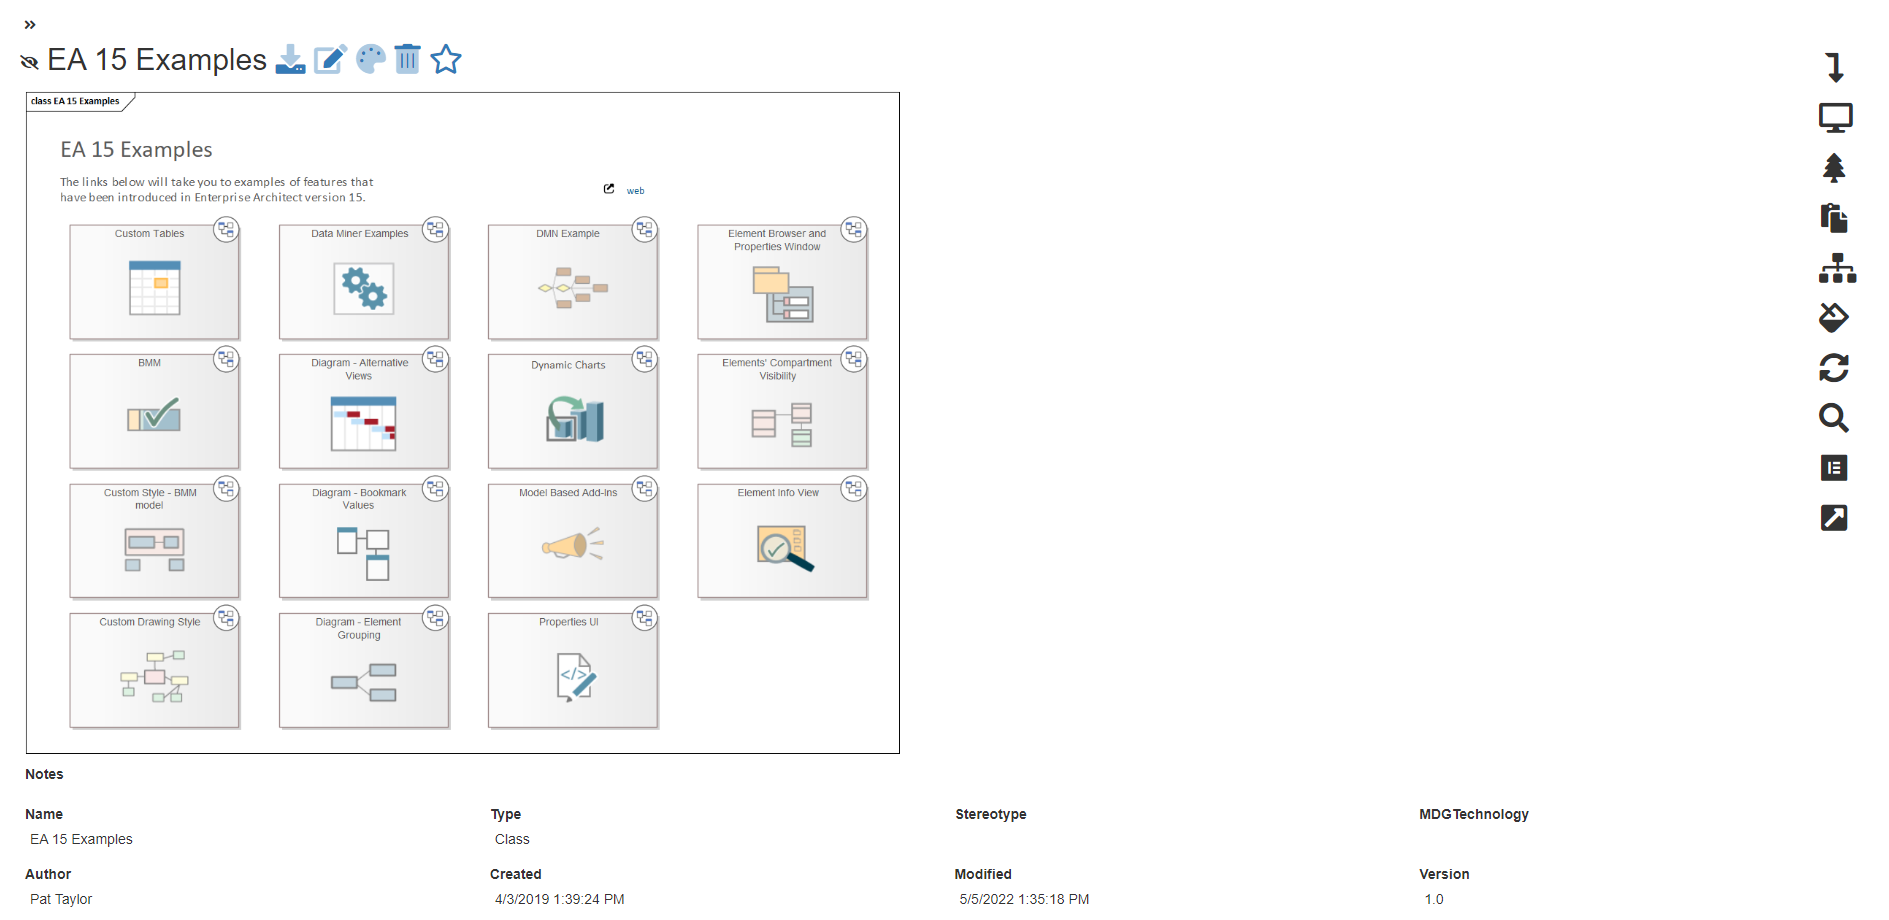
Only the detail of the artefact remained. To call up the other elements again, simply click on the “Full Screen” icon again.
Find in the Repository Browser
For example, if a user searches for any artefact through the “Search”, his/her detail will be displayed, but he/she will not see his/her position in the repository tree.
Thanks to the “Find in the Repository Browser” option, the user has the option to expand the repository tree to the appropriate artefact.
The functionality is available in the context menu under the tree symbol 
After clicking on the “Find in the Repository Browser” icon, the repository tree will expand to the position of the relevant artefact.

The repository tree successfully expanded and found the searched artefact.
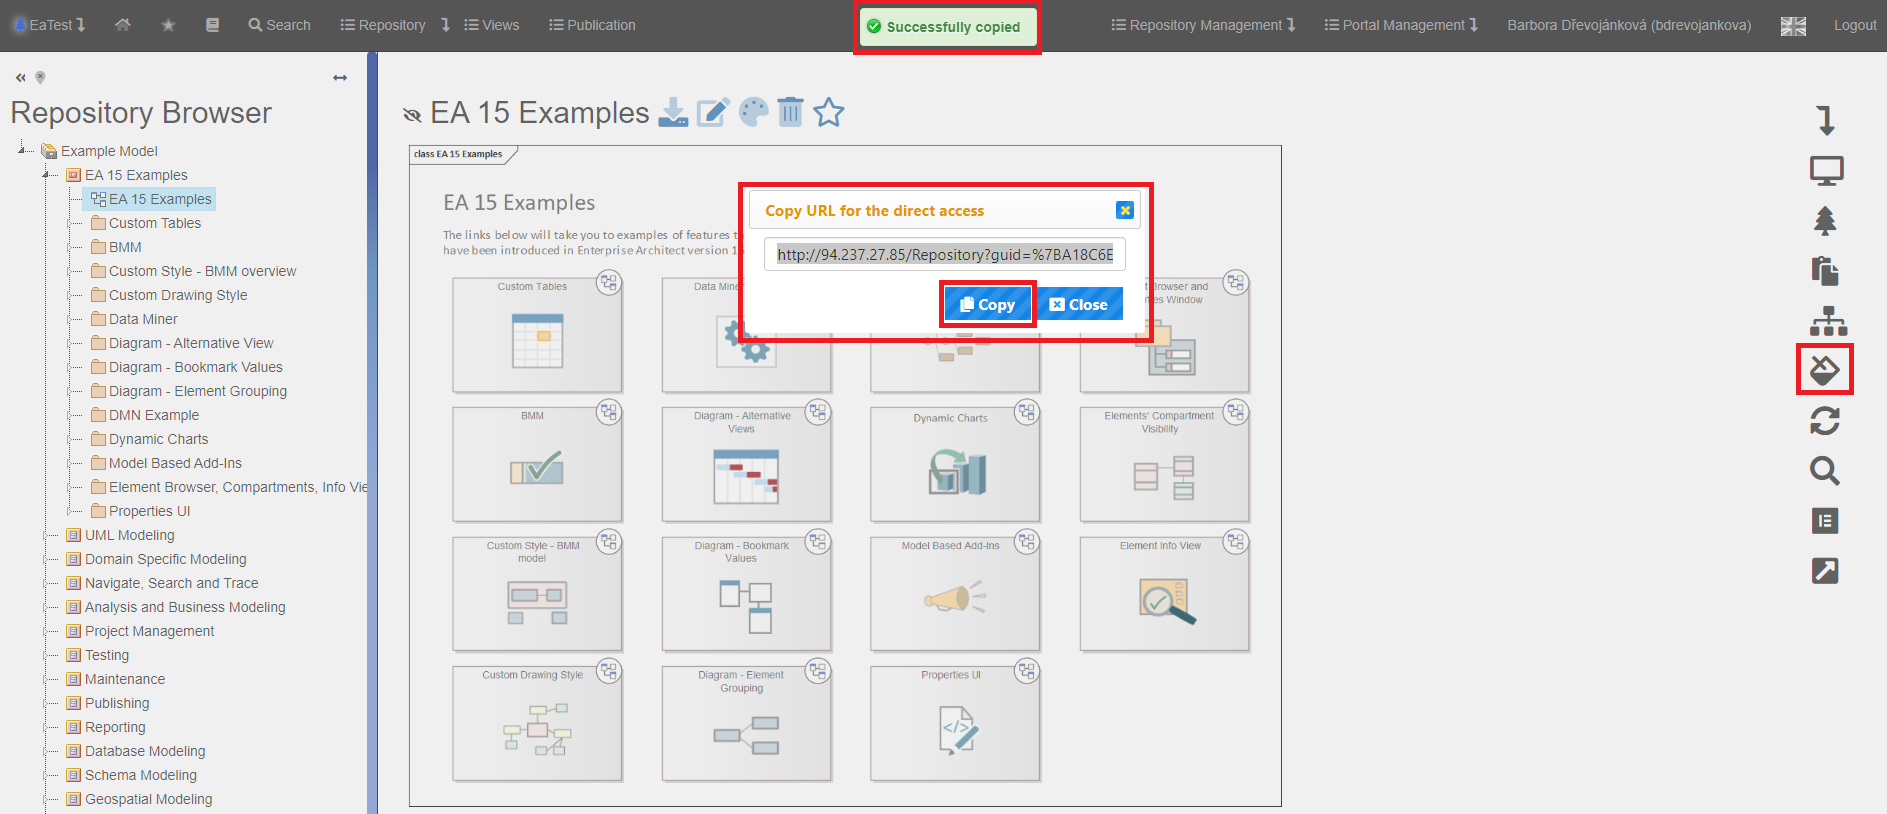
Copy URL
A user can copy a URL and send it to a colleague.
The colleague will only be able to view this URL if he/she is logged in; otherwise, he will be directed to the login screen.
This functionality is available in the context menu under the symbol 
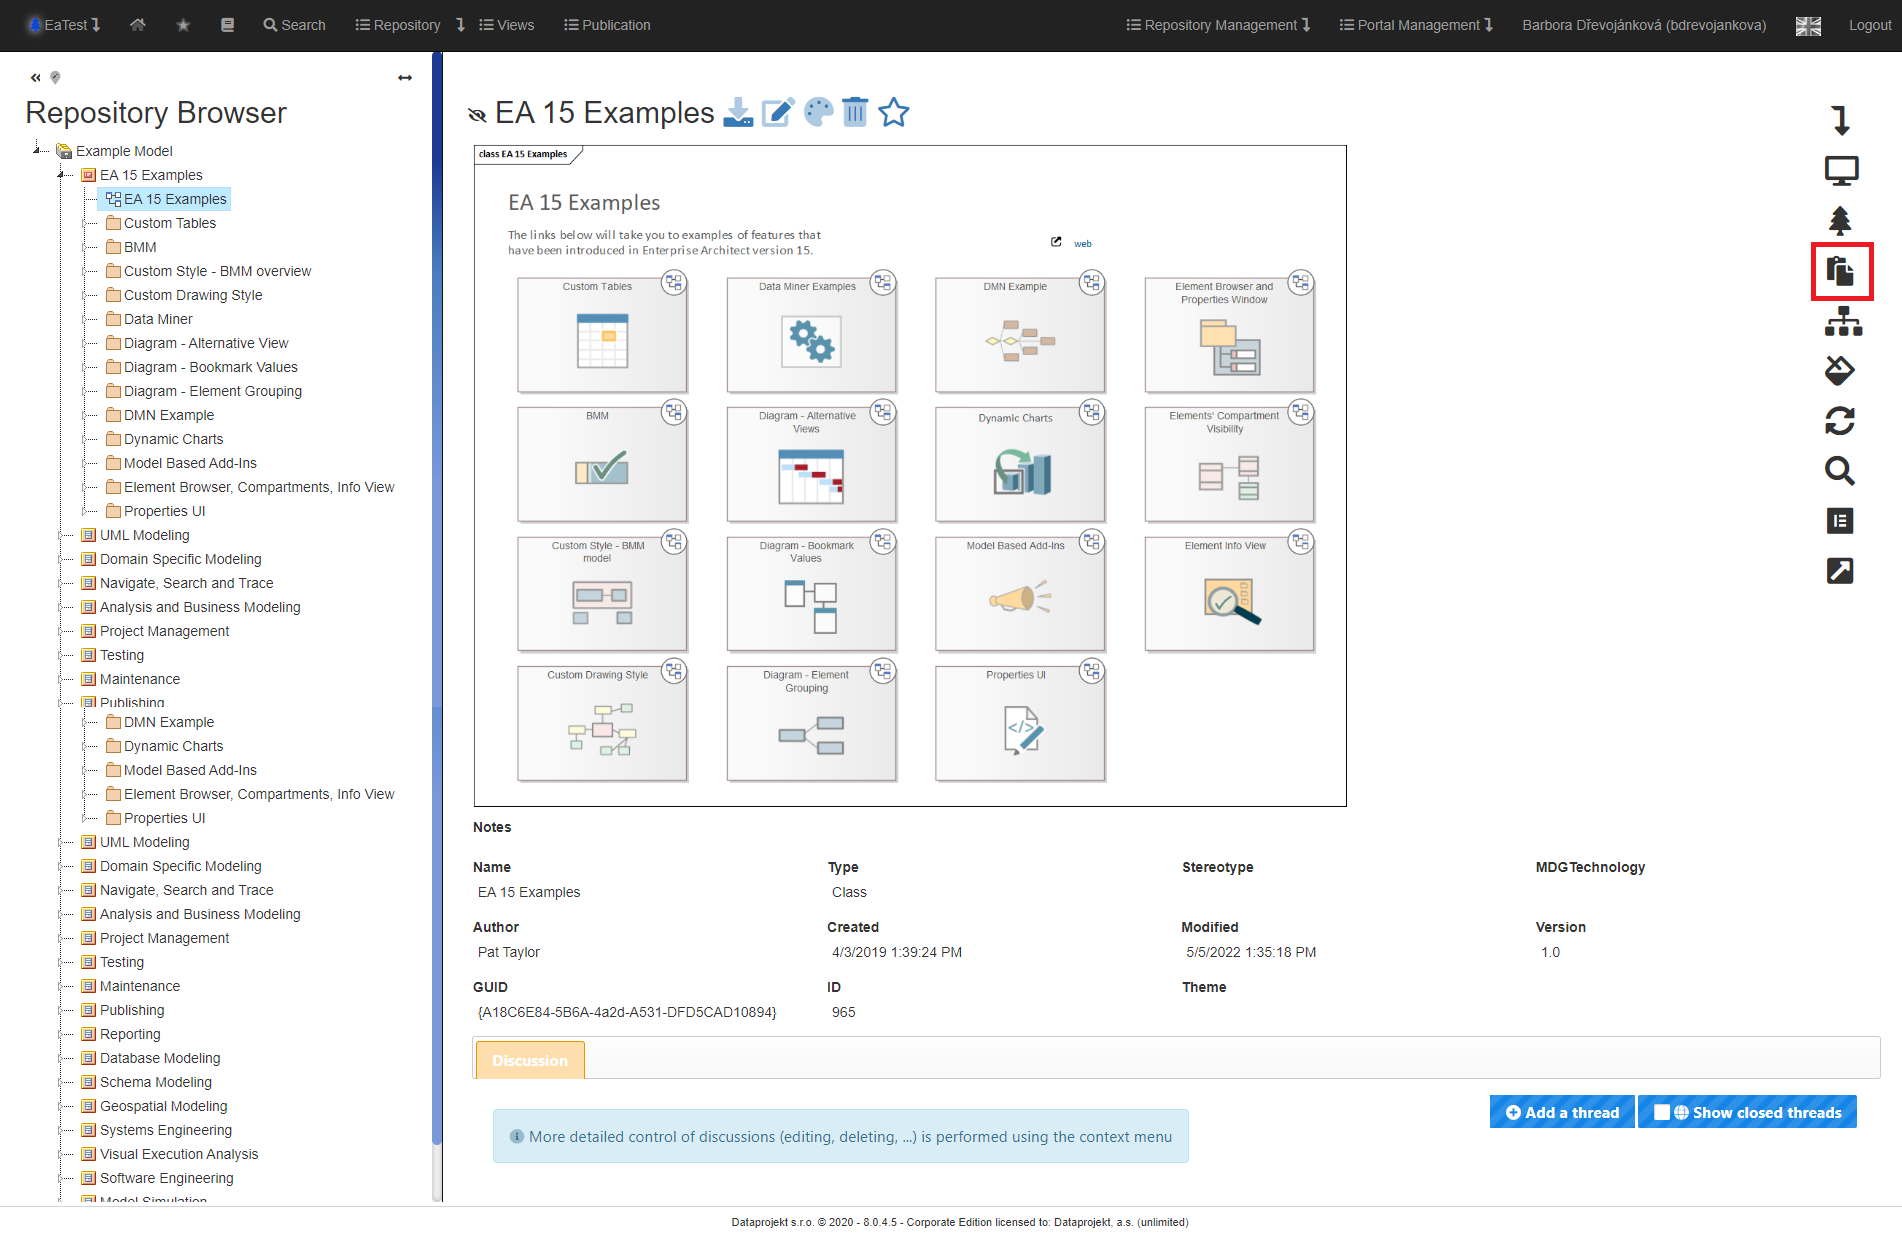
After clicking on the “Copy URL” icon, a pop-up chart will appear where the user can get the URL of the relevant artefact.
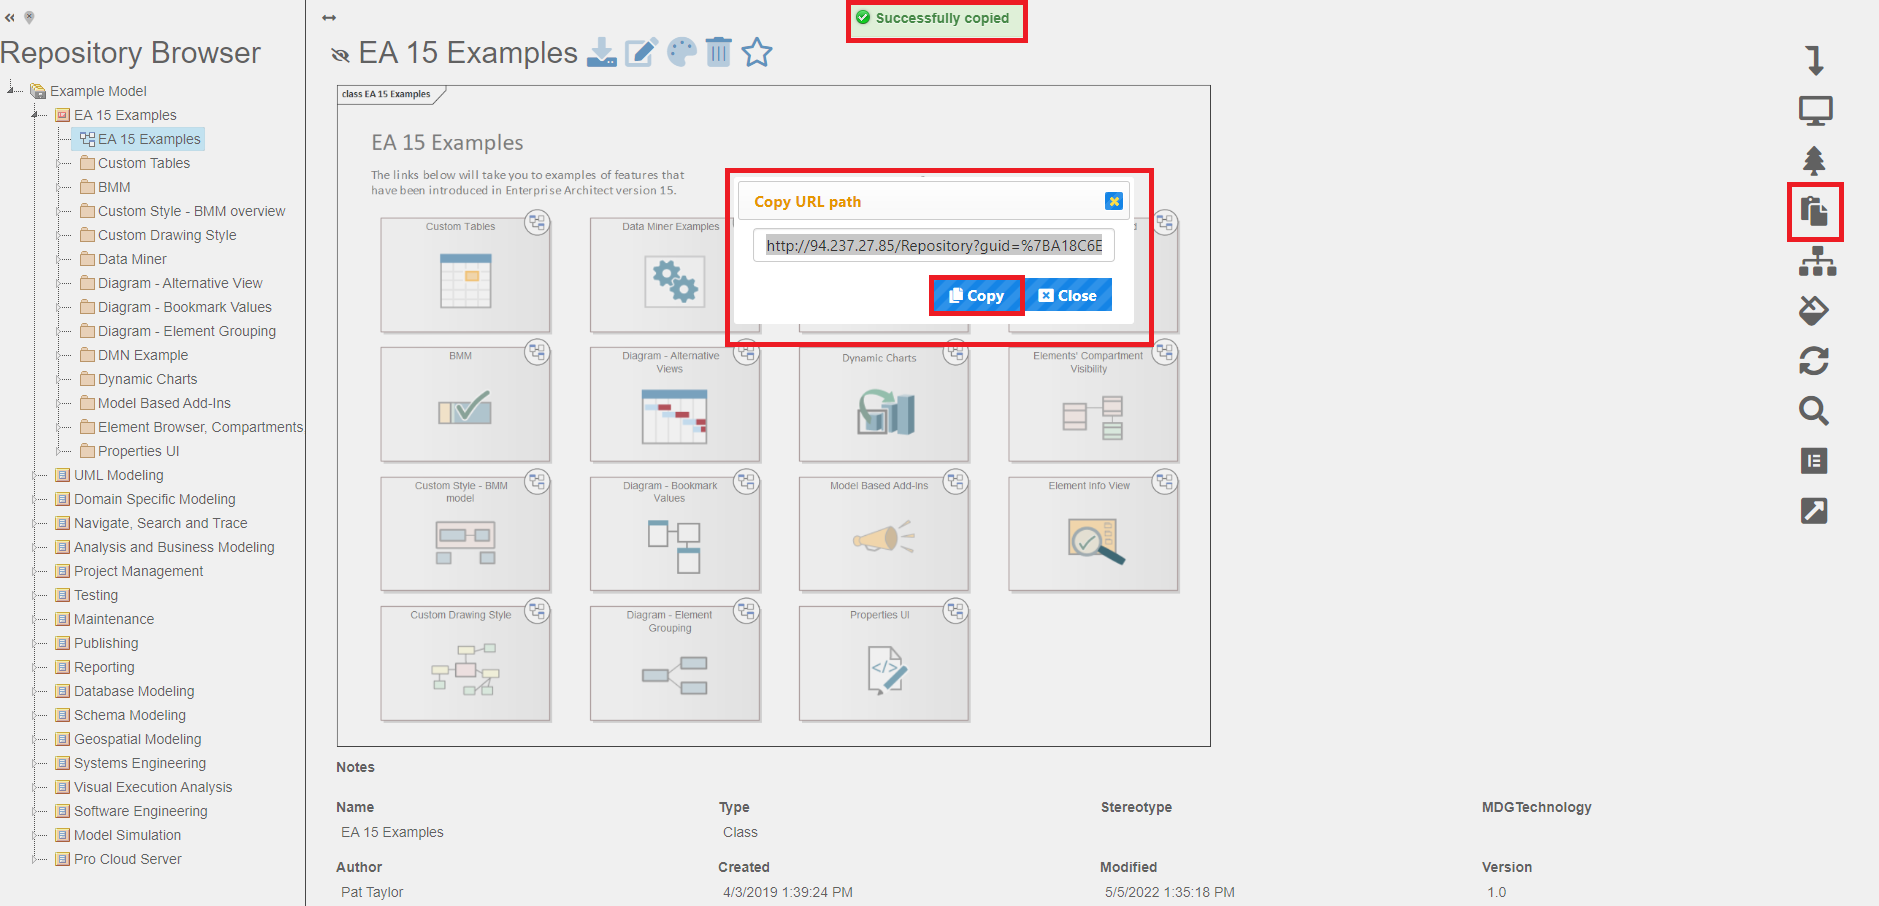
After clicking on the “Copy” button, the user saves the URL to the clipboard.
An identical method is to select the entire line with CTRL+A and copy it to the clipboard with CTRL+C.
Then just paste the URL in the appropriate place.
Copy EA Address
In EaInfoportT3 it is possible to have a path copied through the tree repository to the relevant artefact.
The functionality is available in the context menu under the symbol 

After clicking on the “Copy EA Address” icon, a pop-up chart will appear where the user can get the EA path to the relevant artefact.
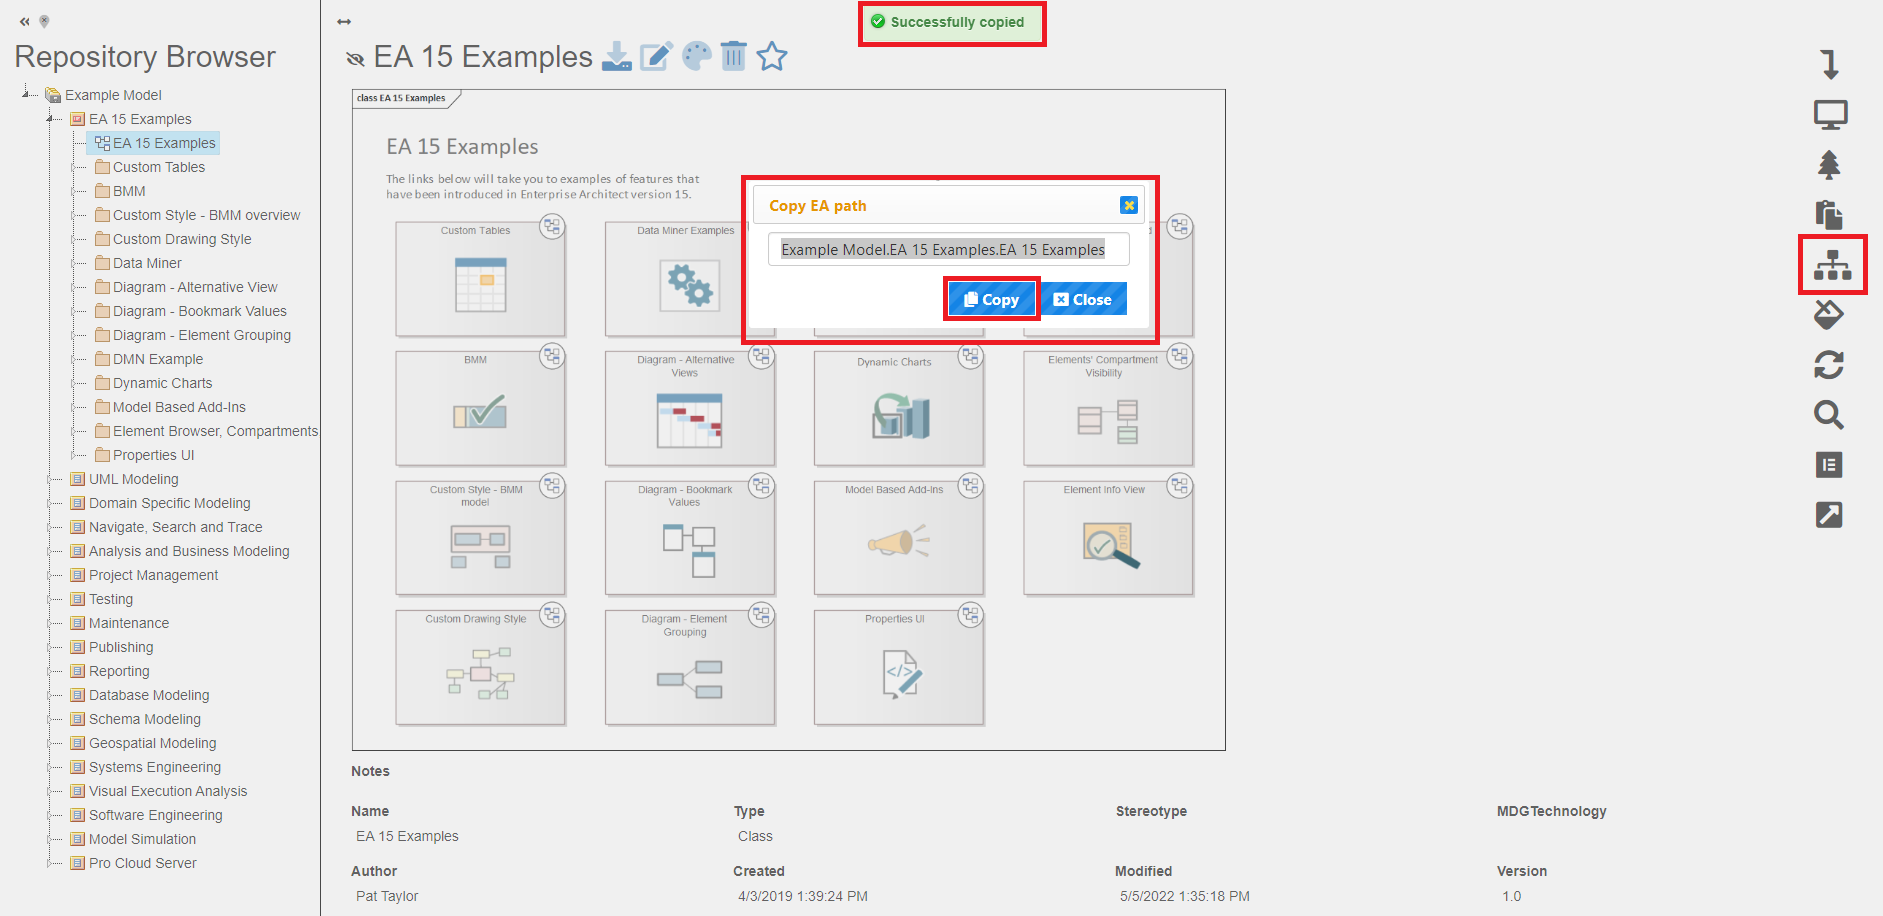
After clicking on the “Copy” button, the user saves the EA to the clipboard.
An identical method is to select the entire line with CTRL+A and copy it to the clipboard with CTRL+C.
Then just enter the EA path in the appropriate place to search by the EA path.
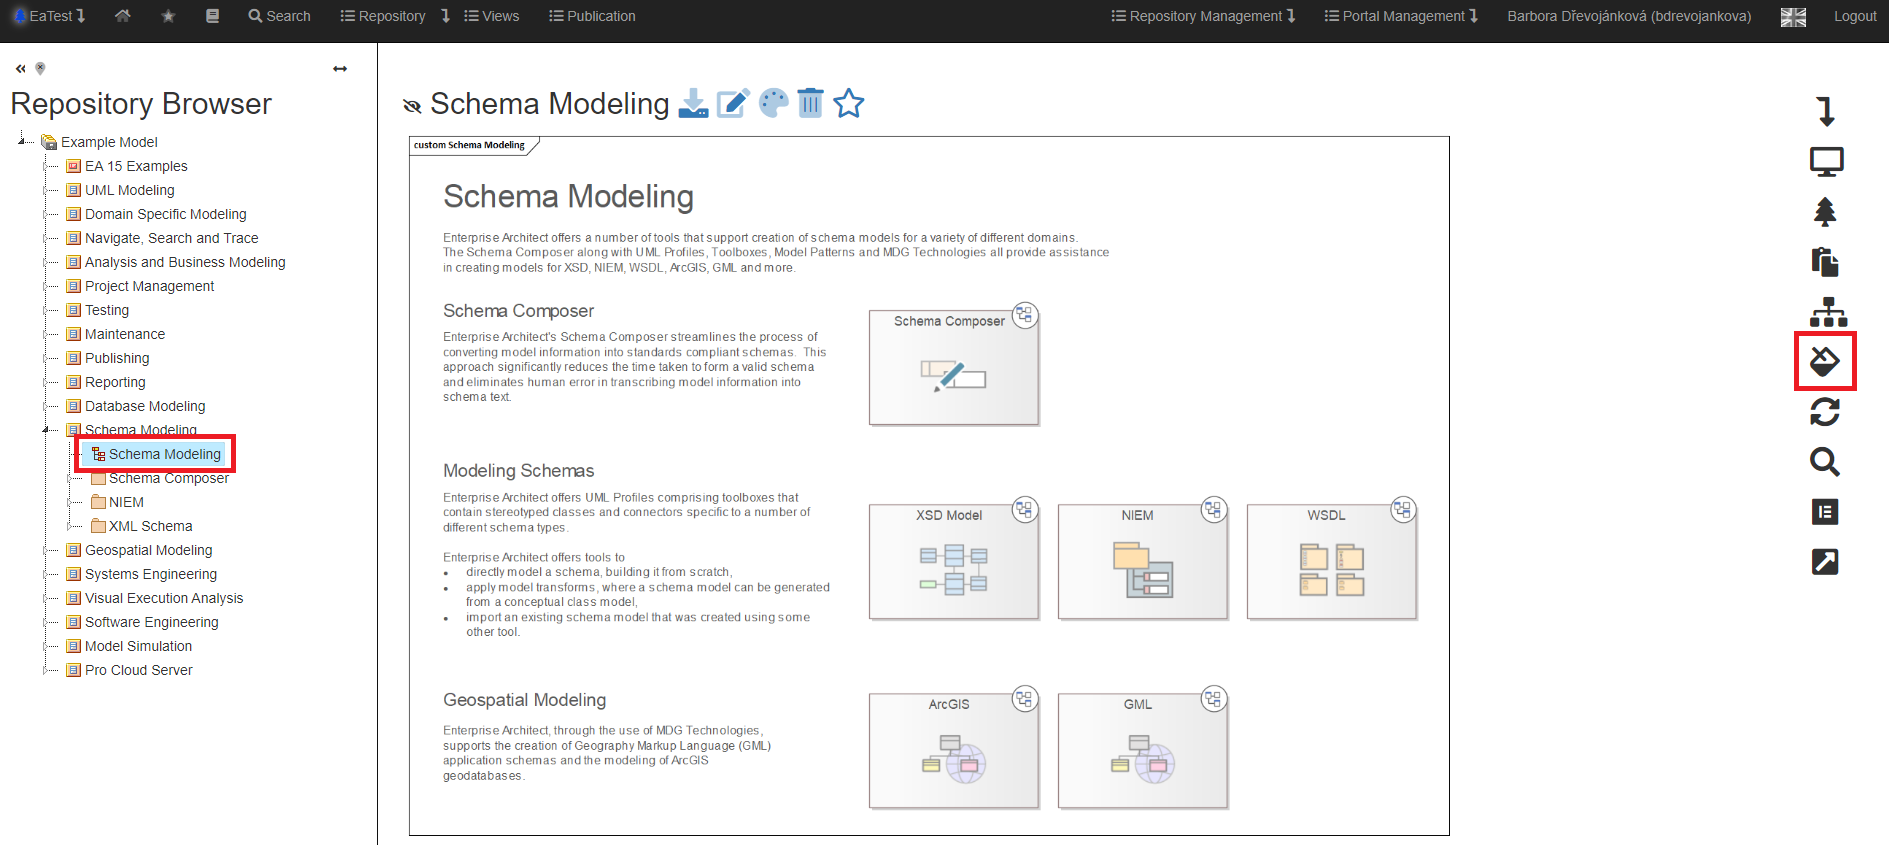
URL for Direct Access
A user can copy a URL for direct access and send it to a colleague.
The colleague will be able to view this URL even if he is not logged in, but he will only see the relevant artefact – for example, he cannot go anywhere else in the repository or to a publication, etc.
The functionality is available in the context menu under the symbol 
After clicking on the “URL for Direct Access” icon, a pop-up chart will appear where the user can get the direct URL of the relevant artefact.
After clicking on the “Copy” button, the user saves the URL to the clipboard.
An identical method is to select the entire line with CTRL+A and copy it to the clipboard with CTRL+C.
Then just paste the URL in the appropriate place.
The recipient of the URL for direct access after entering it in the browser will get the same detail as the user who created the URL.
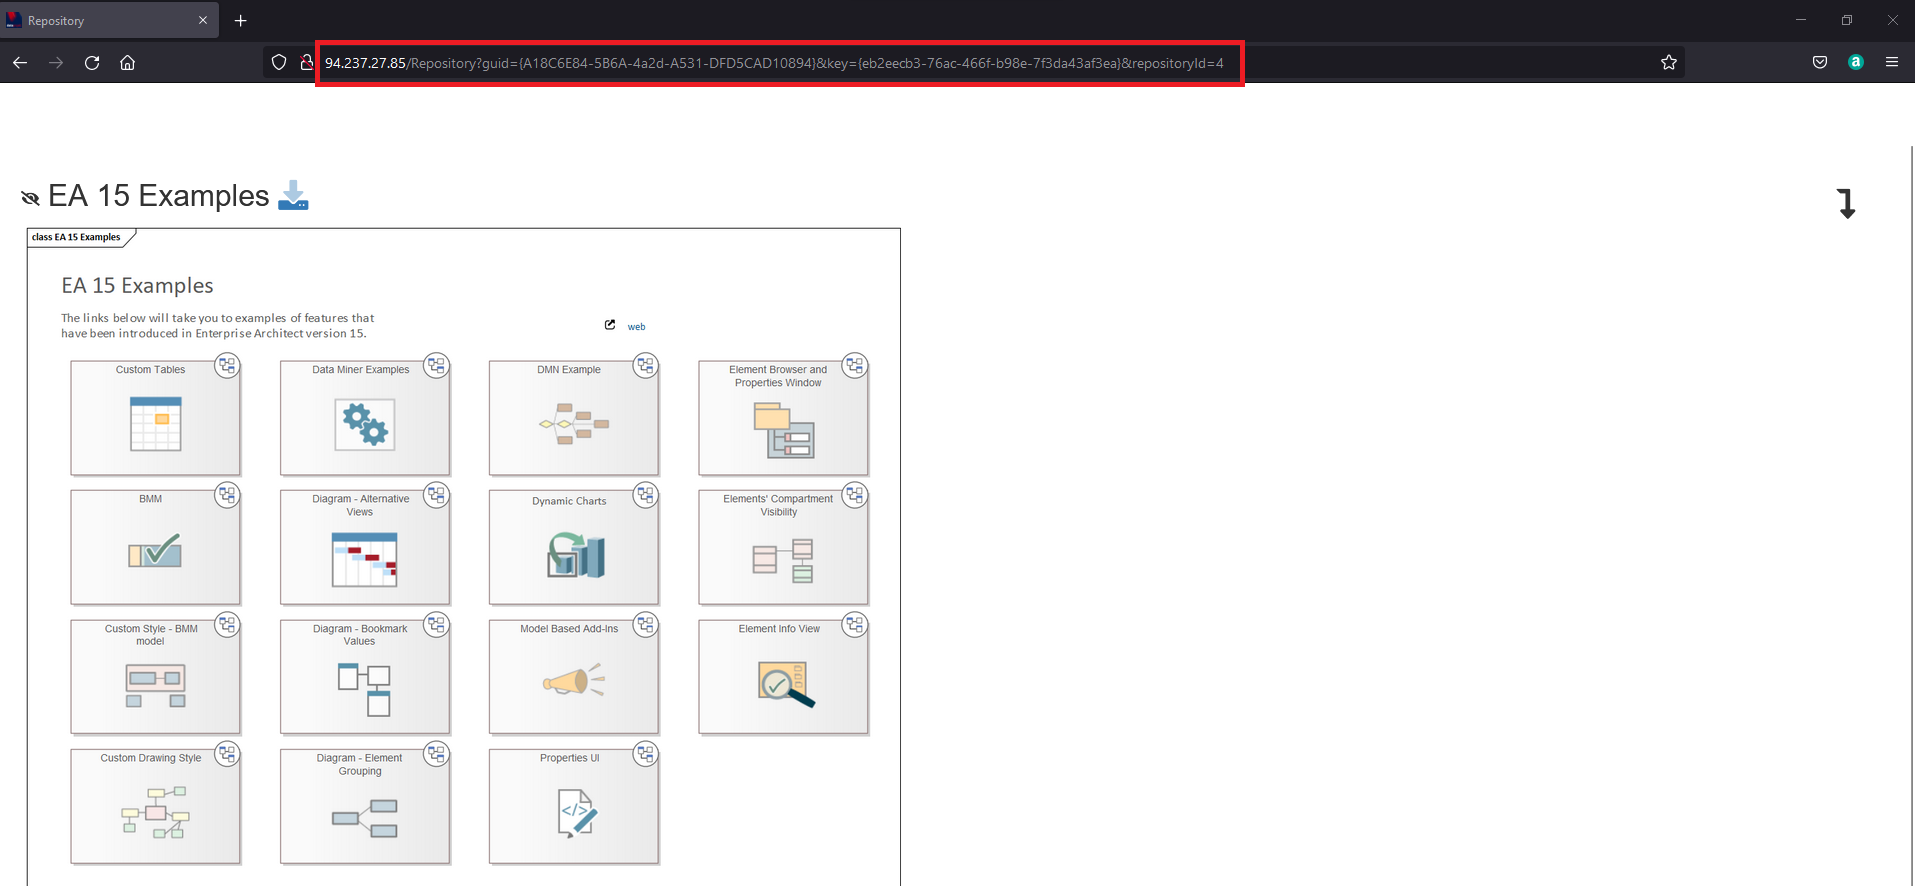
The user has no permissions. He/she can only view a diagram.
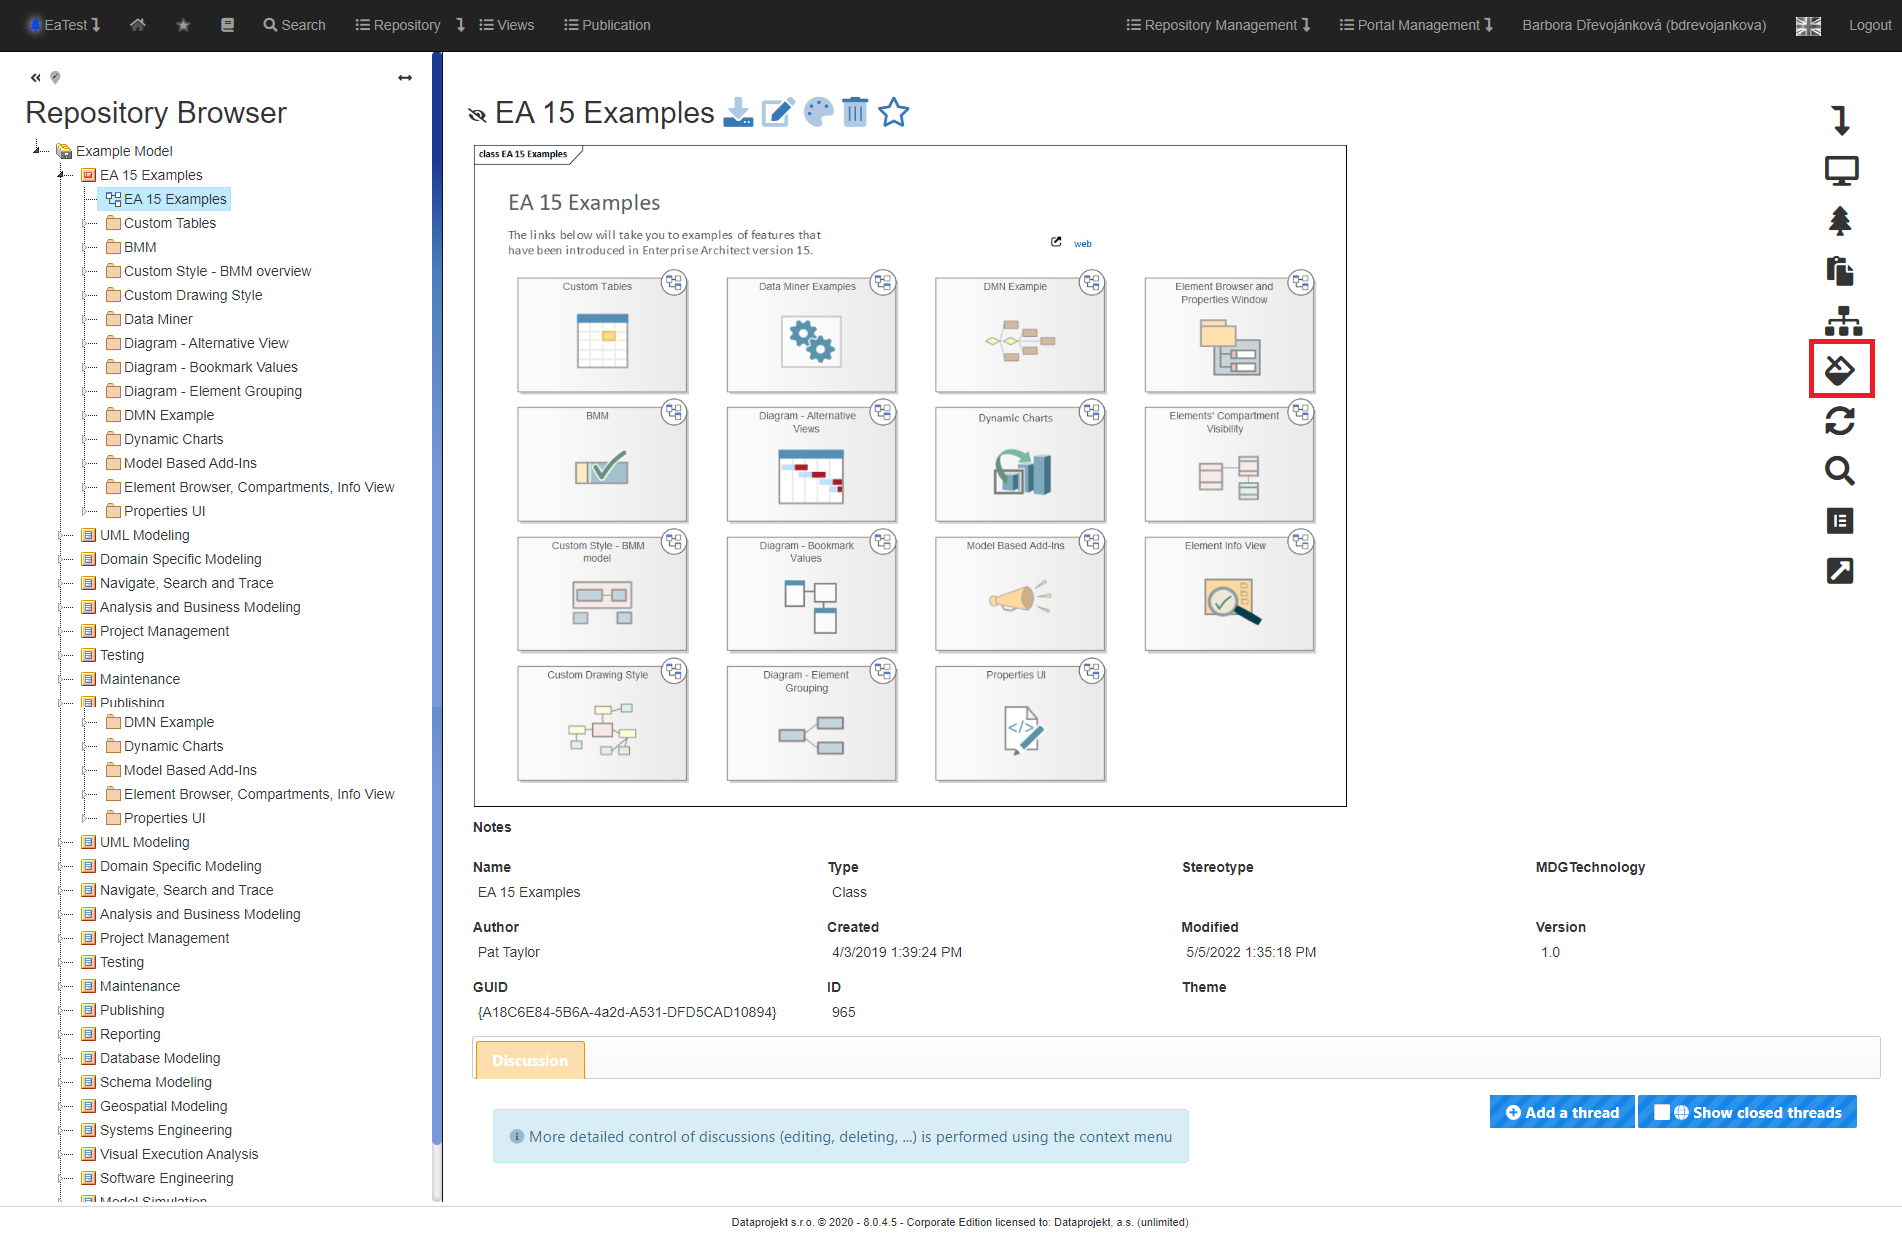
Forced Refresh
Forced refresh is actually “Refresh” and is used if a change has been made to an artefact and has not been applied to EaInfoportT3.
For example, if a user has a diagram open in EaInfoportT3 and changes it in some way in Enterprise Architect. Thus, after clicking on the forced refresh icon, these changes will be immediately applied to EaInfoportT3.
The functionality is available in the context menu under the symbol 

After clicking on the “Forced refresh” icon, the changes of the artefact in EaInfoportT3 compared to Enterprise Architect will be applied.
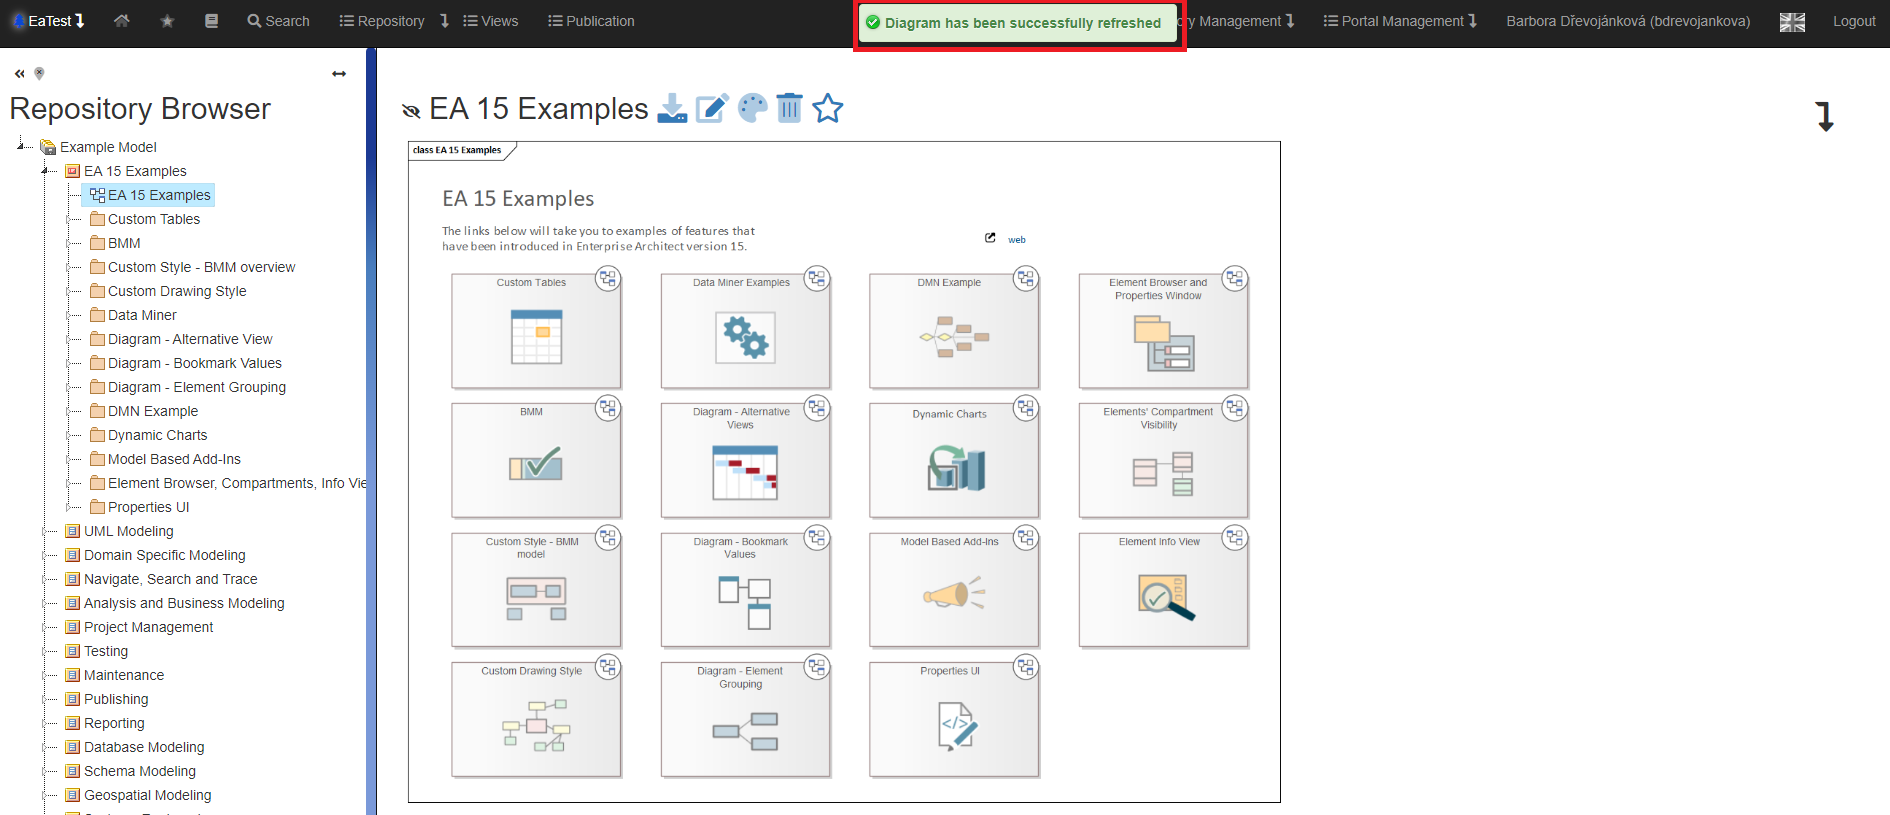
The diagram shows that the note has been removed.
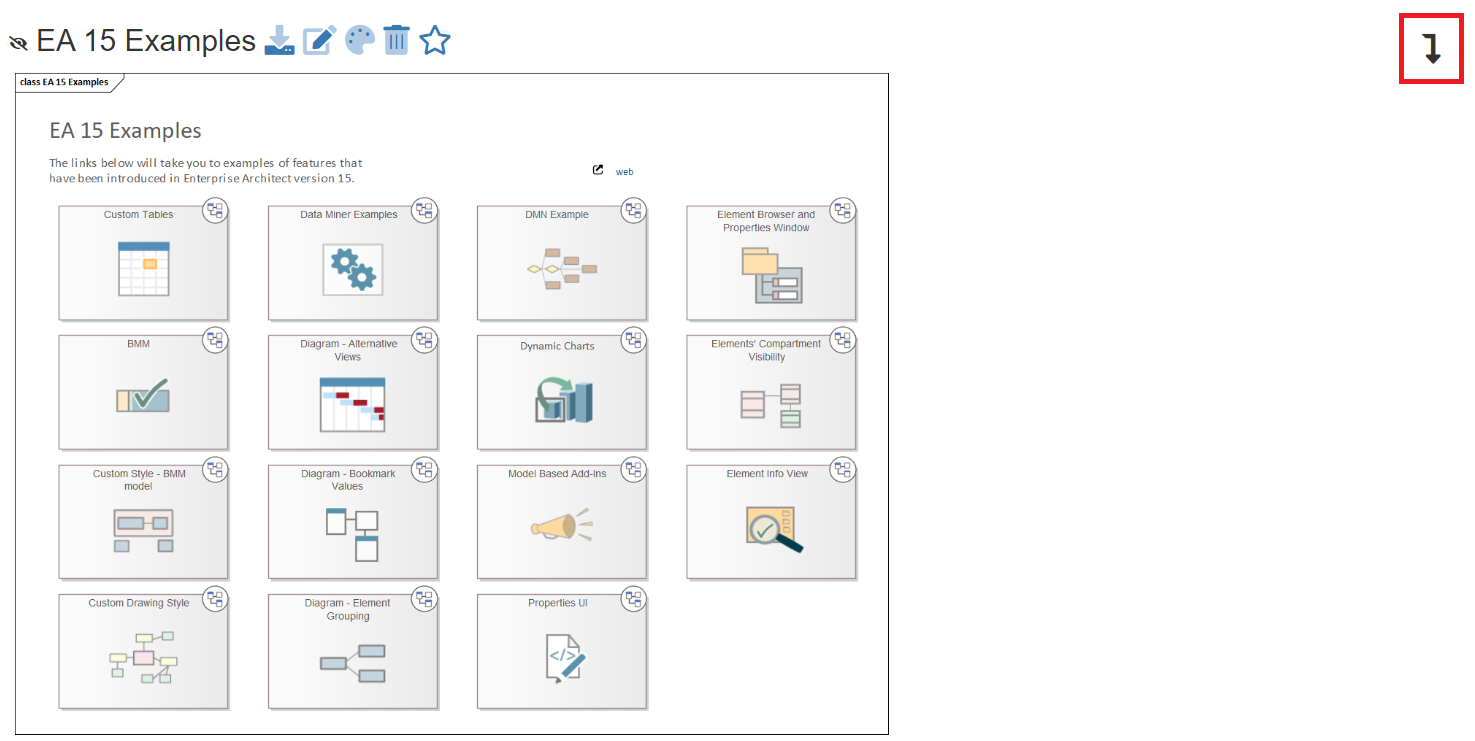
Zoom
EaInfoportT3 includes several zoom options.
The functionality is available in the context menu under the symbol 
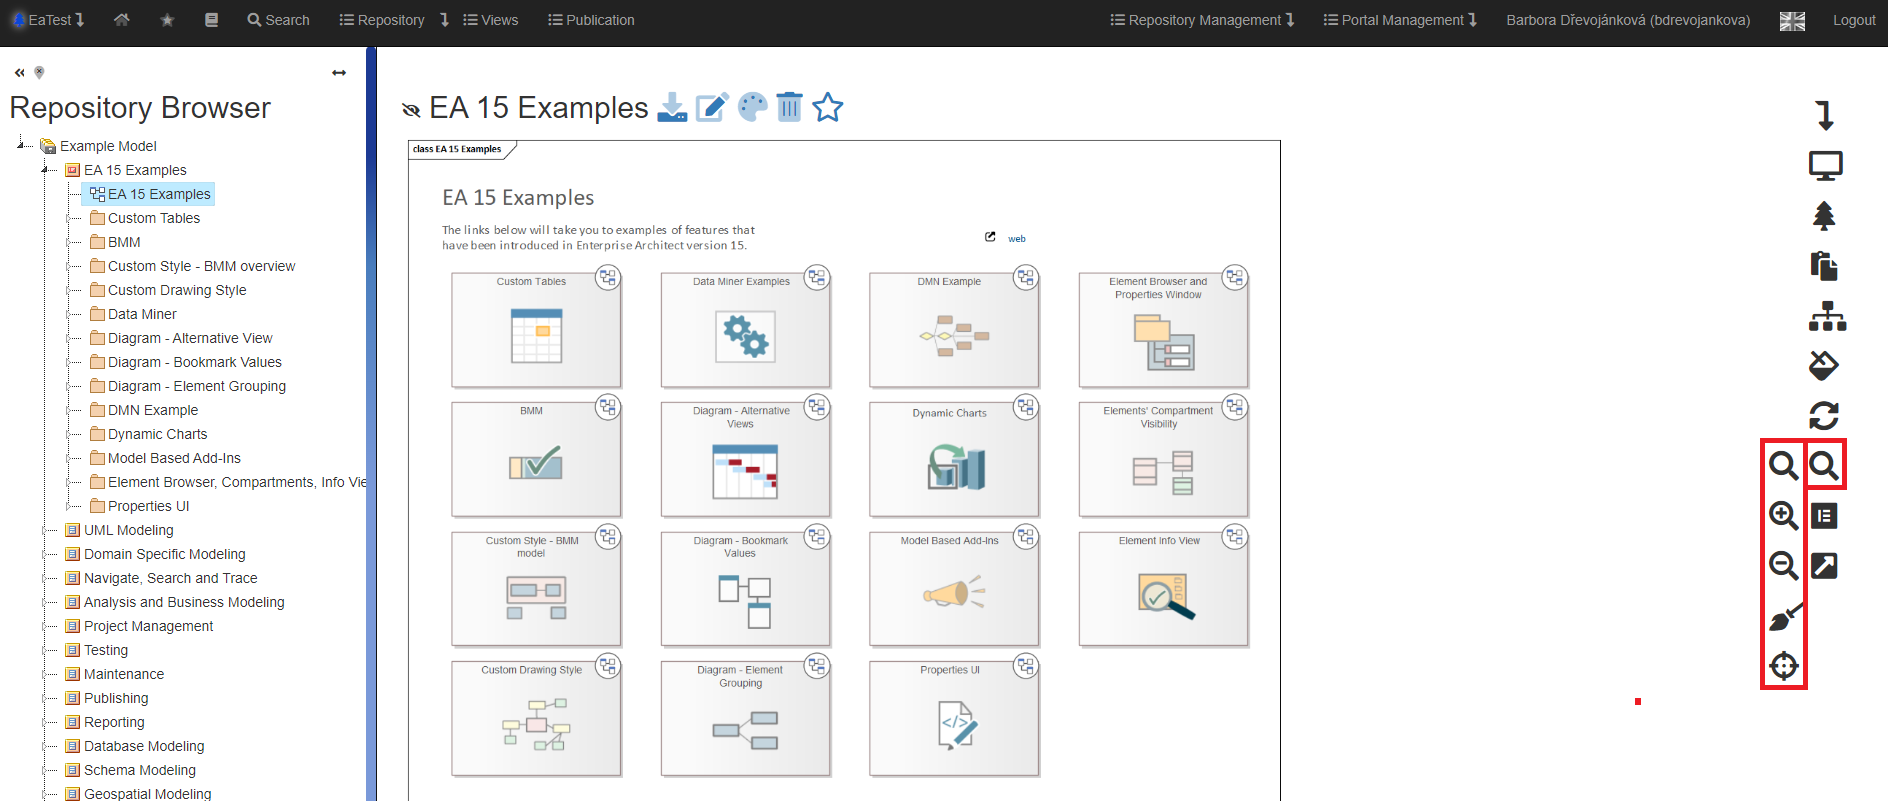
Zoom in
The functionality is available in the context menu under the symbol 
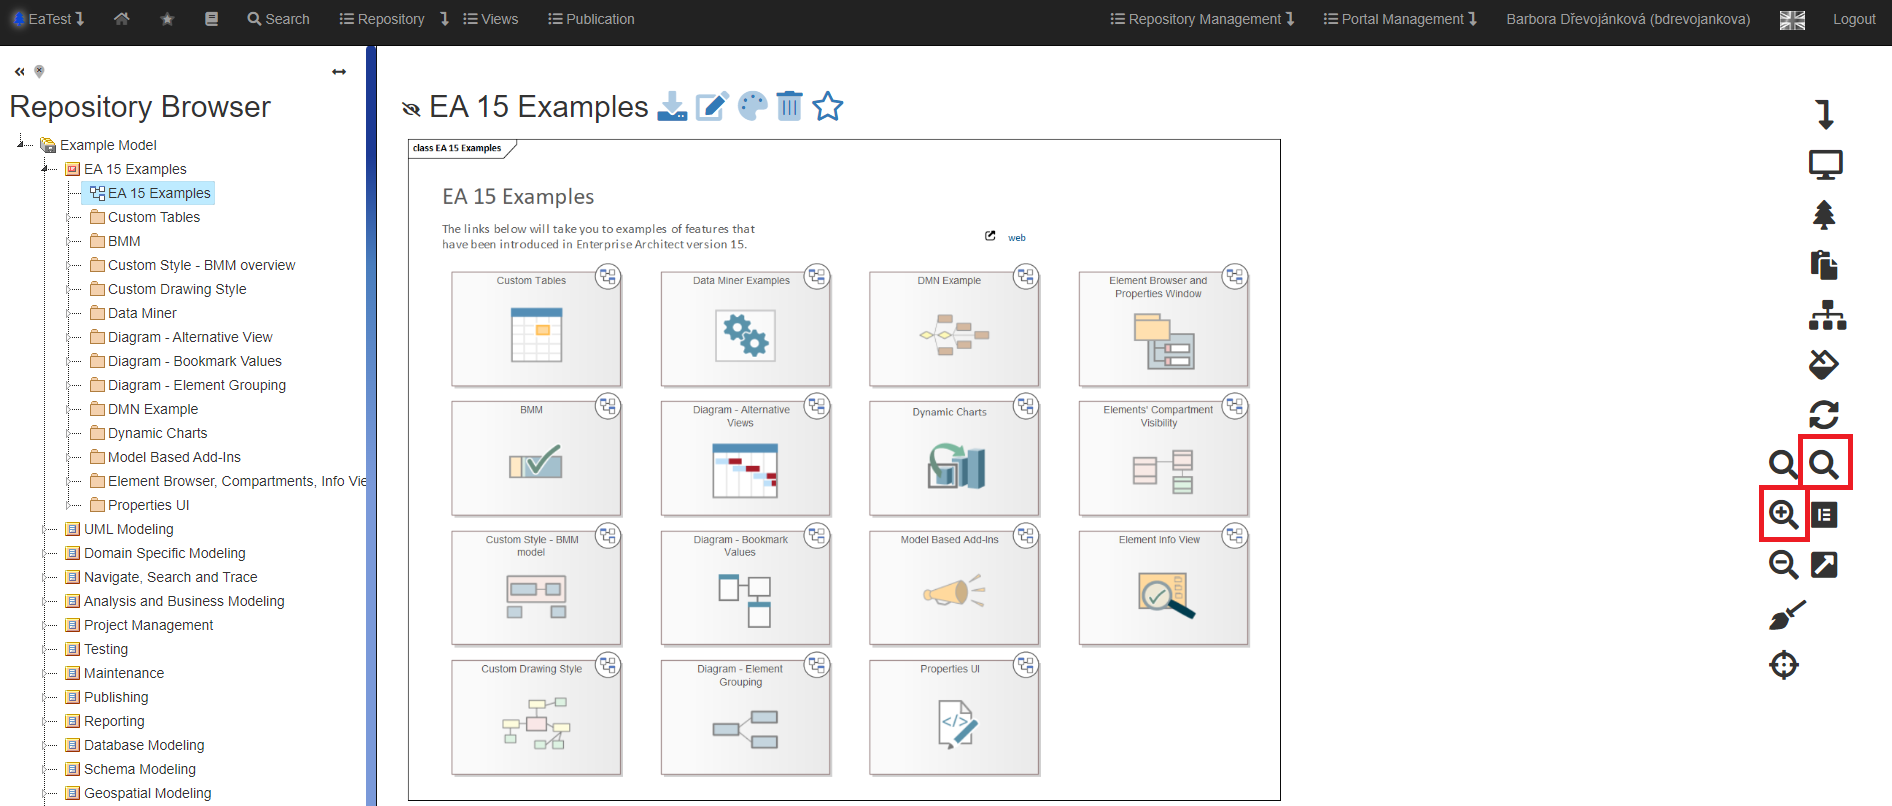
We have 2 options to zoom in the diagram:
- Hold down the CTRL key + scroll the mouse wheel.
- Click on the “Zoom in” icon.
Zoom out
The functionality is available in the context menu under the symbol 
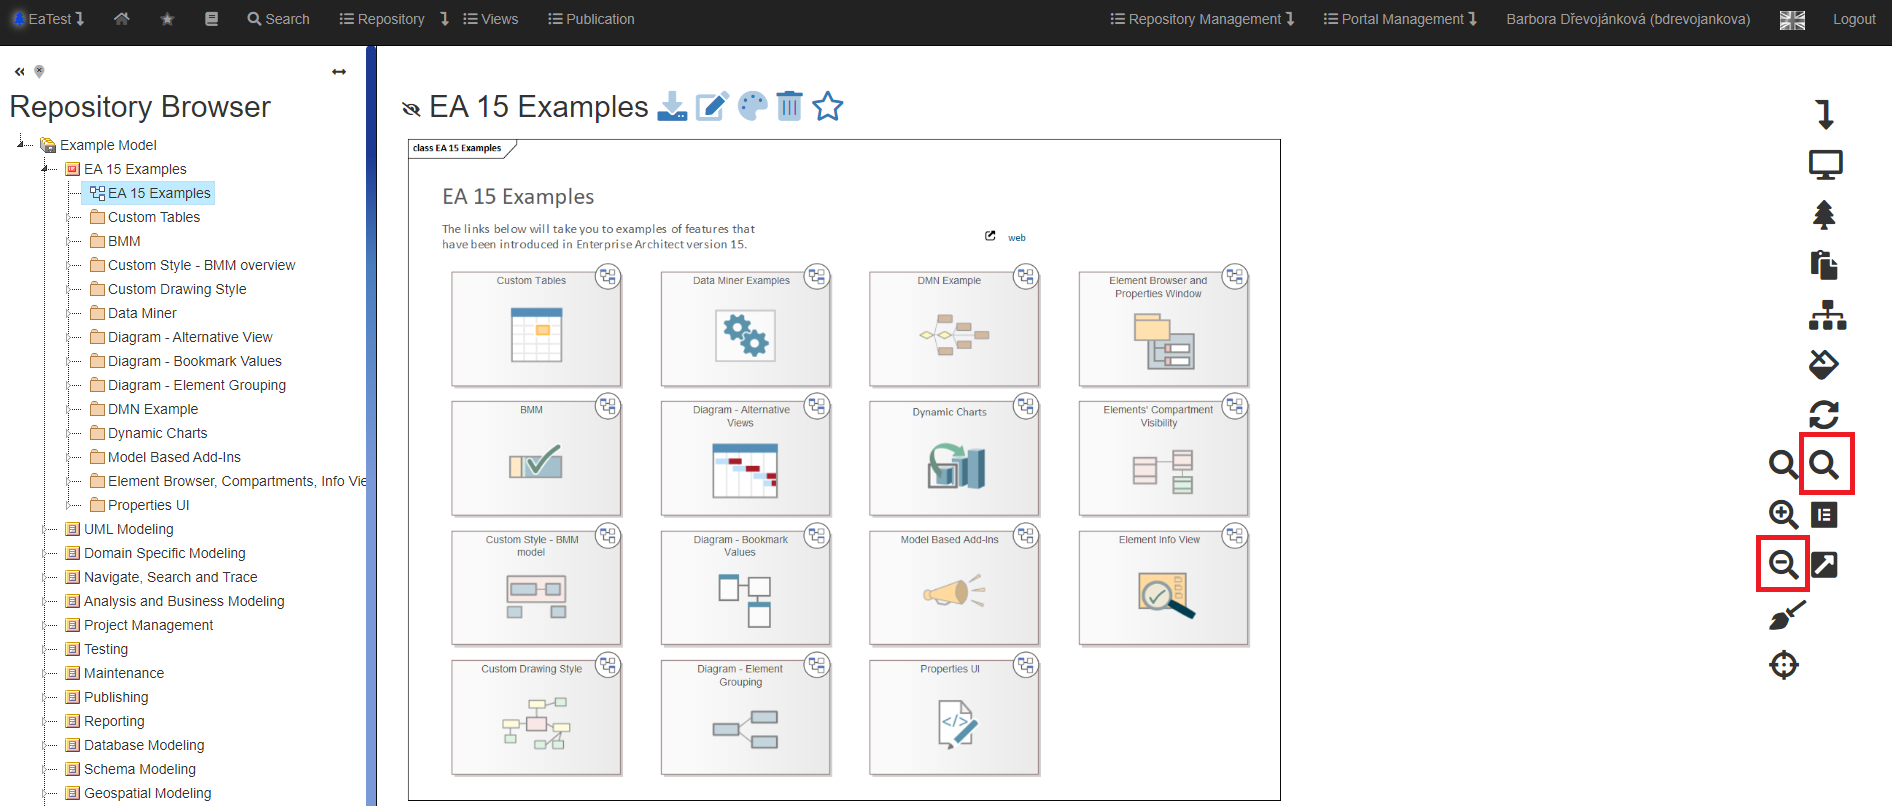
We have 2 options to zoom out the diagram:
- Hold down the CTRL key + scroll the mouse wheel
- Click on the “Zoom out” icon
Reset Diagram Zoom
The functionality is available in the context menu under the symbol 
If you want to return to the default zoom (100%), click on the “Reset Diagram Zoom” icon.
The diagram will zoom out to the original 100%.
Reset Diagram Position
The functionality is available in the context menu under the symbol 
If you want to return to the default zoom (100%), click on the “Reset Diagram Position” icon.
The diagram will return to its original place.
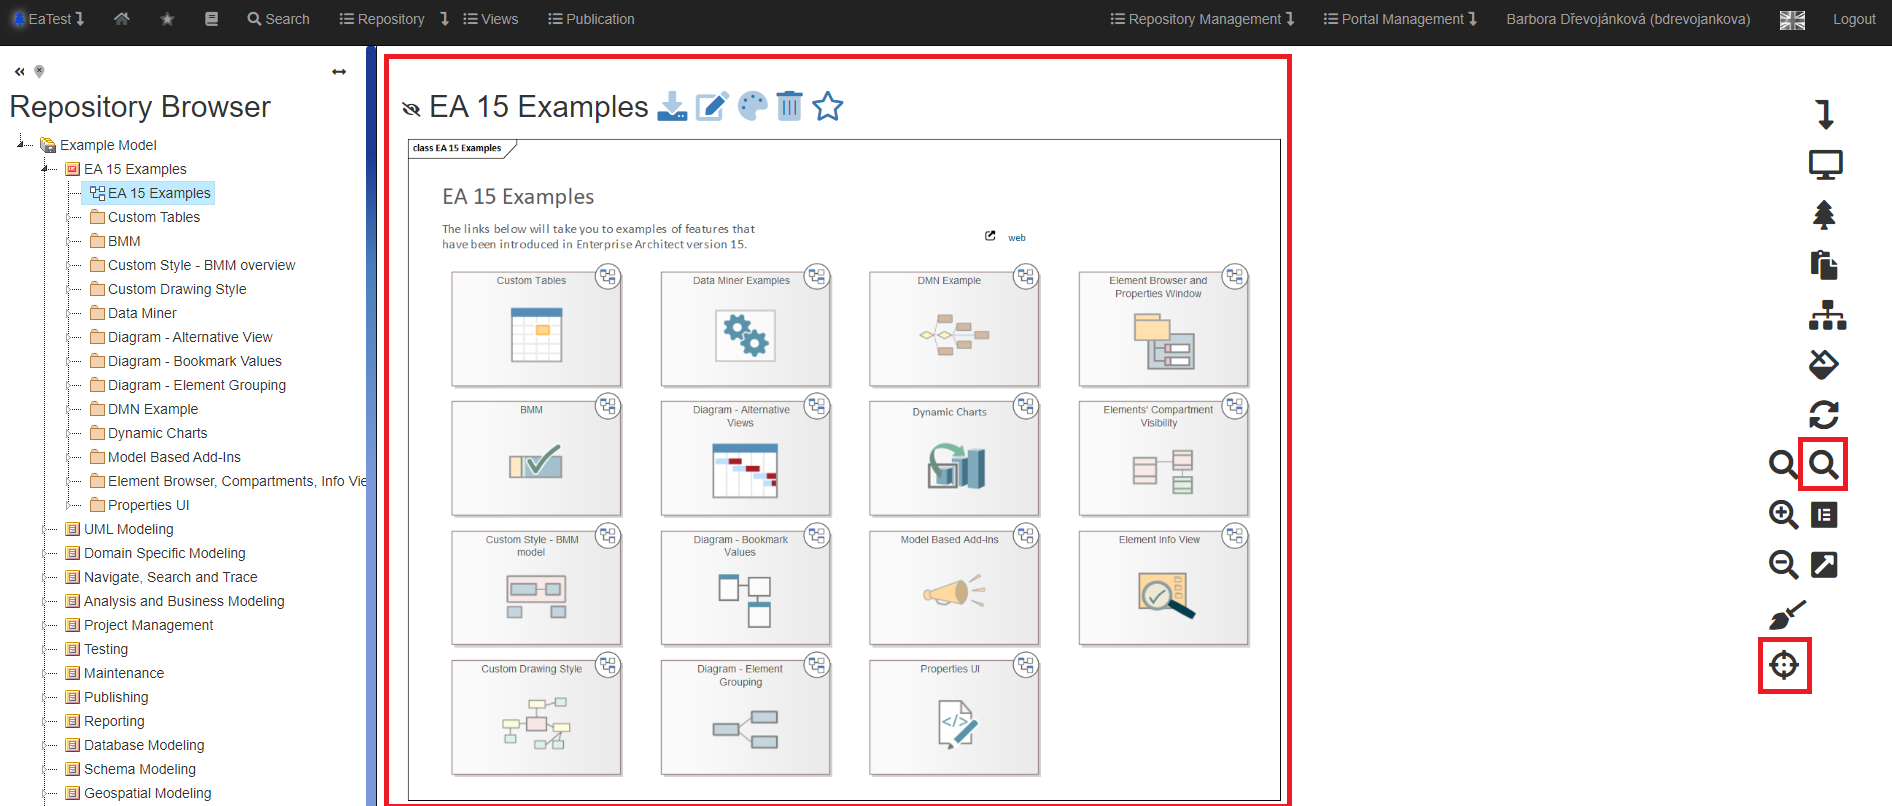
Elements in the Diagram
The functionality is available in the context menu under the symbol 
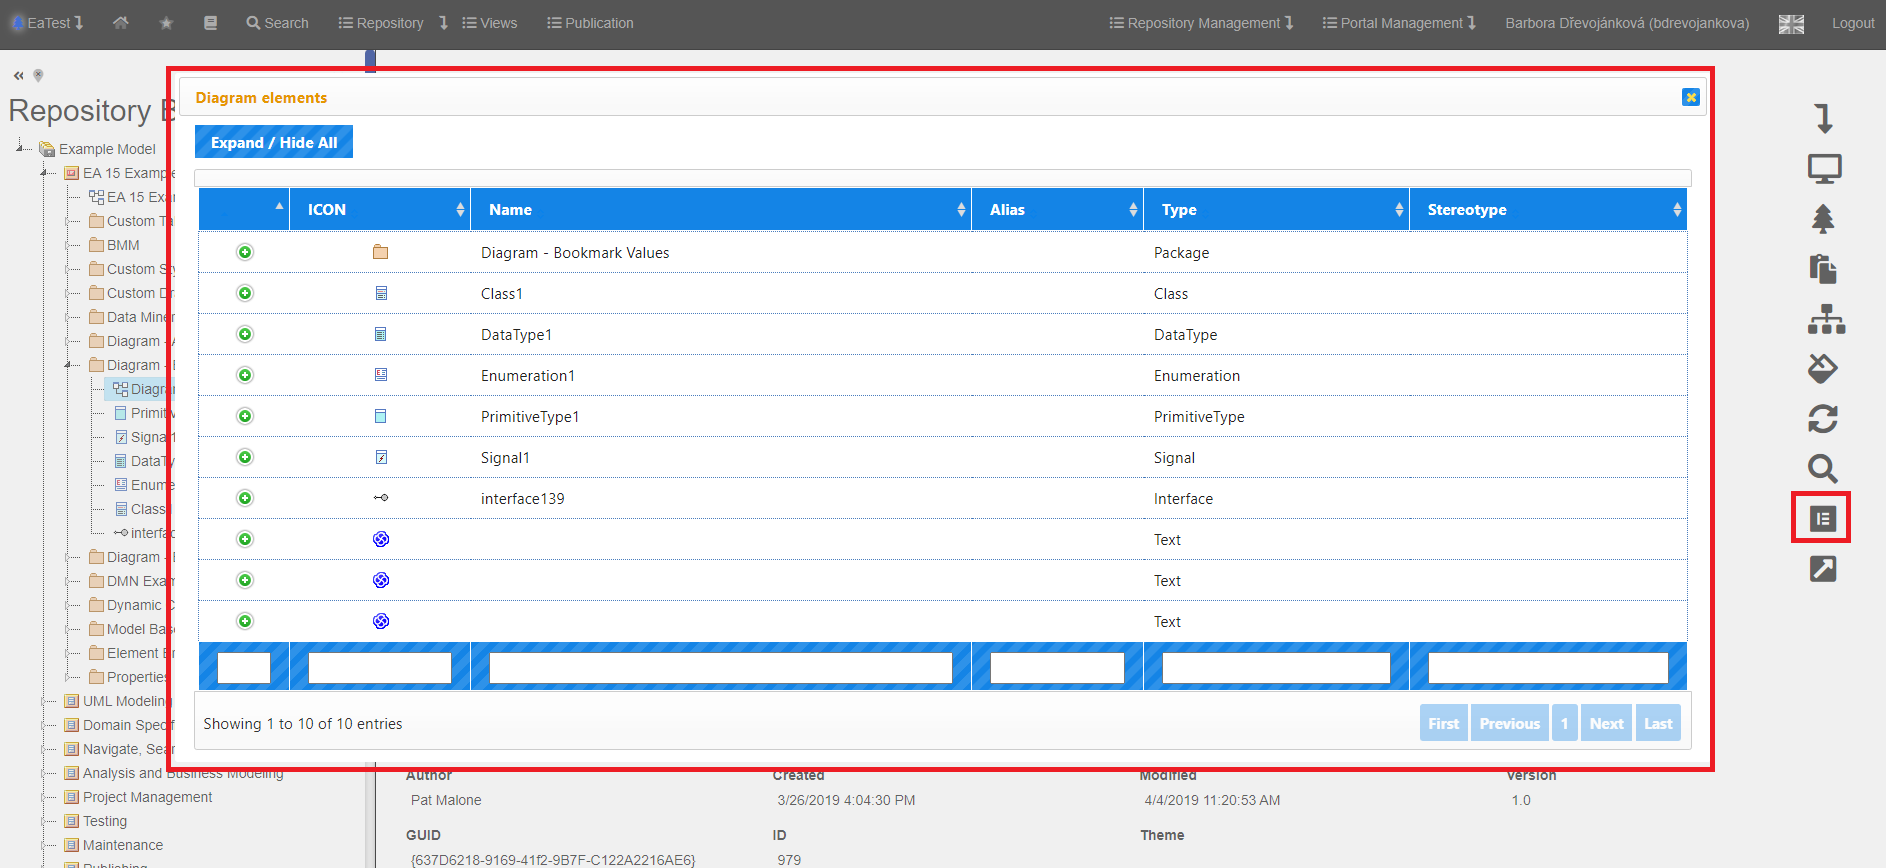
- When a user is in a diagram detail, he/she has the option, after clicking on the “Elements in the Diagram” icon, to display a list of all elements that are in this diagram.
- After clicking on
 the detail of the specified element is displayed.
 - After clicking on
 in the ICON column, you get to the specified element.
We got to the “Account” element and selected “Search diagrams with this element” there.
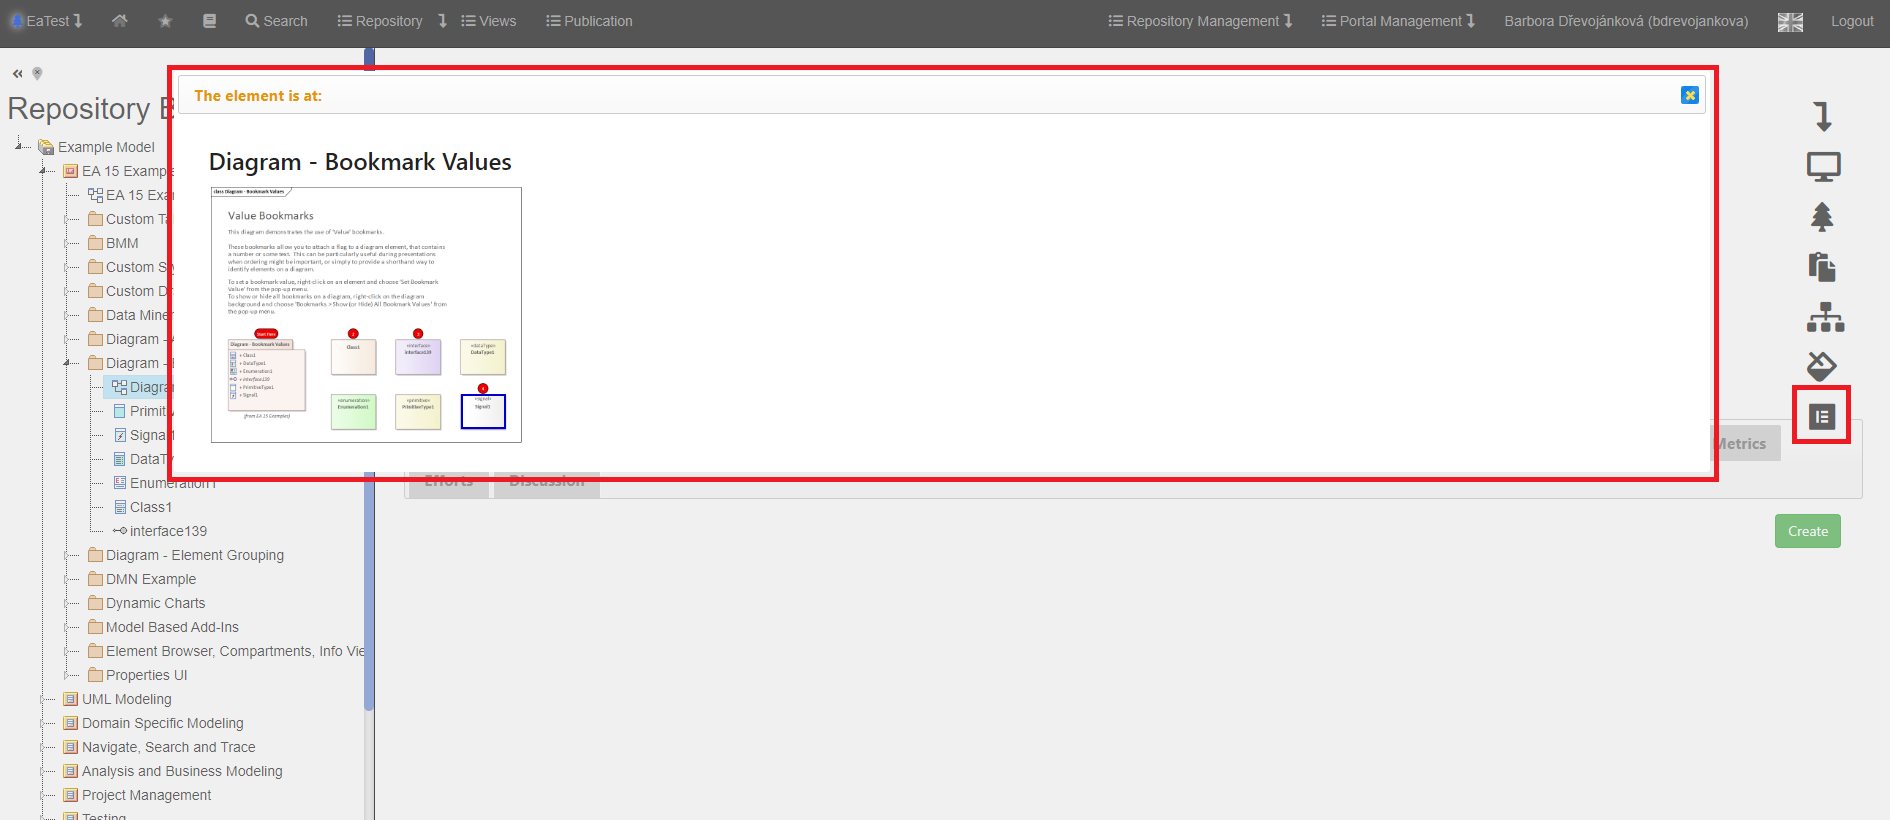
- A list of diagrams in which this element is located is displayed, with a preview and highlighting where it appears in them.
- Double-click on the diagram to get to its detail.
Hiding Text Information in Element Detail
The  button is used to hide the information below the diagram.
Here you will see the same diagram with hidden detail and discussion.
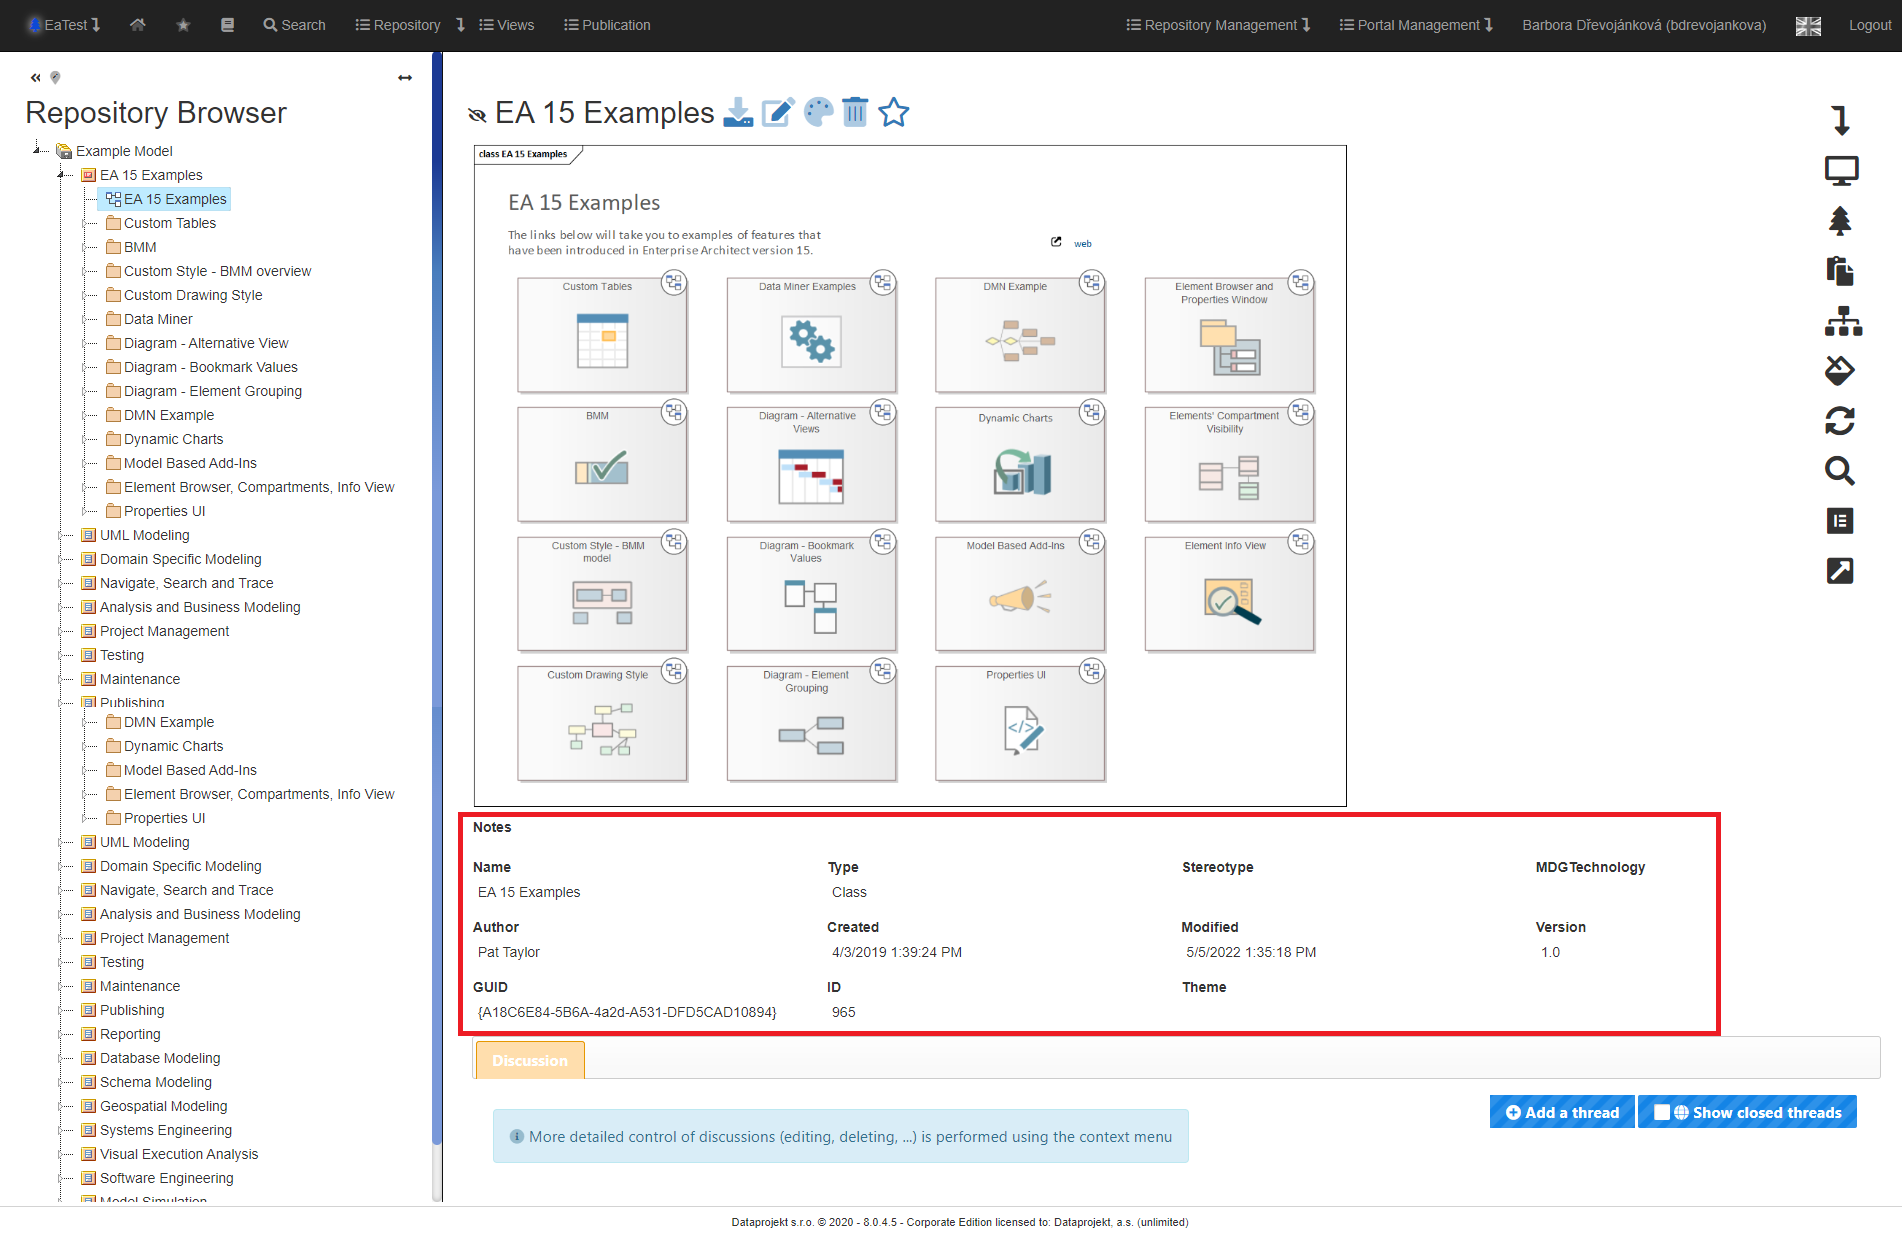
Information about the repository
If the detail displays the package, element, and element elements (such as class attribute, class operation, activity parameter, and more), the detail screen looks slightly different.
It does not, of course, display the diagram image. However, the amount of "textual" information is much greater compared to the diagram.
The above screenshot is only an example - depending on the portal configuration (or the settings of a particular user), it may differ in the number or placement of specific information.
The configuration of the detail, repository element, will be explained later in this document.
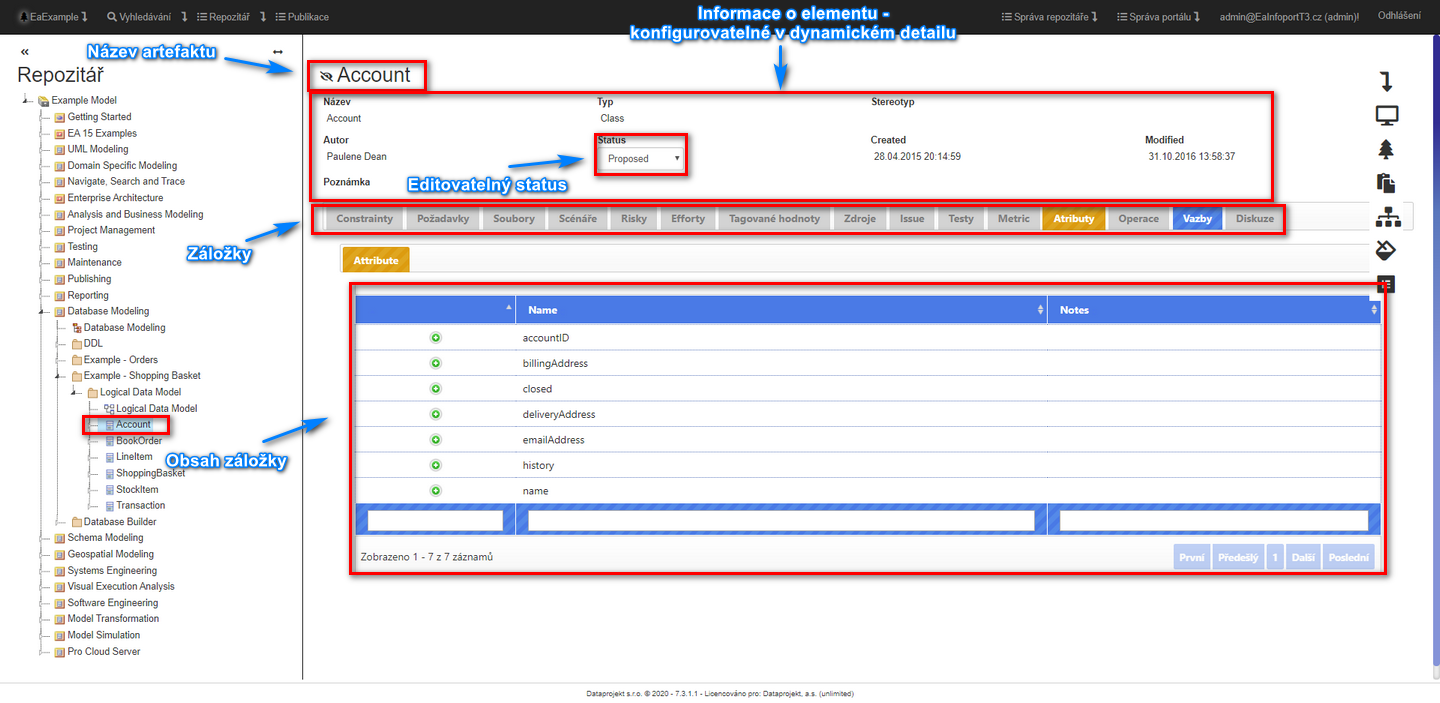
Displayable element detail
Click on the "Account" element in the tree to see the detail.
In the detail you can see:
Name and information about the element with editable status.
The element may contain properties and discussions that are clickable in the blue tabs. The grey tabs are empty and the orange tab indicates the currently selected tab.
In the tab content, you can see that the "Account" element contains seven attributes.
By clicking on  you can open the detail of the selected attribute.
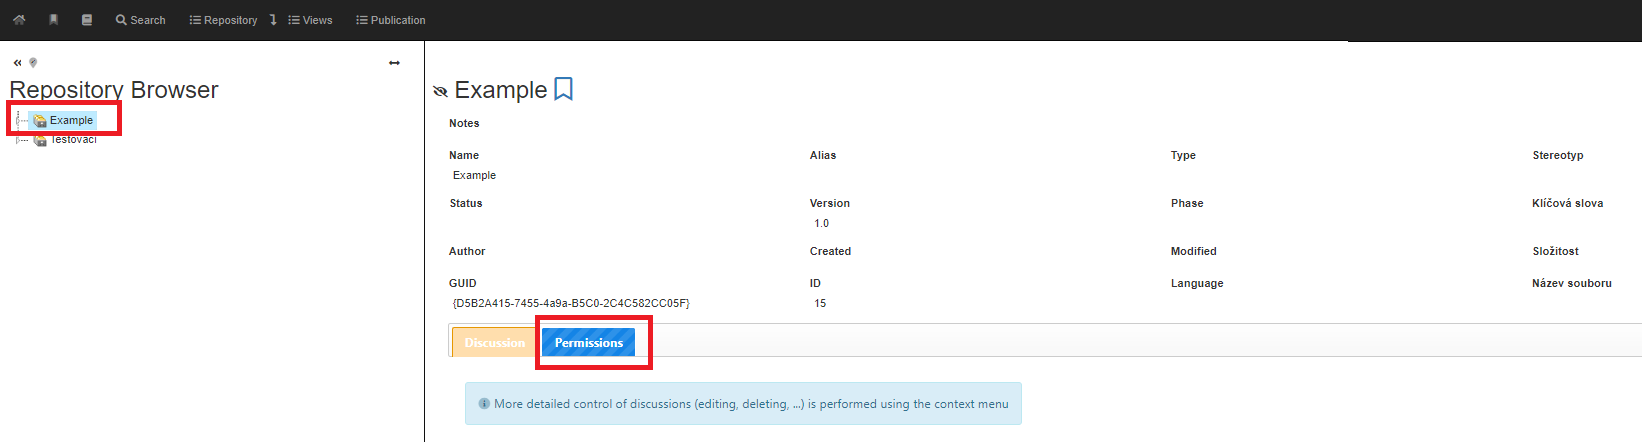
Package properties
After clicking on the “UML Modeling” package in the tree, the detail will be displayed.

- n the detail, you can see the name and information about the package with editable status.
- A package can contain properties, discussions and permissions. You can click on them in the blue highlighted tabs. The grey bookmarks are empty and the orange bookmark indicates the currently selected one.
- The “Permissions” tab is unique to a package. We can use it to set permissions in the selected package.
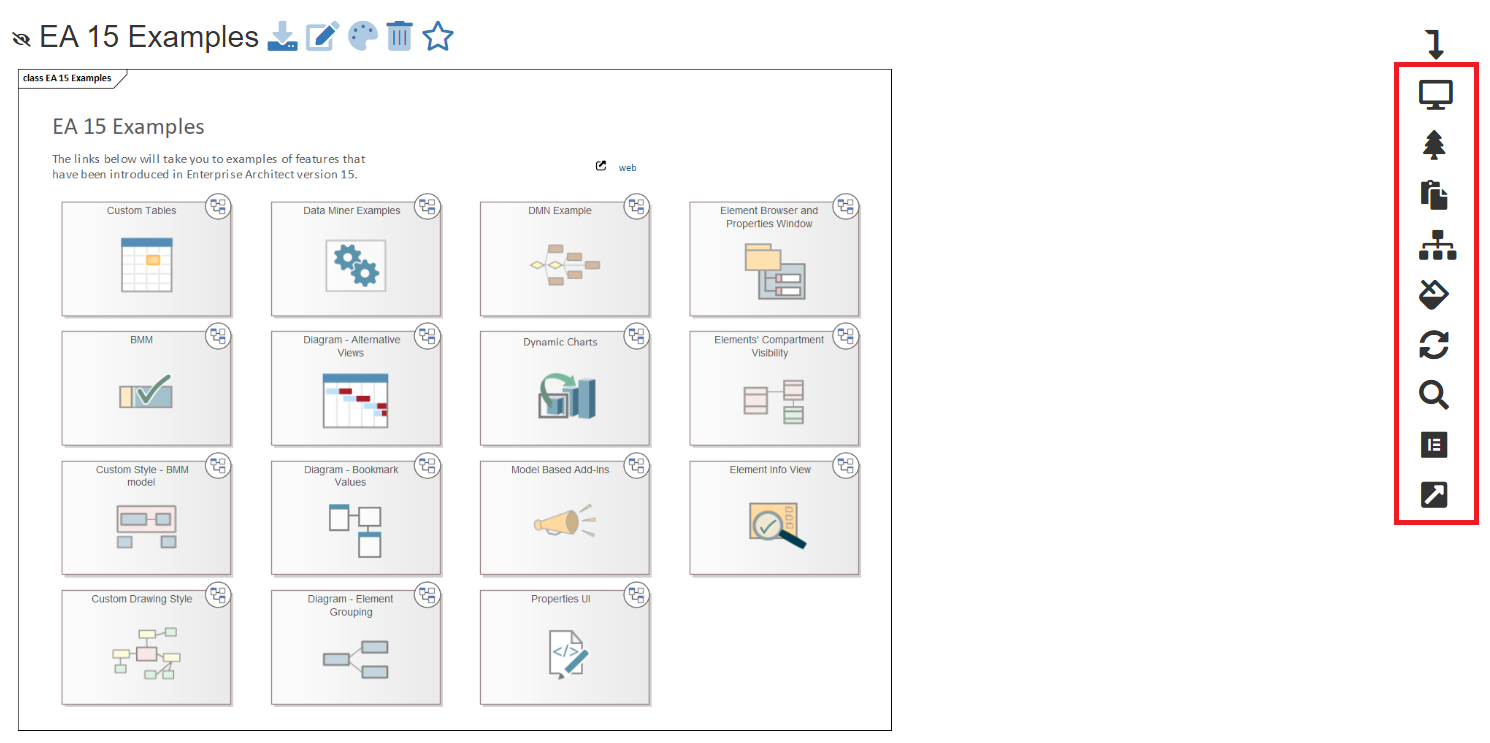
Icons on Artefacts
Detail elementu / package / diagramu
This is the largest part of the screen, containing the detail of the item (diagram, element, package and others) that is currently selected in the tree. The exact information varies depending on which element is selected in the tree.
If a diagram is selected, then the diagram itself is displayed at the top and the diagram details below it.
If an element (package and others) is selected, then the information about the selected element is displayed directly.
A detailed description of the diagram/element details is given below.
Discussion (comments) in packages, diagrams, elements
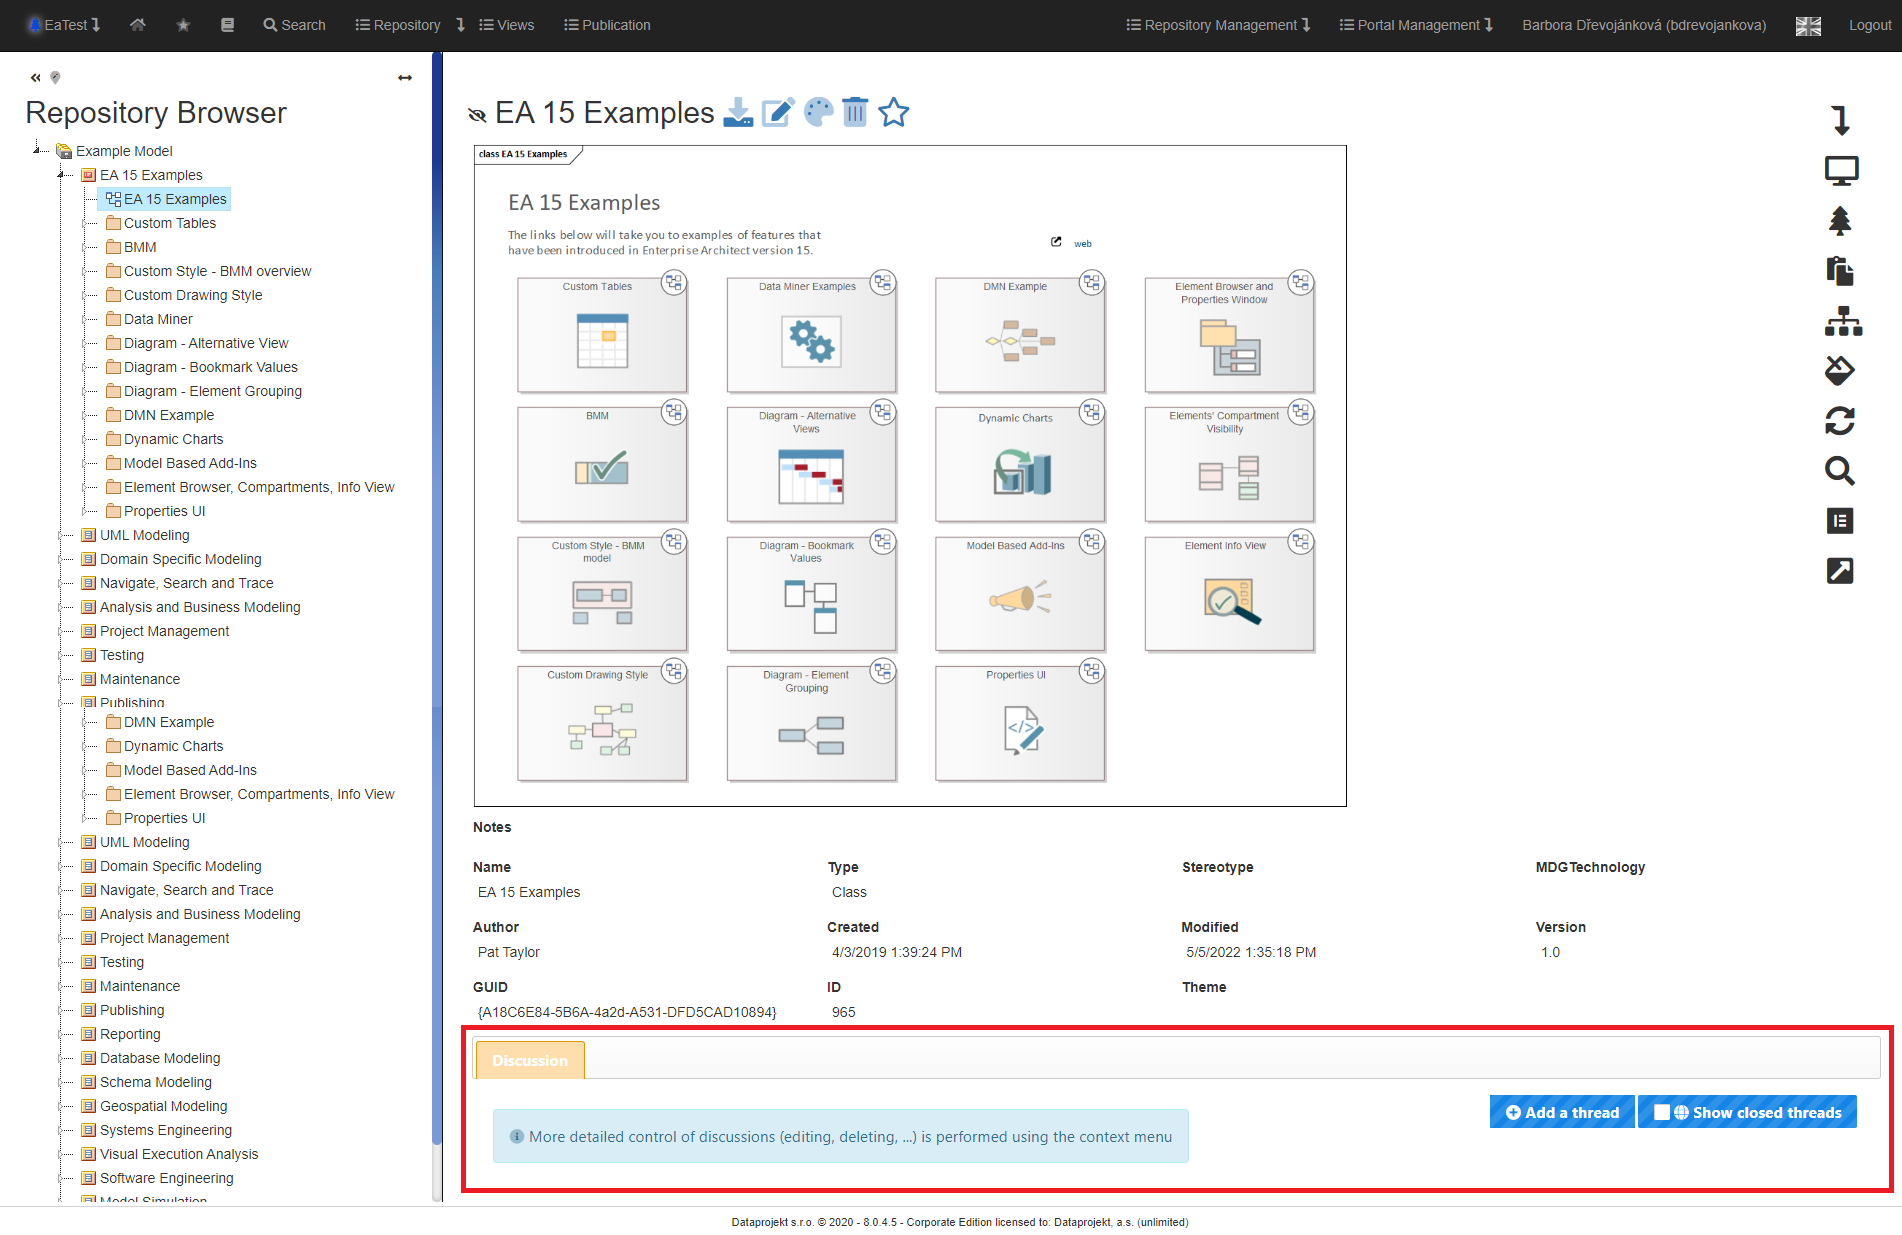
In packages, diagrams and elements, you can see comments from EA and you can also edit and add them.

- To create a new comment, click on “Add a thread”.
- Portal/repository admin can click on "Status change"
- If there is a closed thread, you can check the “Show closed threads” filter.
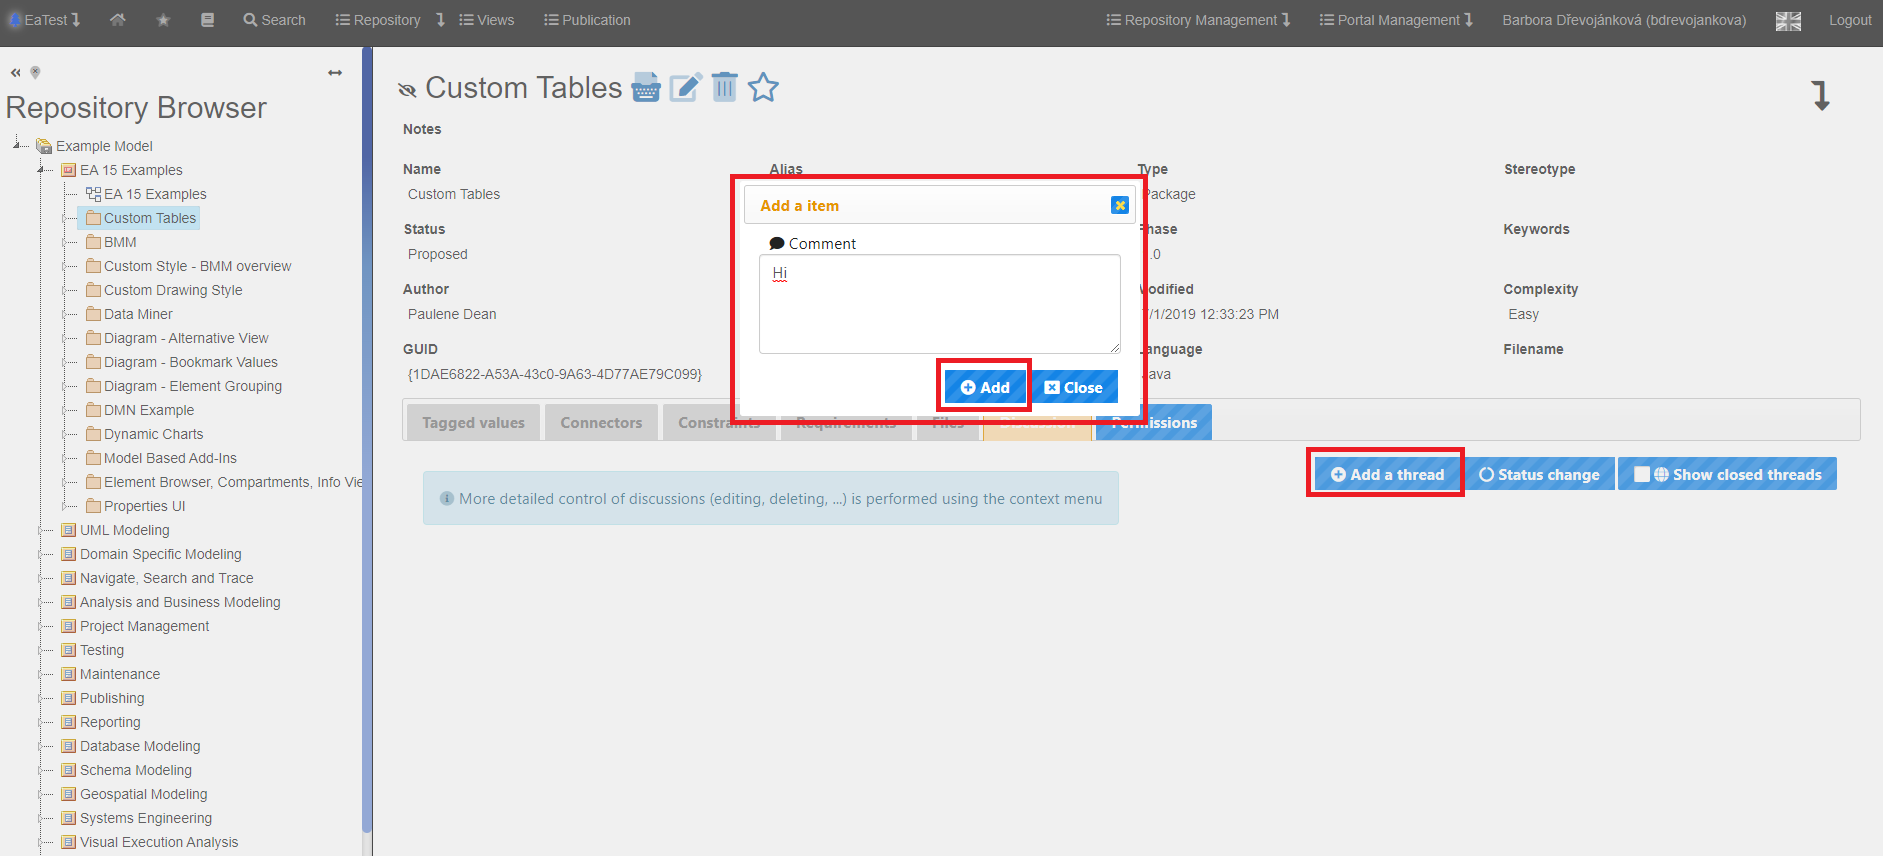
In the picture, you can see that the user admin clicked on “Add a thread”. A window popped up where it is just necessary to fill in a text of a comment and after clicking on “Add” a comment will be created.
In the marked window, we can see a table with four items. The table can be displayed by right-clicking on the selected comment.
In the picture, you can see that the user admin clicked on “Add a thread”.
A window popped up where it is just necessary to fill in a text of a comment and after clicking on “Add” a comment will be created.
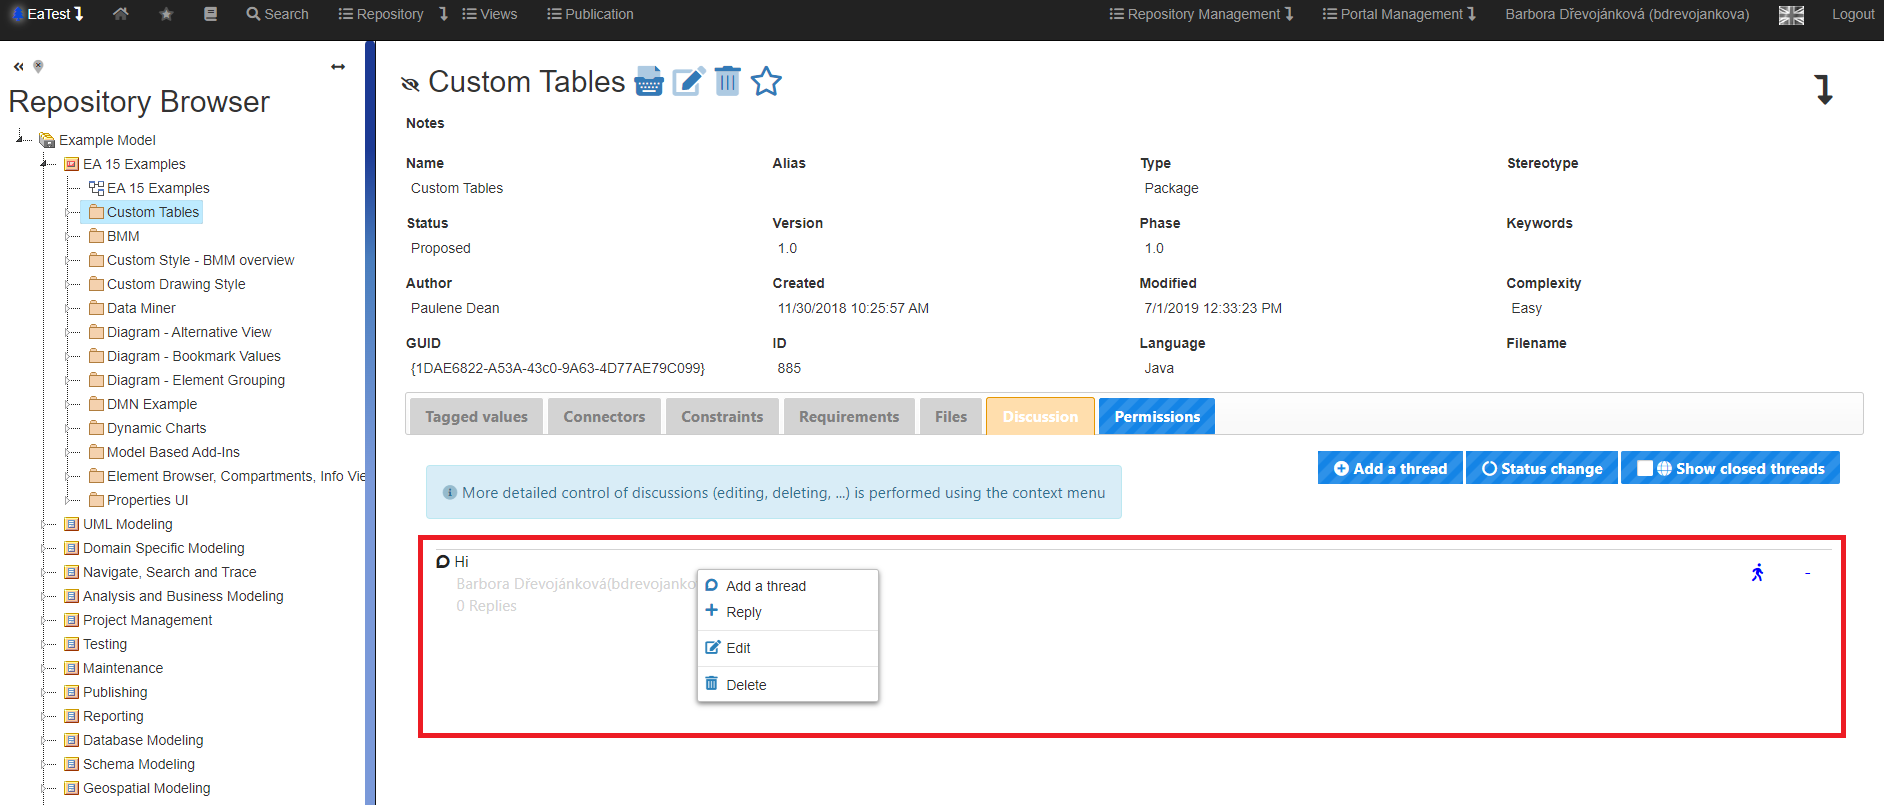
- The “Add thread” option has the same function as the button mentioned above.
- The “Reply” option opens a window for creating a comment. After adding a comment, it will be included under the comment that was selected. An example can be seen above the marked comment.
- The “Edit” option opens a window where you can set Status, Priority or comment text.
- The “Delete” option deletes the comment.
The user has selected the “Edit” option.
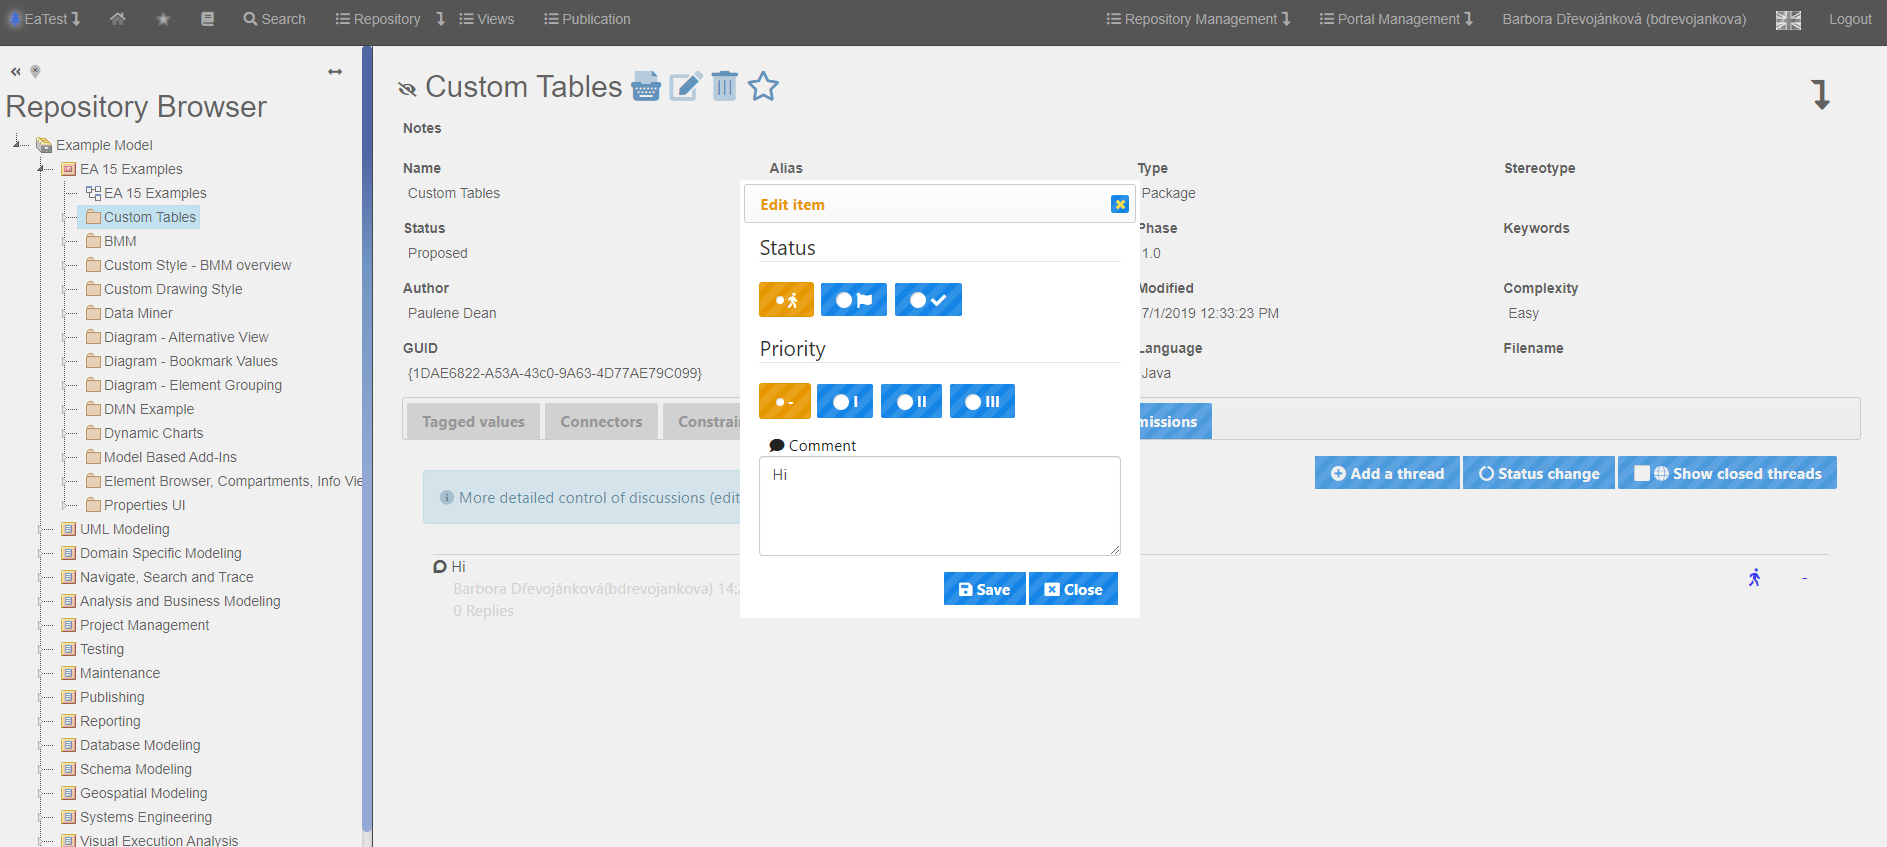
You have the opportunity to choose between three statuses. Open, Awaiting Review, and Closed.
Another option to choose is to set the priority. You can choose Not Specified, Small, Medium and High.
Or you can simply change the text of the comment in the text box.
Setting of Dynamic Detail
The dynamic detail setting allows the user to customize the visibility of various elements in the detail of an element, diagram, tab, etc. That is, which information (element name, description, element binding, tabs such as attributes, operations, bindings, etc.) should or should not be displayed, where they should be displayed, and what size they should be in the detail. For example, it's good to have the element description stretched as much as possible (over all slots), the version over one and the author name over three.
If the displayed text does not fit in the assigned size, it will be wrapped.
EA Infoport le already comes with a default field definition, it can be redefined at the repository, group or user level. The user can set the dynamic detail himself, or an admin can set it for him.

We have a choice:
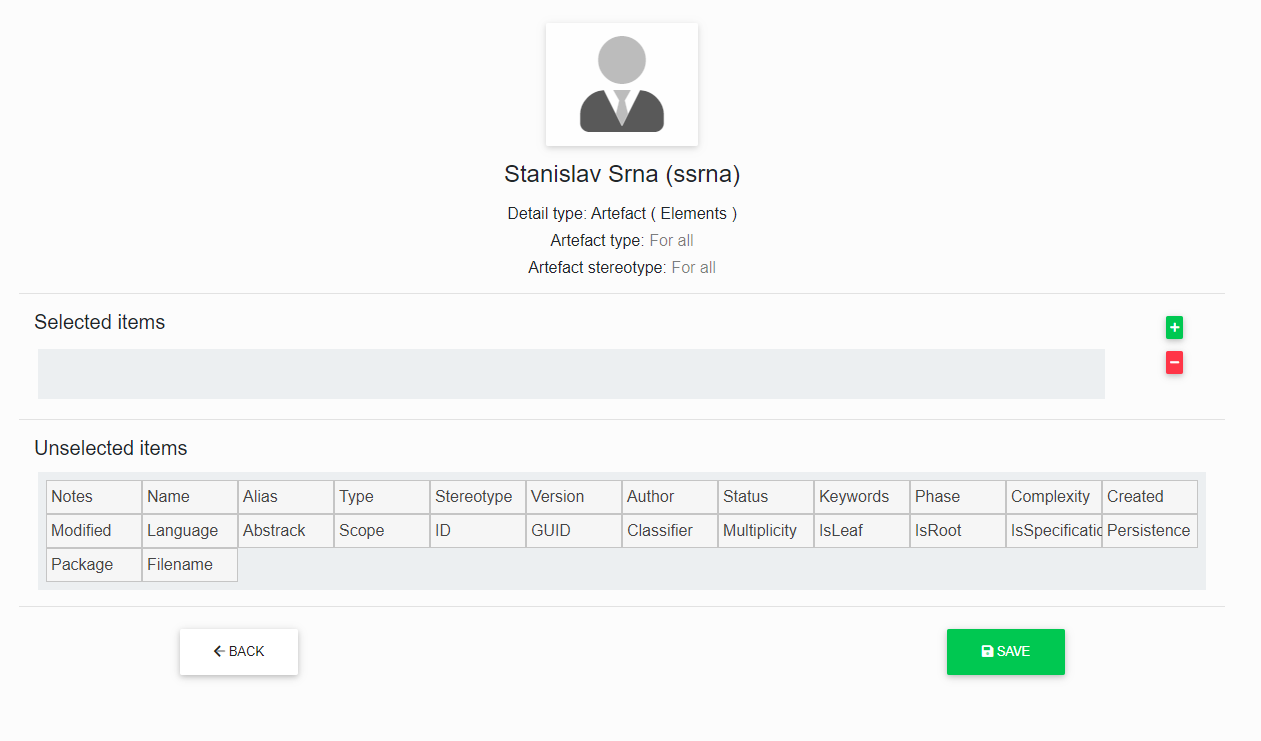
Setting of Dynamic Detail for Users
Here the dynamic detail is set for the logged in user.
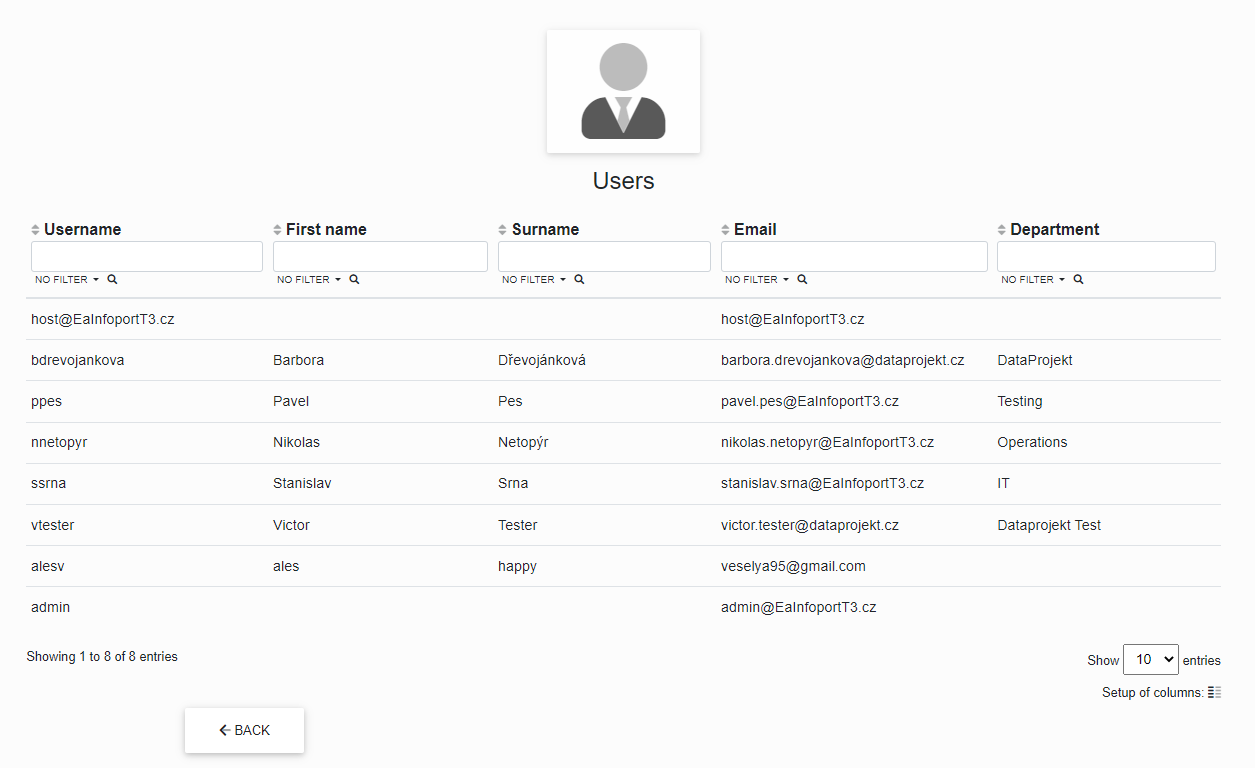
We can set the detail type (artifacts, other, bookmarks).
Setting of Dynamic Detail for Groups
Here the dynamic detail is set for for groups in the repository.
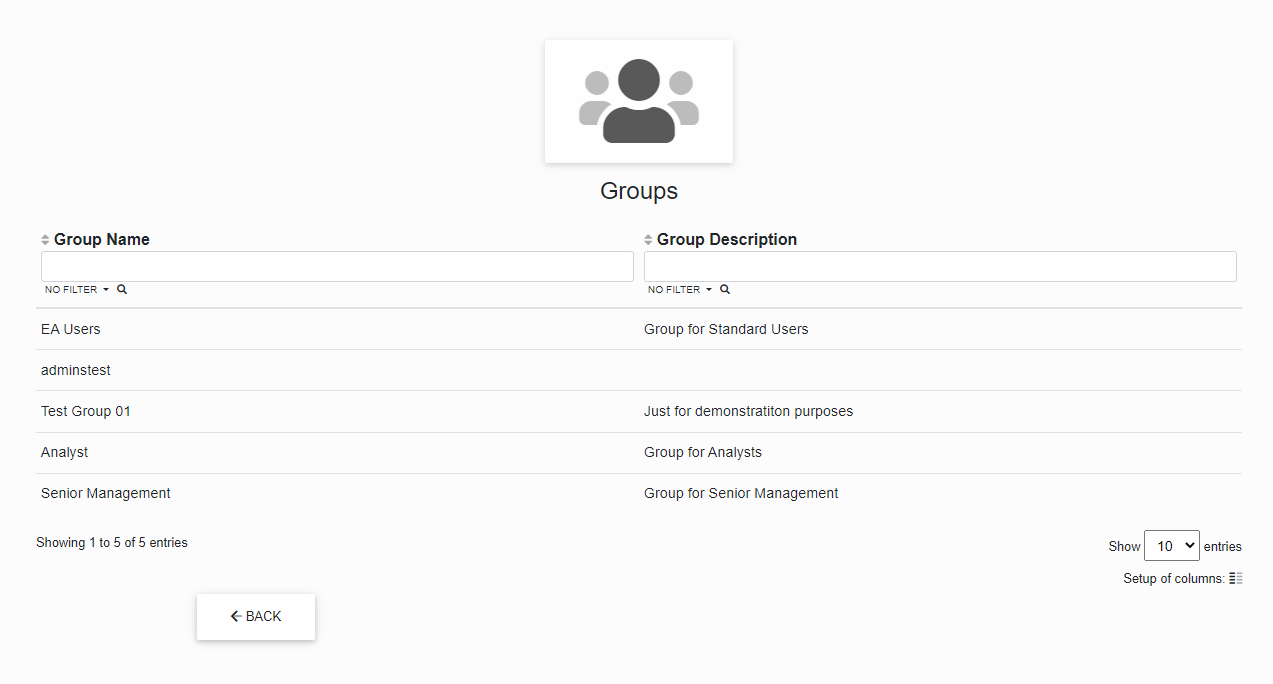
We can set the detail type (artifacts, other, bookmarks).
Setting of Dynamic Detail for Repository
This is where the dynamic detail for the repository is set.
We can set the detail type (artifacts, other, bookmarks).
Repository Tree Filter
The repository tree filter allows a user to hide/show elements and stereotypes in the tree.
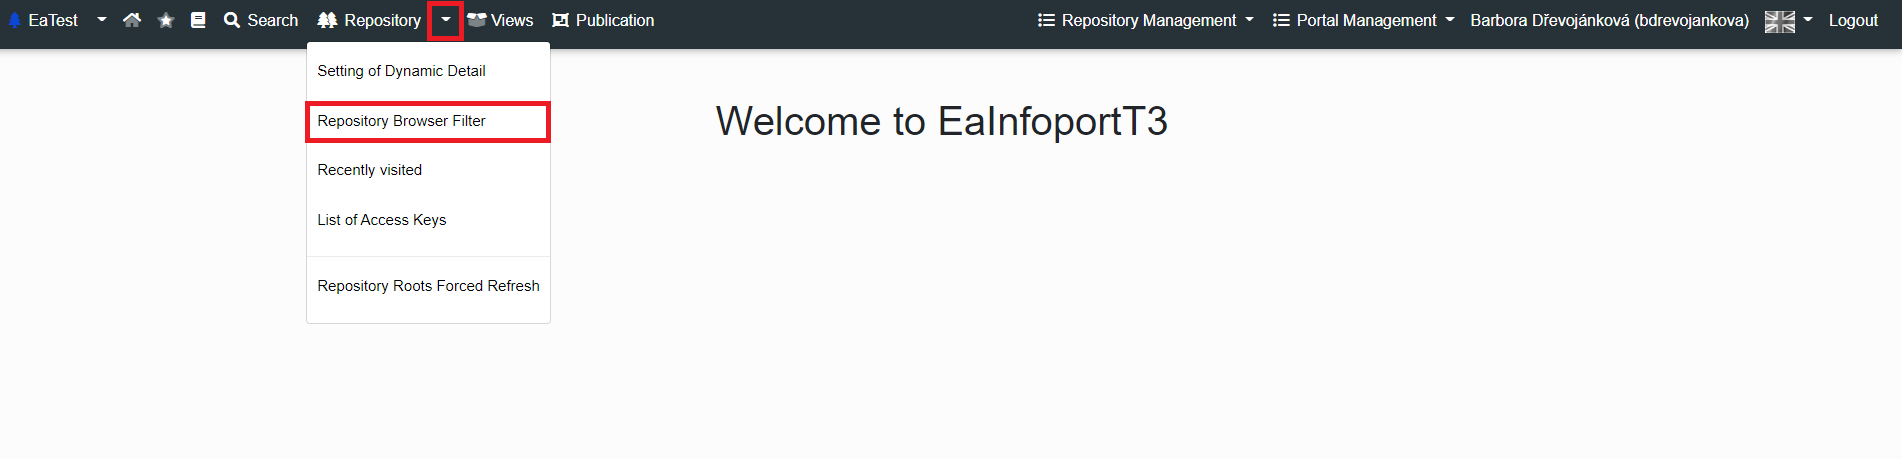
To display the repository tree filters, a user clicks on the arrow next to the “Repository” tab and then on the “Repository Browser Filter” tab.
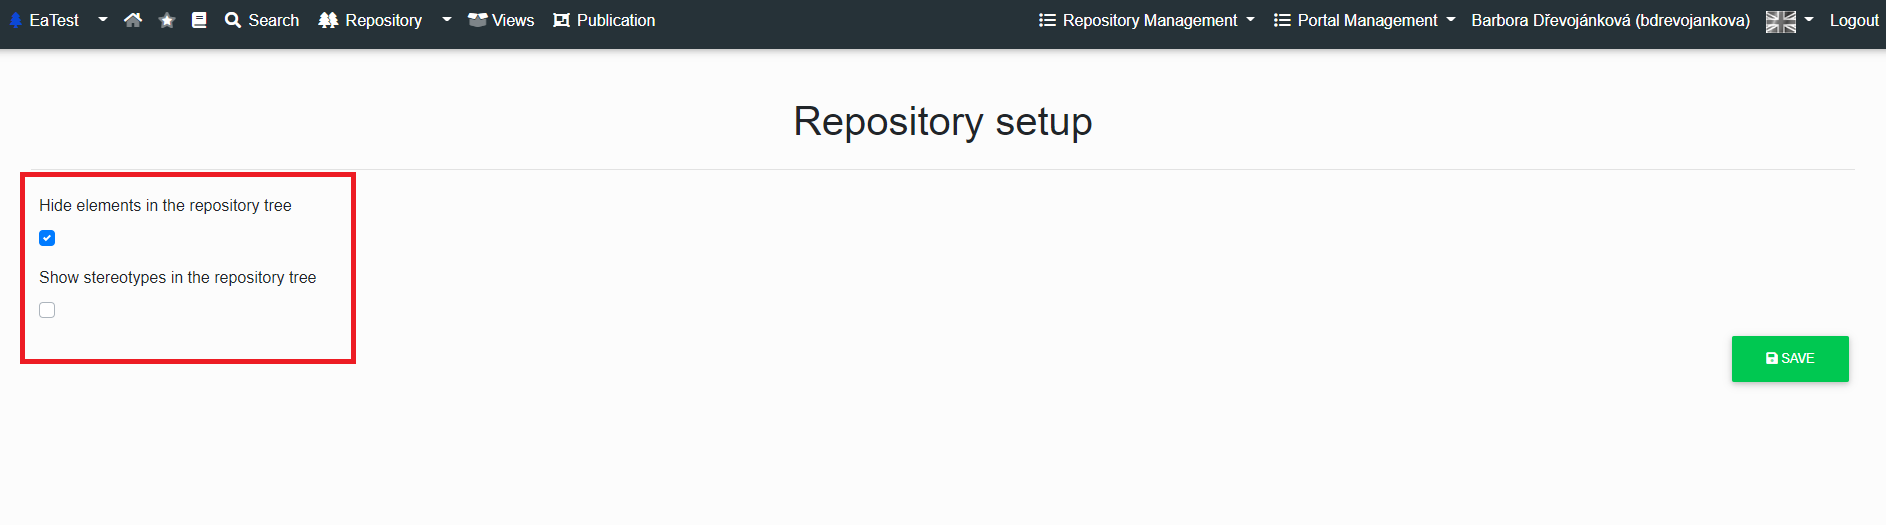
There are currently 2 filters available:
- Hide elements in the repository tree
- Display stereotypes in the repository tree
After checking or unchecking a filter, it is necessary to click on the “Save” button.
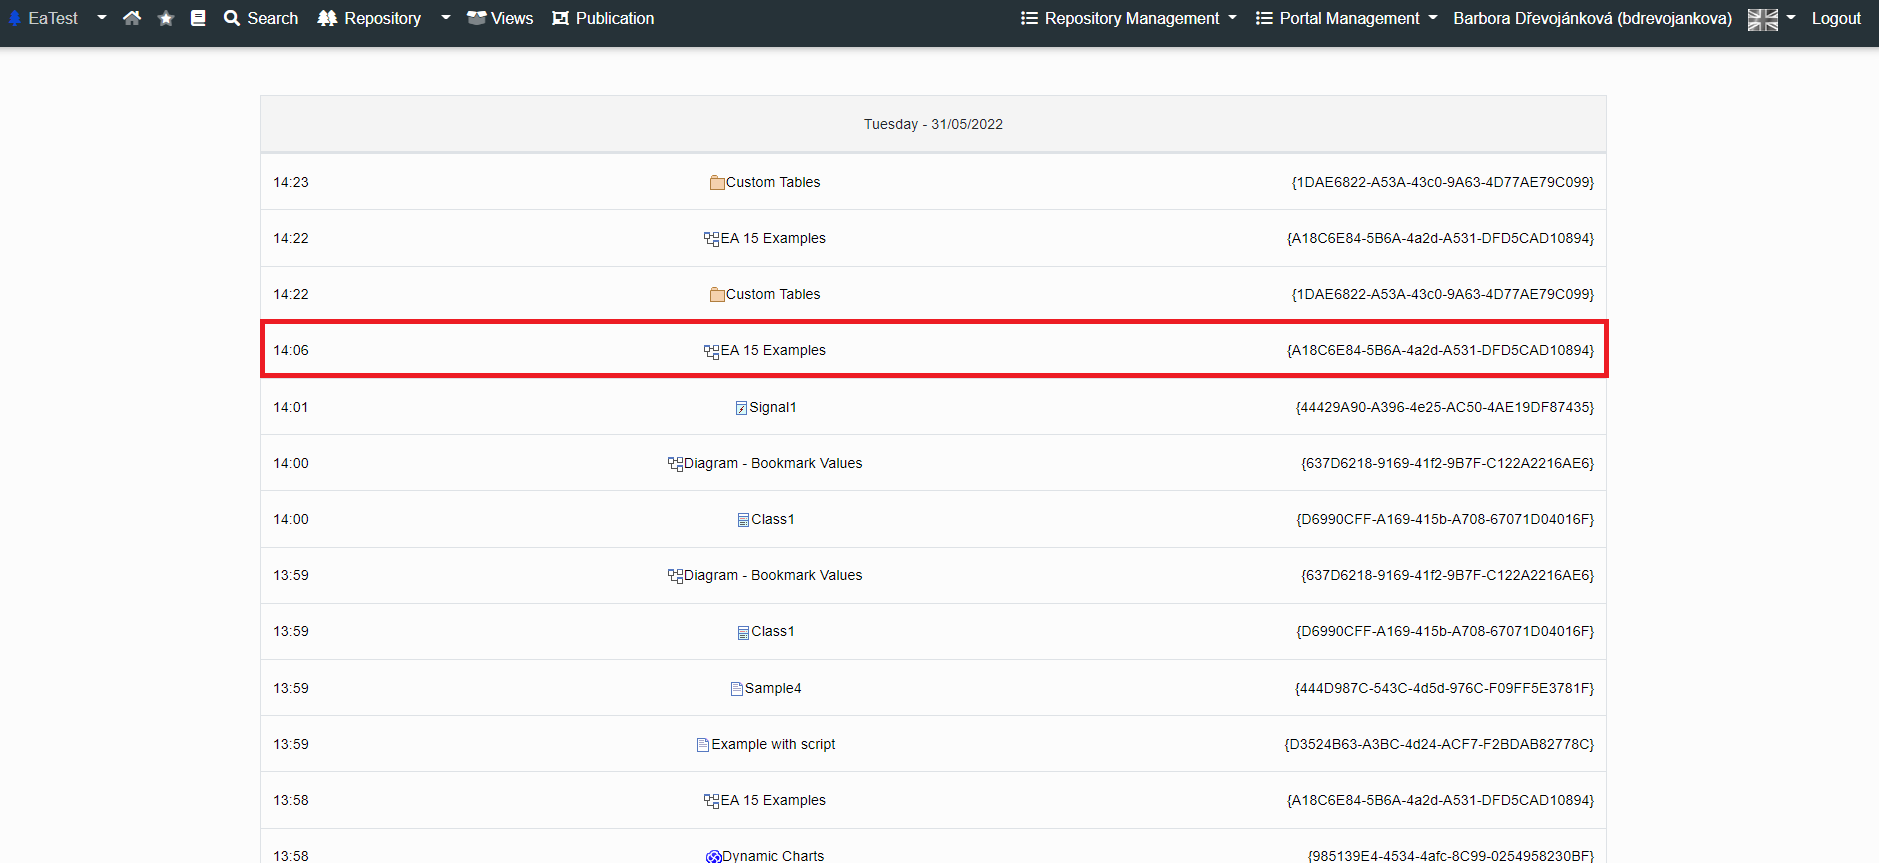
Recently visited
"Recently Visited" allows you to see your click-through history.
In the table we see:
- Date
- Time
- Diagram/element/package/attribute/operation - the line can be clicked on the artifact
- GUID
List of Access Keys
newer versions - https://doc.eainfoport.cz/books/user-manual/chapter/access-keys
Whenever a user uses the “Direct Access URL” option, the key for that URL is saved in the access key list.
If a user no longer wants to be able to access the relevant address without a password through this key, he/she has the option to delete it here.
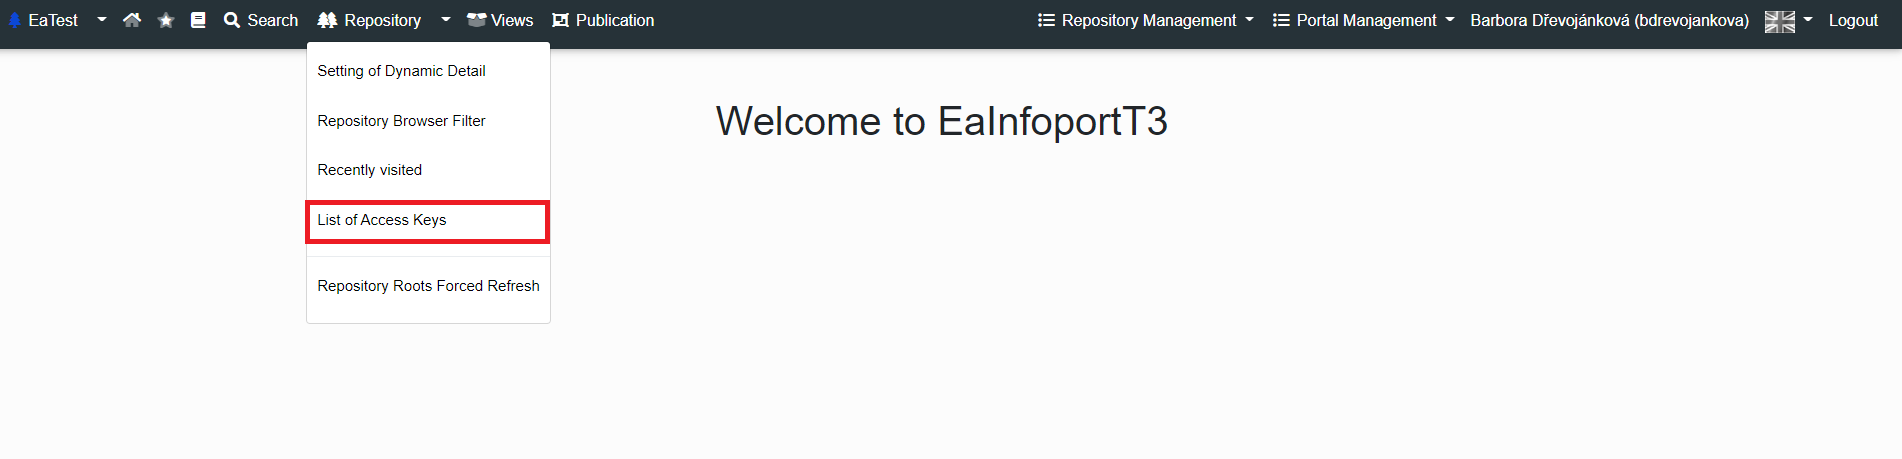
The list of active access keys is available by clicking on the arrow next to the “Repository” tab and in the subsequently expanded submenu on the “Access Key List” tab.
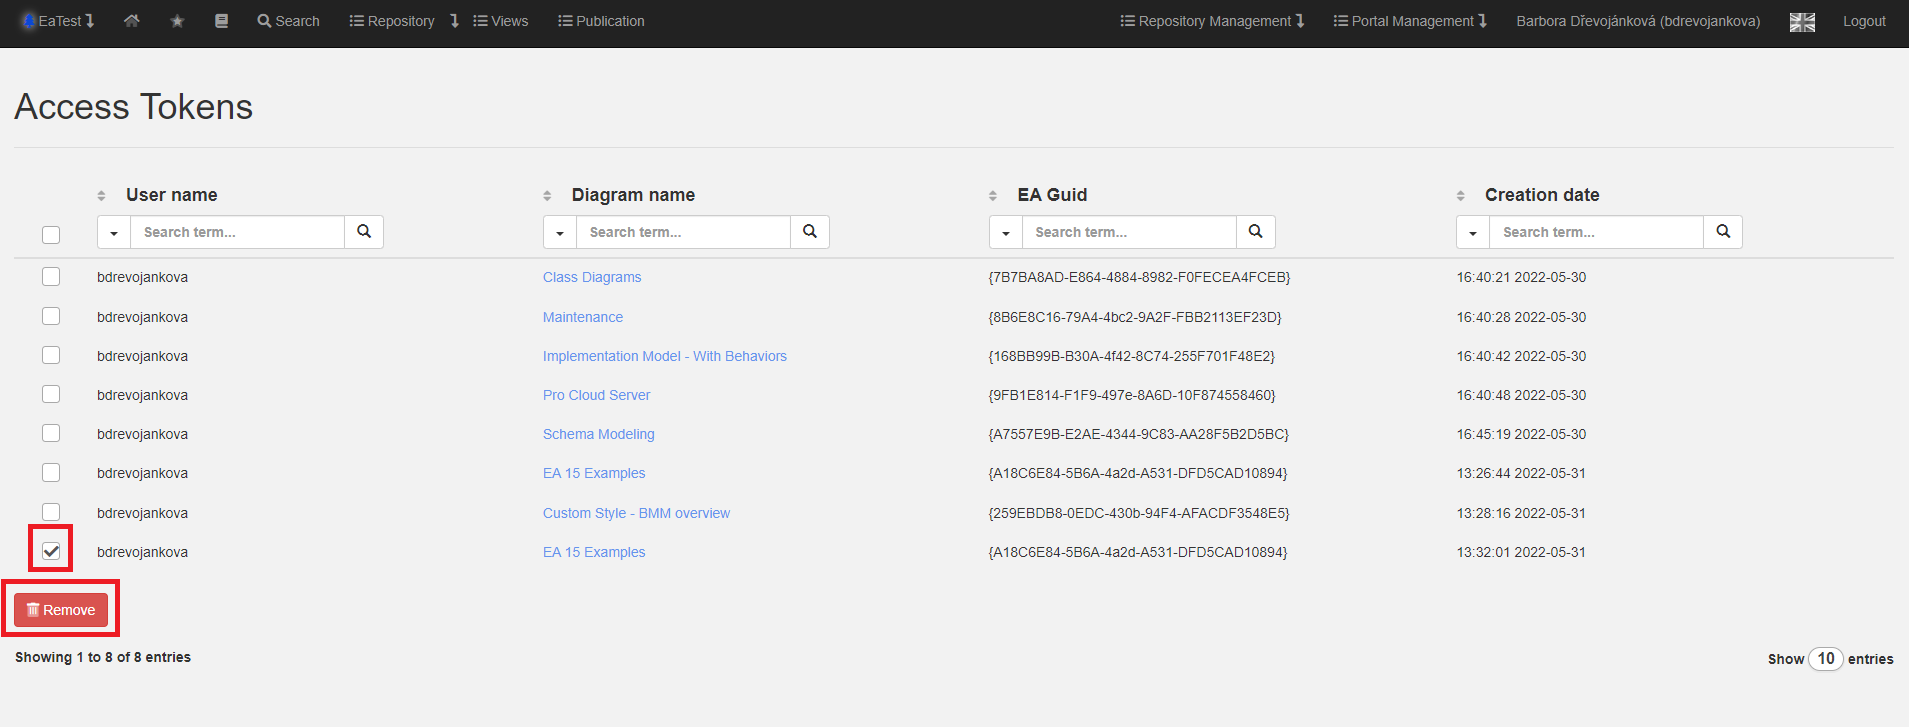
A user sees active keys in the list of access keys.
He/she can use a filter to find the appropriate key, and if he/she wants to remove it, he/she selects this key with the left mouse button and then clicks on the “Remove Keys” button.
To add an access key, a user finds an artefact in the repository and runs the detail – then he/she clicks on the arrow to the right to expand the menu and selects the “Direct Access URL” – then he/she clicks on copy and at this point the key is added to the access key list.
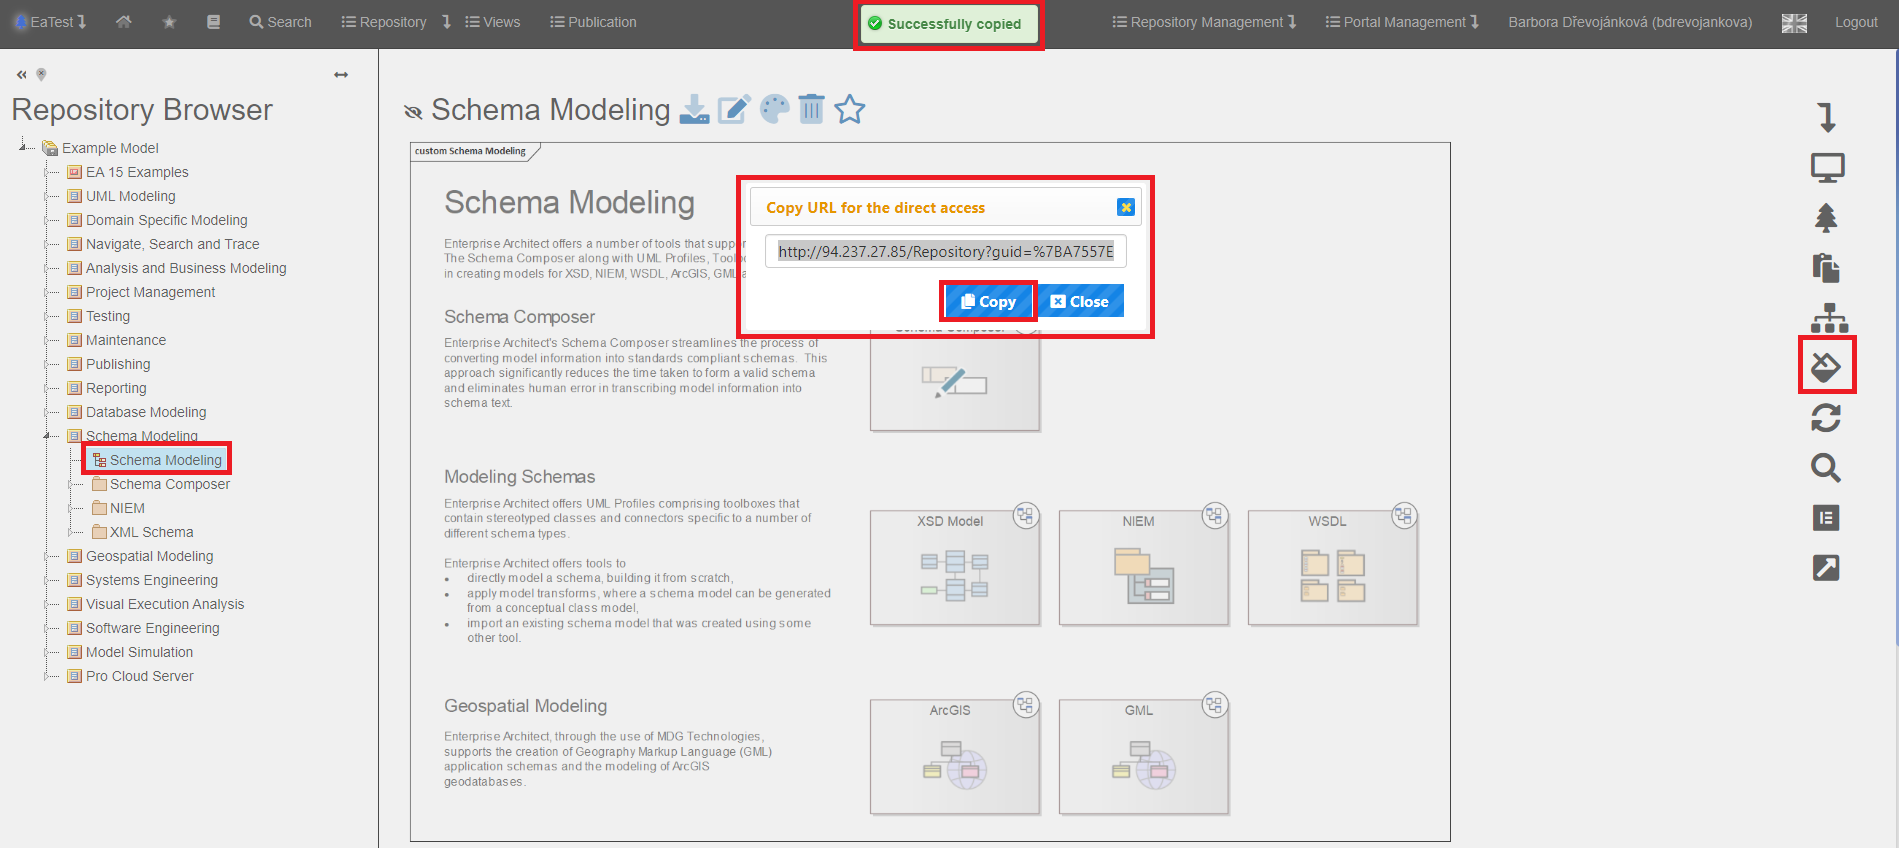
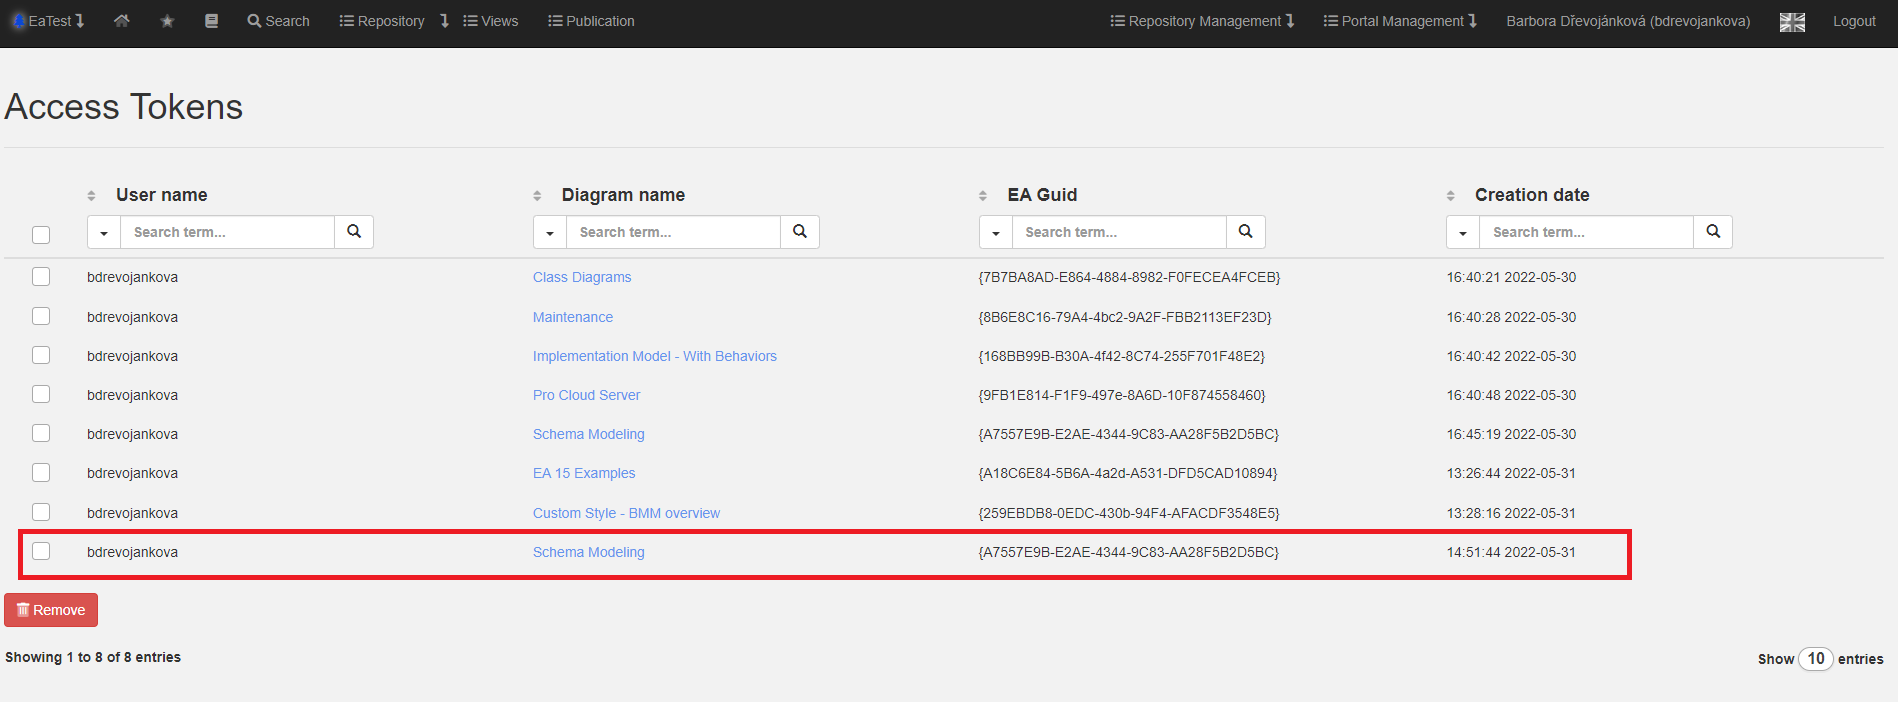
The key has been added to the access key list.
Repository Roots Forced Refresh
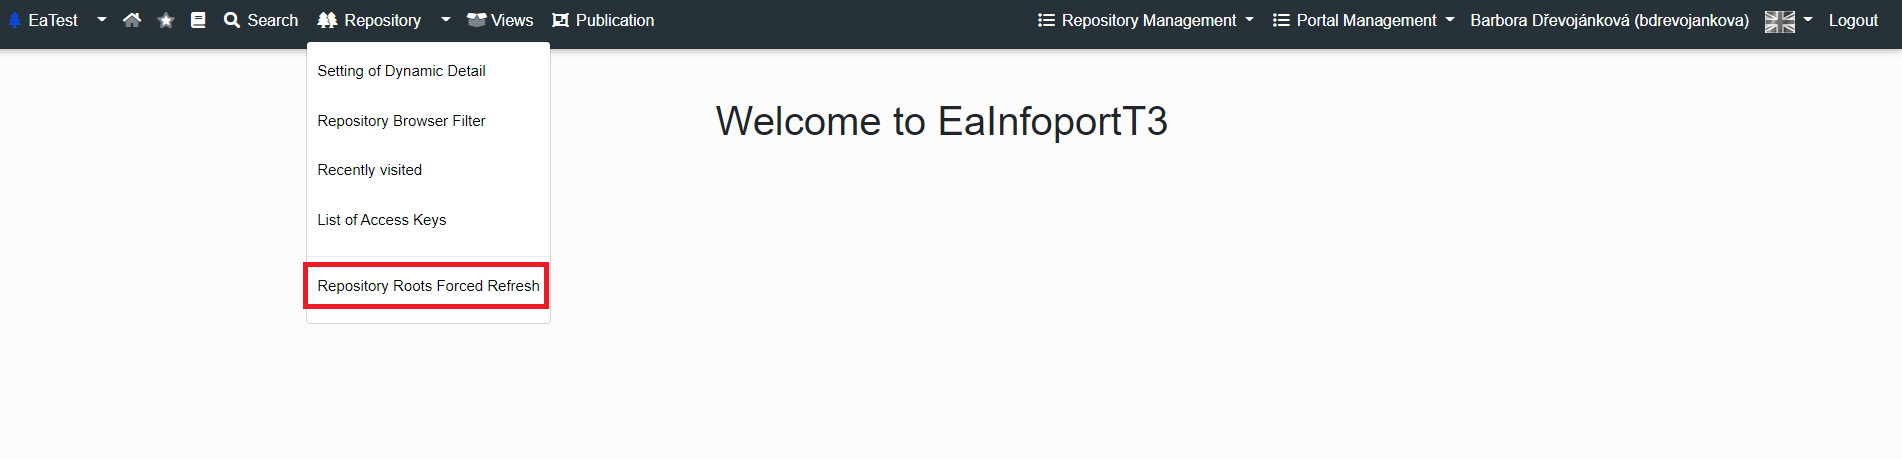
Repository root forced refresh is available by clicking on the arrow next to the “Repository” tab and in the subsequently expanded submenu on the “Repository Root Forced Refresh” tab.

A new root has been added.
Setting the notification interval for diagram subscribers
The administrator must set up an e-mail server in Configuration Manager to send notification e-mails to users.
There are three notification services that notify users of changes to the diagram and the regularity is set in Configuration Manager:
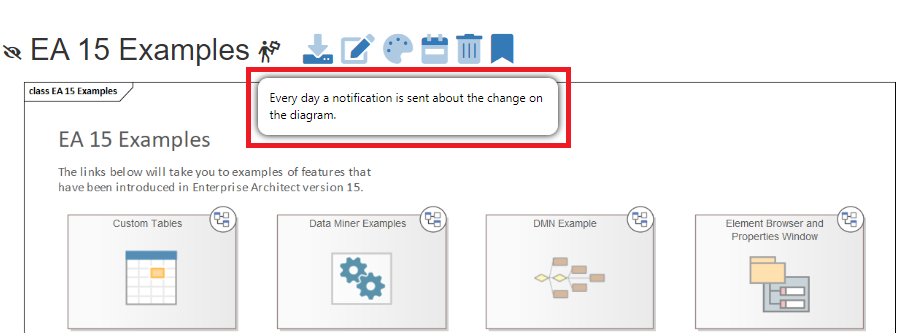
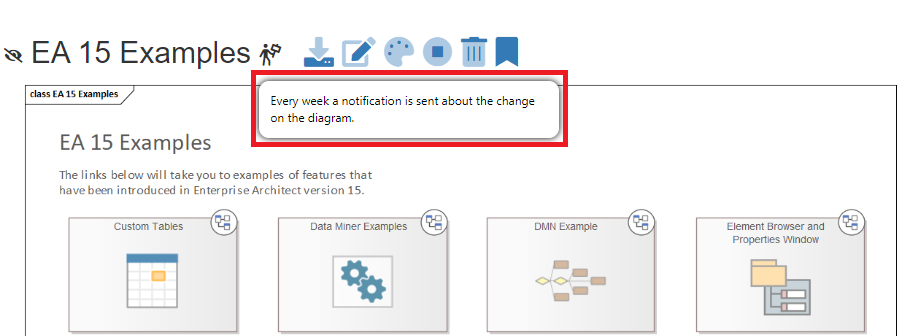
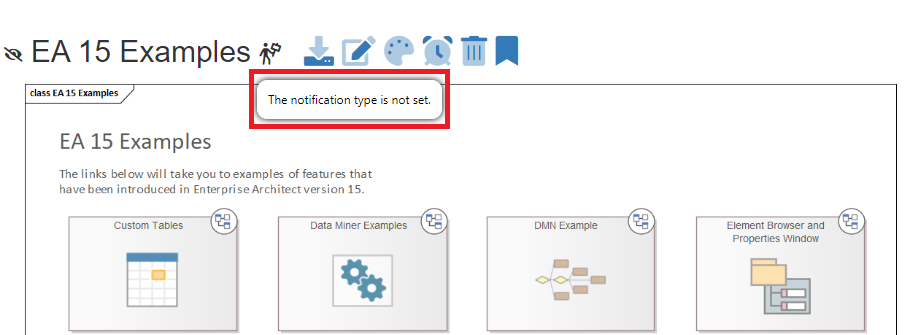
The user can see an "information bar" icon on the diagram which, when clicked, informs what type of notification is set.
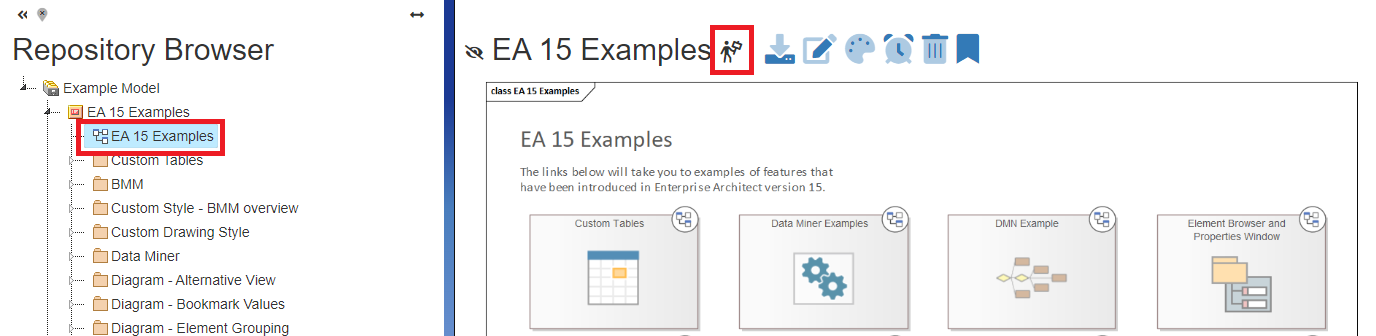
The next icon sets the notification types, the button for the next notification type is always displayed!
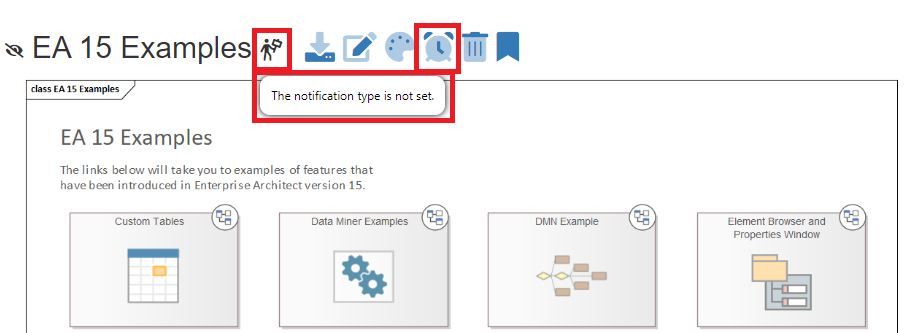
If the user sees the icon  , it means that no function is set.
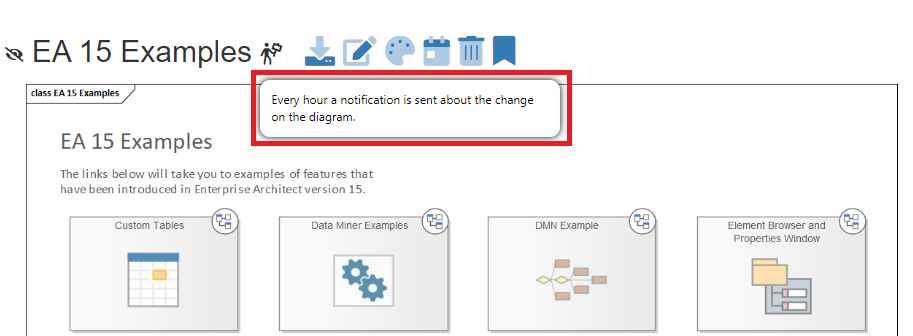
To set up an hourly notification, the user must click on the icon and when the icon changes the sending of the diagram is set.
To set up an daily notification, the user must click on the icon  and when the icon changes the sending of the diagram is set.
To set up an weekly notification, the user must click on the icon  and when the icon changes the sending of the diagram is set.
To cancel the notification, the user must click on the icon  and when the icon changes the notification is cancelled.
The user can view the list of "Overview of notification subscriptions" in their user account.
The repository administrator "Overview of notification subscriptions" in the entire repository, can see in the repository administration.
The portal administrator "Overview of notification subscriptions" in the entire portal, can see in the portal administration.
Permissions to parts of the repository - default settings
The EA Information Portal supports a package-level permission system (repository browser tree branches) for both read and (as of version 7.5) write permissions.
It is therefore possible to restrict the reading of parts of the model to certain groups or users. This functionality is not available in Enterprise Architect itself.
It is therefore possible to restrict access of certain users to (for example) specific projects, sensitive processes, risk analyses, strategic business models, etc.
This feature fundamentally supports the effort to have all models in one repository.
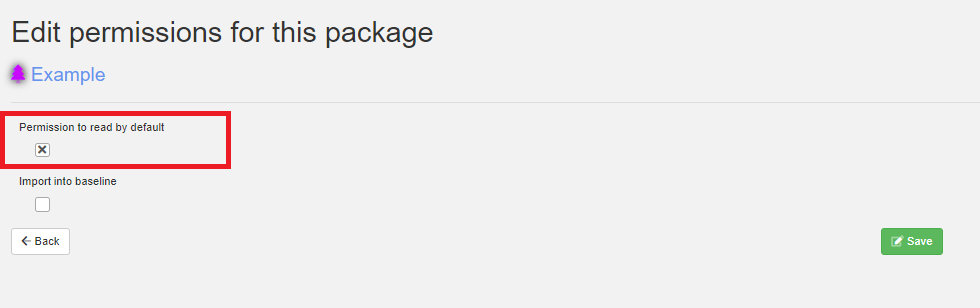
If there is no default setting, i.e. the setting is taken from the parent root package, then the repository is not visible by default, or reading is not allowed.
Permissions can be set for groups and users.
Permissions are applied hierarchically from the package they are set on downwards.
EA Infoport allows by default to disable/enable access of users or groups to various packages using the following button:
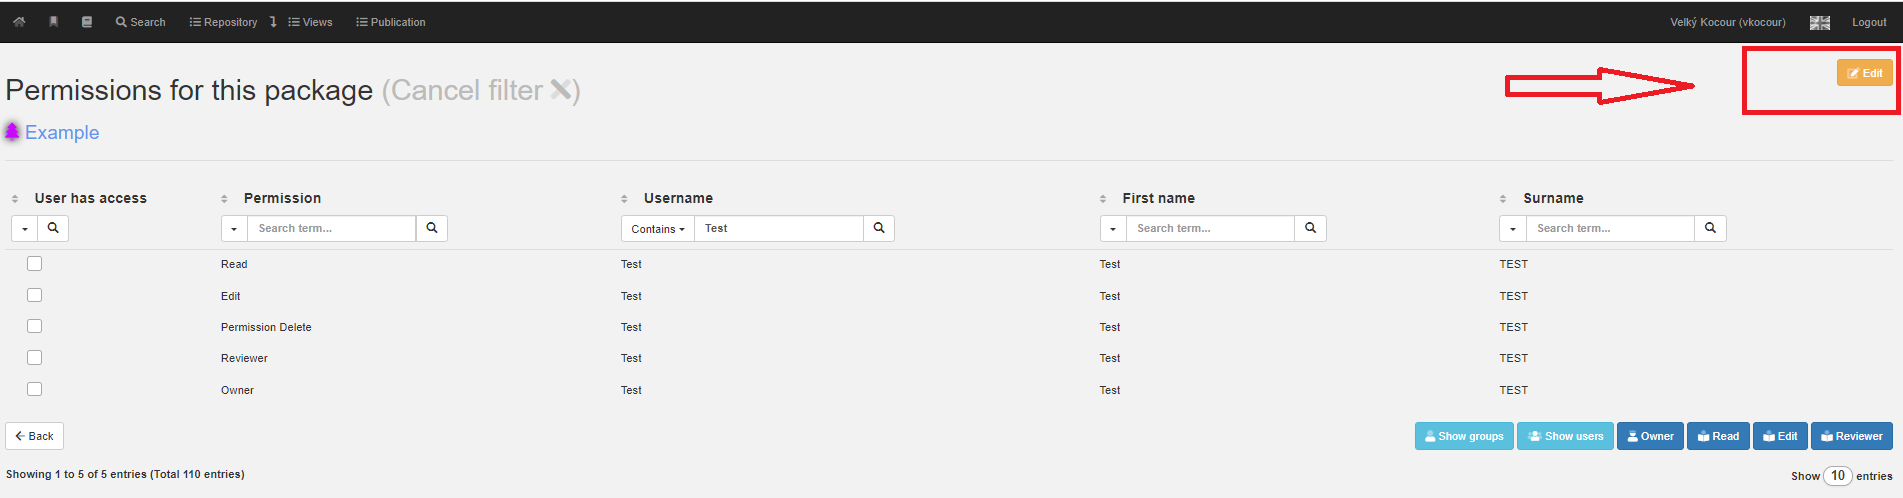
In the event that the default settings are not sufficient for us and it is necessary to specify the range of other users in more detail, it is possible to specify the roles in more detail and set access directly on the user or group.
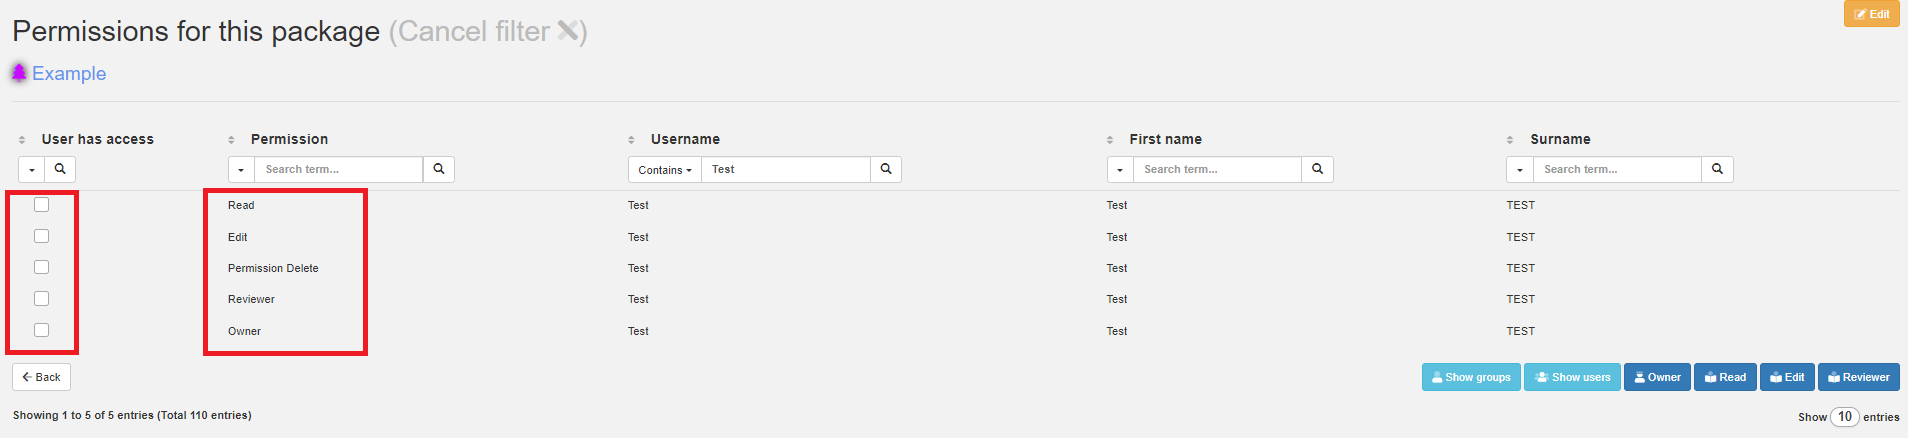
An overview of the roles is shown in the table below:
|
|
read |
edit |
deletion |
review |
|
Reader |
✔ |
x |
x |
x |
|
Editor |
✔ |
✔ |
x |
✔ |
|
Authorized to delete |
✔ |
x |
✔ |
x |
|
Reviewer |
✔ |
x |
x |
✔ |
|
Owner |
✔ |
✔ |
✔ |
✔ |
Dynamic detail - tagged values
Dynamic detail now has the ability to add a reference to the tagged element value. The user can link to a tagged value or note.
1) The user creates the tagged value in the normal way.
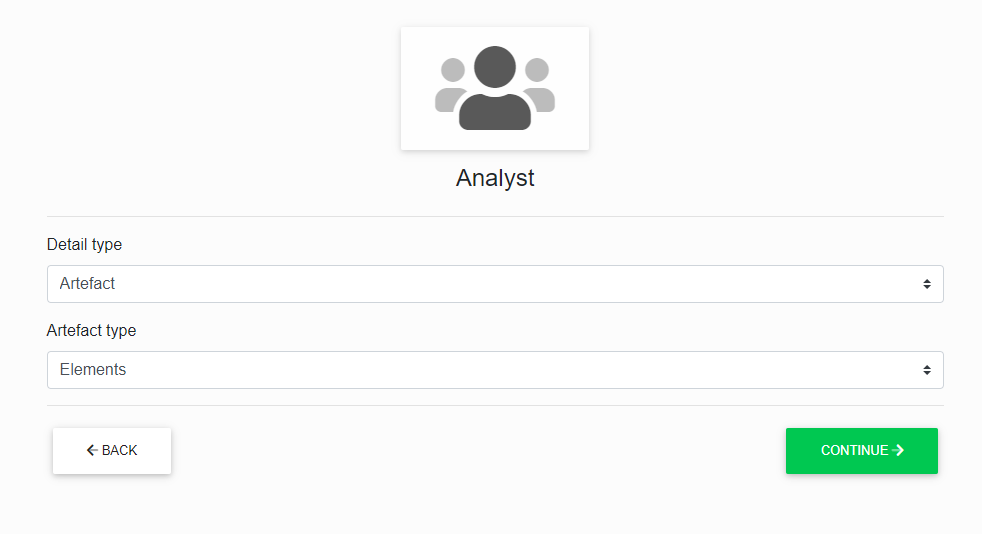
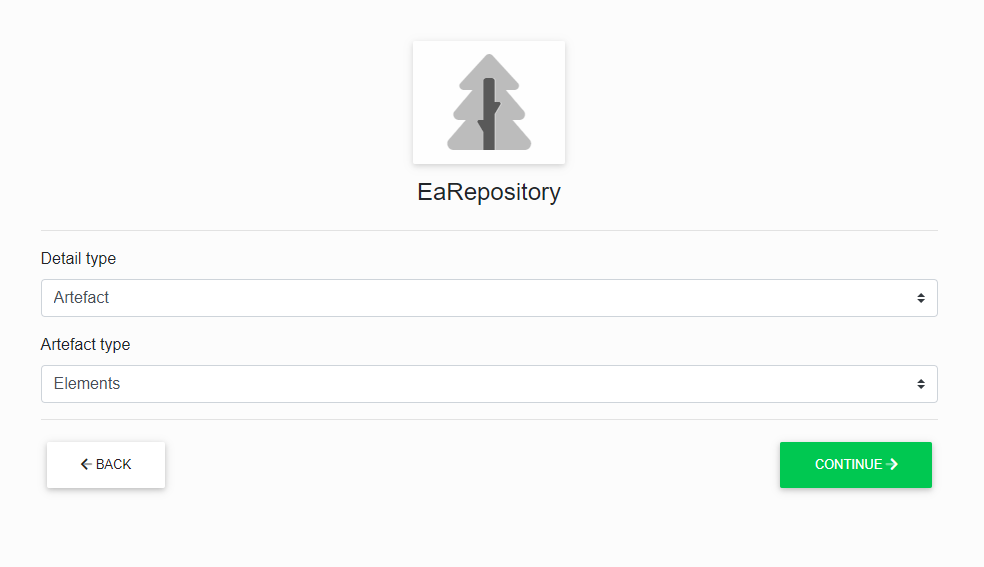
2) Select the desired area (Users, Groups, Repository) via menu >Repository>Dynamic detail settings. In the case of settings on a user or group, you must select the desired user or group.
3) Select:
Detail Type >Artefacts
Artefact type >Elements
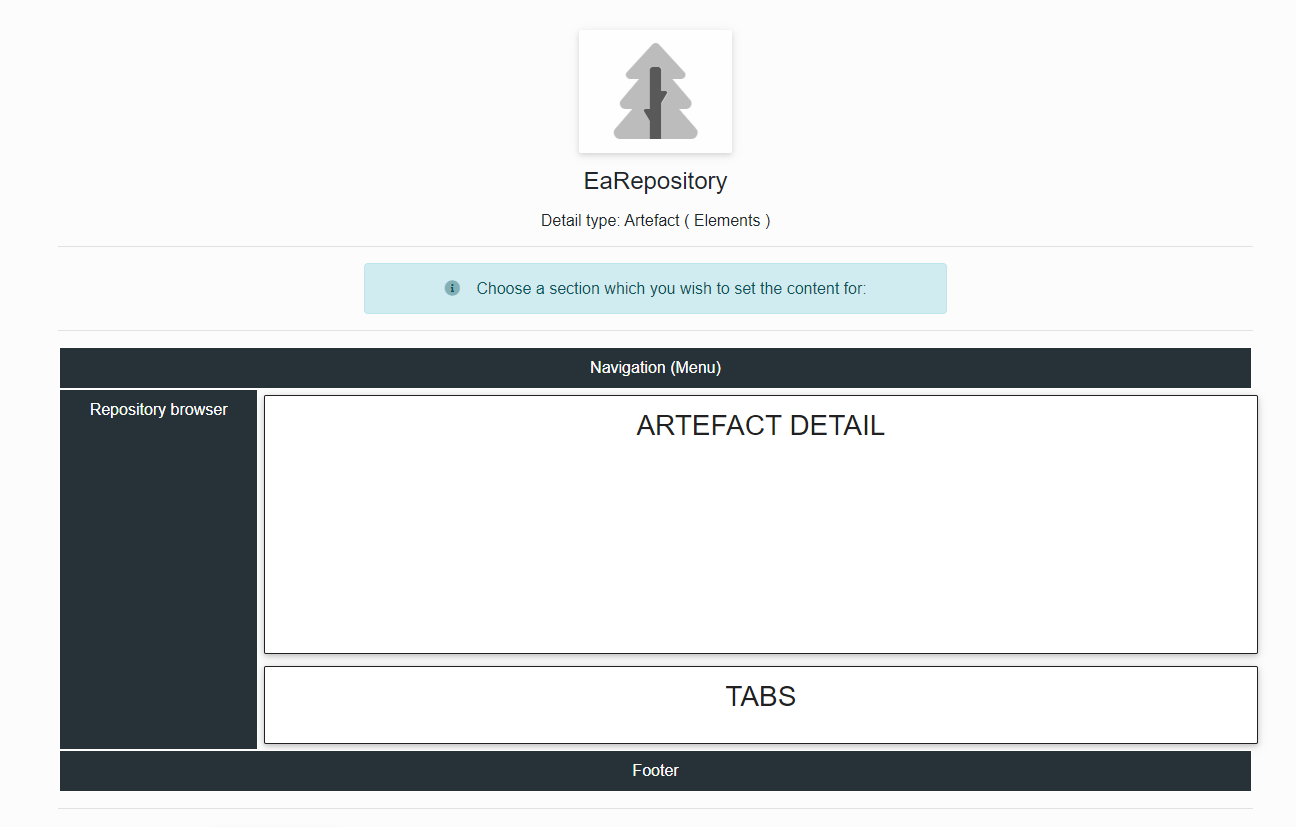
4) Select > ARTEFACT DETAIL
5) The user can specify a specific Stereotype of the artifact.
6) In the DynamicItem field, enter the name of the Tagged value and select TgvNotes (note) or TgvValue (value). Click on the blue plus button to add the value to the "Selected Items" where you can set the width and row where the item will be located.
Finally, save.
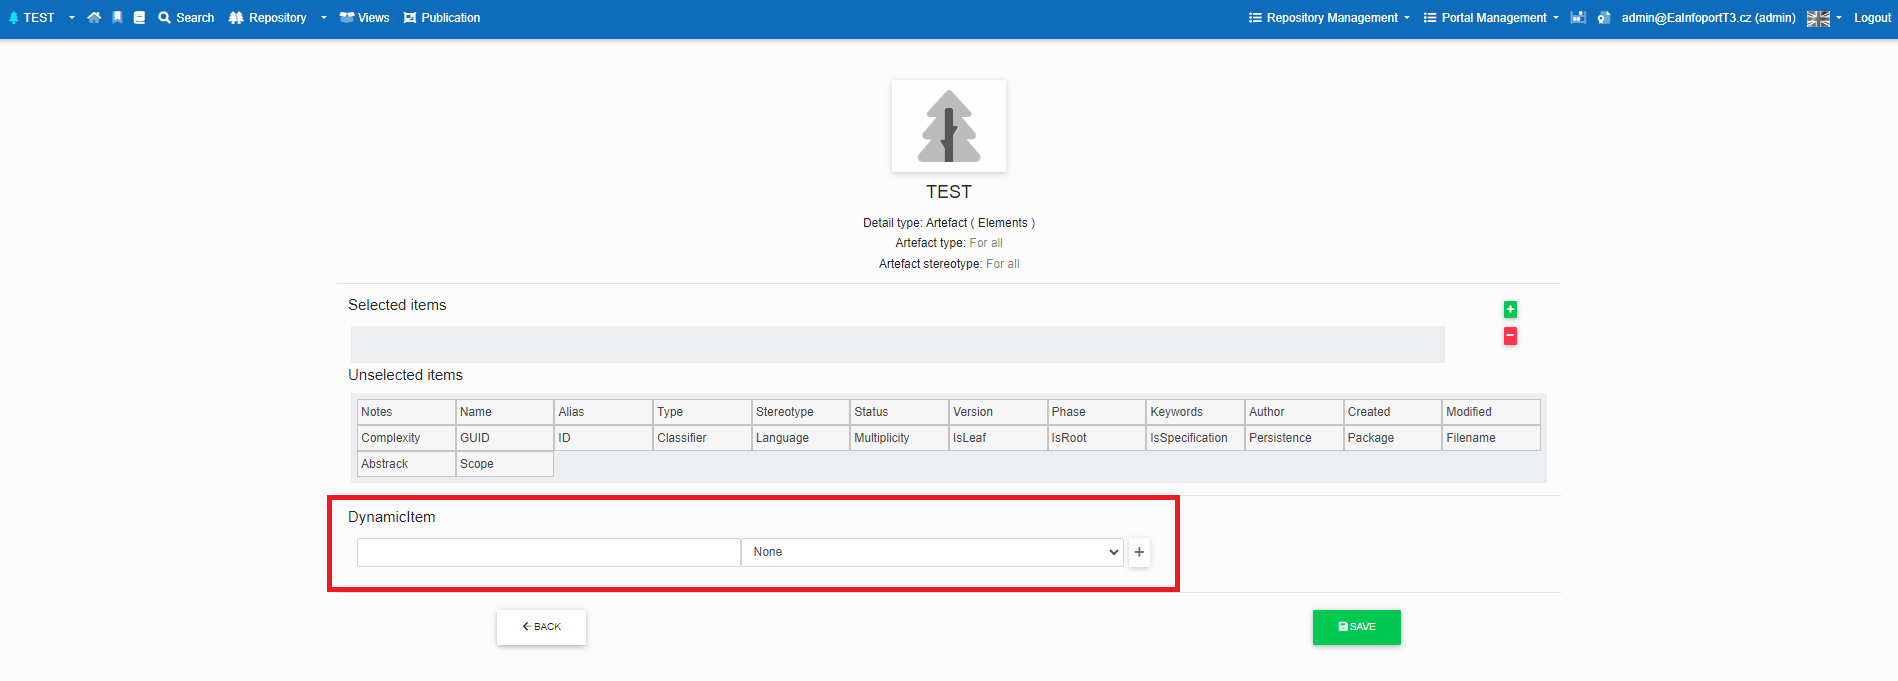
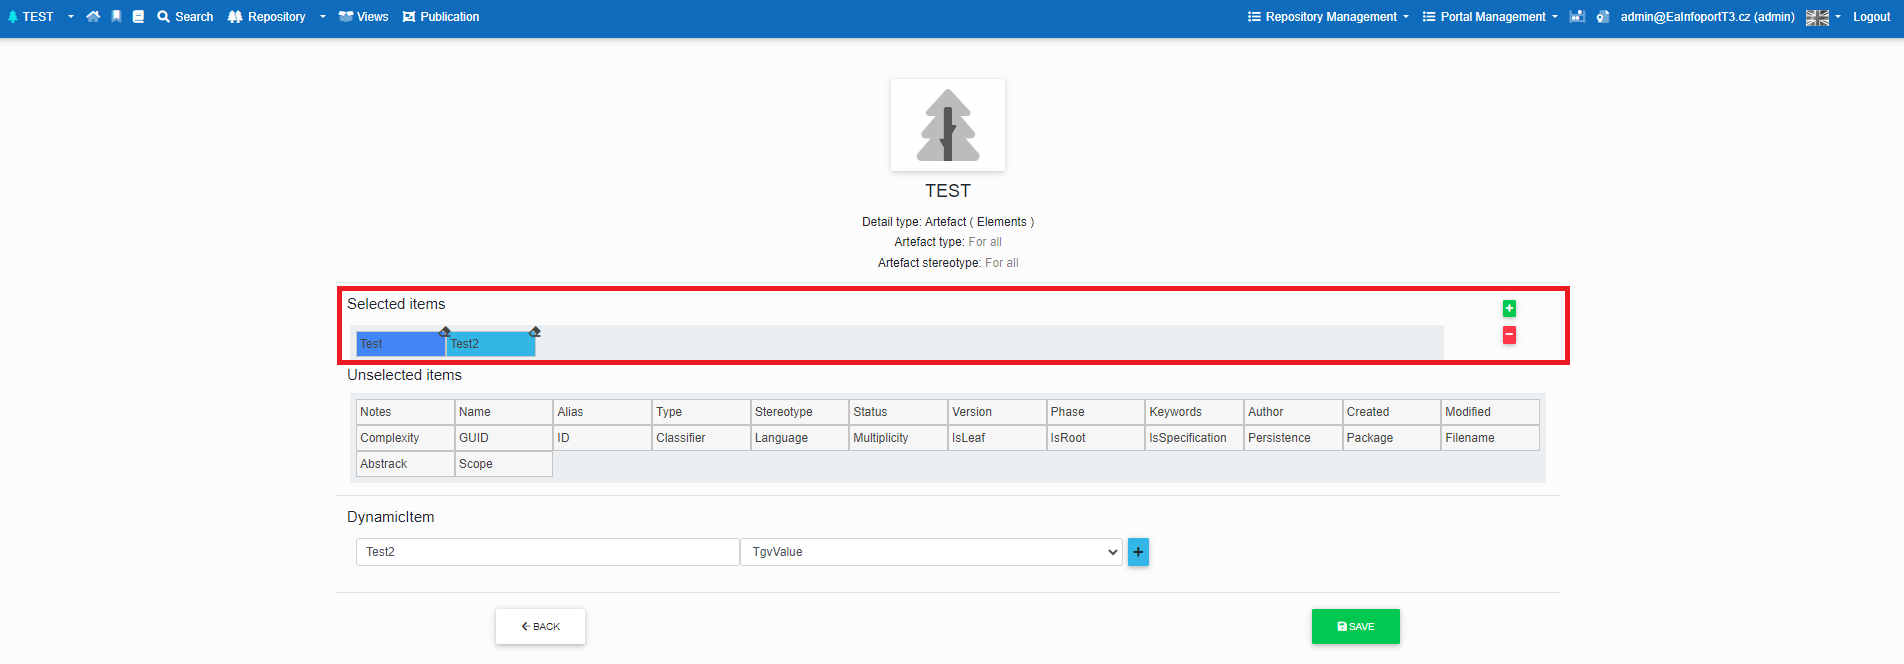
7) After creation, the user will see the selected tagged value on the element detail without the need to search for it on the Tagged Values page.
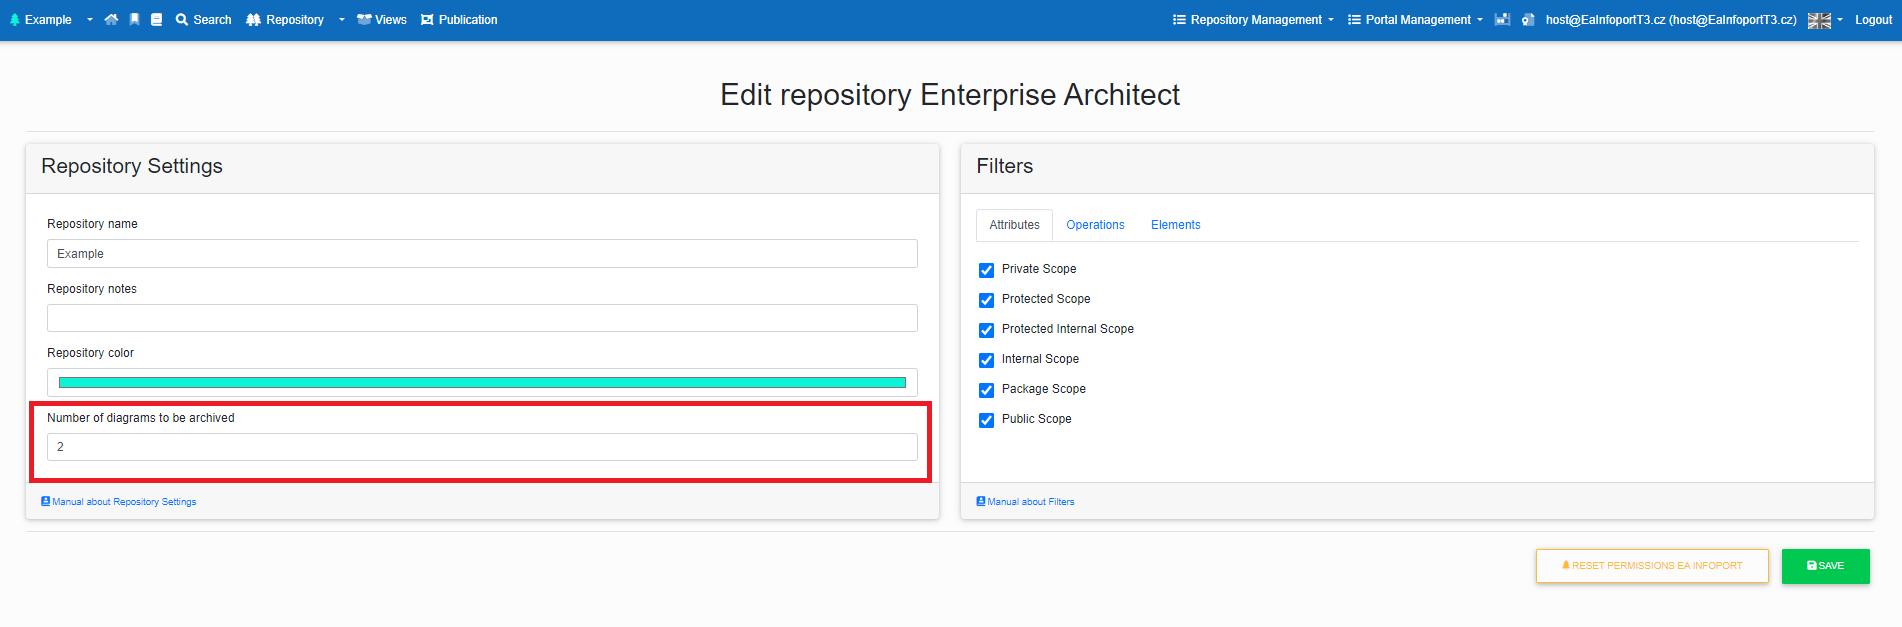
Archiving of diagrams
The repository admin now has a new option to set the number of archived diagrams in the "Repository Details". Then users have the option to see the diagrams before the change. We have added a new button on the diagram detail that redirects users to the archived diagrams, and there is an option to expand the diagram to the original resolution.
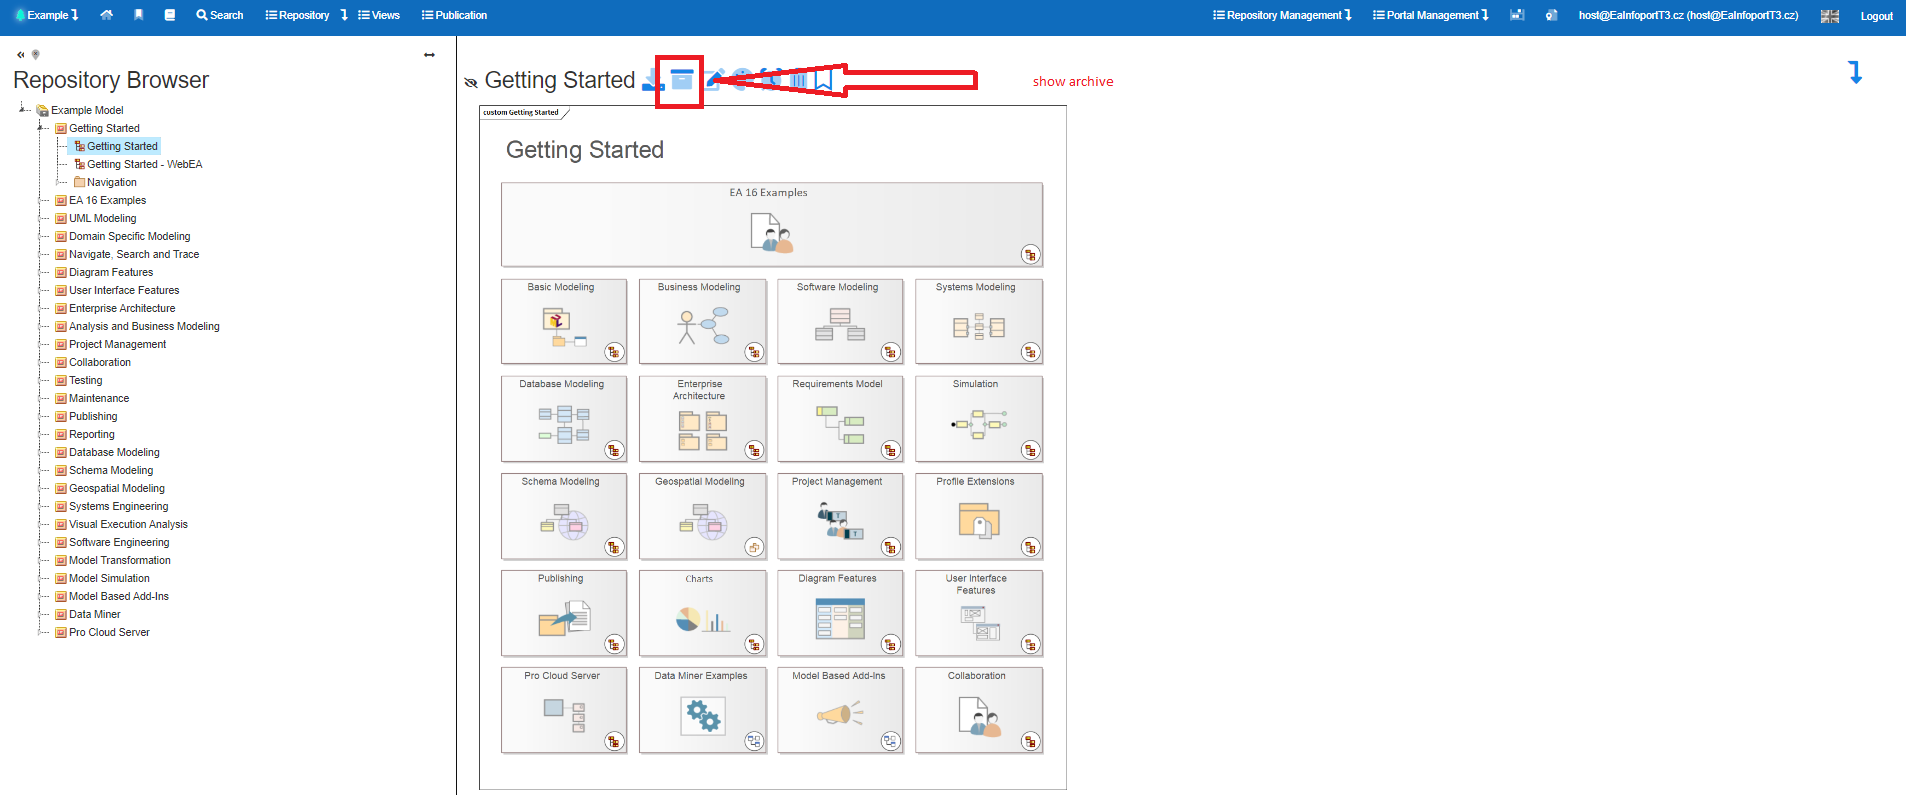
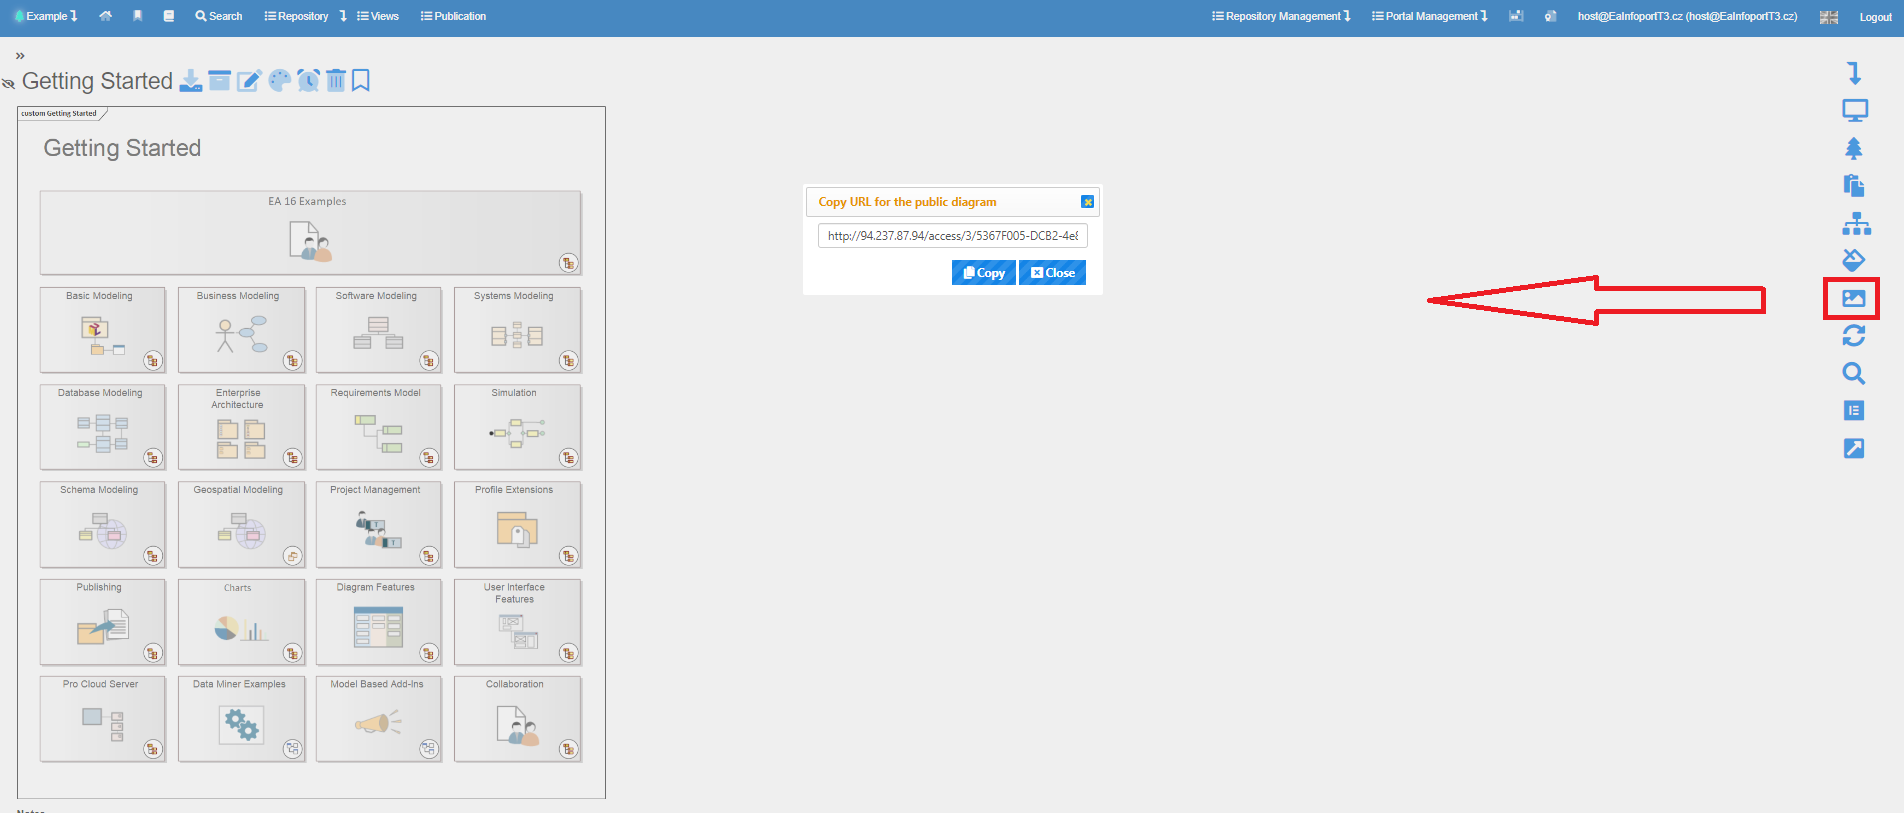
Sharing images
We have added a new button to the side menu on the diagram detail page that creates a link to the .png file of the diagram.
The diagram is now public and anyone can view the link.
Admin can find the link management in the repository pop-up menu in the navigation bar.
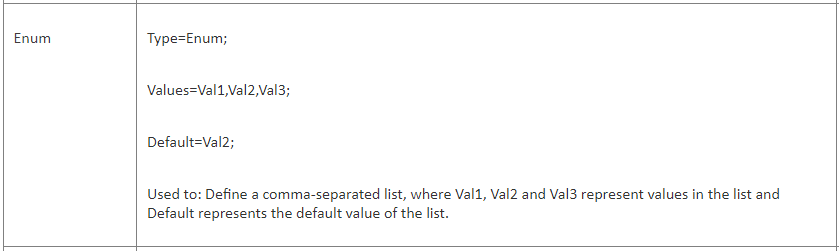
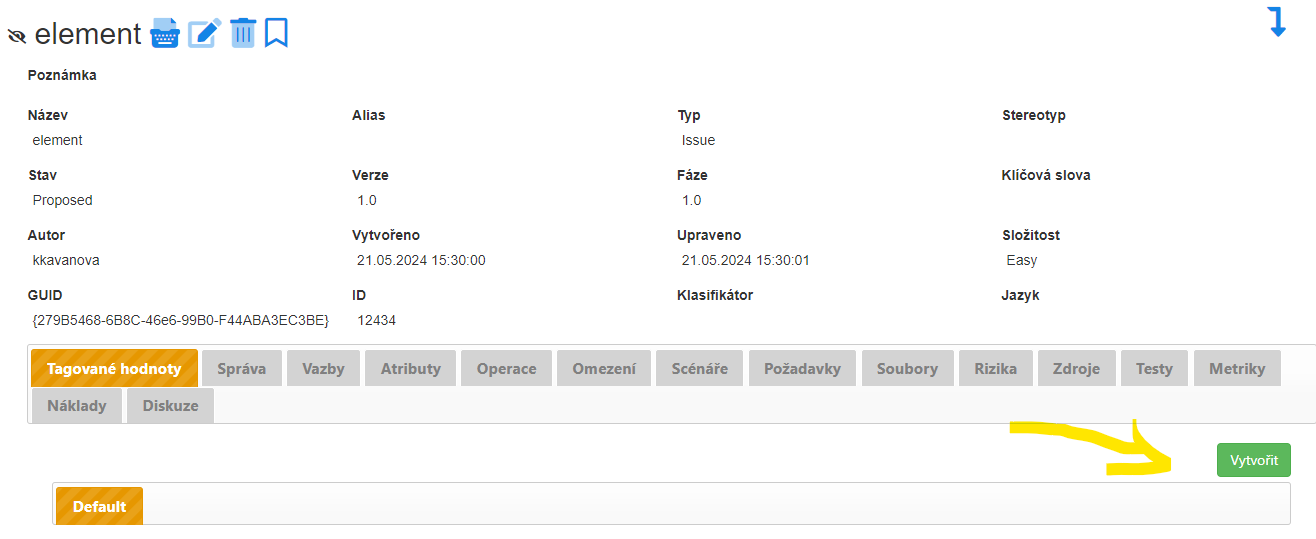
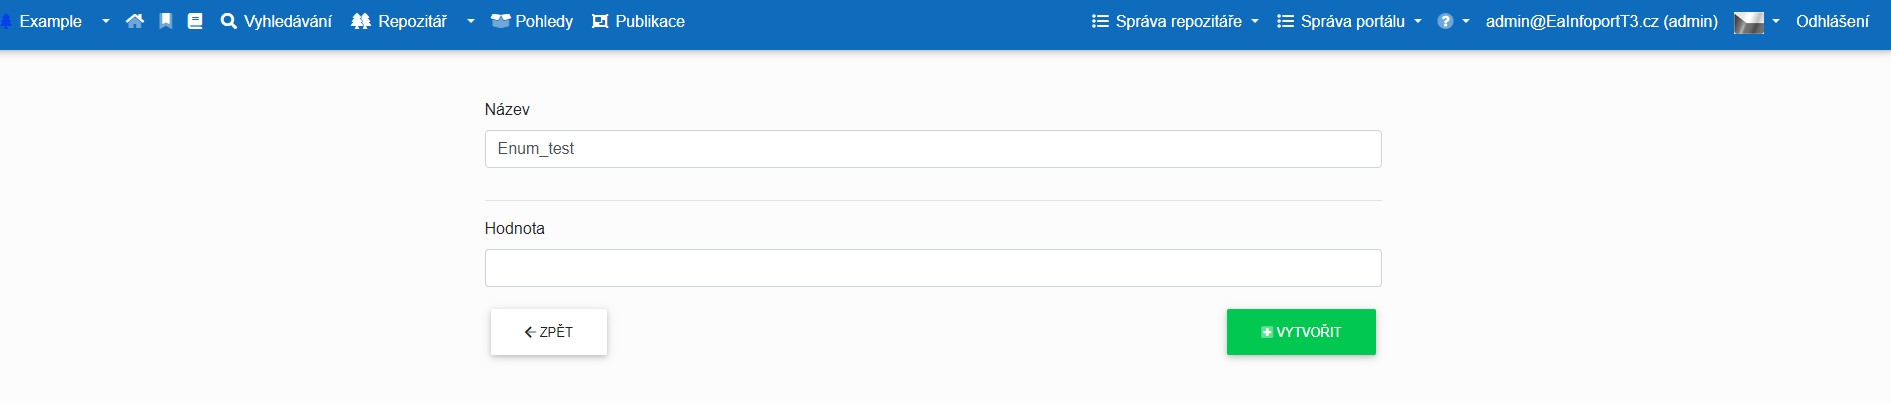
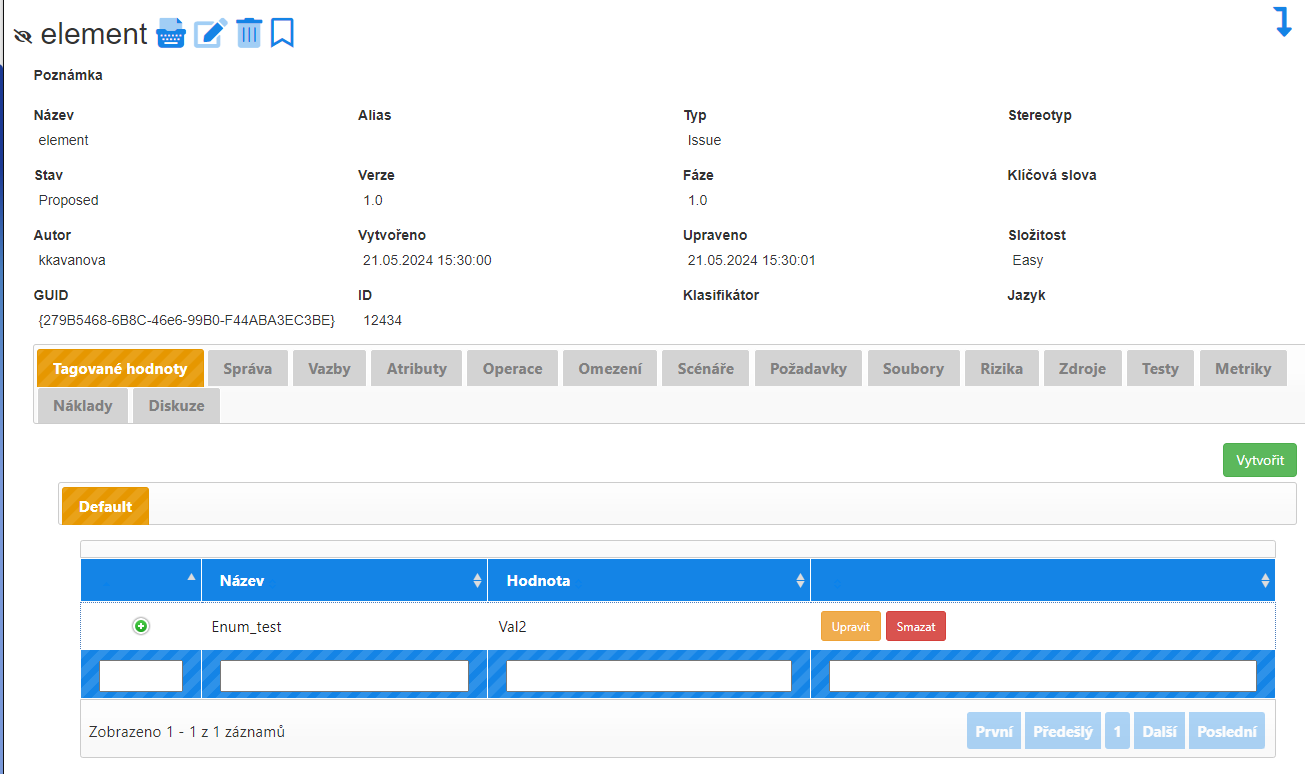
Tagged values - Enum
Tagged values are created in EA Properties > UML Types > via the "Help" button to get to the Sparx page where you can find the predefined Enum types.
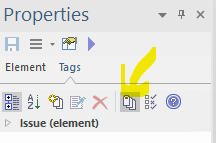
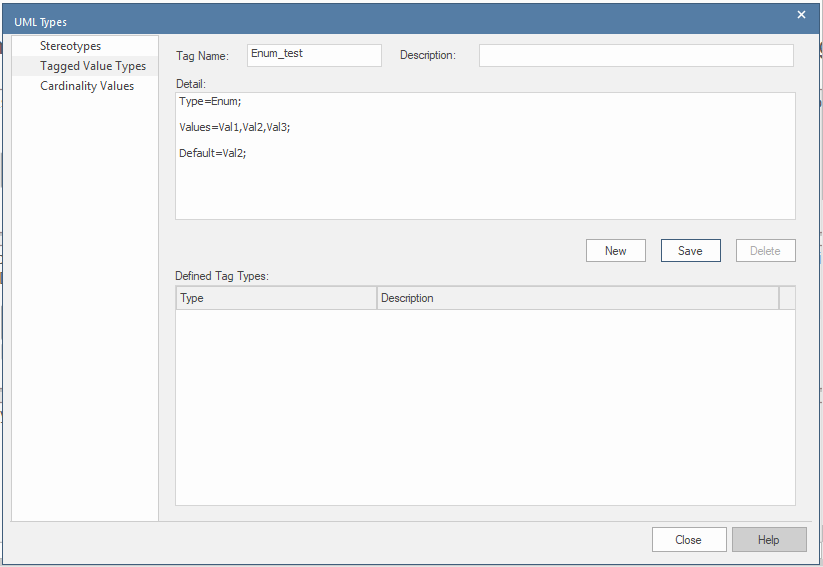
In EaInfoport we create a tagged value with the same name:
Recently visited

Since version 8.7.6.9118, "Recently Visited" has been moved directly to the main menu.